Table of Contents
Advertisement
Quick Links
Advertisement
Table of Contents

Related Manuals for bObi Pet


Summary of Contents for bObi Pet
- Page 1 Owner’s Manual How to employ your intelligent floor cleaner bObi Pet™ 2015...
- Page 2 Congratulations on purchasing your intelligent floor cleaner! bObi is now at your service. To see bObi at her best, please read the Quick Start Guide and this manual thoroughly. If you ever have questions or concerns, feel free to contact our helpful team at support@bobsweep.com.
-
Page 3: Table Of Contents
Contents at a Glance Important Safety Instructions Sensors Blindfold Stickers Components Storage Get bObi ready to clean Troubleshooting Battery Checkup Guide Turning bObi ON/OFF Working Modes Warranty and Support Charging Station bObi blOck General Information & FAQs Remote Control Customizable Cleaning Schedule... -
Page 4: Important Safety Instructions
Do not mutilate or incinerate the battery, as it will explode at high temperatures. Do not expose bObi, her remote control, her blOck, or charging station to tem- peratures higher than 45° C (113° F) or to moisture or humidity. Do not use bObi outdoors. - Page 5 Do not use bObi to pick up flammable or combustible liquids such as gasoline, nor use her in areas where they may be present. Do not use bObi in an enclosed space filled with vapors given off by oil-based paint, paint thinner, moth-proofing substances, flammable dust, or other explosive or toxic vapors.
-
Page 6: Components
Components What comes in bObi Pet’s box? bObi Charging station 2 Main brushes 1 installed; 1 spare bObi blOck Remote control Charging adaptor 2 side brushes 1 installed; 1 spare... - Page 7 Cleaning tool Extra screws & Blindfold stickers Mop extension 2 Micro-fiber mopping cloths Filter replacement Owner’s Manual, Quick Start Guide Warranty Card Phillips head screwdriver, Syncing tool Extra main brush holders...
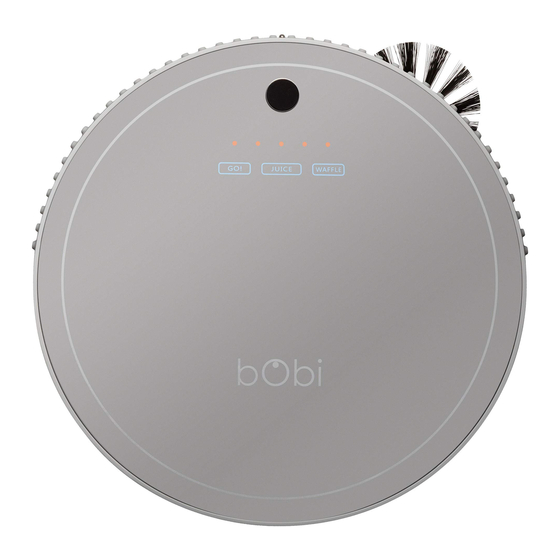
- Page 8 Anatomy Wall sensors Top view Touch sensors Head sensor Charging bars Juice Waffle Cover Charging inlet ON/OFF switch...
- Page 9 Bottom view Floor sensors Front wheel UV light Side brush Battery Wheels Duster Main brush Filter Dustbin...
- Page 10 Charging station Remote blOck...
-
Page 11: Get Bobi Ready To Clean
Get bObi Ready for Cleaning... -
Page 12: Battery
Battery When bObi first arrives, her battery is not installed. To install bObi’s battery, place bObi on a flat surface and set her power switch to OFF. Using the provided Remove the battery Tuck the wire into the Phillips head cover. -
Page 13: Turning Bobi On/Off
Turning bObi ON/OFF bObi’s power switch is located on her side. Use this switch to turn bObi ON or OFF. Standby Mode If bObi is not cleaning and the power switch is left ON, she enters standby mode, which uses a small amount of battery. When in standby mode, bObi beeps every few minutes to remind you to charge her or to turn her OFF. -
Page 14: Working Modes
10 square feet (1 square meter) for about 3 minutes before she stops and enters standby mode. To have bObi clean a small area, press the WAFFLE button on bObi’s cover or on her remote. - Page 15 JUICE The JUICE button tells bObi to stop cleaning and start searching for her charging station. When she detects her charging station, she will dock herself and start juicing. bObi’s main brush and vacuum motor do not work while in Juice mode.
-
Page 16: Charging Station
Charging Station The Sync button is located on the back of the charging station Setting up bObi’s charging station 2ft (0.5m) 2ft (0.5m) Position bObi’s charging station against a wall on a hard flat surface. Make sure that there is at least 10 feet (3 meters) of open space in front of the charging station and 2 feet (0.5 me-... - Page 17 Help bObi avoid this by hiding the cord behind her station and securing it between the charging station and the wall. Syncing bObi with her charging station If bObi can’t find her charging station, the station and bObi are out of sync.
-
Page 18: Charging Bobi
Charging bObi bObi is powered by a rechargeable battery. She will perform best if she fully charges prior to her first cleaning mission. Manual charging using the charging station 1. Turn bObi ON and place her directly onto her plugged-in charging station. - Page 19 When bObi detects her charging station, she will move towards it, dock, and begin to charge. You will know bObi is fully charged when the middle LED light on her cover stops blinking and turns solid.
-
Page 20: Bobi Block
You can use bObi blOck to customize bObi’s cleaning zone by creating an invisible boundary line that bObi will not cross. The barrier that blOck creates can help you section off a room, protect delicate rugs, and keep bObi clear of fragile items in your home. - Page 21 Syncing bObi and her blOck If bObi doesn’t respond to her blOck, the blOck and bObi are out of sync. To synchronize their coding, follow these steps: 1. Switch both bObi and blOck to OFF.
- Page 22 For example, after turning the blOck ON, place blOck with its back facing a wall or an edge of a doorway like the image below. bObi will not move past the blOck and to the right hand side of the room.
-
Page 23: Remote Control
The remote control is your most useful tool when communicating with bObi. It allows you to set bObi’s weekly cleaning schedule and to select her cleaning modes. It also allows you to alter and control bObi’s movements as she is cleaning. Each time you select an action on her remote, bObi will chirp once to acknowledge receipt of your command. - Page 24 3. While holding down the OK button, turn the power switch on bObi’s side 4. bObi will chirp several times to indi- cate that her remote has been synchro- nized. 5. If you do not hear bObi chirp, repeat the process.
- Page 25 Using the direction buttons to steer bObi with her remote If you want to turn bObi or drive her backwards, hold down the applicable direction button until she is moving in the correct direction. When you release the button, bObi will continue moving in that direction.
- Page 26 You can slow bObi down for a deeper, more thorough cleaning. Press the SPEED button on bObi’s remote control to toggle between fast or slow modes. The fan on the lower left side of the remote screen indicates slow mode by...
-
Page 27: Mop
The micro-fiber cloths included with bObi may be used dry or damp — with water or your favorite cleaning product — to remove stains from tile, laminate, concrete, wood, and any other hard flooring. - Page 28 Detach bObi’s mop Grip the latch on the curved side Lift the attachment upwards until it of the mop attachment to unlock it is perpendicular to bObi, then pull from bObi. up to detach. Remove the micro-fiber cloth from Remove the mop attachment the Velcro on the mop attachment before bObi cleans carpet.
-
Page 29: Customizable Cleaning Schedule
Customizable Cleaning Schedule... - Page 30 Use the remote to program bObi’s cleaning schedule. Weekdays Time (current time) Scheduled time Weekdays The numbers 1 to 7 on top of the screen represent days of the week. 1 stands for...
-
Page 31: Time
Time bObi uses a 24-hour clock. If you want bObi to start cleaning at 8:00 AM set her schedule time to 08:00. If you want her to start at 8:00 PM, set it to 20:00. 8:00 AM is the default time. This time is displayed when installing batteries in the remote for the first time or after installing new batteries. - Page 32 4. Press CUR TIME again to save the time. 5. To set the current weekday, press CUR TIME again. 6. Press the LEFT button until the frame around number 1 on top of the screen starts to flash. 7. Press the FWD and BACK buttons to scroll through weekdays. 8.
-
Page 33: Schedule
Programming bObi’s cleaning schedule Follow the steps below to schedule bObi’s cleaning time and day(s): 1. Turn bObi ON and keep her close to the remote. 2. Press SCH TIME on her remote. 3. The first (hour) digit under SCHEDULED TIME will start flashing. Use the FWD and BACK buttons to adjust the time to the desired cleaning time. - Page 34 11. If bObi is meant to work at the same time every day, just press the ALL/ NONE button after setting her cleaning time schedule while the day of the week frame is flashing.
-
Page 35: Maintenance
Maintenance... -
Page 36: Dustbin
One of bObi’s best features is her washable dustbin. For a quick clean, grasp and push down the button on the back of her dustbin, then pull the bin away from bObi to eject it while bObi is on the floor. -
Page 37: Filter
With the filter case open, take the HEPA filter out and clean it using the cleaning tool, or a flow of air. It is recommended that you change bObi’s HEPA filter every 3 to 6 months depending frequency intensity of cleaning. - Page 38 Be careful not to damage the two metal connectors that are also located on bObi. If bObi’s dustbin is not fully in place, her motor may not make proper contact with the battery’s electrodes. If bObi does not resume her normal work...
-
Page 39: Main Brushes
Main Brushes bObi uses a dual brush cleaning system. It is recommended that you open and clean bObi’s main brushes after every 2 to 3 cleaning tasks. To open and clean the brushes: Flip bObi over, so the front wheel is farthest from you and the side brush is on your left. - Page 40 If there is anything wrapped around the bristles or brush ends (hair, strings, etc.), use scissors to cut it out and then use the cleaning tool and a paper towel to remove it.
-
Page 41: Side Brush
Side Brush bObi uses her side brush to closely clean corners and along walls. Trapped dirt and dust can interfere with side brush’s ability to move freely and may reduce bObi’s efficiency. To clean the side brush: Using a Phillips screwdriver, un- screw the center screw of the side brush. -
Page 42: Uv Light
UV Light bObi’s sterilizing UV light is located on her underbelly. The UV light is automatically turned ON when bObi starts cleaning. Toggle the UV light ON or OFF by pressing the UV button on the remote. Caution: Do not look directly into the UV light. -
Page 43: Sensors
Sensors Cleaning bObi’s sensors Dirt and dust on bObi’s bottom and side sensors can reduce her performance. Regularly cleaning them ensures that bObi keeps working at her best. Moisten a soft cloth or cotton swab with cold water or alcohol to wipe atop, underneath, and around bObi’s... -
Page 44: Storage
Storing bObi If you are not using bObi for an extended period of time, it is better if you switch her OFF, unplug the charging station, remove the battery, and store everything in a dry place at room temperature. Do not leave bObi in direct sunlight. -
Page 45: Troubleshooting
Troubleshooting... - Page 46 At least one of the four floor detection sensors located on bObi’s underbelly are blocked or dirty. What to do: Notice the kind of flooring bObi is working on. On dark carpets or rugs, cover bObi’s sensors with her blindfold stickers to resolve the error.
- Page 47 For a video guide and step-by-step instructions, refer to bObi’s owners’ corner at owners.bobsweep.com. On thick rugs or shag carpet, take out the rubber main and let bObi sweep with her soft-bristled, blue main brush only. If the problem persists on hard flooring with a clean main brush and no congestion in the brush motor area, it is likely that bObi has an internal problem that bObsweep support will be able to resolve.
- Page 48 Error Code 3 (Er 03)- Battery If bObi’s battery is 100% empty, she won’t be able to charge using her station and may show error 3 (Er 03) on her remote. What to do: Plug the charging adapter directly into the inlet below her ON/OFF switch. bObi’s screen will flash and turn on, and she will make a short, chirping sound.
- Page 49 What to do: Take out the dustbin, empty it, and clean the four connector electrodes (2 on bObi and 2 on the dustbin). Verify that the electrodes located on the red strip spring freely and are not stuck or bent.
-
Page 50: Checkup Guide
Checkup Guide... - Page 51 If you notice that bObi is not working in her usual way or repeatedly runs into a cer- tain error, you may want to perform a checkup test to find out what is causing the issue. bObi’s remote can be used to test all of her sensors and electronic parts in the span of a few minutes.
- Page 52 4 infrared floor detection sensors and the two floor detection sensors located in bObi’s left and right wheels. The test mode indicator reads 0000. With bObi on the floor, numbers 1, 2, 3, and 4 should be underlined to show that bObi’s floor detection sensors are working.
- Page 53 0100 will appear on the test mode indicator. Use a piece of paper, a roll of paper towels, or a flat white surface to imitate a wall in front of bObi. Drag it from the left side of the bumper around to the right side until you reach the power switch. Num- bers 1-5 on the remote will become underlined one by one as you do this.
- Page 54 7 will be underlined. Usage counter & bObi blOck To find out how many times bObi has been used (charged in full and ran out of charge) either manually or automatically, press RIGHT on the remote while in test mode 0100.
- Page 55 Test the left and right wheels, brushes, and vacuum motor Turn bObi upside down and lay her on a flat surface. In test mode 0200, press RIGHT on the remote to enter test mode 0300. In this mode you can test the left and right wheels, main and side brushes, and vacuum fan’s motor.
- Page 56 Test the charging station The final part of the checkup tests bObi’s ability to charge. To begin this test, press RIGHT on the remote so that bObi enters test mode 0400. The main 4-digit number in the center of the remote’s screen should show 0000 when bObi is not on her charging station.
-
Page 57: Warranty And Support
Support and Warranty... -
Page 58: Warranty Information
Additional coverage plans are available for purchase at: http://bobi.bobsweep.com/bobi-support-warranty/coverage-plans Even after bObi’s 1-year warranty is over, we will share the maintenance costs with you. We will subsidize all replacement and repair costs within the five years after your purchase; we will cover no less than 25%. -
Page 59: General Information & Faqs
General information and FAQ... - Page 60 Moving her around, manipulating her movements, or picking her up may confuse her and disrupt her cycle. If you would like bObi to avoid a certain area or to stay within a certain space, you may create an invisible, 10-foot wall with bObi blOck. Or, if you would like to control...
- Page 61 2. How long should bObi’s battery last? bObi’s running time depends on the type of floor she is cleaning, the speed she is set on, and the age and wear of the battery. On average, she works continuously for 1 to 1.5 hours on a full battery. When her battery life falls below 15%, she auto- matically starts to look for her charging station.
- Page 62 5. How often should I clean bObi’s brushes? bObi’s brushes do a lot of the work picking up hair and larger debris, so it is recom- mended that you clean the main and side brushes every 1 to 4 uses.
- Page 63 Use bObi’s favorite accessory! bObi blOck can be placed anywhere to create a 10’ barrier of closed off space. When bObi approaches any space running along the 10’ signal emitting from blOck, bObi will know the area is off limits and she will back away to clean elsewhere.
- Page 64 11. Why does bObi start even though I did not tell her to clean? bObi begins cleaning on her own when she is left on her schedule or if her auto-re- sume feature is enabled. If bObi previously ran out of energy in GO mode and has since just finished recharging, she will automatically resume her job.
- Page 65 15. I have a question and need to contact bObsweep’s support team. Need help with bObi? Our devoted team is ready to help you! You can reach us by phone or e-mail.
- Page 66 sealed with care bObsweep ® and © bObsweep Inc.all rights reserved.
Need help?
Do you have a question about the Pet and is the answer not in the manual?
Questions and answers