
Related Manuals for Ihagee EXA IIa


Summary of Contents for Ihagee EXA IIa
- Page 1 E X A • IIa...
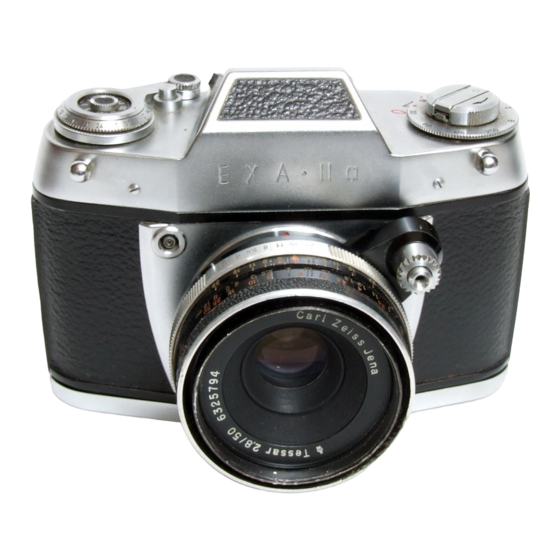
- Page 5 The most importance operating controls of the EXA IIa Lens Red dot on the lens Release rocker/release knob on lens- es with automatic diaphragm Diaphragm setting ring Distance setting ring Depth of field setting ring Red dot on camera Flash contact...
- Page 6 Shutter release lock Take-up chamber (for spool and cassette) Rewind crank Detachable camera back (with inter- Film-speed and type indicator changeable film pressure plate) Shutter-speed setting ring Rotating milled ring for locking Shutter release button camera back Locking lever for lens bayonet Tripod bush Eyepiece of pentaprism viewfinder Film-advance spindle dog...
- Page 7 As you start working with your new EXA IIa, we successful results. And now fold out t he oppo- would like to congratulate you on your choice site page of this manual to the left so that you and wish you lasting enjoyment and successful can always keep the illustrations in front of you results with your new camera.
- Page 8 IHAGEE KAMERAWERK AG. DRESDEN A 16. This instruction manual was reproduced from the scanned original ‘EXA IIa Instruction Manual” by Ihagee Kamerawerk AG Dresden A 16. Lay- out in Adobe InDesign CC and pictures re-touch in Adobe Photoshop CC. Typeface in this book are Avenir, Avenir Next and Adobe Myriad...
-
Page 9: Camera Back
Removing and replacing the camera back Turn milled ring (30) in the base of the camera until red dots are opposite each other. Grip the camera with both hands, with the back (29) facing upwards and the pentaprism viewfinder (12) pointing towards you. Press gently on the back (29) with both thumbs and slide it out from under the chrome-plated top capping, until the red dot above the film gate (25) becomes... - Page 10 Shutter and film advance id-wind lever (11) before releasing the shutter”, neither is it possible to release the shutter before the film has been wound on completely are coupled in order to prevent double expo- and the shutter tensioned. Do not attempt to sures and blank frames.
- Page 11 Operating the shutter be selected. Shutter speeds from 1/250 … 1/30 sec can safely be used with a hand-held camera, without using a tripod; with experience Instantaneous exposures: turn the shutter in holding the camera steady, you can even go speed setting ring (16) in either direction until down to 1/15 sec if necessary”...
- Page 12 Time exposures: set the shutter-speed setting and T settings are particularly useful for night ring (16) to B. Upon depressing the release and indoor pictures. button (17) or the release mechanism of the A cable release is recommended for use when lens, the shutter will remain open for as long taking time exposures, (particularly with the B as the pressure is maintained.
- Page 13 Operating the lens er field). When the definition of the subject as seen in the reflex image appears at its sharpest, then the actual distance of the subject in feet The lens (1) is interchangeable; press the and meters will be shown on the distance-set- locking lever (18) towards the lens, turn the lens to the left (Fig.
- Page 14 ting scale against the red setting mark. The value corresponding to the diaphragm setting distances in meters or feet are measured from intended for taking the picture, it is possible the camera back to the subject. If the camera to see where the depth of field zone will begin is fitted with a Distance Meter or Fresnel Lens and end.
- Page 15 the lenses are provided either with click- stop be felt to engage gently to each marking on the diaphragms, with a device for preselecting the aperture scale. When turning the diaphragm desired diaphragm setting or with completely setting ring to stop down the lens, it is merely automatic pressure or spring diaphragms.
- Page 16 its preset stop to select the previously-closen aperture. Operating the fully-automatic pressure diaphragm of the Domiplan f2.8/50 mm lens (Fig. 8): The fully-automatic pressure diaphragm is always used at full aperture for focusing and observing the reflex finder image. Preselect the desired smaller diaphragm aper- ture by turning the diaphragm setting ring (right at the front of the lens barrel).
- Page 17 can be maintained throughout the duration of the front control ring pointing up- wards - pres- the exposure period without having to keep the sure diaphragm operation. White dot pointing release depressed by hand, with the consequent upwards: normal diaphragm setting (lens aper- danger of camera shake.
- Page 18 ring immediately in front of the camera body. aperture; therefore, do not release the rocker The diaphragm remains stopped-down accord- until the shutter has closed completely (this is ing to the position of the ring; this method of especially important when using the slower in- aperture-setting is required for time exposures).
- Page 19 setting ring. the ring (this is important for time exposures). The diaphragm setting ring has click stops at Set the lens either for fully-automatic spring all aperture values, including the intermediate diaphragm or normal diaphragm setting. When using the fully-automatic spring diaphragm, the release knob on the lens must project, togeth- Fig.
- Page 20 values which are not engraved on the scale. The shutter has closed completely (this is particularly desired aperture value must be set opposite the important when using the slower instantaneous red mark. speed settings). For taking time exposures the lens should be set for normal-diaphragm opera- In order to ensure that the release button on the tion ;...
- Page 21 8 distance 5 meters (approx. 15 feet), you will see that the depth- of-field zone extends from barely 3 m (10 ft) to more than 15 m (actually to 23 m or 76 ft), Focusing when using infra-red film: When using infra-red-sensitive film, first focus the image on the ground-glass screen.
- Page 22 The reflex image will always be up- For normal horizontal and vertical pictures the right and laterally-correct no matter whether the EXA IIa is best held in the right hand, using camera is held horizontally or vertically; this is the right thumb and forefinger for focusing.
- Page 23 Persons who normally wear spectacles should The EXA lla is also available with a Distance use their distance glasses for focusing in the Meter or Fresnel Lens focusing screen built pentaprism viewfinder. permanently into the pentaprism viewfinder. Both types of screen have a split-image range- An invaluable accessory for the PentaPrism view- finder in the center of the image field, the finder is the flexible eyepiece cup (Fig.14) : this...
-
Page 24: Loading The Film
Fig. 16 Loading the film The EXA IIa uses perforated miniature film 35 mm in width 1.6 meters (5 ft 4 in.) of film give 36 exposures, each frame being 24 x 36... - Page 25 manufacturers. Remove the camera back (29) in the manner already described. Slide the cassette contain- ing the unexposed film into the chamber (21) from below (Fig. 16), if necessary swinging out the rewind crank (14) and turning it slightly so that the coupling dog (20) grips the bar in the core of the cassette spool.
- Page 26 and runners (z4),thence over the film transport 90’ so that the two red dots are no longer oppo- sprockets (26) and on to the take-up spool (27’). site one another. Now fire off two blank frames The teeth of the sprocket wheels (27) must en- to wind on the fogged leader at the beginning gage the perforations on both sides of the film of the film: release the shutter, swing the rapid-...
- Page 27 (28). Take care to check the the maximum number of frames available. The condition of this take-up cassette thoroughly: EXA IIa is then ready for action, and after each the core should move easily within the shell of exposure the frame counter will indicate how...
- Page 28 Any shape of leader can be used core of the cassette spool so that it winds on with the take-up spool of the EXA IIa, either the to the spool with the bar across the end of the narrow tongue provided on standard commer- core on the left as you look along the film, i.e.
- Page 29 exposures. Immediately after loading the film, set the film speed and type indicator (15) to remind you what kind of film is in the camera; turn the ring in either direction until the appropriate indicator is opposite the red mark. The figures from 12 to 30 should be used to denote the DIN speed-ratings of black-and-white films, the figures 25-400 for ASA speeds;...
-
Page 30: Changing The Film
Changing the film Fig. 27 When using a take-up spool it may be possible to take one or two more pictures after expos- ing the 36th frame before the film cannot be advanced any further. (Occasionally the rapid- wind lever (11) will stop part-way through its travel.) The film should now be rewound: first depress the rewind de-clutching button (10) into its mount: the button will remain locked in... - Page 31 (11) to advance the 36th exposure into the take-up cassette. The EXA IIa has a flash contact (8) and the Remove the camera back and cut or tear off the shutter speeds required for taking flash pictures end of the film.
- Page 33 EXA IIa is fully open. The cable of any standard flash- gun or electronic speedlight can be plugged into the socket of the flash contact (8);...
- Page 34 Core of the camera and lenses Always keep the camera in its ever-ready case with the lens (or a protective cap) in position: or alternatively wrap it in a piece of fluff-free cloth. All parts which are easily accessible from the outside should be kept clean and dusted with a soft brush;...
- Page 35 Accessories fluff-free linen cloth. lt is highly inadvisable to attempt to interfere with the mechanism of the camera; repairs should be undertaken only by Accessories increase the versatility of the EXA lla authorized servicing agencies. and are absolutely indispensable for many types of work.
- Page 36 f 35mm f 50mm Fig. 31 f 135mm f 300mm...
- Page 37 push-on d iameter). Giant Release Button (Fig.30) This increases the contact area of the camera release button, So that it can be operated easily even with fingers stiffened by cold or when wearing gloves. lt is invaluable for use in winter. (When using lenses fitted with a large release knob or release rocker of their own, these prac- tical devices make it unnec- essaD/ to use the...
- Page 38 The reflex viewfinder image of the EXA IIa always shows the exact area covered by the lens as weIIas the image definition and depth of field.
- Page 39 The standard lens is removed in the manner already described and the special-purpose lens fitted in its place. For certain lenses of very long focal length the outer bayonet of the EXA IIa is Fig. 34 employed. The distance-setting scales of these...
- Page 40 Bayonet Adapter Rings and Extension Tubes The single-lens reflex camera comes into its own when taking close-up pictures, since in th is field too the reflex image always shows the exact area covered by the lens. The Bayonet Adapter Rings and Extension Tubes may be fitted in any desired combination between the camera and the lens (Fig.
- Page 41 (Figs. 34 and 35). Microscope Attachment The Microscope Attachment is designed for connecting the EXA IIa to a microscope and makes it possible to use this camera for photo-micrographic work. The attachment is Fig. 36...
- Page 42 EXA IIa in Lighting Equipment, are designed specially for the widest possible variety of specialized fields. undertaking copying work, but are also suitable The individual components of the “Vielzweck” for use as table stands for other types of close- Equipment can be used both singly and in up photography.
- Page 43 When using the Stereo Attachment the normal exposure should be in- creased by 1.5 times; since the two half-images must always be side-by-side, the EXA IIa should always be held in the horizontal position; it is not possible to make upright stereo pictures.
- Page 44 I H A G E E K A M E R AW E R K A G D R E S D E N A 1 6 Form 747a/5/6402 Made in Germany 1/5/20 Ag 91/70 007/64 201...
Need help?
Do you have a question about the EXA IIa and is the answer not in the manual?
Questions and answers