Table of Contents
Advertisement
Thank you very much for purchasing the ZOOM
Please read this manual carefully to learn about all the functions of the
will be able to use it fully for a long time.
Keep this manual in a convenient place for reference when necessary.
Usage and Safety Precautions ..................................2
Introduction ..............................................................3
Part Names ...............................................................4
Turning the Power ON ..............................................6
Display Information ...................................................7
Terms Used in This Manual .......................................7
Using Patches ...........................................................8
Adjusting Effects..................................................... 10
Adjusting the Master Level and Tempo...................14
Copying or reproduction of this document in whole or in part without permission is prohibited.
OPERATION MANUAL
Contents
Saving and Swapping Patches ................................15
Changing Various Settings ......................................16
Using the Tuner .......................................................20
Using Rhythms .......................................................22
Using the Looper ....................................................24
Updating the Firmware ...........................................28
Troubleshooting ......................................................30
Specifications .........................................................31
© 2013 ZOOM CORPORATION
.
so that you
only) ........26
Advertisement
Table of Contents

Subscribe to Our Youtube Channel
Related Manuals for Zoom G1on


Summary of Contents for Zoom G1on
-
Page 1: Table Of Contents
OPERATION MANUAL Thank you very much for purchasing the ZOOM Please read this manual carefully to learn about all the functions of the so that you will be able to use it fully for a long time. Keep this manual in a convenient place for reference when necessary. -
Page 2: Usage And Safety Precautions
Before using the equipment in a foreign country Interference with other electrical equipment or other region where the electrical voltage differs from that indicated on the AC adapter, always consult with a shop that carries ZOOM products In consideration of safety, the has been designed to beforehand and use the appropriate AC adapter. -
Page 3: Introduction
Long battery operation time 20 hours of continuous operation is possible using alkaline batteries (when the LCD backlight is off). * A printed list of effect parameters is not included with the Please download a copy from the ZOOM website. http://www.zoom.co.jp/... -
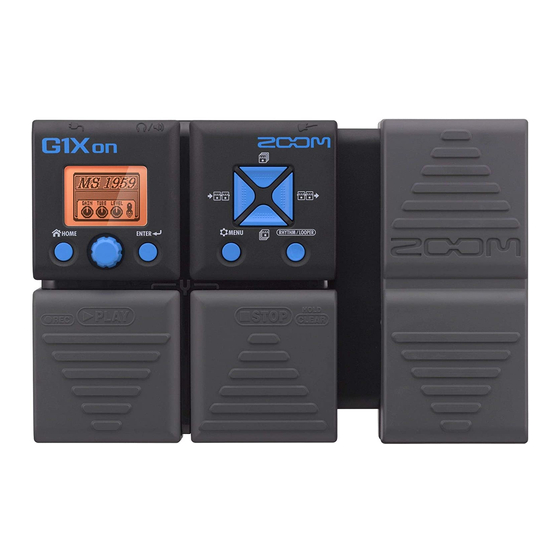
Page 4: Part Names
Part Names Top Panel Expression pedal only) Display Cursor keys (up, down, left, right) HOME key Parameter knob ENTER key RHYTHM/LOOPER key MENU key Foot switches... -
Page 5: Rear Panel
Rear Panel Pedal switch only) DC9V connector AC adapter jack INPUT jack AUX IN jack OUTPUT jack ZOOM AC adapter (AD-16) NOTE Guitar Signals input through the AUX IN jack are sent directly to the OUTPUT jack without passing through the Portable audio built-in effects. -
Page 6: Turning The Power On
Turning the Power ON Lower the amplifier's volume all the way. When using batteries When using an adapter Insert batteries into the battery compartment. Connect an AD-16 adapter. Turn the amplifier's power on and raise its Plug a guitar cable into the INPUT jack. volume. -
Page 7: Display Information
Display Information HOME Screen Bank name Patch number Remaining power display Status icon ( P18) This shows that the patch contents have been changed. This shows that the patch contents have been saved. Patch settings ( P9) Reorder effects ( P13) Delete effects ( P12) Add effects ( P12) Effect... -
Page 8: Using Patches
Using Patches To change the patch To change the bank HINT For details about using the preselect function to change directly to patches that are not next in order, see page 19. Press and hold to change patches continuously. - Page 9 To adjust the patch level (LVL) To change settings for individual patches Turn Select LEVEL. Turn on the HOME screen. Press Select PATCH SETTINGS. Turn Set between 0 and 120. Press The PATCH SETTINGS screen appears. To change the patch name (NAME) only Press...
-
Page 10: Adjusting Effects
Adjusting Effects To select an effect To select an effect type Turn on the HOME screen. Select the effect. Virtual knob Press Show the top screen of the selected effect. Effect processing capacity allows you to combine five effects Graphic for selected effect as you like. - Page 11 To select from a category To adjust parameters Press and hold Press The editing screen appears. The categories appear. Turn Turn Select the parameter to Select the category. adjust. Press Press NOTE Confirm the parameter to adjust. includes a PEDAL effects category. Turn To scroll through the effects shown Adjust the parameter value.
- Page 12 Adjusting Effects Press To add an effect Add the effect. Turn on the HOME Turn to end. screen. Select ADD EFFECT. Select EXIT. Press Press Open the category HINT selection screen. On the effect screen, you can also press and hold to add an effect.
- Page 13 Turn Press Select the effect to delete. Open the EFFECT CHAIN screen. Turn Press Select the effect to move. Open the confirmation screen. Press Press Delete the effect. Confirm the effect to move. Turn to end. Select EXIT. Turn Press Select the new position for the effect.
-
Page 14: Adjusting The Master Level And Tempo
Adjusting the Master Level and Tempo To adjust the master level To adjust the master tempo (BPM) Press on the Press on the HOME screen. HOME screen. Open the MENU screen. Open the MENU screen. Turn Turn Select BPM. Select MASTER LVL. Press Press Turn... -
Page 15: Saving And Swapping Patches
Saving and Swapping Patches To save the current patch To swap the current patch Press on the Press on the HOME screen. HOME screen. Open the MENU screen. Open the MENU screen. Turn Turn Select SAVE. Select SWAP. Press Press Open the patch SAVE Open the patch SWAP screen. -
Page 16: Changing Various Settings
Changing Various Settings Press on the Turn HOME screen. Select ALKALI (alkaline) or Ni-MH (nickel-metal hydride). Open the MENU screen. To set the eco mode Turn Select SETTINGS. Turn on the SETTINGS screen. Select eco. Press Open the SETTINGS screen. Press To select the battery type Turn... - Page 17 To adjust the backlight time To adjust the display contrast Turn on the Turn on the SETTINGS screen. SETTINGS screen. Select LCD LIGHT. Select LCD CNTRST. Press Press Turn Turn Select OFF , ON, 15sec or 30sec. Set between 1 and 13. NEXT...
- Page 18 Changing Various Settings When AUTO SAVE is OFF To set the auto save function Patch changes will not be saved until they are saved manually. Turn on the If a patch has been SETTINGS screen. changed, a confirmation Select AUTO SAVE. screen will appear when you try to open another patch.
- Page 19 Press Press Open the confirmation screen. Turn Select ON or OFF . Turn Select "YES" to save. HINT Select "NO" to cancel. ON: The preselect function is active. You can select the next patch before changing to it. OFF: The preselect function is inactive. Press The patch changes are saved.
-
Page 20: Using The Tuner
Using the Tuner Press to end. To activate the tuner To change tuner settings On the HOME screen or an effect screen, On the tuner screen, press press the same time. Open the tuner screen. Open the TUNER settings screen. To tune the guitar Turn You can play each open string and tune it. -
Page 21: Tuner Types
Setting items OUTPUT Drop tuning (FLAT) Set to × 0, × 1, × 2 or × 3. Select BYPASS or MUTE. NOTE Standard pitch (CALIBRATION) Drop tuning is not possible when the TYPE is The standard pitch for middle A can be set from set to CHROMA. -
Page 22: Using Rhythms
Using Rhythms Turn To activate a rhythm Change the setting. On the HOME screen or an effect screen, press Setting items Open the RHYTHM screen. PATTERN Select the rhythm pattern. For more about HINT rhythm patterns. (See page 23.) On the RHYTHM screen, press to switch Tempo (BPM) to the LOOPER screen. - Page 23 HINT To stop the rhythm On the RHYTHM screen, you can press return to the HOME screen while the rhythm continues playing. On the RHYTHM screen, press Rhythm patterns PatternName TimSig PatternName TimSig PatternName TimSig GUIDE R&B1 Jazz2 8Beats1 R&B2 Fusion 8Beats2 70s Soul...
-
Page 24: Using The Looper
Using the Looper Turn To activate the looper Change the setting. On the HOME screen or an effect screen, press Setting items Open the LOOPER screen. Recording time (TIME) Set to MANUAL or in a range from × 1 to HINT ×... - Page 25 To record and play back a phrase To overdub a recorded loop On the LOOPER During loop playback, screen, press press Start recording. Press to end. After the recording time To stop loop playback elapses, playback will start. On the LOOPER screen, press When TIME is set to MANUAL Loop playback start when you press...
-
Page 26: Using The Expression Pedal ( Only)
Using the Expression Pedal ( only) To set the controlled parameter If a PEDAL category effect has been added, and range settings will be made automatically to allow control of expression pedal parameters. Turn on the PEDAL setting screen. To change the pedal settings Select the item to set. - Page 27 HINT NOTE NO ASSIGN: No function is assigned to the expression If "Error!" appears, restart calibration from the pedal. beginning. AUTO ASSIGN: When using a PEDAL category effect, a parameter will be assigned to the pedal automatically. To adjust the torque If multiple PEDAL category effects are used, their corresponding parameters will all be assigned to the expression pedal.
-
Page 28: Updating The Firmware
Updating the Firmware Download the latest firmware from the ZOOM To update the firmware website. Confirm that the power is off. http://www.zoom.co.jp/ While pressing both To view the firmware versions , connect the unit to a computer using a Press on the HOME screen. - Page 29 Disconnect the USB cable. To restore the its factory default settings HINT Updating the firmware will not erase saved patches. While pressing NOTE turn the power ON. Do not disconnect the USB cable while the firmware (See page 6.) is being updated. The All INITIALIZE screen appears.
-
Page 30: Troubleshooting
There is a lot of noise The expression pedal is not working Check shielded cables for defects. well Use only a genuine ZOOM AC adapter ( P6). Check the expression pedal settings ( P26). Adjust the expression pedal ( P27). -
Page 31: Specifications
S/N (equivalent input noise) 119dB Noise floor (residual noise) -97dBm Power AC adapter DC9V (center minus plug), 500 mA (ZOOM AD-16) 20 hours of continuous operation using 4 alkaline AA batteries (with LCD backlight off) Firmware update Dimensions 154.8mm(D) x 146.0mm(W) x 43.0mm (H) 154.8mm(D) x 237 .0mm(W) x 50.0mm (H) -
Page 32: Zoom Corporation
The recycling of materials will help to conserve natural resources. For more detailed information about recycling of this product, please contact your local city office, your household waste disposal service or the shop where you purchased the product. ZOOM CORPORATION 4-4-3 Kanda-Surugadai, Chiyoda-ku, Tokyo 101-0062 Japan http://www.zoom.co.jp... - Page 33 Manufacturer names and product names mentioned in this patch list are trademarks or registered trademarks of their respective owners and do not indicate any affiliation with ZOOM CORPORATION. All product and artist names are intended only to illustrate sonic characteristics that were used as reference in the development of this product.
- Page 34 Manufacturer names and product names mentioned in this patch list are trademarks or registered trademarks of their respective owners and do not indicate any affiliation with ZOOM CORPORATION. All product and artist names are intended only to illustrate sonic characteristics that were used as reference in the development of this product.
Need help?
Do you have a question about the G1on and is the answer not in the manual?
Questions and answers