Table of Contents
Advertisement
Quick Links
Advertisement
Table of Contents

Related Manuals for GreenWorks 41572


Summary of Contents for GreenWorks 41572
- Page 1 24V LITHIUM-ION AIR COMPRESSOR 41572 Some Greenworks Lithium-Ion products are sold with or without battery and charger. Owner’s Manual TOLL-FREE HELPLINE: 1-888-90WORKS (888.909.6757) www.GreenWorksTools.com Read all safety rules and instructions carefully before operating this tool.
-
Page 2: Table Of Contents
Pump-up time from 85 psi (Cut-in pressure)..............30 Seconds Noise level @ 20ft (dBA).......................74 Power ..........................240 Watts Weight with battery ......................9.92 lbs * For use with 24V 2Ah Greenworks battery only. Model # 29842 * For use with 24V Greenworks charger only, Model # 29862... -
Page 3: General Safety Rules
GENERAL SAFETY RULES IMPORTANT SAFETY INSTRUCTIONS W A R N I N G Do not operate this unit until you read and understand this instruction manual for safety, operation and maintenance instructions. HAZARD RISK OF EXPLOSION OR FIRE WHAT CAN HAPPEN HOW TO PREVENT IT well ventilated area free of within the motor and pressure... - Page 4 GENERAL SAFETY RULES WHAT CAN HAPPEN HOW TO PREVENT IT The compressed air directly from Air obtained directly from the your compressor is not safe for compressor should never be used to breathing. The air stream may supply air for human consumption. contain carbon monoxide, toxic In order to use air produced by this vapors, or solid particles from the...
- Page 5 GENERAL SAFETY RULES The following conditions could lead to a weakening of the air tank, and result in a violent air tank explosion: WHAT CAN HAPPEN HOW TO PREVENT IT Failure to properly drain condensed Drain air tank daily or after each water from air tank, causing rust use.
- Page 6 GENERAL SAFETY RULES RISK FROM FLYING OBJECTS WHAT CAN HAPPEN HOW TO PREVENT IT The compressed air stream can Always wear certified safety cause soft tissue damage to equipment: ANSI Z87 .1 eye exposed skin and can propel dirt, protection (CAN/CSA Z94.3) chips, loose particles, and small with side shields when using the objects at high speed, resulting in...
- Page 7 GENERAL SAFETY RULES RISK FROM MOVING PARTS WHAT CAN HAPPEN HOW TO PREVENT IT Moving parts such as the pulley, Never operate the compressor with guards or covers which are damaged flywheel, and belt can cause serious or removed. injury if they come into contact with Keep your hair, clothing,and gloves you or your clothing.
-
Page 8: General Safety Rules
GENERAL SAFETY RULES RISK OF FALLING WHAT CAN HAPPEN HOW TO PREVENT IT A portable compressor can fall Always operate commpressor in a stable secure position to prevent from a table, workbench, or roof accidental movement of the unit. causing damage to the compressor Never operate compressor on a and could result in serious roof or other elevated position. -
Page 9: Know Your Air Compressor
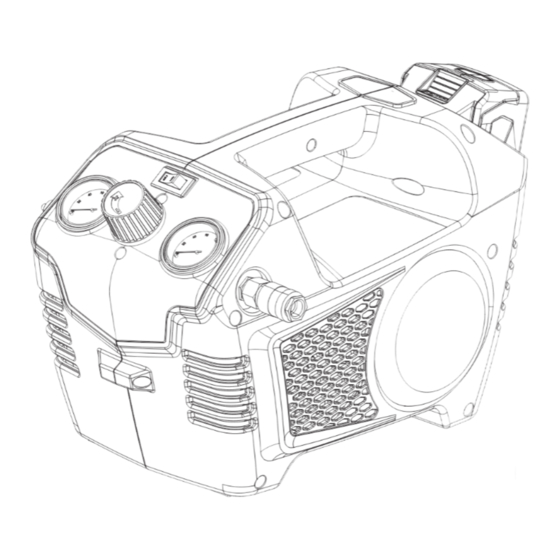
KNOW YOUR AIR COMPRESSOR The safe use of this product requires an understanding of the information on the tool and in this operator’s manual as well as a knowledge of the project you are attempting. Before use of this product, familiarize yourself with all operating features and safety rules. (See Fig. 1) Fig. -
Page 10: Assembly Instruction
ASSEMBLY INSTRUCTION ATTACHING AIR HOSE TO COMPRESSOR 1, Using your left hand push quick connect towards the body of the compressor. 2, Firmly press fit the male quick connect portion on the air hose into the female quick connect and release female quick connect locking hose in place. Fig. -
Page 11: Assembly Instruction
ASSEMBLY INSTRUCTION UNPACKING • This product requires assembly. W A R N I N G Do not use this product if any parts on the Packing List are already assembled to your product when you unpack it. Parts on this list are not assembled to the product by the manufacturer and require customer installation. -
Page 12: Operation
OPERATION BATTERY IMPORTANT! The battery pack is not charged when it is purchased. Before using the air compressor for the first time, place the battery pack in the battery charger and charge. Make sure to read all safety precautions, and follow the instructions in the Battery Charger section. To install (See Figure 2.) 1. - Page 13 OPERATION STARTUP 1. Before each startup,make sure the power switch is in the OFF position 2. Place air compressor on a flat,level surface. 3. Release pressure from the system. Drain moisture from the air tank by slowly opening the air tank drain valve by turning clockwise.Once all the moisture has drained out, close the fitting securely.
-
Page 14: Maintenance
MAINTENANCE W A R N I N G Disconnect air compressor from power source and bleed off all air pressure before attempting any maintenance or repair. SHUTDOWN AND STORAGE: NOTE: NEVER stop the air compressor by pulling the battery pack from the compressor housing as this may result in damage to the compressor. -
Page 15: Environmentally Safe Battery Disposal
ENVIRONMENTALLY SAFE BATTERY DISPOSAL The following toxic and corrosive materials are in the batteries used in this blower battery pack: Lithium-Ion, a toxic material. W A R N I N G All toxic materials must be disposed of in a specified manner to prevent contamination of the environment. -
Page 16: Troubleshooting
TROUBLESHOOTING PROBLEM POSSIBLE CAUSES SOLUTIONS Battery not fully installed. Remove and reinstall the battery The power switch is in the 0 (off) Set the power switch to the I (on) position. position. Remove battery and fully charge and battery Battery requires charging. charger. - Page 17 TROUBLESHOOTING PROBLEM POSSIBLE CAUSES SOLUTIONS regulator does The regulator or its internal parts Replace the regulator. not regulate are dirty or damaged. the pressure. There is a leak at one of the threads). Do not overtighten. The tank drain valve is open. Close the drain valve.
-
Page 18: Warranty
(4) years against defects in materials, parts or workmanship. GREENWORKS™, at its own discretion will repair or replace any and all parts found to be defective, through normal use, free of charge to the customer. This warranty is valid only for... -
Page 19: Exploded View
EXPLODED VIEW... -
Page 20: Parts List
PARTS LIST ITEM NO. PART NO. DESCRIPTION 31101828 GW 24V 2Ah Li-Ion Battery (29842) 34106978 insert base of housing 3290275 drain valve 33302755 0.5US gallon tank 3290252 bellow spring 3410152 rubber cushion 3750150A tube connector 34102755 right housing 32201113 screw ST2.9*15 34901755 polyfoam foot 32206110... -
Page 21: Notes
NOTES... - Page 22 TOLL-FREE HELPLINE: 1-888-90WORKS (888.909.6757) Rev: 00 (08-02-13) Printed in China on 100% Recycled Paper...
Need help?
Do you have a question about the 41572 and is the answer not in the manual?
Questions and answers