Table of Contents
Advertisement
Quick Links
WIRELESS THERMO-HYGROMETER
Instruction Manual
Cat. No. 30.3044.IT
Thank you for choosing this wireless thermo-
hygrometer from TFA.
BEFORE YOU USE IT
Please be sure to read the instruction
manual carefully.
This information will help you to familiarise
yourself with your new device, learn all of its
functions and parts, find out important details
about its first use and how to operate it, and get
advice in the event of faults.
Following the instruction manual for use will
prevent damage to the device and loss of your
statutory rights arising from defects due to
incorrect use.
We shall not be liable for any damage
occurring as a result of not following these
instructions.
Please take particular note of the safety
advice!
Please look after this manual for future
reference.
SCOPE OF SUPPLY:
Thermo-Hygrometer (basic unit)
•
Outdoor transmitter
•
Instruction manual
•
27
Advertisement
Table of Contents

Subscribe to Our Youtube Channel
Related Manuals for TFA 30.3044.IT


Summary of Contents for TFA 30.3044.IT
- Page 1 WIRELESS THERMO-HYGROMETER Instruction Manual Cat. No. 30.3044.IT Thank you for choosing this wireless thermo- hygrometer from TFA. BEFORE YOU USE IT Please be sure to read the instruction manual carefully. This information will help you to familiarise yourself with your new device, learn all of its...
-
Page 2: For Your Safety
FIELD OF OPERATION AND ALL OF THE BENEFITS OF YOUR NEW THERMO- HYGROMETER AT A GLANCE DCF Radio controlled time with manual • setting option Time reception ON/OFF (user selectable) • Time zone option ±12 hours • Calendar display (year only in setting •... - Page 3 Batteries must not be thrown into the fire, • short-circuited, taken apart or recharged. Risk of explosion! Batteries contain harmful acids. Low • batteries should be changed as soon as possible to prevent damage caused by a leaking battery. Never use a combination of old and new batteries together or batteries of different types.
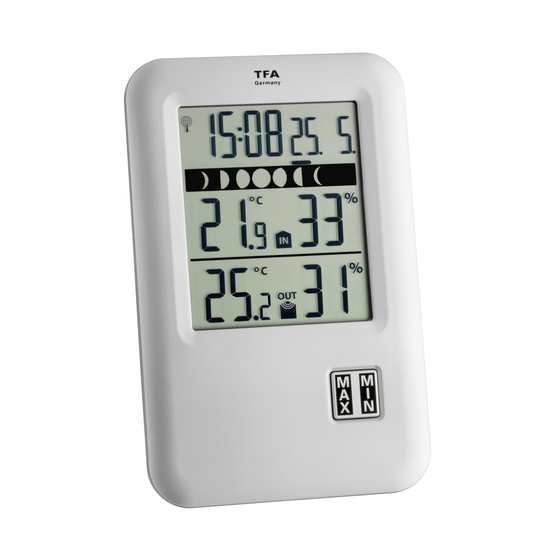
- Page 4 ELEMENTS Thermo-Hygrometer Display Function key Hanging hole Battery compartment Function keys Stand Thermo-Hygro Transmitter Remote transmission of • outdoor temperature and humidity to thermo- hygrometer by 868MHz Alternately display the • outdoor temperature and humidity readings on LCD Wall mounting case •...
- Page 5 Mounting at a sheltered place. Avoid • direct rain and sunshine TO INSTALL AND REPLACE BATTERIES IN THE THERMO-HYGRO TRANSMITTER The outdoor thermo-hygro transmitter uses 2 x AAA, IEC LR3, 1.5 V batteries. To install and replace the batteries, please follow the steps below: Remove the battery cover by pushing the battery cover...
- Page 6 remove the cover. Insert batteries observing the correct polarity (see marking). Replace compartment cover. Battery replacement Replace the batteries when the battery • symbol of the thermo-hygrometer appears on the upper display. When the batteries of the transmitter are • used up, the low battery icon appears next to the outdoor temperature display.
- Page 7 is not displayed on the LCD after 60 seconds, remove the batteries and wait for at least 60 seconds before reinserting them. Once the indoor data is displayed user may proceed to the next step. After the batteries are inserted, the thermo-hygrometer will start receiving data signal from the transmitter.
- Page 8 When the time code is received, the DCF tower becomes permanently lit and the time will be displayed. DCF RADIO CONTROLLED TIME The time base for the radio controlled time is a Cesium Atomic Clock operated by the Physikalisch Technische Bundesanstalt Braunschweig which has a time deviation of less than one second in one million years.
-
Page 9: Function Keys
Recommended distance to any interfering • sources like computer monitors or TV sets is a minimum of 1.5 - 2 meters. Within ferro-concrete rooms (basements, • superstructures), the received signal is naturally weakened. In extreme cases, please place the unit close to a window and/ or point its front or back towards the Frankfurt transmitter. -
Page 10: Lcd Screen
SET key Press and hold the key to enter manual • setting modes: time zone, manual time setting, calendar, time reception ON/OFF + key Increase, change, toggle all values in • manual set mode MIN/MAX key Press shortly to toggle between indoor •... -
Page 11: Time Zone Setting
* When the signal is successfully received by the thermo-hygrometer, the outdoor transmission icon will be switched on. (If not successful, the icon will not be shown on LCD). The user can then easily see whether the last reception was successful (icon on) or not (icon off). -
Page 12: Calendar Setting
disturbances, transmitting distance, etc.), the time can be manually set. The clock will then work as a normal quartz clock. Minutes flashing Hour flashing The hour digit will start flashing. Use the + key to set the hour. Press again the SET key to set the minutes. - Page 13 The date default of the thermo-hygrometer is 1. 1. 2011. Once the radio-controlled time signals are received, the date is automatically updated. However, if the signals are not received, the date can also be set manually. The year starts flashing. Use the + key to set the year (between year 2011-2039).
- Page 14 Use the + key to turn OFF the time reception function. Confirm with the SET key and exit the manual setting. Note: If the Time Reception function is turned OFF manually, the clock will not attempt any reception of the DCF time as long as the Time Reception OFF function is activated.
- Page 15 INDOOR TEMPERATURE/HUMIDITY DATA The indoor temperature and humidity data are automatically updated and displayed on the third section of the LCD. Indoor relative Indoor humidity temperature in RH% in ºC OUTDOOR TEMPERATURE/HUMIDITY DATA The last LCD section shows the outdoor temperature and humidity, and the reception indicator.
- Page 16 TO RESET THE MIN/MAX DATA Press and hold MIN/MAX key for 3 seconds to reset all the indoor and outdoor temperature to current temperatures. ABOUT THE THERMO-HYGRO TRANSMITTER The range of the thermo-hygro transmitter may be affected by the temperature. At cold temperatures the transmitting distance may be decreased.
- Page 17 operating on the 868MHz-signal frequency can also cause interference. Note: When the 868MHz signal is received correctly, do not re-open the battery cover of either the transmitter or thermo-hygrometer, as the batteries may spring free from the contacts and force a false reset. Should this happen accidentally then reset all units (see “Setting up”...
- Page 18 Place the thermo- hygrometer onto the screw, using the hanging hole on the backside. Gently pull the thermo-hygrometer down to lock the screw into place. Foldout table stand: The foldout table stand leg is located on the backside. Pull the stand out from the bottom center edge of the thermo-hygrometer, below the battery compartment.
-
Page 19: Care And Maintenance
To wall mount: Secure the bracket onto a desired wall using the screws and plastic anchors. Clip the transmitter onto the bracket. Note: Before permanently fixing the thermo-hygro transmitter to the wall base, place all units in the desired locations to check that the outdoor temperature and humidity readings are receivable. -
Page 20: Waste Disposal
Display "---" (do not use rechargeable batteries!) Restart the • transmitter and thermo-hygrometer as per the manual Choose another • place for the transmitter and/or the thermo-hygrometer Reduce the distance • between the transmitter and the thermo-hygrometer Check if there is any •... -
Page 21: Specifications
Never throw flat batteries and rechargeable batteries in household waste. As a consumer, you are legally required to take them to your retail store or to appropriate collection sites according to national or local regulations in order to protect the environment. The symbols for the heavy metals contained are: Cd=cadmium, Hg=mercury, Pb=lead This instrument is labelled in... -
Page 22: Declaration Of Conformity
Thermo-hygrometer : 81.8 x 20 x 127.1mm Thermo-hygro transmitter: 36 x 16 x 102.6mm TFA Dostmann GmbH & Co. KG, Zum Ottersberg 12, D - 97877 Wertheim No part of this manual may be reproduced without written consent of TFA Dostmann. The technical data are correct at the time of going to print and may change without prior notice. - Page 23 A copy of the signed and dated Declaration of Conformity is available on request via info@tfa- dostmann.de. www.tfa-dostmann.de 10/11...
Need help?
Do you have a question about the 30.3044.IT and is the answer not in the manual?
Questions and answers