Table of Contents
Advertisement
Quick Links
Advertisement
Table of Contents

Related Manuals for Conceptronic C300APRA2


Summary of Contents for Conceptronic C300APRA2
-
Page 1: Conceptronic C300Apra2
CONCEPTRONIC C300APRA2 Version 1.0 802.11n Wireless ADSL Router User Manual... -
Page 2: Table Of Contents
Installation ....................10 Before You Begin ..................10 Installation Notes..................10 Information you will need from your ADSL service provider ........12 Information you will need about C300APRA2 .............13 Information you will need about your LAN or computer ........14 Device Installation..................14 Power on Router ..................14 Factory Reset Button .................15... - Page 3 Conceptronic C300APRA2 User Manual DMZ ......................40 Virtual Server ..................41 IP Address Mapping ..................42 ADVANCED – QoS..................43 ADVANCED – VLAN ..................45 Assign PVID .....................45 VLAN Group Setting ...................46 ADVANCED – ADSL ..................48 ACCESS MANAGEMENT ..................49 ACCESS MANAGEMENT - ACL ................49 ACCESS MANAGEMENT - FILETER ...............50 IP/MAC Filter ...................50...
-
Page 4: About This Manual
Conceptronic C300APRA2 User Manual About This Manual This manual provides descriptions of the Conceptronic C300APRA2 802.11n Wireless ADSL Router, its hardware and software features, and how to set up and use the device on your small office or home network. -
Page 5: Operating System
Conceptronic C300APRA2 User Manual must install an adapter, follow the installation instructions that come with the Ethernet NIC adapter. Operating System The Wireless ADSL Router uses an HTML-based web interface for setup and management. The web configuration manager may be accessed using any operating system capable of running web browser software. -
Page 6: Packing List
Open the shipping carton and carefully remove all items. Make sure that you have the items listed here. • One Conceptronic C300APRA2 - 802.11n Wireless ADSL Router with two fixed Antennas • One CD-ROM containing this User’s Guide • One Straight-through Ethernet cable •... -
Page 7: Radio Transmission
It will allow access to the wireless network to devices using the correct SSID after a negotiation process takes place. The Conceptronic C300APRA2 broadcasts its SSID so that any wireless station in range can learn the SSID and ask permission to associate with it. -
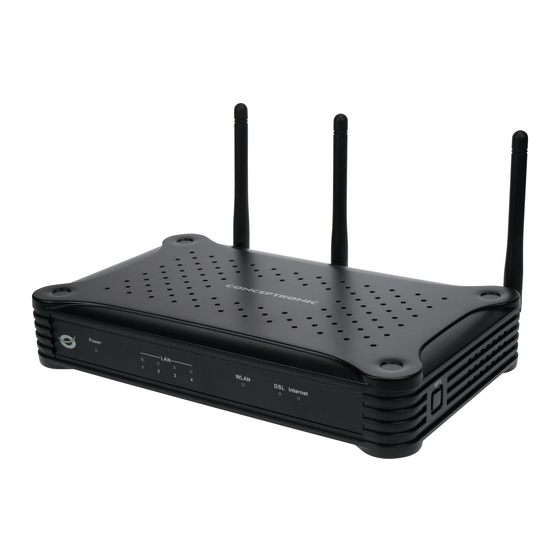
Page 8: Front Panel Led Display
Conceptronic C300APRA2 User Manual Front Panel LED Display Place the Router in a location where the LED indicators on the front panel can be viewed. The LED indicators on the front panel include the Power, Status, WAN, WLAN and WPS indicators. -
Page 9: Rear Panel Cable Connections
Connect with the fixed Antenna WPS Push Button The WPS Push Button is located at the right side of the C300APRA2 Wireless Router. Press the button to enable the WPS function. Refer to WPS Security section for more detail. When the... -
Page 10: Installation
Operating Systems The C300APRA2 uses an HTML-based web interface for setup and management. The web configuration manager may be accessed using any operating system capable of running web browser software, including Windows 98 SE, Windows ME, Windows 2000, Windows XP, and Windows Vista. - Page 11 Conceptronic C300APRA2 User Manual Ethernet Port (NIC Adapter) Any computer that uses the Router must be able to connect to it through the Ethernet port on the Router. This connection is an Ethernet connection and therefore requires that your computer be equipped with an Ethernet port as well. Most notebook computers are now sold with an Ethernet port already installed.
-
Page 12: Information You Will Need From Your Adsl Service Provider
Conceptronic C300APRA2 User Manual Information you will need from your ADSL service provider Username This is the Username used to log on to your ADSL service provider’s network. Your ADSL service provider uses this to identify your account. Password This is the Password used, in conjunction with the Username above, to log on to your ADSL service provider’s network. -
Page 13: Information You Will Need About C300Apra2
This address will be the base IP address used for DHCP service on the LAN when DHCP is enabled. LAN Subnet Mask for the C300APRA2 This is the subnet mask used by the C300APRA2, and will be used throughout your LAN. The default subnet mask is 255.255.255.0. This can be changed later. -
Page 14: Information You Will Need About Your Lan Or Computer
Ethernet NIC If your computer has an Ethernet NIC, you can connect the C300APRA2 to this Ethernet port using an Ethernet cable. You can also use the Ethernet ports on the C300APRA2 to connect to other computer or Ethernet devices. -
Page 15: Factory Reset Button
Conceptronic C300APRA2 User Manual Factory Reset Button The Router may be reset to the original factory default settings by using a ballpoint or paperclip to gently push down the reset button in the following sequence: 1. With the router powered on (check the Power LED to make sure it lights steady green), press and hold down the reset button using a paper clip or similar object for about 6 to 8 seconds. -
Page 16: Setup
Conceptronic C300APRA2 User Manual Setup This section will show you how to set up and configure your new D-Link Router using the Web- based configuration utility. Web-based Configuration Utility Connect to the Router To configure the WAN connection used by the Router it is first necessary to communicate with the Router through its management interface, which is HTML-based and can be accessed using a web browser. - Page 17 Conceptronic C300APRA2 User Manual Device Info overview...
-
Page 18: Quick Start
QUICK START You can setup the C300APRA2 through the build-in Quick Start. This Quick Start will help you configure the basic settings of the C300APRA2 step by step. Click the Quick Start link to see the page. Quick Start window To use the Quick Start, click the Run Wizard button. - Page 19 Conceptronic C300APRA2 User Manual B. You are recommended to set an admin password here. Enter the new password and re-enter it for confirmation. When completed, click Next. C. For system management purpose, a correct time setting is critical to have accurate time stamps on the system logs.
- Page 20 Conceptronic C300APRA2 User Manual E. When your provider requires a Static IP Connection - Static IP connection, select the Static IP option. Enter the requested information: • • • IP Address • Subnet Mask • ISP Gateway • Connection Type When completed, click Next.
- Page 21 Conceptronic C300APRA2 User Manual G. When your provider requires a PPPoE Connection – PPPoE/PPPoA connection, select the PPPoE/PPPoA option. Enter the requested information: • Username • Password • • • Connection Type When completed, click Next. H. When your provider requires a PPTP Connection - Bridge connection, select the Bridge option.
- Page 22 Conceptronic C300APRA2 User Manual I. The Setup Wizard is now complete. If you want to apply your settings, click Next. If you want to change any setting, click Back to return to the previous screen. If you want to close the Setup Wizard without any changes, click Exit.
-
Page 23: Interface Setup - Internet
Conceptronic C300APRA2 User Manual INTERFACE SETUP - INTERNET To configure the Router’s basic Internet and LAN configuration settings, click the Interface Setup -> Internet link in the Wireless ADSL Router’s opening page. This window is also used to configure the Router for multiple virtual connections (Multiple PVCs). - Page 24 Conceptronic C300APRA2 User Manual PVCs Summary window Most users will not need to change ATM settings in the ATM VC section. If this is the first time you are setting up the ADSL connection it is recommended that you leave the ATM QoS type and associated Cell Rate settings at the default values until you have established the connection and verified that your ISP supports ATM for your ADSL account.
-
Page 25: Pppoe/Pppoa
Conceptronic C300APRA2 User Manual PPPoE/PPPoA Follow the instructions to configure the Router to use a PPPoA or PPPoE for the Internet connection. Make sure you have all the necessary information before you configure the Internet (WAN) connection. PPPoE/PPPoA connection To set up a PPPoE or PPPoA connection: Click the PPPoA/PPPoE radio button under ISP in the Encapsulation section. - Page 26 Conceptronic C300APRA2 User Manual PPPoE/PPPoA connection, click the Static radio button under Get IP Address and enter the Static IP Address, IP Subnet Mask, and Gateway information. NAT should remain Enabled. If you disable NAT, you will not be able to use more than one computer for Internet connections.
-
Page 27: Dynamic Ip Address
Conceptronic C300APRA2 User Manual Dynamic IP Address A Dynamic IP Address connection configures the Router to automatically obtain its global IP address from a DHCP server on the ISP’s network. The service provider assigns a global IP address from a pool of addresses available to the service provider. Typically the IP address assigned has a long lease time, so it will likely be the same address each time the Router requests an IP address. -
Page 28: Static Ip Address
Conceptronic C300APRA2 User Manual Static IP Address When the Router is configured to use Static IP Address assignment for the Internet (WAN) connection, you must manually assign a global IP Address, Subnet Mask and Gateway IP Address used for the WAN connection. Follow the instruction below to configure the Router to use Static IP Address assignment for the WAN connection. -
Page 29: Bridge Mode
Conceptronic C300APRA2 User Manual Bridge Mode For Bridged connections it will be necessary for most users to install additional software on any computer that will the Router for Internet access. The additional software is used for the purpose of identifying and verifying your account, and then granting Internet access to the computer requesting the connection. -
Page 30: Interface Setup - Lan
Conceptronic C300APRA2 User Manual INTERFACE SETUP - LAN To access the LAN window, click the LAN button in the Interface Setup directory. LAN Setup window You can configure the LAN IP address to suit your preference. Many users will find it convenient to use the default settings together with DHCP service to manage the IP settings for their private network. -
Page 31: Use The Router For Dhcp
Conceptronic C300APRA2 User Manual Use the Router for DHCP To use the built-in DHCP server, click the Enabled radio button under DHCP if it has not already selected. The IP Address Pool settings can be adjusted. The Starting IP Address is the lowest available IP address (default = 192.168.0.100). -
Page 32: Interface Setup - Wireless
Conceptronic C300APRA2 User Manual INTERFACE SETUP - WIRELESS The two essential settings for wireless LAN operation are the SSID and Channel Number. The SSID (Service Set Identifier) is used to identify a group of wireless LAN components. The SSID can be broadcast in order to allow properly configured wireless stations to learn the SSID and join the group. -
Page 33: Basic Wireless
Conceptronic C300APRA2 User Manual Basic Wireless Basic wireless settings To disable the wireless interface, click in the Deactivated radio button under Access Point and click the SAVE button. This will immediately disable the wireless access point; it is not necessary to restart the access point to make this change. -
Page 34: Wps Security
Follow the steps below to activate and establish a WPS connection with the Push Button technology: Press the WPS Button at the right side of the C300APRA2 until the WPS LED blinks. Or you can click the PBC radio button under WPS mode and click Start WPS on the web... - Page 35 If the authentication of the Wireless Client is succeeded, the WPS LED will burn steady blue for 5 minutes. After these 5 minutes, the LED will turn off. Your Wireless Client is now connected to the C300APRA2 and your network is secured with WPA Encryption.
-
Page 36: Wep Encryption
Conceptronic C300APRA2 User Manual WEP Encryption WEP (Wireless Encryption Protocol) encryption can be enabled for security and privacy. WEP encrypts the data portion of each frame transmitted from the wireless adapter using one of the predefined keys. The router offers 64- or 128-bit encryption with four keys available. -
Page 37: Advanced
Conceptronic C300APRA2 User Manual ADVANCED The Advanced menu contains main windows for Firewall Routing, NAT, QoS, VLAN and ADSL. ADVANCED - FIREWALL This window allows the Router to enforce specific policies intended to protect the private network against certain types of attacks. -
Page 38: Advanced - Routing
Conceptronic C300APRA2 User Manual ADVANCED - Routing Use Static Routing to specify a route used for data traffic within your Ethernet LAN or to route data on the WAN. This specifies that all packets destined for a particular network or subnet use a predetermined gateway. -
Page 39: Advanced - Nat
Conceptronic C300APRA2 User Manual ADVANCED – NAT The Router features include policy-based Network Address Translation (NAT) for greater flexiblity and control of NAT functions. The user can customize port mapping for a single global IP address or full feature NAT support for mapping multiple global IP addresses to servers or clients on the LAN. -
Page 40: Dmz
Conceptronic C300APRA2 User Manual Since some applications are not compatible with NAT, the Router supports use of a DMZ IP address for a single host on the LAN. This IP address is not protected by NAT and will therefore be visible to agents on the Internet with the right type of software. Keep in mind that any client PC in the DMZ will be exposed to various types of security risks. -
Page 41: Virtual Server
Conceptronic C300APRA2 User Manual Virtual Server To customize inbound port mapping of NAT for a Single User Account using one global IP address, select the Single option under Number of IPs and click the Virtual Server link. Virtual Server window By default, NAT will map all ports according to the traditional IP NAT protocol. -
Page 42: Ip Address Mapping
Conceptronic C300APRA2 User Manual IP Address Mapping The Router allows the user to setup policies used for inbound or outbound port mapping to one or multiple global IP addresses. This may be desirable on networks that maintain multiple global IP addresses, multiple virtual connections or where servers on the network must respond to connection requests from the WAN. -
Page 43: Advanced - Qos
Conceptronic C300APRA2 User Manual ADVANCED – QoS Quality of Service or QoS assigns a priority level to data packets to make sure time sensitive network applications operate smoothly with minimal delay. QoS enables applications such as VoIP (voice-over Internet Protocol) or video conferencing to function well on networks that may have multiple simultaneous transmissions of many types of data. - Page 44 Conceptronic C300APRA2 User Manual Option Description Click Activated to enable the QoS function, or Deactivated to disable Summary Click the QoS Setting Summary button to see the list of QoS rules. Rule Index Select a number of a rule from the drop-down list to edit the rule.
-
Page 45: Advanced - Vlan
Conceptronic C300APRA2 User Manual ADVANCED – VLAN The Router supports port-based VLANs to segment the Ethernet LAN and/or map 802.1Q VLAN groups to different PVCs. VLANs are grouped according to physical Ethernet port or by PVC for users running multiple connections on the WAN. -
Page 46: Vlan Group Setting
Conceptronic C300APRA2 User Manual Enter the desired PVID values in the menu and then click the SAVE button. PVIDs assignment can be used to create port-based VLANs for any of the four Ethernet ports; or use the PVID to map VLANs to separate PVCs. The eight PVCs are labeled ATM VC # 1, VC # 2 and so on up to VC # 7 for the purpose of VLAN to PVC mapping. - Page 47 Conceptronic C300APRA2 User Manual thus keeping the VLAN information intact. Other 802.1Q compliant devices on the network to make packet-forwarding decisions can then use the VLAN information in the tag.
-
Page 48: Advanced - Adsl
Conceptronic C300APRA2 User Manual ADVANCED – ADSL This window allows the user to set the configuration for ADSL protocols. For most ADSL accounts the default settings will work. This configuration works with all ADSL implementations. If you have been given instructions to change the ADSL Mode or ADSL Type, select the desired option from the drop-down lists and click the SAVE button. -
Page 49: Access Management
Conceptronic C300APRA2 User Manual ACCESS MANAGEMENT The Access Management directory contains links for the ACL, Filter, SNMP, UPnP, DDNS, and CWMP menus. ACCESS MANAGEMENT - ACL Access Control on the Router is an IP-based and/or application-based filtering mechanism used for security and efficiency. -
Page 50: Access Management - Fileter
Conceptronic C300APRA2 User Manual ACCESS MANAGEMENT - FILETER The filtering functions on the Router are based on IP address, MAC address, URL or common network applications. Choose the type of filtering to configure and enter the criteria appropriate for that type of filtering. Each menu presents settings specific to the type. IP and... -
Page 51: Application Filter
Conceptronic C300APRA2 User Manual Application Filter The Application Filter is a simple filter that drops all incoming packets for the selected applications from the Internet. Select Application Filter from the Filter Type Section drop- down list to configure the filter. -
Page 52: Url Filter
Conceptronic C300APRA2 User Manual URL Filter The URL Filter will deny access to any URL entered in the list. Up to 16 URLs can be specified. The URL Filter can be active (Yes) or not (No) without changing the entries on the list. -
Page 53: Access Management - Snmp
Conceptronic C300APRA2 User Manual ACCESS MANAGEMENT - SNMP Simple Network Management Protocol (SNMP) is a standard for internetwork and intranetwork management. SNMP window Enter the desired information in the Get Community and Set Community fields and then click the SAVE button when you are finished with your SNMP settings. -
Page 54: Access Management - Ddns
Conceptronic C300APRA2 User Manual ACCESS MANAGEMENT - DDNS The Router supports Dynamic Domain Name Service or Dynamic DNS. Dynamic DNS is used for account that may not have a permanent fixed global IP address for servers or other resources that are accessed through the Internet. It allows the user to alias a dynamic IP address to a fixed host name. -
Page 55: Access Management - Cwmp
Conceptronic C300APRA2 User Manual ACCESS MANAGEMENT - CWMP CPE WAN Management Protocol (CWMP) allows technicians to connect to the customer’s device doing management and configurations. CWMP window To enable the CWMP feature: 1. Click the Activated radio button in CWMP. -
Page 56: Maintenance
Conceptronic C300APRA2 User Manual MAINTENANCE The Maintenance directory contains windows for Administration, Time Zone, Firmware, SysRestart, and Diagnostics. MAINTENTANCE - ADMINISTRATION To create a new password, type the new password in the New Password field and then retype it in the Confirm Password field. -
Page 57: Maintentance - Firmware
Conceptronic C300APRA2 User Manual Alternatively, you can manually configure the system time. Simply click Manually under the Synchronize time with section and then type in the Date and Time in the spaces provided. Click the SAVE button to set the system time. -
Page 58: Maintentance - Reset/Restart System
Conceptronic C300APRA2 User Manual MAINTENTANCE – RESET/RESTART SYSTEM This window allows you to restart the Router with the current settings or the factory default settings. SysRestart window To reset the Router to its factory default settings, click the SysRestart button in the Maintenance menu. -
Page 59: Status
Conceptronic C300APRA2 User Manual STATUS Use this window to quickly view basic current information about the LAN, WAN, and wireless interfaces and device information including Firmware Version and MAC address. STATUS – DEVICE INFO This display window is used to view Device, LAN, WAN, and ADSL information. -
Page 60: Status - System Log
Conceptronic C300APRA2 User Manual STATUS – SYSTEM LOG This window displays chronological event log data. Use the navigation buttons to view or scroll log pages. View System Log window You may also save a simple text file containing the log to your computer. Click the SAVE LOG... -
Page 61: Status - Statistics
Conceptronic C300APRA2 User Manual STATUS - STATISTICS Use the Transmit Statistics window to monitor traffic on the Ethernet, Wireless or ADSL connection. Select the interface for which you want to view packet statistics and the information will appear below. Statistics window... -
Page 62: Help
Conceptronic C300APRA2 User Manual HELP This window displays the Router’s help. Help window... -
Page 63: Technical Specifications
Conceptronic C300APRA2 User Manual Technical Specifications... - Page 64 Conceptronic C300APRA2 User Manual Standards Temperature • IEEE 802.11 Operating: 0ºC to 40ºC Storing: -20ºC to 70ºC • IEEE 802.11b/g Humidity • IEEE 802.11n Draft (EWC) Operating: 5%~95% (non-condensing) Device Management Certifications Web-Based – Internet Explorer v6 or later; FCC Class B Netscape Navigator v6 or later;...
- Page 65 Conceptronic C300APRA2 User Manual...
Need help?
Do you have a question about the C300APRA2 and is the answer not in the manual?
Questions and answers