Table of Contents
Advertisement
Quick Links
I N S T R U C T I O N M A N U A L
Orion 8" and 10" f/3.9
Newtonian Astrographs
#8297 8" f/3.9, #8296 10" f/3.9
#8296
Providing Exceptional Consumer Optical Products Since 1975
OrionTelescopes.com
Customer Support (800) 676-1343 • E-mail: support@telescope.com
Corporate Offices (831) 763-7000 • 89 Hangar Way, Watsonville, CA 95076
© 2011 Orion Telescopes & Binoculars
IN 406 Rev. A 07/11
Advertisement
Table of Contents

Related Manuals for Orion 8297


Summary of Contents for Orion 8297
- Page 1 I N S T R U C T I O N M A N U A L Orion 8" and 10" f/3.9 Newtonian Astrographs #8297 8" f/3.9, #8296 10" f/3.9 #8296 Providing Exceptional Consumer Optical Products Since 1975 OrionTelescopes.com Customer Support (800) 676-1343 • E-mail: support@telescope.com Corporate Offices (831) 763-7000 •...
-
Page 2: Parts List
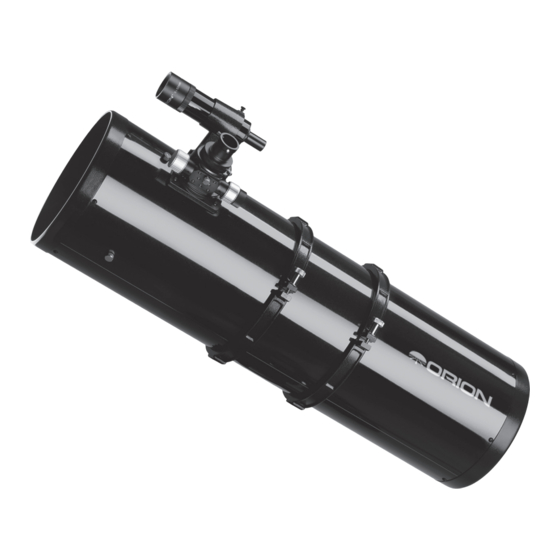
Figure 1. The Orion 8" f/3.9 Newtonian Astrograph Congratulations on your purchase of an Orion f/3.9 Newtonian Astrograph! These powerful imaging telescopes feature “fast,” high-quality parabolic optics, a 2" dual-speed Crayford focuser, and excellent mechanical construction with some special features. Optimized for astrophotography with DSLR and astronomical CCD imaging cameras, our f/3.9 Newtonian Astrographs are capable of delivering breathtak-... -
Page 3: Getting Started
then retighten the clamps. Rotating the telescope to achieve 1.25" Eyepiece holder Accessory lock a comfortable eyepiece or camera angle is done in the same thumbscrews fashion. Simply loosen the tube ring clamps just enough to allow the optical tube to rotate within the tube rings. Retighten 2"... -
Page 4: Attaching The Finder Scope
The finder scope alignment should be checked before every Your Orion f/3.9 Newtonian Astrograph is designed primar- imaging or observing session. This can easily be done at ily for astro-imaging, but it makes a fine visual instrument as night, before viewing through the telescope. -
Page 5: Cooling The Telescope
This is because even though it runs astro-images due to optical distortion. Check Orion’s website free from vibration, the air currents it generates in the optical for compatible coma correctors. - Page 6 Attachment of a DSLR camera requires a T-ring for the particular camera model and a T-adapter, such as the Orion with a screwdriver. Using a Phillips screwdriver, remove the Zero-Profile Prime Focus Camera Adapter, which fits into the 2"...
- Page 7 Reflective surface Primary mirror of collimation center mark drawtube Reflection of primary mirror clip Figure 8. Collimating the optics. (a) When the mirrors are properly aligned, the view down the focuser drawtube should look like this. (b) With the collimation cap in place, if the optics are out of alignment, the view might look something like this. (c) Here, the secondary mirror is centered under the focuser, but it needs to be adjusted (tilted) so that the entire primary mirror is visible.
-
Page 8: Aligning The Secondary Mirror
8b through 8e assume that you have the collimation cap in place. We strongly recommend the use of a laser collimating tool such as the Orion LaserMate Deluxe or LaserMate Pro to aid Figure 9. The quick collimation cap, which features an inner in collimating the optics. - Page 9 one hand while turning the center screw with a large Phillips head screwdriver with your other hand (Figure 11). Turning the screw clockwise will move the secondary mirror toward the front opening of the optical tube, while turning the screw counter-clockwise will move the secondary mirror toward the primary mirror.
-
Page 10: Care And Maintenance
Figure 13. Figure 14. The tilt of the secondary mirror is adjusted with a The tilt of the primary mirror is adjusted by turning 2mm Allen wrench on the three setscrews surrounding the center one or more of the three large, spring-loaded collimation knobs. The Phillips-head bolt. - Page 11 Out of collimation Collimated Figure 15. A star test will determine if the telescope’s optics are properly collimated. A defocused view of a bright star through the eyepiece should appear as illustrated on the right if the optics are perfectly collimated. If the circle is unsymmetrical, as illustrated on the left, the optics need alignment.
-
Page 12: Specifications
The Orion 8" and 10" f/3.9 Newtonian Astrographs are warranted against defects in materials or workmanship for a period of one year from the date of purchase. This warranty is for the benefit of the original retail purchaser only. During this warranty period Orion Telescopes &...
Need help?
Do you have a question about the 8297 and is the answer not in the manual?
Questions and answers