Sign In
Upload
Manuals
Brands
Toshiba Manuals
Projection TV
72HM196 - 72" Rear Projection TV
Toshiba 72HM196 - 72" Rear Projection TV Manuals
Manuals and User Guides for Toshiba 72HM196 - 72" Rear Projection TV. We have
4
Toshiba 72HM196 - 72" Rear Projection TV manuals available for free PDF download: User Manual, Installation Manual, Manual D'installation, Specification
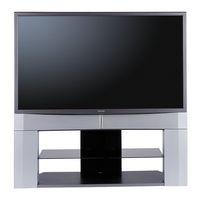
Toshiba 72HM196 - 72" Rear Projection TV User Manual (92 pages)
Integrated High Definition DLP Projection Television
Brand:
Toshiba
| Category:
Projection TV
| Size: 3.58 MB
Table of Contents
Important Notes about Your DLP ™ Projection TV
2
Trademark Information
3
Table of Contents
4
Chapter 1: Introduction
6
Welcome to Toshiba
6
Features of Your New TV
6
Overview of Steps for Installing, Setting Up, and Using Your New TV
7
TV Front and Side Panel Controls and Connections
8
TV Back Panel Connections
9
Chapter 2: Using the Remote Control
11
Installing the Remote Control Batteries
11
Remote Control Effective Range
11
Learning about the Remote Control
12
Remote Control Functional Key Chart
14
Using the Remote Control to Operate Your Other Devices
16
Programming the Remote Control to Operate Your Other Devices
16
Device Code Setup
16
Searching and Sampling the Code of a Device (8500)
17
Using the Volume Lock Feature (8000)
17
Operational Feature Reset (8900)
17
Multi-Brand Remote Control Device Codes
18
Chapter 3: Menu Layout and Navigation
22
Main Menu Layout
22
Setup/Installation Menu Layout
23
THINC Menu Layout
24
Navigating the Menu System
24
Chapter 4: Setting up Your TV
25
Selecting the Menu Language
25
Configuring the Antenna Input Sources for the
25
ANT 1 and ANT 2 Terminals
25
Programming Channels into the Tv's Channel Memory
26
Programming Channels Automatically
26
Manually Adding and Deleting Channels in the Channel Memory
27
Setting the Time and Date
28
Setting the Colorstream ® HD Audio Mode
28
Setting the HDMI ™ Audio Mode
29
Viewing the Cablecard ™ Menu
29
Setting the Quick Restart ™ Feature
30
Viewing the Digital Signal Meter
30
Viewing the System Status
31
Chapter 5: Using the Tv's Features
32
Selecting the Video Input Source to View
32
Labeling the Video Input Sources
32
Tuning Channels
33
Tuning Channels Using the Channel Browser
33
Tuning to the Next Programmed Channel
35
Tuning to a Specific Channel (Programmed or Unprogrammed)
35
Switching between Two Channels Using Channel Return
36
Switching between Two Channels Using Surflock
36
Selecting the Picture Size
37
Scrolling the Theaterwide ® Picture (Theaterwide 2 and 3 Only)
38
Using the Auto Aspect Ratio Feature
39
Selecting the Cinema Mode (480I Signals Only)
39
Using the POP Features
40
Using the POP Double-Window Feature
40
Switching the Speaker Audio (Left or Right)
41
POP Double-Window Aspect Ratio
41
Using the FREEZE Feature
41
Adjusting the Picture
42
Selecting the Picture Mode
42
Adjusting the Picture Quality
42
Using the Closed Caption Mode
43
Closed Caption Advanced
43
Digital Closed Captions
44
Using the Closed Caption Button on the Remote Control
44
Adjusting the Audio
44
Muting the Sound
44
Using the Digital Audio Selector
44
Selecting Stereo/Sap Broadcasts
45
Adjusting the Audio Quality
45
Using the Stablesound ® Feature
46
Turning off the Built-In Speakers
46
Selecting the Optical Audio Output Format
46
Using the Locks Menu
47
Entering the PIN Code
47
If You Cannot Remember Your PIN Code
47
Changing Your PIN Code
47
Blocking TV Programs and Movies by Rating (V-Chip)
48
Downloading an Additional Rating System for Blocking TV Programs and Movies
48
Blocking Channels
49
Unlocking Programs Temporarily
50
Using the Input Lock Feature
50
Using the Gametimer
51
Using the Control Panel Lock Feature
51
Setting the Sleep Timer
52
Setting the On/Off Timer
52
Displaying TV Status Information Using RECALL
53
Understanding the Auto Power off Feature
53
Understanding the Last Mode Memory Feature
53
Chapter 6: Using the Tv's Advanced Features
54
Using the Advanced Picture Settings Features
54
Using Dynamic Contrast
54
Using Cableclear ® Digital Noise Reduction
54
Using MPEG Noise Reduction
55
Selecting the Color Temperature
55
Selecting the Lamp Mode
55
Using the Game Mode Feature
56
Using the Advanced Audio Settings Features
56
Using the SRS WOW ™ Surround Sound Feature
56
Chapter 7: Using the THINC ™ Home Network Feature
57
Connecting the TV to Your Home Network
57
Setting up the Network Address
57
Automatically Setting up the Network Address
57
Manually Setting up the Network Address
58
Resetting the Network Address
59
Setting up File Sharing on Your PC
59
Compatible Operating Systems
59
Setting up File Sharing on a PC with Microsoft Windows XP Service Pack 1 or Service Pack
59
Setting up File Sharing on a PC with
59
Microsoft ® Windows ® 2000
60
Setting up File Sharing on the TV
61
About the Software Upgrade Feature
62
Viewing/Playing Shared Files on the TV
63
Media Specifications
63
Using the Picture Viewer
64
Using the Audio Player
66
Setting up E-Mail Scheduling
67
Required Information and Services
67
Setting up SMTP Authentication
69
Description of Fields in the "E-Mail Scheduling Setup" Window
71
Using E-Mail Scheduling
73
E-Mail Parameters
73
Sending a Request E-Mail to the TV
73
Formatting a Request E-Mail
73
Sample Request E-Mails
74
Receiving an E-Mail from the TV
75
Modifying an Existing Recording or Reminder
75
Chapter 8: Troubleshooting
76
General Troubleshooting
76
Home Network Troubleshooting
78
LED Indications
80
Troubleshooting
80
Chapter 9: Appendix
81
Lamp Unit Replacement and Care
81
Replacing the Lamp Unit (User-Replaceable Component)
81
When to Replace the Lamp Unit
81
How to Replace the Lamp Unit
82
Disposing of the Used Lamp Unit
83
Specifications
84
Limited United States Warranty
85
For DLP ™ Television Models
85
Limited Canada Warranty
86
For DLP ™ Television Models
86
Index
88
Advertisement
Toshiba 72HM196 - 72" Rear Projection TV Installation Manual (24 pages)
Integrated High Definition DLP Projection Television
Brand:
Toshiba
| Category:
Projection TV
| Size: 1.7 MB
Table of Contents
Lamp Unit Replacement
2
Safety Precautions
2
Important Safety Instructions
3
Installation, Care, and Service
3
Welcome to Toshiba
5
Terminal Specifications for DLP™ Projection Televisions
5
Table of Contents
6
Connecting Your TV
7
Overview of Cable Types
7
About the Connection Illustrations
8
Connecting a Digital Cablecard
8
Connecting a VCR and Antenna or Cable TV (no Cable Box)
9
Connecting a VCR and Cable Box
10
Connecting a DVD Player with Colorstream
11
Receiver
11
Connecting a VCR with S-Video and a Cable Box
12
Connecting an HDMI™ or DVI Device to the HDMI Input
13
Connecting a Device to the IR out Infrared Terminal Using the IR Blaster Cable for IR Pass-Through Device Control
14
Connecting an IR Receiver/Repeater Control System to the IR in Infrared Terminal
15
Connecting a Camcorder
15
Connnecting a Digital Audio System
16
Connecting an Analog Audio System
16
G-LINK™ Connection
17
Connecting a Personal Computer (PC)
18
Connecting a Home Network
19
Index
21
Toshiba 72HM196 - 72" Rear Projection TV Specification (2 pages)
72" (measured diagonally) INTEGRATED HDTV DLP (1080p)
Brand:
Toshiba
| Category:
Projection TV
| Size: 0.09 MB
Advertisement
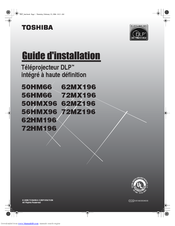
(French) Toshiba 72HM196 - 72" Rear Projection TV Manual D'installation (24 pages)
Téléprojecteur DLP intégré à haute définition
Brand:
Toshiba
| Category:
Projection TV
| Size: 2.79 MB
Table of Contents
Remplacement de la Lampe
2
Instructions Importantes Sur la Sécurité
3
Installation, Entretien Et Service Après-Vente
3
Bienvenue À Toshiba
5
Spécifications des Connecteurs des Téléprojecteurs DLP
5
Table of Contents
6
Raccordement du Téléviseur
7
Aperçu des Types de Câbles
7
Au Sujet des Illustrations de Raccordement
8
Raccordement D'une Carte Cablecard™ Numérique
8
Raccordement D'un Magnétoscope Et D'une Antenne Ou D'une Câblodistribution (Aucun Décodeur Câble)
9
Raccordement D'un Magnétoscope Et D'un Décodeur Câble
10
Raccordement D'un Lecteur DVD Avec Colorstream ® (VIDéo À Composante), D'un Magnétoscope Et D'un Récepteur Satellite
11
Raccordement D'un Magnétoscope Muni de S-VIDéo Et D'un Décodeur Câble
12
Raccordement D'un Appareil HDMI™ Ou DVI À L'entrée HDMI
13
Raccordement D'un Appareil Au Connecteur Infrarouge IR out À L'aide du Câble IR Blaster Pour Commander un Appareil D'intercommunication IR
14
Raccorder Une Commande de Récepteur/Répéteur IR Au Connecteur Infrarouge IR in
15
Raccorder un Caméscope
15
Raccordement D'un Système Audio Numérique
16
Raccordement D'un Système Audio Analogique
16
Raccordement G-LINK
17
Raccordement D'un Ordinateur Personnel (PC)
18
Raccordement D'un Réseau Domestique
19
Index
21
Advertisement
Related Products
Toshiba 72HM195
Toshiba 72CM9UA
Toshiba 72MX196 - 72" Rear Projection TV
Toshiba 72CM9UE
Toshiba 72MZ196
Toshiba 72MX195
Toshiba e-STUDIO 720
Toshiba Portege 7200CT
Toshiba Portege 7200CTe
Toshiba Portege 7220CTe
Toshiba Categories
Laptop
Air Conditioner
TV
LCD TV
All in One Printer
More Toshiba Manuals
Login
Sign In
OR
Sign in with Facebook
Sign in with Google
Upload manual
Upload from disk
Upload from URL