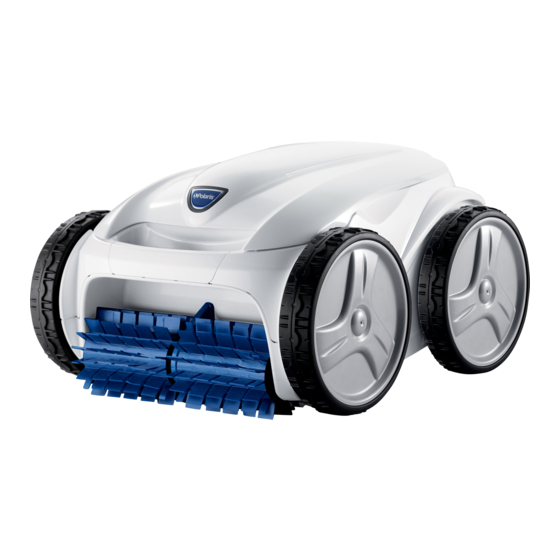
Polaris 9350 Sport Owner's Manual
Hide thumbs
Also See for 9350 Sport:
- Owner's manual (72 pages) ,
- Owner's manual (72 pages) ,
- Quick start manual (2 pages)
Table of Contents
Advertisement
Advertisement
Table of Contents
Troubleshooting

Related Manuals for Polaris 9350 Sport


Summary of Contents for Polaris 9350 Sport
-
Page 2: Table Of Contents
(9450 Sport/P945 and 9550 Sport/P955) ..23 THANK YOU FOR PURCHASING THE POLARIS CLEANER. YOUR POLARIS ROBOTIC CLEANER HAS BEEN DESIGNED AND MANUFACTURED TO BE EASILY INSTALLED AND TO PROVIDE LOW MAINTENANCE OPERATION. PRIOR TO INSTALLING YOUR NEW POLARIS CLEANER, PLEASE DO THE FOLLOWING: Complete and return the warranty card. - Page 3 Page 3 FCC Statement This device complies with Part 15 of the FCC Rules and IC licence-exempt RSS standard. Operation is subject to the following two conditions: (1) this device may not cause harmful interference, and (2) this device must accept any interference received, including interference that may cause undesired operation. NOTE: This equipment has been tested and found to comply with the limits for a Class B digital device, pursuant to part 15 of the FCC Rules.
-
Page 4: Section 1. Important Safety Instructions
• Do not bury cord. Locate cord so as to prevent it from being damaged by lawn mowers, hedge trimmers and other equipment. • To reduce the risk of electrical shock, do not use the Polaris robotic cleaner or control unit if the cord is worn or damaged. Contact Zodiac Pool Systems, Inc. -
Page 5: Section 2. Cleaner Speciications
(three-prong) cord/plug. Unscrew the handnut from the base unit (Figure 2). Section 3. Assembly Unpacking The packaging should contain the following items: • Polaris cleaner • Control unit • Remote Control (9550 Sport/ P955 only) • Transport and storage caddy assembly components (Figure 1) (a) handle frame (b) support blocks (x 2) - Page 6 Page 6 Push base unit down (Figure 3) so the metal handle frame is seated in the recess on the underside of the base. Figure 5. Snap in Support Blocks and Attach Wheels Slide the control unit base / caddy handle attachment down over the metal tubing until it snaps into place.
-
Page 7: Connecting The Control Unit To The Caddy
Page 7 Align cleaner hook pins with the top holes in the handle tube and snap into place (Figure 7). Figure 7. Snap Cleaner hook into Place Figure 9. Fully Assembled Transport Caddy Locate pin on the remote (9550 Sport/P955) Connecting the Control Unit to the control holder and align it with the recepticle Caddy... -
Page 8: Connecting To Power Source
Page 8 Figure 12. Remove Protective Cap Figure 11. Attach the Control Unit onto Caddy Connecting to a Power Source WARNiNg Failure to comply with the following warnings can result in permanent injury, electrocution or drowning. PREVENT ELECTRiCAL ShOCk • U.S.: Per NEC ®... -
Page 9: Section 4. Operation
(Figure 17). selected cycle is displayed. The Polaris robotic cleaner includes a safety feature that automatically stops the cleaner if it is powered on but not submerged in water. For pools equipped with a... -
Page 10: The Polaris 9350/P935 Cleaner Control Unit
Pool Cleaner Error indicator Start/Stop Cleaner Operation Select Cleaning Surface • Bottom • Bottom and Sides The Polaris 9450 Sport/P945 Cleaner Control Unit Navigate Day/hour Display Current Time/ Set Time Validate Time Setting Selection Program Cleaning Cycles / Set Time... -
Page 11: The Polaris 9550 Sport/P955 Cleaner Control Unit
• Bottom and Sides • Waterline only Starting the Cleaner Select Pool Shape (9550 Sport/P955 only): The default cleaning surface setting for the Polaris cleaners is Bottom Surface . To change the to choose pool shape. current programmed cycle, see Section 5. Programming the Cleaner. -
Page 12: Stopping The Cleaner And Removing From The Pool
Operating the Cleaner with the and Removing from the Pool Remote Control ( 9550 Sport/P955 only The Polaris 9550 Sport and P955 robotic cleaner comes The automated Lift System makes removing the cleaner from the pool simple. The Lift System will move the with a handheld remote control stored on the cleaner cleaner toward the edge of the pool then drive it to the caddy next to the control unit. -
Page 13: Synchronizing The Remote Control
Page 13 • To remove the cleaner from the pool using the remote control, press (see Figure 20). The cleaner rotates left until you release the Lift System button. Synchronizing the Remote Control Even though the remote control is factory-synchronized to your cleaner's control unit, it may be necessary to synchronize again if you need to replace either the control unit or the remote control. -
Page 14: Section 5. Programming The Cleaner
Page 14 Section 5. Programming the NOTE: Control unit is set to display time in 24-hour clock format. Time setting will cycle through 1-24. Cleaner Press (9450 Sport/P945 and 9550 Sport/P955 only) to select. You can program up to seven preset cleaning cycles to run the cleaner on a speciic day and time when you are away from the pool. -
Page 15: Programming Cleaning Cycles
Page 15 Programming Cleaning Cycles You can program up to seven cleaning cycles. Press to select. Program cleaning for either seven consecutive cycles or the same cycle repeated over several weeks (e.g., every Wednesday and Saturday for three weeks). Choose pool cleaning settings to program. Minutes setting lashes zero. -
Page 16: Section 6. Cleaning And Maintenance
Page 16 Section 6. Cleaning and and hold for 3 to 5 seconds to Press Maintenance delete programming for the selected day. Press to exit. WARNiNg To avoid electric shock and other hazards which To Cancel All Programs: could result in permanent injury or death, disconnect (unplug) the cleaner from the power source before performing any cleaning and maintenance. -
Page 17: Cord Tangling
Page 17 Figure 28. Wash Filter Canister Figure 25. Remove Filter Canister Assembly Push the quick release button on the canister assembly (4) and pull open the ilter assembly 6.2. Cord Tangling (5), as shown in Figure 26. Figure 26. Open Filter Canister Assembly iMPORTANT Separate the ilter canister from the ilter Cleaner power cable may become tangled if correct support (6), as shown in Figure 27. -
Page 18: Replacing The Brushes
Page 18 After every cleaning cycle: Replacing the Brushes The cleaner is itted with PVC brushes. There are ''wear'' indicators on the brushes (Figure 29). To maintain cleaner performance at its best you need to replace the brushes as soon as one of the wear indicators is reached (even if the blade wear is not even). -
Page 19: Replacing The Tires
Page 19 Figure 31. Undo the Tabs of the Brush Figure 34. Cut Tabs To install a new brush, position the new Repeat this procedure to install the second brush on the roller with the spikes facing brush. downwards (Figure 32). Replacing the Tires Pull on the inside of the old tire to remove the tire lip from the wheel (Figure 35). -
Page 20: Section 7. Spare Parts
(Figure 38). Section 7. Spare Parts The complete spare parts list and exploded view is available on the Polaris website at www.polarispool.com. In Canada, parts list and exploded view is available at www.polarispool.ca Figure 38. Start on One Side of the Tire... -
Page 21: Section 8. Troubleshooting
Turn cleaner wheels to ensure they are not jammed. interval Check brushes for debris. Start a new cleaning cycle. If the problem persists, contact Polaris Technical Support at (USA) 1-800-822-7933. LED lashes three times with one Check the pump axis for debris. -
Page 22: General Troubleshooting
If the indicator light is not lit, turn the wheels then disconnect the control unit and wait at least 20 seconds before reconnecting. If the problem persists, contact Polaris Technical Support at (USA) 1-800-822-7933. Cable is tangling in the pool Too much cable length in the water. -
Page 23: Control Unit Error Codes (9450 Sport/P945 And 9550 Sport/P955)
• If problem is not resolved through troubleshooting, contact Polaris Technical Support at (USA) 1-800-822-7933. • Pump motor overconsumption Check for small debris or hair in the fan. - Page 24 Zodiac Pool Systems, Inc. 2620 Commerce Way, Vista, CA 92081 1.800.822.7933 | www.ZodiacPoolSystems.com Zodiac Pool Systems Canada, Inc. 2115 South Service Road West, Unit 3 Oakville, Ontario • Canada L6L 5W2 1.888.647.4004 | www.ZodiacPoolSystems.ca ® ZODIAC is a registered trademark of Zodiac International, S.A.S.U., used under license. All trademarks referenced herein are the property of their respective owners.