Table of Contents
Advertisement
Quick Links
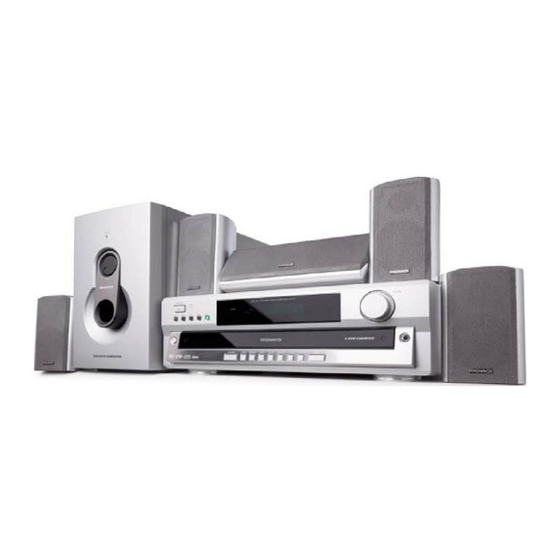
Front Speaker
(Right)
Passive
Subwoofer
Rear Speaker
(Surround Right)
PUSH
OUT
2
1
PUSH
IN
Connecting Speaker Cable
... then play
(see next page)
MRD300
Front Speaker
(Left)
Center Speaker
Rear Speaker
(Surround Left)
MAGNAVOX
S M A R T . V E R Y S M A R T .
First connect ...
Rear of TV
(example only)
Helpful Hints
To obtain a better picture quality effect, you can
choose to connect an extra video connection if
your TV has the same input connector: A or B.
Use this
If your TV has
video cable(s)
this video input jack(s)
A
COMPONENT VIDEO IN
not supplied
S-VIDEO
B
When listening to TV programs, press TV•AUX button at the front panel
of the DVD system to select 'AUDIO IN-TV' in order for the sound to be
heard.
For connecting to a VCR, see page 9 in the owner's manual for more details.
FM Antenna
If your TV has only
a single Antenna In
jack, you will need an
ANTENNA IN
accessory RF
modulator. The RF modulator
converts the video from the
DVD system so it can play
through the TV's Antenna
connector. Refer to your
owner's manual for proper
connection (refer to page 9 in
IN
the owner's manual.)
Printed in China
AM Loop
Antenna
Advertisement
Table of Contents

Related Manuals for Magnavox MRD300


Summary of Contents for Magnavox MRD300
- Page 1 MRD300 Front Speaker (Right) Center Speaker Passive Subwoofer Rear Speaker (Surround Right) PUSH PUSH Connecting Speaker Cable ... then play (see next page) MAGNAVOX First connect ... Front Speaker Rear of TV (Left) (example only) Rear Speaker Helpful Hints (Surround Left)
-
Page 2: Playing A Disc
STANDBY POWER ON•OFF DVD VIDEO DIGITAL SURROUND SYSTEM iR SENSOR DISC 1 DISC 2 DISC 3 DISC 4 DISC 5 5 D I S C D I R E C T P L AY OPEN•CLOSE PROGRESSIVE STOP SCAN TUNER•BAND TV•AUX MUTE SELECT Make sure your DVD system and... - Page 3 S M A R T . V E R Y S M A R T . MRD300 DVD VIDEO DIGITAL SURROUND SYSTEM Need help? Call us! Return Magnavox representatives are ready to help you with any your Warranty questions about your new product. We can guide you Registration Card within 10 days through Connections, First-time Setup, or any of the Features.
- Page 4 As a member of the Magnavox “family,” you’re entitled to protection by one of the most comprehensive warranties and outstanding service networks in the industry.
- Page 5 Index English -------------------------------------------------------- 6 Español ------------------------------------------------------ 31 NDEX...
-
Page 6: Important Safety Instructions
IMPORTANT SAFETY INSTRUCTIONS Read these instructions. Keep these instructions. Heed all warnings. Follow all instructions. Do not use this apparatus near water. Clean only with dry cloth. Do not block any ventilation openings. Install in accordance with the manufacturer´s instructions. Do not install near any heat sources such as radiators, heat registers, stoves, or other apparatus (including amplifiers) that produce heat. -
Page 7: Important Notes
Canada English: This digital apparatus does not exceed the Class B limits for radio noise emissions from digital apparatus as set out in the Radio Interference Regulations of the Canadian Department of Communications. Manufactured under license from Dolby Laboratories. “Dolby”. “Pro-Logic” and the double-D symbol are trademarks of Dolby Laboratories. -
Page 8: Table Of Contents
Contents Introduction and General Information Features ... 7 Supplied accessories ... 7 Environmental information... 7 Installation ... 7 Maintenance ... 7 Connections Step 1: Connecting antennas ... 8 AM Indoor Loop Antenna ... FM Indoor Antenna ... Step 2: Connecting the speakers and passive subwoofer ... -
Page 9: Introduction And General Information
Introduction and General Information Features Your complete 7-piece 300-Watt DVD Digital Home Cinema System creates the same dynamic sound qualities that you find in full-fledged cinemas and incorporates some of the best features in home theater technology. Features include: Built-in Dolby Digital decoder, supporting Dolby ProLogic Use the Home Cinema Audio System for a movie-theater... -
Page 10: Connections
Connections Front Speakers (Right) Center Speaker Passive Subwoofer Rear Speakers (Surround Right) IMPORTANT! – Before connecting the AC power cord to the wall outlet, ensure that all other connections have been made. – Never make or change any connections with the power switched on. -
Page 11: Connecting A Tv
Step 3: Connecting a TV IMPORTANT! – There are various ways to connect the system to a TV (as shown in the illustration,) it depends on the capabilities of your TV system. – The progressive scan video quality is only possible through Pr/Cr Pb/Cb Y output and a progressive scan TV is required. -
Page 12: Functional Overview
Functional Overview Front panel STANDBY POWER ON•OFF DISC 1 DISC 2 DISC 3 DISC 4 DISC 5 5 D I S C D I R E C T P L AY OPEN•CLOSE 1 2 3 POWER ON•OFF y – to switch between power on and standby modes. 5 DISC DIRECT PLAY (DISC 1~5) –... -
Page 13: Remote Control
Remote Control SOURCE SLEEP >10 MUTE SELECT DISPLAY MENU OPEN/ CLOSE SET UP PREV PLAY/PAUSE NEXT í ë É Å STOP à Ç á TITLE ANGLE ZOOM GOTO LANGUAGE SUBTITLE REPEAT SHUFFLE PROGRAM DISC SKIP DISC NO SLOW/MEM CD MODE ST/MONO LISTENING AUDIO Notes for remote control:... -
Page 14: Remote Control
Numeric Keypad (0-9, >10) – to enter a track/title number of the disc. – to enter a number of preset radio stations. ¡ MUTE – to interrupt or resume sound reproduction. ™ DISPLAY – to switch on or off the On Screen Display on the TV. £... -
Page 15: Preparations
Inserting batteries into the remote control Open the battery compartment. Place the batteries in the compartment with the correct polarity as indicated by “+“ and “-“ symbols. Close the cover. CAUTION! – Remove batteries if they are exhausted or will not be used for a long time. -
Page 16: Changing The Speakers' Sound Level
Changing the speakers’ sound level You can change the speakers’ sound distribution to suit your surround sound needs. For example, if you are close to the left front speaker than the right front speaker, the left front speaker might seem “louder” than the right one. To adjust it, you must change the channel level for one or both speakers until the sound evens out. -
Page 17: Selecting The Type Of Video Output
Selecting the type of video output This setting is used to select the type of video connection between your DVD system and TV. Press SETUP. SETUP MENU - - MAIN PAGE GENERAL SETUP Select ‘GENERAL SETUP, ’ SPEAKER SETUP AUDIO SETUP then press OK. -
Page 18: Selecting The Language For Audio/Subtitle/Disc Menu
Selecting the language for Audio/Subtitle/ Disc Menu You can select your preferred language settings so that this DVD system will automatically switches to the language for you whenever you load in a disc. If the language selected is not available on the disc, the disc’s default setting language will be used instead. -
Page 19: Changing The Sound Channel
Changing the sound channel Digital mode only) Press SETUP. SETUP MENU - - MAIN PAGE GENERAL SETUP Press 4 to select ‘AUDIO SPEAKER SETUP AUDIO SETUP SETUP,’ then press OK. PREFERENCES Press 4 to select ‘DUAL EXIT SETUP MONO’, then press 2. DIGITAL OUT DUAL MONO DYNAMIC... -
Page 20: Setting The Parental Control Level
Setting the parental control level This feature lets you set a playback limitation level. Some DVDs may have a parental level assigned to the complete disc or to certain scenes on the disc. The rating levels are from 1 to 8 and are country dependent. You can prohibit the playing of certain discs that are not suitable for your children or have certain discs played with alternative scenes. -
Page 21: Disc Operations
IMPORTANT! – DVD discs and players are designed with regional restrictions. Before playing a disc, make sure the disc is for the same zone as your player. – Depending on the DVD or VIDEO CD, some operations may be different or restricted. –... -
Page 22: Resuming Playback From The Last Stopped Point (Dvd Only)
Resuming playback from the last stopped point (DVD only) G In stop mode and when a disc has not been ejected, press ÉÅ. To cancel the resume mode G In stop mode, press Ç again. Helpful Hints: – When the player is disconnected from the power supply or the disc tray is opened, the resume option will be cancelled automatically. -
Page 23: Changing The Audio/Subtitle Language For The Current Disc Only
Changing the audio/subtitle language for the current disc only G Press LANGUAGE to change the audio language and SUBTITLE to change the subtitle language from the selection available on the disc. ➜ The changes are only applied to the current disc, it will not change the default preset (see “Selecting the language for Audio/Subtitle/Disc Menu”.) Viewing from another angle... -
Page 24: Shuffle Play Mode
Shuffle play mode You can playback CD tracks in random order. To shuffle play one CD: Stop playback. Press SHUFFLE to turn on shuffle function. ➜ “SHUFFLE ON” is briefly displayed. Press É Å to start shuffle play. To cancel shuffle play, press Ç twice. To shuffle play all CDs: G Stop playback and press CD MODE, then follow the above steps 2-4. -
Page 25: Radio Reception
Tuning to radio stations Press POWER ON•OFF to switch on the last selected source. Press TUNER•BAND (or press SOURCE on the remote control repeatedly) to select TUNER mode. Press TUNER•BAND again to select the desired band : FM or AM. Press and hold S or T (or í... -
Page 26: Other Functions
Other Functions Volume control Adjust VOLUME button (or press VOL +/-) to increase or decrease the volume level. To listen through the headphones G Connect the headphones plug to the PHONES n socket at the front of the DVD system. ➜... -
Page 27: Specifications
AMPLIFIER SECTION Output power ... 300 W - Stereo mode (DIN) ... 2 x 50 W RMS ... 2 x 40 W FTC Total Harmonic Distortion ... 10% at rated power (1 kHz) Frequency Response ... 180 Hz – 14 kHz / ±1 dB Signal-to-Noise Ratio ... -
Page 28: Troubleshooting
Troubleshooting WARNING! Under no circumstances should you try to repair the system yourself, as this will invalidate the warranty. Do not open the system as there is a risk of electric shock. If a fault occurs, first check the points listed below before taking the system for repair. If you are unable to solve a problem by following these hints, consult your dealer or call 1800-705-2000. -
Page 29: Glossary
Analog: Sound that has not been turned into numbers. Analog sound varies, while digital sound has specific numerical values. These jacks send audio through two channels, the left and right. Aspect ratio: The ratio of vertical and horizontal sizes of a displayed image. -
Page 30: Limited Warranty
WHERE IS EXCHANGE AVAILABLE? You may exchange the product in all countries where the prod- uct is officially distributed by Magnavox. In countries where Magnavox does not distribute the product, the local Magnavox service organization will attempt to provide a replacement product (although there may be a delay if the appropriate prod- uct is not readily available).