
Related Manuals for Magnavox MRD100


Summary of Contents for Magnavox MRD100
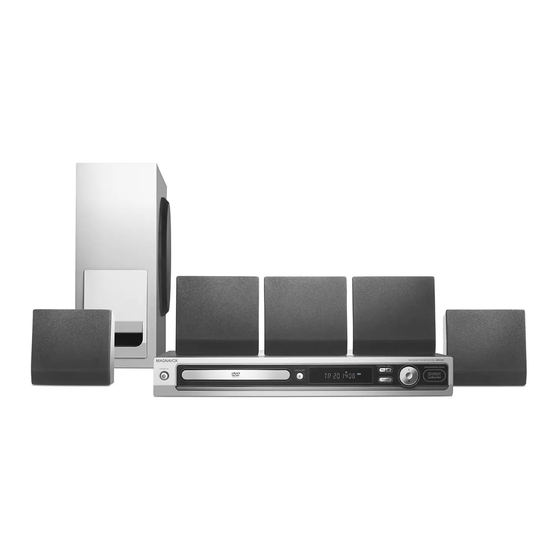
- Page 1 User Manual S M A R T . V E R Y S M A R T . User Manual Manual del usuario Manual do Usuário...
- Page 2 México Es necesario que lea cuidadosamente su instructivo de manejo. Descriptión: Reproductor de Disco de Video Digital Modelo: MRD100 Alimentacón: 110~127V/220~240V; 50~60Hz Consumo: Importador: Philips Mexicana, S.A. de C.V. Domicilio: Av. La Palma No. 6, Col. San Fernando, La Herradura Huixquilucan, Edo de Mexico C.P.
- Page 3 This product incorporates copyright protec- this information for future reference. tion technology that is protected by method claims of certain U.S. patents and other intel- Model No. MRD100 lectual property rights owned by Microvision Corporation and other rights owners. Use of Serial No. _______________...
- Page 4 Language Code...
- Page 5 Index English ------------------------------------ 6 Español ---------------------------------- 44 B. Português ---------------------------- 82...
-
Page 6: Table Of Contents
Table of contents General General Information ......................8 Setup precautions ..............................8 Accessories supplied ............................8 Cleaning discs ................................8 About recycling ..............................8 Product Overview Main Unit ........................... 9 Remote Control ......................10-12 Using the remote control ..........................12 Connections Basic Connections .....................13-17 Step 1 : Placing the speakers ...........................13 Step 2 : Connecting to the speakers and subwoofer ................14 Step 3 : Connecting to TV ..........................15 Option 1: Using composite video jack (CVBS) .................15... - Page 7 Table of contents Other playback features ..........................27 Using the Disc Menu ..........................27 Using the Title Menu ..........................28 Viewing playback information ......................... 28 Resuming playback from the last stopped point ................28 Zooming in ..............................28 Changing subtitle language (DVD only) ....................28 Changing sound track language .......................29 Switching camera angles ...........................29 Playing an MP3/ JPEG disc ........................
-
Page 8: General Information
General Information CAUTION! Accessories supplied The machine does not contain any user-serviceable parts. Please leave – 1 passive subwoofer all maintenance work to qualifi ed – 4 satellite speakers personnel. – 1 center speaker – 1 remote control with batteries –... -
Page 9: Main Unit
Main Unit 5 6 7 8 Ç (STOP) STANDBY ON 2 – Exits an operation. – Turns on the system or turns off to – DISC: stops playback or clears programed standby mode. track. – TUNER: erase the current preset radio Disc tray station. -
Page 10: Remote Control
Remote Control PLAY/PAUSE u – DISC: starts/pause playback. STOP Ç – Exits an operation. – DISC: stops playback or clears programed track. – TUNER: erase the current preset radio station. DISC MENU – For DVD, enter or exit disc contents menu. - Page 11 Remote Control (continued) OPEN/CLOSE ç – Open or close the disc tray. REW m / FFWD M – DISC: fast backward and forward search. – TUNER: tune the radio frequency down/ PREV í / NEXT ë – DISC: direct access the previous/next chapter or track.
-
Page 12: Using The Remote Control
Remote Control (continued) CAUTION! Using the remote control – Remove batteries if they are exhausted or if the remote control is not to be used for a long time. – Do not mix batteries (old and new or carbon and alkaline, etc.). –... -
Page 13: Basic Connections
Basic Connections Helpful Hints: Step 1: Placing the speakers – The placement diagram shown here is only a guideline that will provide great system This Home Theater System is simple to performance. You may fi nd other placement install. However, proper system choices that are more suitable for your room placement is critical to ensure an layout and provide the sound experience you... -
Page 14: Step 2 : Connecting To The Speakers And Subwoofer
Basic Connections (continued) FRONT FRONT RIGHT LEFT CENTER SUBWOOFER REAR REAR LEFT RIGHT Step 2: Connecting the speakers and subwoofer Connect all the speakers and subwoofer to the speaker jacks at the rear of the DVD system. Make sure that the colors of the plugs and jacks are matched. -
Page 15: Step 3: Connecting To Tv
Basic Connections (continued) Option 1 Option 1: Using Composite Video Step 3: Connecting to TV jacks (CVBS) This connection enables you to view the Use the supplied composite video cable playback from this DVD system. You (yellow) to connect the VIDEO OUT only need to choose one of the options jack on the DVD system to the video below to make your video connection. -
Page 16: Option 2: Connecting To A Progressive Scan Tv Or Component Video Input
Basic Connections (continued) fi x the claw into the slot AM loop antenna Option 2 FM wire antenna Option 2: Connecting to a Step 4: Connecting the FM/ Progressive Scan TV or component AM antennas video input The progressive scan video quality is only Connect the supplied AM loop antenna available when using Y Pb Pr connection to the AM jack. -
Page 17: Step 5: Connecting The Power Cord
Basic Connections (continued) ~ AC MAINS Step 5: Connecting the power cord After everything is connected properly, plug the AC power cord into the power outlet. The LED on the DVD system will light up. Never make or change any connections with the power turned on. -
Page 18: Optional Connections
Optional Connections DIGITAL OUT S-VIDEO AUDIO SCART IN VIDEO IN ~ AC MAINS VCR or Cable/ Satellite Box Connecting audio from an Connecting digital audio analog audio/video device equipment You can connect the audio output from Use a coaxial cable (not supplied) to an analog audio/video device (e.g. -
Page 19: Getting Started
Getting Started Step 1: Turning on the DVD Step 2: Finding the correct system viewing channel Press STANDBY ON (2). Before you start ... Make sure you have completed all the Press the SOURCE button on the front necessary connections before proceeding. panel repeatedly to select : DISC AM .. -
Page 20: Step 3: Setting Language Preferences
Getting Started (continued) Audio, Subtitle and Menu language Step 3: Setting language for DVD playback preferences You can select your preferred language settings for DVD playback. If the The language options are different selected language is recorded on the depending on your country or region. It DVD disc, the DVD system will may not correspond to the illustrations automatically play the disc in that... -
Page 21: Step 4: Setting The Tv
Getting Started (continued) Helpful Hints: Step 4: Setting the TV – During DVD playback, you can switch the audio and subtitle languages by pressing the AUDIO and SUBTITLE buttons on the Selecting the matching color remote control. However, this does not system change the default settings you have made The color system of the DVD system,... -
Page 22: Setting The Tv Display
Getting Started (continued) { PAL } Setting the TV Display Select this if the connected TV has the Set the aspect ratio of the DVD system PAL color system. It will change the video according to the TV type you have signal of an NTSC disc and output it to connected. -
Page 23: Step 5: Setting Up Progressive Scan Feature
Getting Started (continued) Step 5: Setting up Progressive Scan feature (for Progressive Scan TV only) The progressive scan displays twice the number of frames per second than interlaced scanning (ordinary normal TV Read the notifi cation message on the TV system). -
Page 24: Step 6: Setting The Speakers' Channels
Getting Started (continued) { REAR DELAY } Step 6: Setting the speakers’ Select this to set the delay time in channels relation to the listening position/distance from the rear speakers (15ms, 12ms, You can adjust the delay times (center 9ms, 6ms, 3ms or OFF). and rear only) and volume level (center, keys to set the delay times rear and subwoofer) for individual... -
Page 25: Disc Operations
Disc Operations IMPORTANT! Playable discs – If the inhibit icon ( ) appears on the TV screen when a button is pressed, it means the function is not available on the current disc or at the current time. – Do not put any objects other than discs on the disc tray. -
Page 26: Basic Playback Controls
Disc Operations (continued) Basic playback controls Selecting various repeat functions Pausing playback During playback, press u. Repeating play mode To resume playback, press u again. While playing a disc, press REPEAT on Selecting another track/chapter the remote control repeatedly to choose Press í... -
Page 27: Programming Disc Tracks
Disc Operations (continued) Programming disc tracks Other playback features (for audio CDs and VCDs) You can play the contents of the disc in the order you want by programming the playing order of the tracks. Up to 99 tracks can be stored. Stop playback, press PROGRAM on the remote control. -
Page 28: Using The Title Menu
Disc Operations (continued) Using the Title Menu Resuming playback from the last stopped point While playing a DVD disc, press TITLE When play is stopped and the disc has to display the title menu. not been ejected, Press u to resume keys or numeric playback from the last stopped point. -
Page 29: Changing Sound Track Language
Disc Operations (continued) Changing sound track language Playing an MP3/ JPEG disc This operation works only on DVDs with multiple soundtrack languages, you can This DVD system can playback most of change the language you want while the MP3 and JPEG fi les recorded on a playing a DVD. -
Page 30: Zoom Picture
Disc Operations (continued) During playback, you can; Playing MP3 music and JPEG Press í / ë to playback previous/next pictures simultaneously track/fi le in the current folder. Press m / M to fast reverse/forward You can create a musical slide show if the search for a music track. -
Page 31: Dvd Setup Menu Options
DVD Setup Menu Options SUBTITLE Using the menu bar Select a subtitle language that is available on the DVD. LANGUAGE You can continue a number of operations DVD: Select an audio soundtrack language that is available on the DVD. directly via the multiple menu bars on the VCD: Select an audio channels: LEFT VOCAL, RIGHT TV screen without interrupting the disc VOCAL, MONO LEFT, MONO RIGHT or STEREO. -
Page 32: Accessing The Dvd Setup Menu
DVD Setup Menu Options (continued) Accessing the DVD setup menu Picture Setup This DVD system setup is carried out via see page 33 the TV, enabling you to customize the DVD system to suit your particular requirements. GO TO PICTURE SETUP PAGE Sound SETUP Setup... -
Page 33: Picture Setup Page
DVD Setup Menu Options (continued) Picture Setup page (underlined options are the factory default settings) TV SHAPE The picture shape can be adjusted to fi t your TV. { 4:3 PS } – For a full-height picture with the sides trimmed. { 4:3 LB } –... -
Page 34: Sound Setup Page
DVD Setup Menu Options (continued) Sound Setup Page (underlined options are the factory default settings) This mode optimizes playback of sound at low volume. High NIGHT MODE volume outputs will be softened and low volume outputs will be enhanced to an audible level. This feature is only applicable for DVD video discs with Dolby Digital mode. -
Page 35: English
DVD Setup Menu Options (continued) Feature Setup Page (underlined options are the factory default settings) This is to prohibit viewing of discs that had exceeded the limits PARENTAL you set. It works only on the DVDs with parental level assigned to the complete disc or to certain scenes on the disc. -
Page 36: Tuner Operations
Tuner Operations IMPORTANT! Using auto install Make sure the FM and AM antennas This feature is only applicable for fi rst are connected. time radio station programming. You will be prompted to install the radio stations when you access the tuner mode. With Tuning to radio stations one touch of button, all the available radio stations will be stored... -
Page 37: Using Automatic Preset
Tuner Operations (continued) Using automatic preset Selecting a preset radio Use automatic presetting to store or station reinstall all the preset radio stations. Press TUNER to select “FM” or “AM” band. or í / ë keys to select a preset radio stations. The preset number followed by waveband and radio frequency will appear on the display panel. -
Page 38: Sound And Volume Controls
Sound and Volume Controls Selecting digital sound effects Select a preset digital sound effect that matches your disc’s content or that optimizes the sound of the musical style you are playing. VOLUME MUTE Press SOUND to select the available sound effect. SURROUND When playing movie discs or in TV mode, SOUND... -
Page 39: Other Features
Other Features Controlling ‘PHILIPS’ TV Dimming system’s display with the remote control screen This DVD system’s remote control In any active mode, press DIM on the enables you to control the basic functions remote control to select desired of your ‘PHILIPS’ brand TV. brightness: HIGH, MID or LOW. -
Page 40: Troubleshooting
Troubleshooting WARNING Under no circumstances should you try to repair the system yourself, as this will invalidate the warranty. Do not open the system as there is a risk of electric shock. If a fault occurs, fi rst check the points listed below before taking the system for repair. If you are unable to solve a problem by following these instructions, consult your dealer for help. - Page 41 Troubleshooting (continued) Problem (Playback) Solution The remote control does not – Select the source you want to play (for example, function properly. DISC or TUNER) before pressing the function button ( , m / M). – Reduce the distance between the remote control and the system.
-
Page 42: Glossary
Glossary Analog: Sound that has not been turned JPEG: A very common digital still picture into numbers. Analog sound varies, while format. A still picture data compression digital sound has specifi c numerical values. system proposed by the Joint Photographic These jacks send audio through two Expert Group, which features a small channels, the left and right. -
Page 43: Specifi Cations
Specifi cations AMPLIFIER MAIN UNIT Output power: 100 W Power Supply Rating: 110–127 V / 220–240 V; - Front : 15 W / channel 50-60 Hz - Rear: 15 W / channel Power Consumption: 35 W - Center : 15 W RMS Dimensions: 360 x 48 x 339 (mm) - Subwoofer:...