Table of Contents
Advertisement
Downloaded from Caradio-Manual.com Manuals
®
Bluetooth
CD/USB/MP3/WMA RECEIVER
LECTEUR CD/USB/MP3/WMA Bluetooth
®
Bluetooth
-CD/USB/MP3/WMA-RECEIVER
SINTOLETTORE CD/USB/MP3/WMA Bluetooth
®
Bluetooth
CD/USB/MP3/WMA-ONTVANGER
RECEPTOR Bluetooth
®
Bluetooth
CD/USB/MP3/WMA-RECEIVER
ODTWARZACZ CD/USB/MP3/WMA
z interfejsem Bluetooth
CD/USB/MP3/WMA ΔΕΚΤΗΣ
®
Bluetooth
®
CD/USB/MP3/WMA
®
®
®
Advertisement
Chapters
Table of Contents

Related Manuals for Clarion CZ301E


Summary of Contents for Clarion CZ301E
- Page 1 ® Bluetooth CD/USB/MP3/WMA RECEIVER ® LECTEUR CD/USB/MP3/WMA Bluetooth ® Bluetooth -CD/USB/MP3/WMA-RECEIVER ® SINTOLETTORE CD/USB/MP3/WMA Bluetooth ® Bluetooth CD/USB/MP3/WMA-ONTVANGER RECEPTOR Bluetooth ® CD/USB/MP3/WMA ® Bluetooth CD/USB/MP3/WMA-RECEIVER ODTWARZACZ CD/USB/MP3/WMA ® z interfejsem Bluetooth CD/USB/MP3/WMA ΔΕΚΤΗΣ ® Bluetooth Downloaded from Caradio-Manual.com Manuals...
- Page 2 CAUTIONS: OBS! Apparaten innehåller laserkomponenten som This appliance contains a laser system and is classified as a “CLASS 1 LASER avger laserstrålning överstigande gränsen för PRODUCT“. To use this model properly, read laserklass 1. this Owner’s Manual carefully and keep this manual for your future reference.
-
Page 3: Table Of Contents
Contents Thank you for purchasing this Clarion product. • Please fully read this owner’s manual before operating this equipment. • Check the contents of the enclosed warranty card and store it in a safe place with this manual. 1. FEATURES ........................3 Expanding Systems ...................... -
Page 4: Features
1. FEATURES ® Built-in Bluetooth Hands free(HFP) and Audio Streaming(A2DP & AVRCP) Front-panel auxiliary input and 2ch RCA output with Subwoofer Control MP3/WMA compatible with ID3-TAG display Expanding Systems Expanding audio features 2 Channel Amplifier USB Memory (Connect via CCA-755) Portable Player (Connect via AUX IN Jack) Bluetooth... -
Page 5: Precautions
When the memorized data is lost or damaged by any chance, Clarion shall Front Panel / Generalities not be liable for any damage. When using an USB memory stick, we... -
Page 6: Remove The Dcp
Remove the DCP The control panel can be detached to prevent theft. When detaching the control panel, keep it in the safety place and prevent scratches. We recommend taking the DCP (DETACHABLE CONTROL PANEL) with you when leaving the car. 1. -
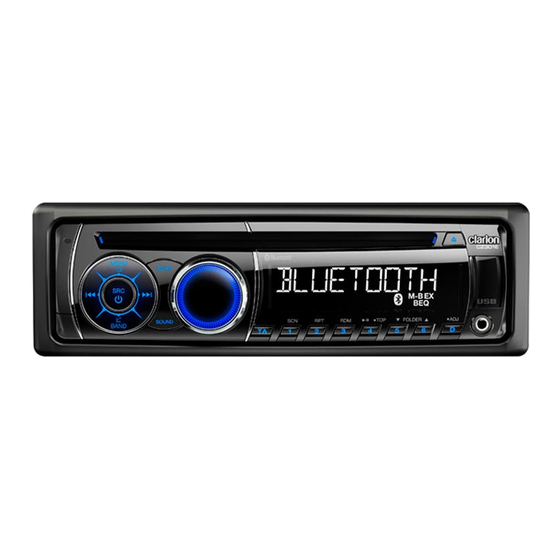
Page 7: Controls
3. CONTROLS Operational Panel USB connector Disc Slot [MIC] [MENU / [PS/AS] [TA] [SOUND] [BAND / [ D ] [1~6] [OPEN] [VOLUME] AUX Jack [ SRC / Names of Buttons [SRC / ] Button • Power/Toggle the audio source [VOLUME] Knob •... -
Page 8: Cautions On Handling
4. CAUTIONS ON HANDLING Handling Discs Handling Cleaning • New discs may have some roughness • To remove fingermarks and dust, use a around the edges. If such discs are used, soft cloth and wipe in a straight line from the player may not work or the sound may the center of the disc to the outer edge. -
Page 9: Operations
5. OPERATIONS Basic Operations Note: Volume adjustment • Refer to the diagrams in “3. CONTROLS” Turn the [VOLUME] knob on the front panel. when reading this chapter. The adjustable range of volume is 0 to 40. CAUTION CAUTION When the unit is turned on, starting and stopping the engine with its volume While driving, keep the volume level at raised to the maximum level may harm... -
Page 10: System Setup
System Setup At all mode, press and hold [ D ] button to SCROLL: ON/OFF enter system setup. Press [ ] or [ For track information that is longer than the button to select options, rotate the [VOLUME] display panel: knob to adjust. -
Page 11: Audio Setup
FM3, MW and LW. FM3, MW and LW can Note: store by AS function. Each bands can When a station is received, searching stops store 6 stations, CZ301E can store 30 and the station is played. stations in total. Preset scan... -
Page 12: Radio Data System Operations
Radio Operations [VOLUME] knob to select Local or Distant Recall the stored stations mode. Press one numeric button among 1 to 6 on the panel to select the corresponding stored station. Note: The number of radio stations that can be received will decrease after the local seeking Local seeking mode is on. -
Page 13: Selecting Pty
Radio Data System Operations * This function can only be used when PTY (Programme Type) “TP” appears in the display. When “TP” This function enables you to listen to a appears, this means that the “Radio Data broadcast of the selected programme type System”... -
Page 14: Cd/Mp3/Wma Operations
CD/MP3/WMA Operations This unit can play back MP3/ Logical format (File system) WMA files 1. When writing MP3/WMA file on a CD-R disc or CD-RW disc, please select Notes: “ISO9660 level 1, 2 or Joliet or Romeo” or • If you play a WMA file with active DRM Apple ISO as the writing software format. -
Page 15: Selecting A Track
CD/MP3/WMA Operations Listening to a disc already loaded Selecting a track in the unit Track-up 1. Press the [ ] button to move ahead to ] button to select the CD/ Press the [SRC / the beginning of the next track. MP3/WMA mode. - Page 16 CD/MP3/WMA Operations * When play back MP3 / WMA file, this 1. Press the [ 2 ] button once or more until function is performed in the current folder. “RPT ON” appears on the LCD to perform repeat play. Top function 2.
-
Page 17: Usb Operations
USB Operations 1. Push the cap of the USB connector to the right. Insert a USB cable (CCA-755) into the USB connector. Insert a USB device into the USB cable. When connecting a USB device, the unit will read the files automatically. 2. -
Page 18: Bluetooth Operations
Bluetooth Call History. audio players. 1. Rotate the [VOLUME] knob to select • Clarion cannot guarantee the “DIALLED”, “MISSED” or “RECEIVED”. compatibility of all mobile phones together 2. Press the [VOLUME] knob to enter the with unit. - Page 19 During music streaming playback, “A2DP” the car’s speakers. Please consult your will be shown on the display. Information nearest Clarion dealer for more information about tracks (e.g. the elapsed playtime, song on the product of wireless audio streaming title, etc.) cannot be displayed on this unit.
-
Page 20: Trouble Shooting
6. TROUBLE SHOOTING GENERAL Problem Cause Measure Replace with new fuse of correct rating. Unit fuse blown. Unit can not power Replace with new fuse of correct rating. Car battery fuse blown. Turn off the power and remove the DCP. Press the [RESET] button with a thin rod. -
Page 21: Disc Player
DISC Player Problem Cause Measure Another disc is already loaded. Eject the disc before loading the new one. Disc cannot be There is an object installed inside the loaded. Remove the object inside the unit. unit. Compact disc is dirty. Clean the compact disc with a soft cloth. -
Page 22: Error Displays
7. ERROR DISPLAYS If an error occurs, one of the following displays is displayed. Take the measures described below to solve the problem. Display Cause Measure Disc is inserted incorrectly. Eject the disc then reload it properly. ERROR 3 The disc format is not supported. Try another disc. -
Page 23: Specifications
8. SPECIFICATIONS Audio Amplifier FM Tuner Frequency range: 87.5-108.0MHz Maximum power output: Usable sensitivity: 8dBμ 180W (45W x 4) Frequency response: 30Hz-15kHz Speaker impedance: 4 (4 to 8 allowable) Stereo separation: 30dB(1kHz) Signal/noise ratio: >55dB Input Audio input sensitivity: MW Tuner High: 320mV (at 1V output) Mid: 650mV (at 1V output) Frequency range: 531- 1602kHz... -
Page 24: Installation / Wire Connection Guide
For tough dirt, installation, consult your dealer or an apply a little cold or warm water to a authorized Clarion service center. soft cloth and wipe off the dirt gently. Downloaded from Caradio-Manual.com Manuals... -
Page 25: Cautions On Installation
Notes: 1. Some car models require special mounting kits for proper installation. Consult your Clarion dealer for details. 2. Fasten the front stopper securely to prevent the source unit from coming loose. • Console opening dimensions (182 mm) Hole Downloaded from Caradio-Manual.com Manuals... -
Page 26: Unit Installation
7. DO NOT block the cooling fan exit to Notes of installation ensure sufficient heating dissipation of this 1. Before installation, please make sure unit, or it may result in damage to this unit. proper connections are conducted and the unit operates normally. Improper connection may result in damage to the Unit Installation unit. -
Page 27: Removing The Source Unit
Method B 6) Removing the Source Unit Disassemble trim ring 1. Push the trim ring to right and pull out the right part. 2. Push the trim ring to left and pull out the left part. 1. Insert this unit directly to the opening of the Disassemble the unit dashboard. -
Page 28: Wiring And Connections
7) Wiring and Connections Black White Rear audio output (Left)/ Subwoofer output 1 Black Rear audio output (Right)/ Subwoofer output 2 Black Black External microphone (RCB-199:Sold by separately) Black Black Steering wheel control terminal 2 Channel Amplifier Fuse 15A Antenna (Black) Refer to next page Refer to next page. -
Page 29: Connecting The Accessories
Rear right - Front right - Front left + Rear left + AMP Remote ACC + Ground Rear right + Front right + Front left - Rear left - Illumination Phone Mute Battery + ear right (+) / Purple Rear right (-) / Purple with black stripe Front right (+) / Grey Front right (-) / Grey with black stripe Battery 12V(+) / Yellow... - Page 30 English: Declaración de conformidad Declaration of conformity Clarion declara que este modelo CZ301E We Clarion declares that this model CZ301E is cumple con los requisitos esenciales y otras following the provision of Directive 1999/5/EC disposiciones aplicables descritos en la with the essential requirements and the other Directiva 1999/5/CE.