Table of Contents
Advertisement
Advertisement
Table of Contents

Related Manuals for Magellan NAV 6500


Summary of Contents for Magellan NAV 6500
- Page 1 M A G E L L A N NAV 6500/NAV 6510 User Manual...
- Page 2 No part of this User Guide may be reproduced or transmitted in any form or by any means, electronic or mechanical, including photocopying and recording, for any purpose other than the purchaser's personal use without the written permission of Magellan Corporation. Magellan™, GPS NAV 6500/ NAV 6510™ are the trademarks of Magellan Corporation. Part No. 630323...
- Page 3 Magellan NAV 6500/ NAV 6510 User Manual...
- Page 4 Use only Magellan cables and antennas; the use of non-Magellan cables and antennas may severely degrade performance or damage the Magellan grants you, the purchaser, the right to use the software supplied in and with MAGELLAN GPS products (the “SOFTWARE”) in the normal operation of the equipment.
-
Page 5: Table Of Contents
Packing List ... 1 Conventions Used in this Manual ... 2 Commonly Used Terms ... 2 Getting Started Magellan NAV 6500/NAV 6510 Description ... 3 Power ON/OFF ... 5 Adjusting Contrast ... 5 Adjusting Backlighting ... 6 First Time Use - Initializing the Receiver ... 6 Navigating with Your Receiver ... - Page 6 Deleting a Waypoint from the Map Screen ... 26 Moving a Waypoint ... 26 Routes ... 27 Creating a GOTO Route from Waypoint List ... 27 Creating a GOTO Route from Nearest List ... 28 Creating a GOTO Route by Waypoint Name ... 28 Creating a GOTO Route to the Cursor Position ...
- Page 7 Troubleshooting Troubleshooting ... 60 Warnings/Alarms ... 62 Tutorial Tutorial ... 63 NAV 6500/NAV 6510 Appendix Installation Instructions ... 69 Gimbal Mount Installation Instructions ... 70 Flush Mount Installation Instructions ... 72 Proper Antenna Installation - Signal Reception ... 74 Electrical Connections ... 74 Wiring Instructions ...
- Page 8 Coordinate Systems ... 93 What Is GPS? ... 95 Explanation of Data Terms ... 97 Glossary ... 99 Index...
-
Page 9: Packing List
The manual is to be used with either the NAV 6500 or the NAV 6510. These receivers differ in that the NAV 6510 is the color version of the NAV 6500. -
Page 10: Conventions Used In This Manual
Leg: Legs are the divisions of a route between waypoints. A route that goes from WPT A to WPT B, from WPT B to WPT C, and from WPT C to WPT D has three legs. Magellan NAV 6500/NAV 6510... -
Page 11: Magellan Nav 6500/Nav 6510 Description
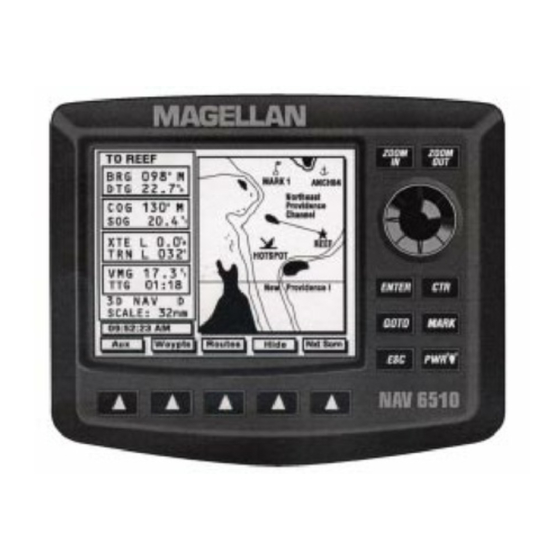
• Navigating Magellan NAV 6500/NAV 6510 Description The Magellan GPS NAV 6500/NAV 6510 has a high con- trast, high resolution backlit LCD, and backlit keypad and is designed to be either flush-mounted or gimbal mounted. Mount the unit as you plan on using it, install the antenna, and make all the electrical and data connections before you attempt to operate it. - Page 12 Magellan NAV 6500/NAV 6510 GPS Receiver Display Softkeys Cartridge Slot (not shown) ZOOM IN ZOOM OUT Cursor Key ENTER Key CTR (Center) Key GOTO Key MARK Key PWR (Power) and Light Key ESC (Escape) Key Magellan NAV 6500/NAV 6510...
-
Page 13: Power On/Off
Magellan NAV 6500/NAV 6510 Power ON/OFF To turn power on : Press and release the PWR key. -
Page 14: Adjusting Backlighting
OUT repeatedly, then use the CURSOR KEY to move the cursor to your present geographic area and use the ZOOM IN key repeatedly to zero in on your present location. When you have placed the cursor near your current loca- Magellan NAV 6500/NAV 6510... - Page 15 (Be reminded that as you calculate your UTC you need to correct for changes in your time zone due to daylight savings time.) Magellan NAV 6500/NAV 6510 While “General Setup” is highlighted in the Auxiliary window, press ENTER to access the window at right, containing the options, UTC DATE and UTC TIME.
-
Page 16: Navigating With Your Receiver
The unit can also be connected to an autopilot. The steering of the boat is then done automatically by the autopilot using NMEA messages output by the unit. Magellan NAV 6500/NAV 6510... -
Page 17: General Usage
IN 3 Seconds. Continue to hold the PWR key until the countdown is complete. The unit turns off. Magellan NAV 6500/NAV 6510 Cancelling an Operation Use the ESC key to cancel and back out of an operation. (except in setup) -
Page 18: Adjusting Backlighting
The satellites’ positions in the sky are plotted at right in 2 concentric circles representing 0 elevation at the horizon, and 45 . The center point of the circle, 90 , is directly overhead. The satellites being tracked are shaded. Magellan NAV 6500/NAV 6510... - Page 19 Init Pos can be used to initialize the unit (see Entering an Approximate Initial Position). If the receiver is computing fixes and moving faster than 0.2 mph, a line from the center to the outer circle points in the Magellan NAV 6500/NAV 6510 Jan/19/96 GPS Fix 09:19:05AM...
-
Page 20: Map Screen
03:07:21 PM Waypts Routes Press the Hide softkey to temporarily remove the informa- tion window, extending the map to the full screen width. Press the Show softkey to redisplay the information window. Magellan NAV 6500/NAV 6510 Los Angel Hide NxtScrn... -
Page 21: Setting The Map Scale
( If the last computed fix is differentially corrected, the letter D appears next to the GPS status. Magellan NAV 6500/NAV 6510 Setting the Map Scale ZOOM The map screen first appears in the highest possible scale set- ting. -
Page 22: Map Orientation
The top of the screen is then always the COG direction. The map rotates every time the COG changes more than the specified number of degrees set under Aux functions (see Selecting Map Orientation, Auxiliary Func- tions). Los Angeles Waypts Routes Magellan NAV 6500/NAV 6510 Show NxtScrn... -
Page 23: Track Plot Mode
Track Plot Mode then plots the route you are traveling on a grid showing coordinates, without background cartography. Magellan NAV 6500/NAV 6510 Viewing Nav-Aid Attributes Map objects appear as icons on the map. The Nav-Aids (buoys, lights, signals, etc.) and other objects are... - Page 24 ENTER. For example, to view Set Ref the attributes for "Navigational aid, generic" use the CUR- SOR KEY to highlight it and press ENTER. Complete attributes on the selected object appear. Magellan NAV 6500/NAV 6510...
-
Page 25: Finding Distance & Bearing From A Point On The Map
Expand will immediately dis- play the attributes of the object. When you have finished viewing attributes, press ESC to re- Magellan NAV 6500/NAV 6510 turn to the object menu, and ESC again to return to the map screen. -
Page 26: Viewing Tide Information
Map screen with your port location selection shown. The C-MAP cartridge needs to be inserted into the receiver in order to obtain the above informa- tion. The C-MAP cartridge containing port informa- tion is needed for this function. Magellan NAV 6500/NAV 6510... -
Page 27: Nav 1 Screen
Bearing (BRG), Speed over Ground (SOG), Course over Ground (COG), Velocity made good (VMG), and how many degrees and direction to turn (TRN). Magellan NAV 6500/NAV 6510 The bottom of the screen displays Time to Go (TTG), Estimated Time of Arrival (ETA ), and Course Deviation In- dicator (CDI). -
Page 28: Customizing The Nav 2 Screen
In addition, you may choose from 16 different waypoint types, whose icons appear on the map, making them more easily identifiable. From any NAV screen, press the Waypts softkey to access the Waypoints function. The Map screen appears. Magellan NAV 6500/NAV 6510... -
Page 29: Creating A Waypoint
Waypts Create Position Magellan NAV 6500/NAV 6510 From any NAV screen, press the Waypts softkey, use the CURSOR KEY to move the cursor arrow to the point on the map at which you wish to create a waypoint, and press the CREATE softkey. -
Page 30: Modifying Waypoint Data Fields
Description: You may enter any description you desire up to 16 characters in this field. The default description is the time and date of the waypoint creation. Creating a Waypoint Using the MARK key MARK Modify or Accept Done Default Data Magellan NAV 6500/NAV 6510... -
Page 31: Accessing The Waypoint List
When the highlight reaches the bottom of a page, it automatically continues on the next page, if one exists. When scrolling up, the highlight automatically continues on the previous page if one exists. Magellan NAV 6500/NAV 6510 Waypoint Type Description... -
Page 32: Viewing A Waypoint From The Waypoint List
Editing a Waypoint from the Waypoint List This function enables you to change the name, icon, coordi- nates, and/or description of a previously saved waypoint. Highlight Waypts List Waypoint Done View Modify or ENTER Accept Default Data Magellan NAV 6500/NAV 6510... -
Page 33: Deleting A Waypoint From The Waypoint List
If a waypoint is contained in an active route, it cannot be deleted without first deactivating the route. Magellan NAV 6500/NAV 6510 If a waypoint is contained in an inactive route, it can be deleted but the route will be modified. If a waypoint is contained in a single leg route, it can be deleted but the route will be deleted also. -
Page 34: Viewing Nearest Waypoint
Moving a Waypoint From the map screen a waypoint can be moved to a different location. Confirm Delete Magellan NAV 6500/NAV 6510... -
Page 35: Routes
When you have positioned the cursor at the desired new location, press ENTER. A waypoint used in a route cannot be moved. The waypoint can be moved under Route Edit. Magellan NAV 6500/NAV 6510 Routes Move ENTER Waypoint A route is a planned course of travel defined by a series of waypoints stored in the receiver’s memory. -
Page 36: Creating A Goto Route From Nearest List
GOTO route created from the current position (boat icon) to the selected waypoint. Enter Name ENTER Name Creating a GOTO route automatically deletes any previous GOTO route. If the previous GOTO route was a GOTO MOB, you must confirm to delete it. Magellan NAV 6500/NAV 6510... -
Page 37: Creating A Goto Route To The Cursor Position
GOTO route. If the previous GOTO route was a GOTO MOB, you must confirm to delete it. A solid line shows the GOTO route created from the present position to the cursor position. Magellan NAV 6500/NAV 6510 Creating a MOB Route Modify or GOTO Done... -
Page 38: Multi-Leg Routes
Creating a Multi-Leg Route (Text Mode) ENTER Routes Done Done ENTER Modify or Create Txt Crt Accept Default Comment Select ENTER Waypoint Select Highlight ENTER Waypoint next field Repeat for each leg in the route Done Done Magellan NAV 6500/NAV 6510 Highlight start field ENTER... -
Page 39: Activating A Route
Use the CURSOR KEY to step down to the next line and press ENTER. Select the next waypoint and press ENTER. Magellan NAV 6500/NAV 6510 Continue to select waypoints to complete the route, (up to 50 legs). When you have finished, press the Done softkey. -
Page 40: Deactivating A Route
While viewing an inactive route on the Map screen, press the Routes, Reverse softkeys. The route you were viewing is reversed. An active route cannot be reversed. Press ESC to exit the Routes function. Highlight Deactiv List route Magellan NAV 6500/NAV 6510... -
Page 41: Reversing A Route From The List
If the chosen position is not an existing waypoint, a window will be displayed to create a new waypoint for that position. Magellan NAV 6500/NAV 6510 From any NAV screen, press Routes, List softkeys. Use the CURSOR KEY to highlight the route in which Reverse you wish to insert a waypoint and press ENTER. -
Page 42: Removing A Waypoint From A Route
EN- TER. To edit the active route a shortcut is to press Routes, Edit. Highlight List ENTER route Move cursor to the position ENTER at which you wish to append Magellan NAV 6500/NAV 6510... -
Page 43: Moving A Waypoint In A Route
Use the CURSOR KEY to highlight the route in which you wish to move a waypoint and press ENTER. Magellan NAV 6500/NAV 6510 Use the CURSOR KEY to highlight the waypoint in the route that you wish to move and press the Move softkey. -
Page 44: Activating A Leg Of A Route
Any multi-leg route which was previously ac- tive is deactivated. To deactivate the route you can use the Deactiv softkey that appears on the Txt Edit screen or the Routes List screen. ENTER A c t i v t e Magellan NAV 6500/NAV 6510... -
Page 45: Deleting A Route On The Map
Use the CURSOR KEY to highlight the route you wish to delete and press the Delete softkey. A confirmation window appears. Magellan NAV 6500/NAV 6510 “Delete Route. Are you sure? YES NO” Highlight YES and press ENTER. The route is deleted. -
Page 46: Auxiliary Functions
English date and their format, control screen contrast, activate and deactivate the beeper. Contrast Time Reference UTC Date Jan/24/96 UTC Time 00:12:18 Time Format 24 hour Date Format MMM-DD-YY Beeper Language English Magellan NAV 6500/NAV 6510... -
Page 47: Adjusting Contrast
CURSOR KEY to input Local Offset in hours and press ENTER. Press ESC to exit. Magellan NAV 6500/NAV 6510 Default setting: UTC Initializing Date/Time In order for the receiver to locate satellites and compute posi-... -
Page 48: Setting Time Format
The receiver supports five languages: English, Italian, French, MMM-DD-YY German and Spanish. DD-MMM-YY Press the Aux softkey, highlight General Setup using the CURSOR KEY and press ENTER. Highlight Language, press ENTER and a window opens listing the languages. Magellan NAV 6500/NAV 6510... -
Page 49: Navigation Setup
Degrees, Minutes, Seconds or Degrees, Min- utes and fractions of minutes to 2 or 3 digits of resolution, (ddd mm.mm or ddd mm.mmm). Magellan NAV 6500/NAV 6510 The important difference between Deg/Min/Sec English and Deg/Min/Fractions is that there are 60... -
Page 50: Selecting Map Datum
ENTER to accept. If Track Up is selected, the resolution of rotation must be entered (the default is 10 ). Press ESC to exit. True Auto Mag. Default setting: North Up North Up Track Up Magellan NAV 6500/NAV 6510... -
Page 51: Setting Projected Course
2 Screen Setup and press ENTER. Use the CURSOR KEY to select the parameter you wish to change Magellan NAV 6500/NAV 6510 and press ENTER. Use the CURSOR KEY to highlight one of the following parameters: BRG, COG, CTS, Drift, DTG, SOA, Set, SOG, STR, TRN, VMG, XTE. -
Page 52: Selecting Cdi Scale
Press the Aux softkey, use the CURSOR KEY to highlight CDI/Units/Alarms and press ENTER. Use the CURSOR KEY to highlight Depth Units and press ENTER. Use the CURSOR KEY to select desired unit and press ENTER. Press ESC to exit. Default setting: Feet (Ft) Magellan NAV 6500/NAV 6510... -
Page 53: Activating Alarms
The arrival radius can be set between 0.01 and 9.99 distance units. Magellan NAV 6500/NAV 6510 Press the Aux softkey, use the CUR- SOR KEY to highlight CDI/Units/ Alarm and press ENTER. Use the CURSOR KEY to highlight Arrival Radius and press ENTER. -
Page 54: Setting Xte Alarm
1200 for NMEA 0180 and 4800 for NMEA 0183. Default setting: OFF NMEA Output Baud Rate 4800 NMEA Input Baud Rate 4800 Differential Input Baud Rate 4800 0183A v1.5 0183B v1.5 0183C v1.5 0183D v2.0 0183E v2.0 0180 0180/CDX Magellan NAV 6500/NAV 6510... -
Page 55: Changing Nmea Output Baud Rate
ENTER. Use the CURSOR KEY to select on or off and press ENTER. Press ESC to exit. Default setting: OFF Magellan NAV 6500/NAV 6510 Changing NMEA Input Baud Rate Press the Aux softkey, use the CURSOR KEY to highlight Data Port Setup and press ENTER. Use... -
Page 56: Map Configuration Functions
Lines, Depth Areas Limits (depth contours, dredged and intertidal areas); Bathymetrics and Soundings Range, Spot Soundings, and Bottom Type. Press the Aux softkey, use the CURSOR KEY to highlight Map Configuration Functions and press ENTER. Magellan NAV 6500/NAV 6510... -
Page 57: Bathymetric Lines
When you turn off bathymetric lines and return to the map, you will notice that some contours disappear and others ap- Magellan NAV 6500/NAV 6510 pear in a paler shade of grey. Those that disappear are con- tours which appear on the chart as discontinuous or "open."... -
Page 58: Bathymetrics And Soundings Range
Default setting: ON (except for Attention Areas, default: Contour; Lights, default: No Sector). NxtScrn Nav-Aids and Features Menu Port & Services Attention Areas Contour Tracks & Routes Lights No Sector Buoys & Beacons Signals Cartograph. Objects Magellan NAV 6500/NAV 6510... -
Page 59: Lights
Info Level. (Amount of information given for each Nav-Aid or cartographic object; can be basic or de- tailed). Magellan NAV 6500/NAV 6510 Press the Aux softkey, use the CURSOR KEY to highlight Map Configuration Functions and press ENTER. Use the... -
Page 60: Plotter Mode
Setting Track History on or off will automatically set track display under Map Configuration - Chart Settings on or off, respectively. Distance 10 sec 001% Magellan NAV 6500/NAV 6510... -
Page 61: Turning Track History On Or Off
Press the Aux softkey, use the CURSOR KEY to highlight Track History and press ENTER. Magellan NAV 6500/NAV 6510 Use the CURSOR KEY to highlight Resolution by Dist. and press ENTER. Use the CURSOR KEY to select desired distance resolution and press ENTER. -
Page 62: Clearing Track Memory
External Instrument Speed Log Heading Current Spd (Drift) Current Dir. (Set) Jan/25/98 17:30:42 UT --:--:-- --:--:-- --:--:-- --:--:-- --:--:-- --:--:-- --:--:-- --:--:-- Page Dn Lunar Feb/14/96 06:11:00 18:18:00 1.0 Kts 000` M 1.0 Kts 180` M Magellan NAV 6500/NAV 6510... -
Page 63: Calculating Sunrise/Sunset And Lunar Information
ENTER. Once the date is selected, the sunrise/sunset times and lunar phase information are recalculated and displayed. Press ESC. Magellan NAV 6500/NAV 6510 Calculating Actual Current Use the CURSOR KEY to access the Actual Current win- dow and press ENTER. -
Page 64: Simulation Mode Function
Two options are available under Color Setup: Waypoint Color and Track Color. You may choose the color of Waypoints and Tracks. Press the Aux softkey, use the CURSOR KEY to highlight Color Setup and press ENTER. Use the CURSOR KEY Magellan NAV 6500/NAV 6510... -
Page 65: User C-Card
(for more information on cartridge installation, see Data Cartridges section). The information on a User C-Card is interchange- able and can be accessed by another NAV 6500/NAV 6510. Once the C-Card is installed, you can access the User C- Card functions. -
Page 66: Map Shift
(error) to ap- pear between the displayed position and known coordinates. This bias can be corrected by using Map Shft to shift the receiver’s computed position to match its coordinates on your paper chart. Magellan NAV 6500/NAV 6510... - Page 67 When you have finished placing the cursor, press EN- TER. Magellan NAV 6500/NAV 6510 As you travel, you can check to see that you have shifted the boat’s position properly by comparing other points of refer- ence on your paper chart with the corresponding points on the electronic chart.
-
Page 68: Troubleshooting
0.5A at 12V for the NAV 6500 or 1.0A at 12V for the NAV 6510. Use only the Magellan Power/Data Cable to connect the receiver to external power. - Page 69 Magellan NAV 6500/NAV 6510 If you are experiencing a problem that is not described above, please contact Magellan Technical Support for assistance at Tel.: (909) 394-5000 or Fax: (909) 394-7050. Technical Sup- port engineers are available from 8 a.m. to 5 p.m. PST.
-
Page 70: Warnings/Alarms
X.XX Nm from the course line. Off course by more than x.xx Press ENT Is displayed when Arrival Radius Arrival alarm is set and the boat has moved Closer than x.xx within the arrival radius. nm to WPT 006 Press ENT Magellan NAV 6500/NAV 6510... -
Page 71: Tutorial
Hide be displayed. The cursor is moved with the Cursor Key until the area in which the route is to be created is displayed. Magellan NAV 6500/NAV 6510 40 00 00.00 30 00 00.00 Press... - Page 72 30 00 00.00 by pressing the ENTER key. , and ac- Create Create WPT001 . Press the key. The display returns Done WPT002 WPT001 Magellan NAV 6500/NAV 6510 WPT002...
- Page 73 WPT001 the cursor towards waypoint WPT002. Notice the dashed line from WPT001 to the cur- sor. This helps you visualize the leg you are creating. Magellan NAV 6500/NAV 6510 When the cursor is over WPT002, press This defines WPT002 as the destination for the leg being created.
- Page 74 The Insert Move softkey becomes active. WPT003 . The waypoint WPT001 WPT003 WPT001 Magellan NAV 6500/NAV 6510 WPT002 WPT002...
- Page 75 This win- dow behaves like the other Creating Waypoint windows pre- sented in this tutorial. However, as in the previous example, the coordinates cannot be changed. Magellan NAV 6500/NAV 6510 Pressing . As you be- Insert the new waypoint and the route now resembles the one at the right.
- Page 76 Deactiv softkey. The arrow next to the route number in the list disappears. The selected route has been deactivated. When you return to the map screen, the deactivated route is no longer shown. Magellan NAV 6500/NAV 6510...
-
Page 77: Nav 6500/Nav 6510 Appendix
NAV 6500/NAV 6510 Appendix Magellan NAV 6500/NAV 6510 Installation Instructions ... 69 Gimbal Mount Installation Instructions ... 70 Flush Mount Installation Instructions ... 72 Proper Antenna Installation - Signal Reception ... 74 Electrical Connections ... 74 Wiring Instructions ... 75 Nav-Aid Icons ... -
Page 78: Gimbal Mount Installation Instructions
1) Place the metal coil in the opening on the under side of the base plate. 2) Slip the bolt through the plas- tic washer, then in through the coil and out the top side of the base plate. Magellan NAV 6500/NAV 6510... - Page 79 (Otherwise, the base will not rest flat on the surface to which you are attaching it.) Magellan NAV 6500/NAV 6510 6) Insert four screws as shown to at- tach the base plate to the desired sur- face.
-
Page 80: Flush Mount Installation Instructions
5) Fit the unit through the cut out and adjust the flush mount bracket and connect them to the unit. 6) Insert the three washers on the threaded studs. Then insert the three nuts on the studs and tighten them so that thereceiver unit is firmly mounted. Magellan NAV 6500/NAV 6510... - Page 81 Flush Mount Diagram Magellan NAV 6500/NAV 6510...
-
Page 82: Proper Antenna Installation - Signal Reception
The power/data connector on the back of the unit has the following pin-out. NMEA Output + Improper placement External Alarm Differential In + NMEA Input - NMEA Input + Power + Shield Magellan NAV 6500/NAV 6510... -
Page 83: Wiring Instructions
Wiring Instructions Magellan NAV 6500/NAV 6510 Connect... External Alarm ** NMEA Data Power/Data Cable to NAV 6500/6510 NMEA Data from NAV 6500/6510 External Power * If connecting to more than one device, additional wire must be spliced to the black wire. -
Page 84: Navaid Icons
Bottom type Seabed area. Building, religious Building, single Buoys Barrel Buoys, cardinal; Buoy, in- stallation; Buoy, isolated danger; Buoy, internal; Can, Buoy, safe water; Buoy, spe- cyclindrical cial purpose; Buoy, generic Conical Pillar Spar, Spindle Spherical Super Magellan NAV 6500/NAV 6510... - Page 85 Caution Areas Cemetery Chimney Coastguard station Compass Compass, Distance Local magnetic anomaly. Magellan NAV 6500/NAV 6510 Composite objects Airport; Anchorage; Channel edge; Deep water route; De- fined water; Harbour; Range system; Lighthouse; Mooring trot; Navigation mark, afloat; Navigation mark, fixed; Traffic Separation Scheme System.
- Page 86 Canal; Canal bank; Rapids; River; River bank; Waterfall. Navigational aid, generic Navigational mark fixed Navigational mark floating Offshore Installation Cable, submarine; Cable area; Diffuser; Obstruction; Off- shore production area; Pipe- line, submarine/on land; Pipeline area; Production in- stallation. Magellan NAV 6500/NAV 6510...
- Page 87 Lock basin; Oil barrier; Pon- toon; Ramp; Shoreline con- struction; Slipway; Weir; Small craft facility. Production Objects Correction marker. Radar dome Magellan NAV 6500/NAV 6510 Radar, Radio Radar, Radio, Electronic Po- sitioning System Radar station; Radar tran- sponder; Radio station_refco. Radar Reflector...
- Page 88 Water Turbulence Tideway; Water turbulence. Weed/Kelp Windmill Windmotor Wrecks Magellan NAV 6500/NAV 6510...
-
Page 89: Data Cartridges
To remove the cartridge, turn the unit off and push the car- tridge in and up gently to free it from the plastic catch, then remove. The cartridge will pop out easily. Data cartridges are available from your Magellan dealer or directly from C-MAP. C-MAP/C-Card Cartridge... -
Page 90: List Of Available Datums
SAPPER H. 43 NEW P. SANTO SCHWARZECK NORWEGIAN SELVAGEM 1938 SOUTH ASIA SWEDISH SWISS CH-1903 TANANARIVE 25 TIMBALAI 1948 TOKYO TRISTAN 1968 VITI LEVU 16 VOIROL 1875 WAKE ISL.1952 WAKE-ENIWETOK WGS 1972 WGS 1984 YACARE ZANDERIJ Magellan NAV 6500/NAV 6510... -
Page 91: Nmea Messages
NMEA Messages Your GPS receiver can be set to output GPS data in the NMEA 0183 version 1.5 or version 2.0 format to interface with other marine devices or equipment. NMEA DATA MESSAGES. NMEA data is output at 4800 baud, 8, N, 1. These settings are acceptable to most equip- ment and software applications. - Page 92 2-3 Lat, N or S of waypoint 4-5 Long, E or W of waypoint 6-7 Bearing, True 8-9 Bearing, Magnetic A = OK or not used A = arrival circle entered A = perpendicular passed at waypoint 9 10 Magellan NAV 6500/NAV 6510 11 12...
- Page 93 Geoidal separation - difference between the WGS-84 earth ellipsoid and mean sea level (geoid), “-” = mean sea level below ellipsoid Magellan NAV 6500/NAV 6510 Units of geoidal separation, meters. 13 Age of Differential GPS data - Time in seconds...
- Page 94 1-2 Track degrees, True 3-4 Track degrees, Magnetic 5-6 Speed, knots 7-8 Speed, kilometers/hour 10 12 HDG (track), degrees Date (DDMMYY) Variation, degrees Variation, sense (E or W) CHECKSUM (Mandatory in this sentence) Actual Track and Ground Speed (SPD) Magellan NAV 6500/NAV 6510...
- Page 95 UTC of Position 2-3 Latitude - N/S 4-5 Longitude - E/W GPS Quality Indicator Magellan NAV 6500/NAV 6510 0 = fix not available or invalid 1 = GPS SPS Mode, Fix valid 2 = Differential GPS, SPS Mode, fix valid...
- Page 96 Time, UTC of position fix Status (A = valid, V = Navigation receiver warning) Speed over ground, knots Course over ground, degrees Date (DDMMYY) Magnetic variation, degrees Magnetic variation, sense (E or W) CHECKSUM (Mandatory in this sentence) Magellan NAV 6500/NAV 6510...
- Page 97 8-9 Bearing dest. LMK. from origin LMK., Magnetic 10 Dest LMK. identifier Magellan NAV 6500/NAV 6510 The formats listed are NMEA formats and Magellan receiv- ers may not output all of the information listed for a particu- lar format. A complete copy of the NMEA specifica-...
-
Page 98: Abbreviations
Kilometers per hour Kilometers per hour Knots Knots Latitude Longitude Miles per hour Miles Minute Minutes (decimal format to two degrees of resolution) Minutes (decimal format to three degrees of resolution) Miles per hour Meters Navigate Magellan NAV 6500/NAV 6510... - Page 99 Set reference Speed over ground Speed Loran-based coordinate system Direction to turn Time To Go Txt Crt Text Create Universal Transverse Mercator Universal Time (Greenwich Mean Time) Velocity made good Receiver-generated waypoint name Cross track error Magellan NAV 6500/NAV 6510...
-
Page 100: Specifications
Update rate once every second Input voltage 10 - 35 VDC Power consumption 6 watts for NAV 6500 12 watts for NAV 6510 Data Input/Output Differential Input Baud Rate: 4800, 9600, 19200 NMEA Input/Output Baud Rate: 300, 1200, 2400, 4800, 9600... -
Page 101: Coordinate Systems
This is done by using a coordinate system to describe locations. Your Magellan receiver has the ability to use any one of four differ- ent coordinates systems; LAT/LON (latitude and longitude), UTM (Universal Transverse Mercator), OSGB, and TDs. The one you select (in SETUP) will be determined by the maps and charts you use;... - Page 102 Eastings are an east/west measurement, and correspond roughly to lon- gitude. Northings are a north/south measurement, and cor- respond to latitude. This chart shows the position of Magellan described in both Lat/Lon and UTM coordinates. LAT/LON DEG/MIN DEG/MIN/SEC 34˚06.58N...
-
Page 103: What Is Gps
GPS is a constellation of navigation satellites that orbit the earth. The precise time and position information transmitted by these satellites is used by a GPS receiver to triangulate a position fix. The system is now officially declared “initial operational,” and provides continuous, 24-hour 3D (position plus elevation) coverage anywhere on the earth. - Page 104 This technique requires that your GPS receiver be connected to a compatible differential beacon receiver (such as the Magellan DBR™, which is compatible will all differential- ready Magellan receivers). You must also be within range of a differential radio beacon. More Information...
-
Page 105: Explanation Of Data Terms
(B2) perpen- dicular to your position and the current destination waypoint (B). Magellan NAV 6500/NAV 6510 DRIFT. Speed of the current. The receiver requires external NMEA or manual input of the log speed and compass heading in order to calculate drift. - Page 106 XTE and this boat is to the left of the courseline. This boater would need to steer right to close the XTE. ) it would be travelling on a course that would Magellan NAV 6500/NAV 6510...
-
Page 107: Glossary
Magellan NAV 6500/NAV 6510 Datum Refers to the theoretical mathematical model of the earth’s sea level surface. Map makers... - Page 108 GBR36 datum, the GBR36 datum can be used with LAT/LON coordinates; just be sure the map you are using uses both LAT/LON and GBR36.) Position Fix Position coordinates as computed by the receiver. Magellan NAV 6500/NAV 6510...
- Page 109 Loran-C signals. Many coastal navigators use TDs because Loran is a familiar radio aid navigation and TDs are clearly marked on their charts. Your Magellan receiver can display position coordinates in TDs by converting from LAT/ LON. Time To Go...
-
Page 110: Index
Nearest 28, to cursor position 29 Icons 76 Initialization 6, Date/Time 39 Installation instructions 69 Introduction 1 Language setting 40 Leg (see Routes) Light 6 Map configuration/settings 48 Map Datums 82 Map Orientation 14, 42 Map scale 13 Magellan NAV 6500/NAV 6510... - Page 111 33; removing a waypoint 34; replacing a waypoint in a route using text edit 35 Satellite (Sat) Status 10 General Setup Function 38 Magellan NAV 6500/NAV 6510 Signal reception 74 Simulation Mode 56 Specifications 92 Speed Units 44...
- Page 112 Magellan NAV 6500/NAV 6510...
- Page 114 960 Overland Court, San Dimas, CA 91773 USA (909) 394-5000 630323...