Table of Contents
Advertisement
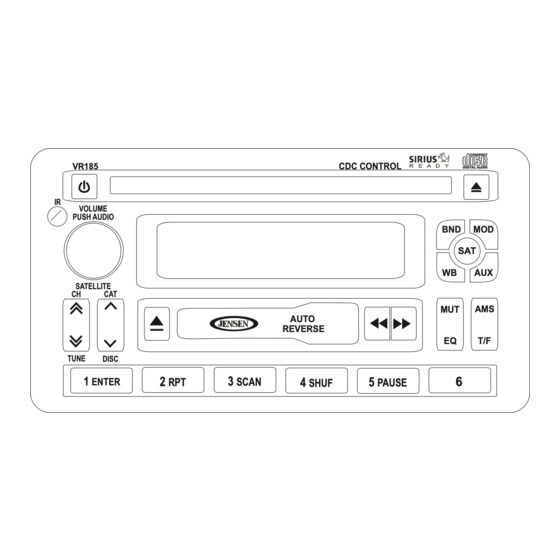
VR185
Owner's Manual
featuring
VR185
IR
VOLUME
PUSH AUDIO
SATELLITE
CH
CAT
TUNE
DISC
2
3
1
ENTER
RPT
SCAN
ASA Electronics Corporation
www.asaelectronics.com
© 2005 ASA Electronics Corporation
v.122004
CDC CONTROL
BND
MOD
SAT
AUX
WB
AMS
MUT
AUTO
REVERSE
EQ
T/F
6
4
5
PAUSE
SHUF
Thank You!
Thank you for choosing a Jensen product. We hope you will find the instructions in this owner's
manual clear and easy to follow. If you take a few minutes to look through it, you'll learn how to
use all the features of your new Jensen receiver for maximum enjoyment.
System Features . . . . . . . . . . . . . . . . . . . . . . . . . . . . . . . . . . . . . . . . . . . . . . . . . . . . . . . . . . 1
Preparation . . . . . . . . . . . . . . . . . . . . . . . . . . . . . . . . . . . . . . . . . . . . . . . . . . . . . . . . . . . . . . 3
Installation . . . . . . . . . . . . . . . . . . . . . . . . . . . . . . . . . . . . . . . . . . . . . . . . . . . . . . . . . . . . . . . 5
Wiring . . . . . . . . . . . . . . . . . . . . . . . . . . . . . . . . . . . . . . . . . . . . . . . . . . . . . . . . . . . . . . . . . . . 6
Basic Operation. . . . . . . . . . . . . . . . . . . . . . . . . . . . . . . . . . . . . . . . . . . . . . . . . . . . . . . . . . . 7
Radio Operation . . . . . . . . . . . . . . . . . . . . . . . . . . . . . . . . . . . . . . . . . . . . . . . . . . . . . . . . . . 9
CD Player Operation . . . . . . . . . . . . . . . . . . . . . . . . . . . . . . . . . . . . . . . . . . . . . . . . . . . . . . . 11
CD Changer Operation . . . . . . . . . . . . . . . . . . . . . . . . . . . . . . . . . . . . . . . . . . . . . . . . . . . . . 12
Cassette Operation . . . . . . . . . . . . . . . . . . . . . . . . . . . . . . . . . . . . . . . . . . . . . . . . . . . . . . . . 13
Remote Control . . . . . . . . . . . . . . . . . . . . . . . . . . . . . . . . . . . . . . . . . . . . . . . . . . . . . . . . . . . 13
Sirius Operation . . . . . . . . . . . . . . . . . . . . . . . . . . . . . . . . . . . . . . . . . . . . . . . . . . . . . . . . . . 14
Troubleshooting . . . . . . . . . . . . . . . . . . . . . . . . . . . . . . . . . . . . . . . . . . . . . . . . . . . . . . . . . . 16
Ignition and Interference Noise . . . . . . . . . . . . . . . . . . . . . . . . . . . . . . . . . . . . . . . . . . . . . . 16
Maintenance. . . . . . . . . . . . . . . . . . . . . . . . . . . . . . . . . . . . . . . . . . . . . . . . . . . . . . . . . . . . . . 16
Specifications . . . . . . . . . . . . . . . . . . . . . . . . . . . . . . . . . . . . . . . . . . . . . . . . . . . . . . . . . . . . 19
Warranty. . . . . . . . . . . . . . . . . . . . . . . . . . . . . . . . . . . . . . . . . . . . . . . . . . . . . . . . . . . . . . . . . 19
System Features
Features of the Jensen VR185 mobile audio system include:
•
PLL Synthesizer Stereo Radio
•
Sirius-Ready Satellite Radio Function
•
Automatic Memory Storing
•
Fixed Front Panel
•
Preset Equalization
•
Electronic Shockproof (ESP) Function
•
Digital Compact Disc Player
•
Auto-Reverse Cassette Player
•
CD Changer Control
•
Auxiliary Input Function
•
Remote Control
Advertisement
Table of Contents

Related Manuals for Jensen VR185


Summary of Contents for Jensen VR185
- Page 1 Warranty..............19 System Features Features of the Jensen VR185 mobile audio system include: •...
-
Page 2: Table Of Contents
Garantía ..............20 Funciones del Sistema Las funciones del sistema de audio móvil Jensen VR185 son: •... -
Page 3: Preparación
VR185 Preparation Tools and Supplies The following tools and supplies are needed to install the unit. • Torx type, Flat and Phillips screwdrivers • Wire cutters and strippers • Tools to remove existing radio (screwdriver, socket wrench set or other tools) •... - Page 4 Insérez les clefs à travers les trous dans le panneau d'avant avec les entailles en haut. Appuyez les clefs jusqu'au bout dans les fentes appropriées, et puis glissez la manche du dos de l'appareil. Keys VR185...
-
Page 5: Instalación
VR185 Installation Mounting the Sleeve Insert the sleeve into the opening of the dashboard, and bend open the appropriate tabs with a screwdriver to secure the sleeve in place. Tabs Screwdriver Installing the Unit Mounting Screw Once the sleeve has been mounted, reconnect the wiring harness and the antenna, taking care not to pinch any wires or cables. -
Page 6: Cableado
Le schéma du câblage dépeint tous les branchements de câble exigés pour l'opération de l'appareil. WIRING CHART Nro. de Pin Color del cable 16-PIN CONNECTOR (POWER + SPEAKER OUT) Numéro du pin Couleur VR185 CUADRO DE CABLEADO Función Vacío Sin conexión Blanco / Negro Altavoz delantero izquierdo (-) -
Page 7: Operación Básica
VR185 Basic Operation 1. Power Press the power button (1) or any other button on the front of the radio (except the eject button) to turn the unit on. Press the power button again to turn the unit off. 2. Mode Press MOD (2) to select a different mode of operation as indicated on the display panel. - Page 8 10. Récupération de valeur initiale Pour restaurer tous les réglages d'usine, appuyez et maintenez l'appui sur MOD jusqu'à ce que " EEP INIT " apparaît sur l'affichage. VR185...
-
Page 9: Operación De La Radio
VR185 Radio Operation 11. Select a Band Press BND (11) to change between three FM bands and two AM bands. Each band stores up to six preset stations. When operating the unit in Satellite, CD, CDC or Cassette mode, press BND to immediately access radio mode. - Page 10 Channels 1-6 can also be accessed by momentarily pressing the corresponding preset button (1-6). Preset Stations Preselección de Emisoras Stations programmées l número preseleccionado aparecerá VR185 VOLUME PUSH AUDIO SATELLITE AUTO REVERSE...
-
Page 11: Operación Del Casete
VR185 CD Player Operation 16. Insert and Eject CD Insert a CD label-side up into the CD slot (16a), and the disc will begin to play. Press the eject button (16b) to stop CD play and eject the CD. 17. Pause Press PAUSE (17) to suspend disc play. -
Page 12: Operación Del Reproductor De Cd
Pour une performance optimale, utilisez des disques CD-R avec les vitesses 1x à 8x et avec vitesse d'écriture de 1x à 2x. Utilisez des disques CD-RW avec les vitesses 1x à 4x et vitesses d'écriture de 1x à 2x. Ne jouez pas des disque CD-RW qui ont été écrit plus de VR185... -
Page 13: Operación Del Cambiador De Cd
VR185 Cassette Operation 24. Insert and Eject Cassette Hold the cassette with the exposed tape edge of the side to be played to the right, and insert the cassette into the cassette door (24a). Press the eject button (24b) to stop cassette play and eject the cassette. -
Page 14: Operación De Radio Satelital Sirius
TUNE up or down. The current channel will continue to play during a category/channel search. When the desired channel is found, press ENTER (31c) to access the channel. Sirius Satellite Radio Operation Operación de Radio Satelital Sirius Opération radio satellite Sirius VR185 VOLUME PUSH AUDIO CH NAME SATELLITE... - Page 15 VR185 Sirius Satellite Radio Operation (continued) 32. Preset Channels To store favorite channels for quick access, select the desired channel, then press and hold the desired preset button (1-6) (32) until the corresponding number appears in the display. To recall a preset station, momentarily press the corresponding preset button.
-
Page 16: Ignition And Interference Noise
Clean the capstans and the pinch rollers with the cotton swab. Allow the tape head, capstans and pinch rollers to dry before operating. Do not touch the tape with your fingers. If it becomes loose, wind it back by twisting a pen- cil in the cassette reel. VR185... -
Page 17: Corrección De Problemas
VR185 Corrección de Problemas Problema Causa No hay corriente. La llave de la ignición del vehículo está apagada. El fusible está quemado. El disco no se Hay un disco en la unidad. puede introducir ni quitar. Insertó el disco en la dirección equivocada. -
Page 18: Dépannage
Nettoyez le cabestan et les galets presseurs avec le tampon Permettez à la tête de bande, les cabestans et les galets presseurs de se sécher avant d'opérer Ne toucher pas à la bande avec vos doigts. Si elle devient lâche, rebobinez en mettant un crayon dans la bobine. VR185... -
Page 19: Specifications
VR185 Specifications General Power Supply Requirements......DC 12 Volts, Negative Ground Chassis Dimensions ......180mm.(W) x 183mm. (D) x 100mm. (H) Loading Impedance. -
Page 20: Especificaciones
Esta garantía le da derechos específicos y usted también puede tener otros derechos los cuales varían de estado en estado. Audiovox Specialized Electronics www.asaelectronics.com VR185... -
Page 21: Caractéristiques
VR185 Caractéristiques Généralités Alimentation ........12 VDC, mise à la terre négative Dimensions .