KTM 400 LS-E/MIL Owner's Manual
2004
Hide thumbs
Also See for 400 LS-E/MIL:
- Owner's handbook manual (46 pages) ,
- Owner's handbook manual (41 pages) ,
- Owner's handbook manual (42 pages)
Table of Contents
Advertisement
Advertisement
Table of Contents

Related Manuals for KTM 400 LS-E/MIL


Summary of Contents for KTM 400 LS-E/MIL
- Page 1 OWNER´SMANUAL2004 400 LS-E/mil ART.NR: 3.211.23-E...
- Page 2 FAILING TO OBSERVE THESE INSTRUCTIONS MAY DAMAGE THE MOTORCYCLE OR IMPAIR ITS TRAFFIC SAFETY. Please fill in the vehicle's serial numbers below. Chassis number Engine number Dealer's stamp KTM S PORTMOTORCYCLE RESERVES THE RIGHT TO MODIFY OR CANCEL EQUIPMENT TECHNICAL INFORMATION COLORS...
- Page 3 KTM workshop, also in the interest of your own safety. For your safety, only use spare parts and accessories approved by KTM. KTM shall not assume any liability for other products or consequential damage resulting from the use of such products.
-
Page 4: Table Of Contents
Chain wear ........22 General information on KTM disk brakes ... .23 CONTROL ELEMENTS . -
Page 5: Location Of Serial Numbers
LOCATION OF SERIAL NUMBERS Chassis number The chassis number is embossed on the right side of the steering head pipe. Write the number down on page 1. Engine number, engine type The engine number and engine type are imprinted on the right side of the engine below the engine sprocket. -
Page 6: Choke Lever
Choke lever Pushing the choke lever back will open a hole in the carburetor through which the engine can draw additional oil. This results in a "rich" fuel/air mixture required for a cold start. Pulling the choke lever forward all the way to the stop will close the hole again. -
Page 7: Combination Switch
Combination switch The gearshift paddle is used to dim or flash the headlight. = high beam = low beam The flasher switch returns to the center position after the swit- ching operation. To switch off the turn signal, press the flasher switch into the switch casing. -
Page 8: Fuel Tap
Fuel tap OFF The fuel tap is turned off in this position. No fuel can flow to the car- buretor. ON Turn the twist grip to the ON position when operating the motorcycle to allow the fuel to flow to the carburetor. The tank will empty down to approx. -
Page 9: Compression Damping Of The Fork
Compression damping of the fork Adjust the compression damping on the bottom of the fork tubes. It regula- tes the damping rate during compressed travel. The compression damping rate can be adjusted with the adjusting screw (COM). To adjust, remove the caps with a screwdriver. -
Page 10: Rear Mirror
Rear mirror The two rear mirrors can be folded towards the inside for off-road opera- tion. They must be folded outwards when driving on public roads. Headlight range adjustment Use the adjustment screw to adjust the headlight range. Turn the screw in a clockwise direction to reduce the headlight range and in a counter- clockwise direction to increase the headlight range. -
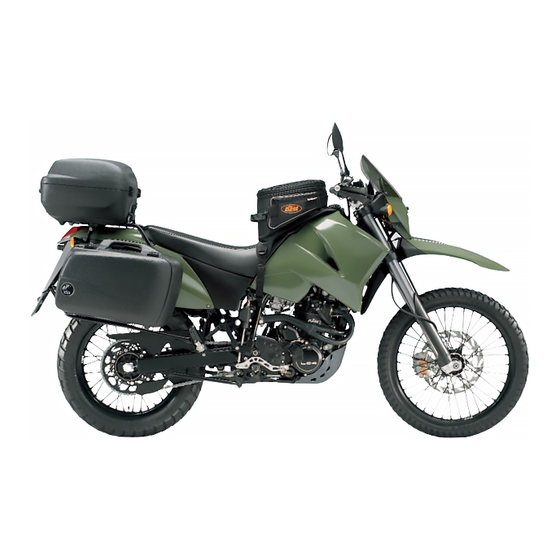
Page 11: Trunk System
Trunk system The Motorcycle is equipped with two side trunks and one top case. All of the trunks can be locked. The keys will lock/unlock both the rack and the trunk lids. All racks and lids must be locked while driving. To open the trunk, unlock the trunk lid locks , fold up the clip and detach the hook from the trunk lid. -
Page 12: Tips And Warnings When Starting The Motorcycle
O NOT DRIVE AFTER DRINKING ALCOHOL – A LWAYS SWITCH ON THE LIGHT WHILE DRIVING TO MAKE SURE OTHER – Make sure your authorized KTM dealer has provided the ROAD USERS SEE YOU IN TIME services required to make your vehicle "READY TO DRIVE"... -
Page 13: Driving Instructions
If the brake fluid level drops below the mini- mum amount this will indicate a leak in the brake system or completely worn brake pads. Have the brake system checked by an authorized KTM workshop to avoid brake failure. -
Page 14: Starting With A Cold Engine
– If not, the battery is run down – If so, proceed as described in the chapter "Troubleshooting" or visit an authorized KTM workshop. IF THE ENGINE STARTS BUT DOES NOT SWITCH ON WHEN YOU PRESS THE STARTER PUSHBUTTON, CHECK WHETHER: –... -
Page 15: Driving Off
Driving off Braking Pull the clutch lever, engage the 1st gear and slowly release Close the throttle and simultaneously brake with the hand and the clutch lever while accelerating. foot brake. Primarily actuate the rear brake on sandy, wet or slippery surfaces. -
Page 16: Fuel, Refueling
NOTE ON THE CENTER STAND: The following procedure is recommended to park the motorcycle on the center stand with as little effort as possible: a) press the center stand down to the ground with your foot b) swing out the kickstarter, pull the motorcycle diagonally towards the back while putting the weight on the center stand stabilizer (see illustration). -
Page 17: Lubrication And Maintenance Chart
LUBRICATION AND MAINTENANCE CHART KTM 400 LS-E/mil 2nd service at 1st service 5000 km, afterwards A clean motorcycle reduces inspection time and saves money! after every 5000 km or 1000 km once a year Change the engine oil, oil filter and fine screen filter... - Page 18 LUBRICATION AND MAINTENANCE CHART KTM 400 LS-E/mil RECOMMENDED MAINTENANCE WORK - ADDITIONAL WORK TO BE PERFORMED UNDER A SEPARATE ORDER At least Every 2 years or Every 3 years once a year 20000 km Completely service the fork Completely service the shock absorber...
-
Page 19: Maintenance Work - Chassis And Engine
N I I N ALL MAINTENANCE AND ADJUSTMENT WORK MARKED WITH AN ASTERISK * REQUIRES SPECIAL TECHNICAL SKILLS. IN YOUR OWN INTEREST, HAVE THIS WORK PERFORMED BY AN AUTHORIZED KTM WORKSHOP, WHERE YOUR MOTORCYCLE WILL BE SERVICED BY SPECIALLY TRAINED TECHNICIANS. -
Page 20: Checking And Adjusting The Steering Head Support
Checking and adjusting the steering head support * The steering head support must be checked regularly for play. To check, prop the motorcycle on the frame keeping the front wheel off the ground. Try to move the fork back and forth. To adjust, loosen the 5 clamp screws on the upper triple clamp and turn the end screw until no clearance is left. -
Page 21: Changing The Spring Preload Of The Shock Absorber
Changing the spring preload of the shock absorber KTM has adjusted the shock absorber for a load (driver plus equipment and payload) of approx. 105 kg. If you have a passenger or if the load deviates significantly from 105 kg, you should adjust the preload accordingly. It can easily be adjusted as follows. -
Page 22: Checking The Chain Tension
Checking the chain tension Set the motorcycle on the main or side stand. Switch the transmission to neutral. Push up under the chain approx. 30 mm behind the end of the chain sliding component until the upper part of the chain is tightened (see illustration). There should be a distance of 12 mm between the chain and the swing arm when the upper part of the chain... -
Page 23: Chain Care
Chain care Service is kept to a minimum with the O-ring chain. Clean the chain with plenty of water. Never use brushes or solvents to clean the chain. A chain spray specially designed for O ring chains (MOTOREX Chainlube 622) can be used when the chain has dried. -
Page 24: General Information On Ktm Disk Brakes
KTM workshop immediately. BRAKE FLUID: KTM fills DOT 5.1, one of the highest grade commercial brake fluids availa- ble, into the brake system. We recommend that you continue to use this brake fluid. DOT 5.1 brake fluid is based on glyco ether and has an amber color. -
Page 25: Checking The Front Brake Fluid Level
Checking the front brake fluid level The brake fluid reservoir is combined with the hand brake cylinder on the handlebar and has an inspection glass . The brake fluid level may not fall below the middle of the inspection glass whent he reservoir is in a horizontal position. WARNING F THE BRAKE FLUID LEVEL DROPS BELOW THE MINIMUM LEVEL THIS INDICATES THAT THE... -
Page 26: Checking The Rear Brake Fluid Level
Checking the rear brake fluid level The reservoir for the rear disk brake is located above the brake master cylin- der. The brake fluid level should not drop below the "MlN" mark when the motorcycle is parked in a vertical position. WARNING F THE BRAKE FLUID LEVEL DROPS BELOW THE MINIMUM AMOUNT THIS WILL INDICATE A LEAK IN THE BRAKE SYSTEM OR COMPLETELY WORN BRAKE PADS... -
Page 27: Dismounting And Mounting The Front Wheel
Dismounting and mounting the front wheel Jack the motorcycle on the frame until the wheel no longer touches the ground. Loosen the two clamp screws on the left fork leg. Loosen the collar nut and then the clamp screws on the right fork leg. Hold the front wheel and pull out the wheel spindle NOTE: the wheel spindle is easier to pull out if you insert a 6 mm hexagon wrench (from the tool set) and move the spindle back and forth. -
Page 28: Dismounting And Mounting The Rear Wheel
Dismounting and mounting the rear wheel Place the motorcycle on the center stand to lift the rear wheel off the ground. Unscrew the collar nut , remove the chain tensioner , hold the rear wheel and pull out the wheel spindle until the rear wheel is free but the brake caliper support is still being held. -
Page 29: Tires, Tire Pressure
– The tire size is specified in the Technical Specifications and in your vehicle registration. front rear 400 LS-E/MIL – Check the condition of the tires before each ride. Inspect the tires for cuts and any embedded nails or other sharp objects. Road, driver only... -
Page 30: Battery
Battery The battery is located under the seat. The battery is a self-contained system and is therefore maintenance-free. It is not necessary to check the electrolyte level or to add water. Merely keep the battery poles clean and grease slightly with acid-free grease if required. To dismount the battery: –... -
Page 31: Main Fuse
Main fuse The main fuse , located near the battery under the seat, protects all of the electric power consumers. Always replace blown fuses with an equivalent fuse. Visit a workshop if a new fuse blows again after it is inserted. It has a capacity of 20 amperes CAUTION EVER USE A STRONGER FUSE OR A REPAIRED FUSE MPROPER USE CAN DESTROY THE... -
Page 32: Replacing The Headlight Lamp
Replacing the headlight lamp Remove the headlight mask: Remove the screws on the left and right Press down the fender in the front, pull up the headlight mask, detach the bottom from the fender and fold forward at the bottom Replacing the headlight lamp: Pull the plug out of the light bulb... -
Page 33: Adjusting The Headlight Range
Adjusting the headlight range The payload may require an adjustment of the headlight range. The headlight range can be adjusted with the adjusting screw . The head- light range is reduced by turning the adjusting screw in a clockwise direction and increased by turning the adjusting screw in a counterclockwise direction. -
Page 34: Changing The Basic Setting Of The Clutch Lever
. The oil level should be 4 mm under the upper edge when the master cylinder is in a horizontal position. If necessary, add biodegradable SAE 10 hydraulic oil (Motorex clutch fluid 75), available from your authorized KTM workshop. CAUTION USES BIODEGRADABLE HYDRAULIC OIL TO ACTUATE THE HYDRAULIC CLUTCH... -
Page 35: Adjusting The Throttle Cable
Adjusting the throttle cable * 3-5 mm The throttle grip should always have 3-5 mm free travel. The throttle cables on models with a throttle grip such as the one depic- ted need to be adjusted at the carburetor. If an adjustment is necessary, remove the tank. Slide back the protection cover . -
Page 36: Cooling System
Cooling system The water pump in the engine ensures a forced circulation of the cooling liquid. When the engine is cold, the cooling liquid only circulates in the cylinders and cylinder heads. After the engine reaches the operating tempe- rature (approx. 70°C), the thermostat opens and the cooling liquid is also pumped through the two aluminum radiators. -
Page 37: Cleaning The Air Filter
(see information on the can). 5W/40 10W/50 KTM recommends Motorex Power Synt 4T in the 10W/50 viscosity (for temperatures over 0°C) or 5W/40 (for temperatures under 0°C). Checking the engine oil level You can check the engine oil level when the engine is cold or warm. -
Page 38: Oil Circuit
We therefore recommend having the oil changed at an authorized KTM workshop. The oil change must be performed by an authorized KTM workshop during the warranty period, otherwise the warranty will become null and void. -
Page 39: Changing The Oil Filter
To make it easier to ventilate the oil system, KTM has included a hose connection and a plastic hose in the tool set to build a filling tool. Take an empty oil can (1 liter) and punch a Ø 7mm hole in the lid. -
Page 40: Tool Set Details
Contents of tank bag: Headlight mask , taillight mask , 4 belts , tool set (see chapter "Tool Set" for details), automatic battery charge maintainer TOOL SET DETAILS ITEM PART NO. DESCRIPTION ITEM PART NO. DESCRIPTION 1 579.29.099.000 MILITARY TOOL SET 22 510.12.023.100 FORK WRENCH, A/F=10/13 2 583.12.100.050... -
Page 41: Troubleshooting
If you have your motorcycle serviced as set forth in this manual, no malfunctioning is to be expected. Nevertheless, if an error does arise, we recommend that you look for the error according to the following chart. Please note that you cannot perform all of the work yourself. If you are not sure, contact a KTM dealer. REMEDY... - Page 42 DEFECT CAUSE REMEDY Engine does not idle Idling jet is clogged Disassemble the carburetor and clean the jets Adjusting screws on the carburetor Have the carburetor adjusted are turned in the wrong position Spark plug is defective Replace the spark plug Ignition system is defective Have the ignition system checked Fuel level is too high in the carburetor...
- Page 43 REMEDY DEFECT CAUSE Run the vent hose without kinks or replace High oil consumption Bent transmission vent hose Check the oil level with the engine at operating temperature Engine oil level is too high and correct if necessary. Use thicker engine oil. See the "Engine Oil" chapter Engine oil is too thin (viscosity) Remove the seat and replace the main fuse.
-
Page 44: Cleaning
CLEANING Clean the motorcycle regularly to retain the beauty of the plastic parts. Use warm water with a commercial detergent and a sponge. Coarse dirt can be removed with a soft water jet. CAUTION NEVER CLEAN THE MOTORCYCLE WITH A POWER WASHER OR A HIGH PRESSURE JET HIS WILL CAUSE THE WATER TO REACH THE ELECTRIC COMPONENTS SOCKET CONNECTORS CABLES... -
Page 45: Technical Specifications - Chassis
TECHNICAL SPECIFICATIONS - CHASSIS 400 LS-E/MIL 2004 400 LS-E/mil Frame Central-tube frame made of chrome molybdenum steel Fork White Power – Up Side Down 43 Suspension travel front/rear 220 / 240 mm Rear suspension Single shock absorber (WP) with PRO-LEVER linking to the needle-bearing aluminum rear swinging fork Front brake Disk brake with perforated Ø... -
Page 46: Technical Specifications - Engine
TECHNICAL SPECIFICATIONS - ENGINE 400 LS-E/MIL 2004 Engine 400 LC4-E Design Liquid-cooled, 1-cylinder, 4-stroke Otto engine with balancer shaft and electric starter Displacement 398 cm Bore/Stroke 89 / 64 mm Compression ratio 10.3:1 Fuel unleaded premium fuel with at least ROZ 91... -
Page 47: Tightening Torques - Chassis
25 Nm 45 Nm Other collar nuts on chassis 15 Nm 30 Nm 50 Nm COMPARISON OF AUTOMOTIVE FLUIDS Recommended by KTM NATO number Fuel: unleaded premium-grade fuel with at least 91 octane ROZ F-67 Engine Oil: ( > 0°C ) -
Page 48: Circuit Drawing
Cable colors headlight speedometer sw: black ge: yellow rear bl: blue brake switch gn: green rt: red ws: white br: brown or: orange rs: pink gr: gray vi: violet ye-bu gn-bl gn-bl gn-bl gn-bl ye-bu head light flascher gn-re ye-bu gn-bl gn-br bu-re... -
Page 49: Table Of Contents
Adjusting the throttle cable * .....34 General information on KTM disk brakes ... .23 Battery . - Page 50 KTM Group Partner KTM-Sportmotorcycle AG A–5230 Mattighofen www.ktm.at...