Table of Contents
Advertisement
Quick Links
Advertisement
Table of Contents

Related Manuals for Lifescan InDuo blood glucose meter


Summary of Contents for Lifescan InDuo blood glucose meter
- Page 1 User’s Manual www.InDuo.com...
- Page 2 EC Directive for Medical Devices 93/42/EEC. The InDuo™ insulin doser fulfils the specification limits for dose accuracy according to ISO 11608-1. Pen-Injectors for Medical use, Part 1: Requirements and test methods. ® needles are designed to be used with the ® not included. are trademarks of Novo Nordisk A/S. ® are trademarks of LifeScan, Inc.
- Page 3 InDuo™ SYSTEM AND ACCESSORIES InDuo™ OneTouch Blood Glucose Meter Control Solution InDuo™ Insulin Doser OneTouch ® UltraClear™ cap for alternate puncture site Ultra OneTouch Ultra ® ® Test Strips NovoFine ® Needles 10-pack OneTouch ® UltraSoft™ Sterile Lancet OneTouch UltraSoft™...
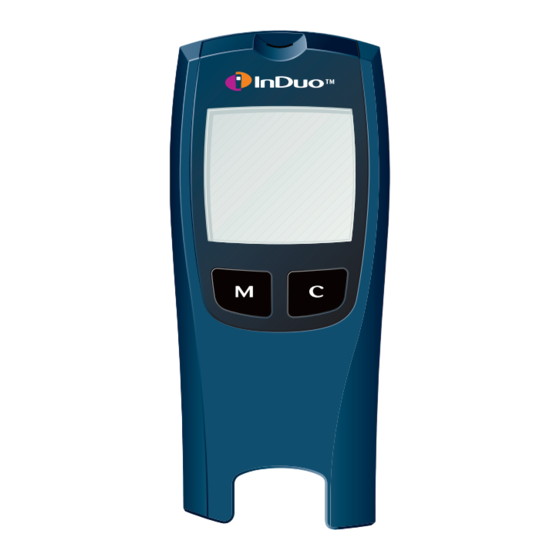
- Page 4 InDuo™ BLOOD GLUCOSE METER AND INSULIN DOSER Data port Test port Meter display M button C button Dose selector LOT number Residual scale Window Slide Insulin doser display Push button Release button...
- Page 5 InDuo™ METER AND INSULIN DOSER DISPLAY SYMBOLS Indicates a control solution test result. Code Appears with the code number of the OneTouch ® Ultra Test strip currently in use. Apply symbol Tells when to apply the sample. Battery symbol Appears when the meter battery power is low or must be replaced.
- Page 6 InDuo™ COMPONENTS OneTouch UltraSoft™ Adjustable blood sampler ® Release button OneTouch ® Lancet Protective disk NovoFine ® 6 mm or 8 mm Outer needle Inner Needle Protective needle Ejection / Cocking control Deep puncture Indicator mark Puncture depth setting knob Shallow puncture PenFill ®...
-
Page 7: Table Of Contents
CONTENTS Welcome Getting your InDuo system ready for use Preparing your InDuo Preparing your InDuo Testing your blood glucose levels Injecting your insulin Using the InDuo memory functions Checking your previous test results Checking your previous injection Viewing blood glucose test results on a personal computer Comparing InDuo meter and laboratory results Caring for your InDuo... -
Page 8: Welcome
WELCOME You have chosen the InDuo system designed to simplify the way you manage your diabetes. Featuring an integrated blood glucose meter and insulin doser, InDuo will enable you to check your blood glucose levels and administer insulin using one compact system. This... -
Page 9: Getting Your Induo
GETTING YOUR InDuo READY FOR USE Preparing your InDuo Setting the time, date, and unit of measurement Your InDuo meter comes with pre-set values for the time, date, and unit of measurement. However, you can reset these if you need to change the date or time, or if you remove the meter battery. - Page 10 GETTING YOUR InDuo SYSTEM READY FOR USE Setting the hour • The time will appear first, with the hour digits flashing. • Press and release Ñ until the correct hour is displayed. • To scroll faster, hold Ñ down. • After setting the hour, press ˛ to set the minutes. The minutes digits will start flashing.
-
Page 11: Getting Your Induo Tm System Ready For Use
Setting the time format • Press ˛ and the 12-hour format will start flashing. • Your InDuo meter can display the time in either a 12-hour format ¸ or a 24-hour format | to ‹. • The 12-hour format is pre-set in the meter. •... - Page 12 GETTING YOUR InDuo SYSTEM READY FOR USE Setting the month • Press ˛ and the date will appear on the display with the month display flashing. • Press and release Ñ until the correct month is displayed. • To scroll faster, hold Ñ down. Setting the day •...
- Page 13 Selecting the unit of measurement • With the correct day on the display, press ˛ and the current unit of measurement will start flashing. The InDuo meter can display test results in milligrams per deciliter (Á) or in millimoles per liter (fi).
- Page 14 GETTING YOUR InDuo Top edge Apply a sample here, where the narrow channel meets the top edge of OneTouch ® Ultra test strip. Confirmation window This is where you confirm if a large enough sample has been applied to the top edge. Contact bars Insert this end of OneTouch...
- Page 15 • Apply only control solution or a blood sample to the top edge of the OneTouch other substances to the top edge may cause inaccurate results. • Do not use OneTouch ® Ultra test strips beyond the expiration date printed on the package since using expired OneTouch ®...
- Page 16 GETTING YOUR InDuo SYSTEM READY FOR USE (Example) Coding your InDuo Code numbers are used to calibrate the OneTouch Ultra test strips with the InDuo code the InDuo meter before using it for the first time, and then every time you change to another vial of OneTouch ®...
- Page 17 Match the code numbers The calibration code is stored in the meter memory until you change it. The current code number will appear on the display for 3 seconds. • Compare the code number on the meter display with the code number on the OneTouch •...
-
Page 18: The Control Solution Test
GETTING YOUR InDuo SYSTEM READY FOR USE The control solution test OneTouch ® Ultra Control Solution is used to check that the meter and the OneTouch are working together as a system and that you are performing the test correctly. It is very important that you do this simple test routinely to check that the system is providing accurate results. - Page 19 æ Caution ® • Use only OneTouch Ultra Control Solution • Check the expiration date on the control solution vial. Do not use if expired. • Store control solution tightly closed at temperatures below 86ºF (30°C). • Do not refrigerate control solution. •...
- Page 20 GETTING YOUR InDuo SYSTEM READY FOR USE Before you use your InDuo for the first time, practice the procedure using the control solution test. When you can do three tests in a row that are within the range printed on the OneTouch ®...
- Page 21 • After the apply symbol R appears on the display, press Ñ. • The Ë symbol will appear on the display. With the Ë symbol on the display, the meter will mark your next test in the memory as a control solution test.
- Page 22 GETTING YOUR InDuo SYSTEM READY FOR USE (Example) Apply control solution • Shake the control solution vial well. • Remove the cap. • Squeeze the vial, discard the first drop, and wipe off the dispenser tip to obtain an accurate result. •...
- Page 23 æ Caution • If the control solution test result falls outside the range printed on the OneTouch vial, repeat the test. • If you continue to get control solution test results that fall outside of the range printed on the vial, the InDuo system may not be working properly.
- Page 24 GETTING YOUR InDuo SYSTEM READY FOR USE The control solution test troubleshooting There are several reasons why a control solution test result may fall outside the expected range (as printed on the OneTouch Probable reasons Error in performing the test Failure to shake the OneTouch control solution vial vigorously Expired or contaminated OneTouch...
-
Page 25: Preparing Your Induo
PREPARING YOUR InDuo TO INJECT INSULIN Before you are ready to inject your insulin, the InDuo insulin doser must be loaded with a PenFill cartridge. A needle must be attached and the InDuo insulin doser must be primed by doing an air shot. How to load your PenFill ®... - Page 26 GETTING YOUR InDuo SYSTEM READY FOR USE To load PenFill ® insulin doser a. • Pull out the InDuo • The very first time the insulin doser is pulled out, the insulin doser display stays blank until the slide is opened. •...
- Page 27 • Insert PenFill ® into the InDuo pushing it slightly backwards as shown d. The end with the rear rubber stopper goes in first. Make sure that the threaded plastic cap fits firmly into place e. • Close the slide completely f. The release button is locked until the slide has been closed.
- Page 28 GETTING YOUR InDuo SYSTEM READY FOR USE How to attach a NovoFine • Never place a NovoFine ® insulin doser until you are ready to prime your InDuo insulin doser by doing an air shot before giving an injection. • Wipe the front rubber stopper of the PenFill an alcohol swab.
- Page 29 æ The InDuo insulin doser should always be primed: • Before each injection. • After changing PenFill ® • After changing the NovoFine • After opening and closing the slide on the InDuo insulin doser. Priming your InDuo insulin doser for the first time æMake sure that a NovoFine the push button is pressed completely in, and the...
- Page 30 GETTING YOUR InDuo SYSTEM READY FOR USE • Dial 8 units b. • Hold the InDuo needle upwards and tap the slide gently with your finger a few times c, to ensure that any air in PenFill ® rises to the top. •...
-
Page 31: Testing Your Blood Glucose Levels
TESTING YOUR BLOOD GLUCOSE LEVELS Be sure to read this section, Important Information on page 65, and the OneTouch package insert found in this system kit box carefully before testing. Before using your InDuo glucose level, check that you have all the items needed to complete the procedure. - Page 32 TESTING YOUR BLOOD GLUCOSE LEVELS Check that the InDuo meter display is working properly. You will know the meter display is working properly because each time the InDuo turned on, all the segments of the meter display appear briefly (see “InDuo display symbols”...
- Page 33 Obtaining a drop of blood Insert a lancet in the blood sampler • Twist the cap of the blood sampler counter- clockwise to remove it. • Insert a new lancet into the lancet holder, and push down firmly until it is fully seated a. Do not twist the lancet.
- Page 34 TESTING YOUR BLOOD GLUCOSE LEVELS • Replace the cap c. • Turn the cap clockwise until it fits snugly but not too tight. • Adjust puncture depth setting if necessary. Twist the knob toward the smaller bumps for a shallower puncture or toward the larger bumps for a deeper puncture d.
- Page 35 Cock the blood sampler • Slide the ejection/cocking control back until it clicks e. • If it does not click, the blood sampler may have been cocked when the lancet was inserted. Wash your hands and the puncture site • Use warm, soapy water to wash your hands and the puncture site f.
- Page 36 TESTING YOUR BLOOD GLUCOSE LEVELS Getting a Fingertip Blood Sample The InDuo System requires a very small blood drop to perform a test. You may obtain it from a fingertip or arm. (See page 33 for information on obtaining a blood sample from the arm).
- Page 37 Important information about arm testing • Under certain conditions, blood glucose test results obtained using samples taken from your arm may differ significantly from fingertip samples. • The conditions in which these differences are more likely to occur are when your blood glucose is changing rapidly such as following a meal, an insulin dose, or associated with physical exercise.
- Page 38 TESTING YOUR BLOOD GLUCOSE LEVELS Actual size of required blood • volume (rounded drop). Correct Incorrect Getting a Blood Sample From The Arm The arm has fewer nerve endings than the fingertip so you may find that obtaining a blood sample from the arm may be much less painful than using the fingertip.
- Page 39 Allow Blood Drop to Form Continue holding the sampler against the skin for a few seconds until the blood drop forms. Allow enough blood to form under the cap until you have a blood sample that is sufficient to fill the confirmation window of the test strip.
- Page 40 TESTING YOUR BLOOD GLUCOSE LEVELS Cleaning the OneTouch ® UltraSoft • Clean the sampler with soap and water as needed. To disinfect the sampler, prepare a disinfectant solution of 1 part household bleach to 10 parts water. Dampen a cloth in this solution and wipe the sampler thoroughly.
- Page 41 correctly. (See page 9 for additional information on the units of measurement.) • Code the meter if necessary. Apply blood sample • Obtain a rounded drop of blood from your finger using the blood sampler. The blood sample must be at least 1 microliter in volume ( rounded drop) to fill the confirmation window or you may get an Æ...
- Page 42 TESTING YOUR BLOOD GLUCOSE LEVELS Good sample Sample too small • If the confirmation window does not fill completely before the meter begins to count down, do not add more blood to the test strip; discard the test strip and repeat the test with a new test strip.
- Page 43 Read the results • Your blood glucose test result will appear after the meter counts down from N to A. InDuo • Turn off the InDuo meter by removing the OneTouch ® Ultra test strip. • Blood glucose test results are automatically stored in the InDuo meter memory.
- Page 44 TESTING YOUR BLOOD GLUCOSE LEVELS Special messages HI: If your blood glucose test result is above 600 mg/dL (33.3 mmol/L), S will appear on the meter display. This indicates severe hyperglycemia (high blood glucose). You should re-check your glucose level, and if S call your health care professional immediately.
-
Page 45: Injecting Your Insulin
INJECTING YOUR INSULIN æ Before beginning, read Important Information on page 65. To begin preparation for injecting your insulin, pull out the InDuo insulin doser. Do not press any buttons on the meter cap while you remove the insulin doser. Attach a NovoFine then be ready to prime your insulin doser and dial your insulin dose. - Page 46 INJECTING YOUR INSULIN How to prime your InDuo • Make sure that a NovoFine (see page 24), the push button is pressed in completely, and the slide is closed. If the slide is not closed, the release button will be locked. •...
- Page 47 How to dial your dose • Make sure that a NovoFine that the push button is pressed completely in. • Press the release button a and the push button will jump out. The display will show 0. • Dial the number of units you need by turning the dose selector at a steady speed b.
- Page 48 INJECTING YOUR INSULIN How to change a dose dialed • If you accidentally dial a larger dose than you need, dial back to the correct number of units a. • The dose dialed can be changed until you press the push button.
- Page 49 How to give an injection It is important that you follow the injection method recommended by your healthcare professional. To inject, press the push button completely in until it locks a. You will probably feel that the push button becomes a little harder to press at the end of the injection.
- Page 50 INJECTING YOUR INSULIN • When the push button is pressed completely in, the segments turn on two by two “ telling you to leave the needle under your skin. • When the circle symbol § appears b, the full insulin dose has been delivered and you can withdraw the needle.
- Page 51 What to do when PenFill • Do not try to inject an insulin suspension (cloudy insulin) if the rear rubber stopper is below the arrow marks on the slide as shown in the picture. The glass ball must have adequate space to resuspend the insulin.
- Page 52 INJECTING YOUR INSULIN either • Change PenFill ® (see page 49). • Prime the InDuo insulin doser (see page 24). • Inject the whole dose at once. • Inject the remaining insulin, making a note of the amount of insulin you have injected. •...
- Page 53 How to change PenFill • Make sure that the push button is pressed in completely a. • Make sure there is no needle on the insulin doser. • Open the slide. • Take out the used PenFill • Take a new PenFill ®...
- Page 54 INJECTING YOUR INSULIN InDuo insulin doser function check You should regularly check the functioning of your InDuo insulin doser. For example, once a month, or before starting a new box of PenFill should also check the functioning of the InDuo insulin doser if you think that it is not working properly.
-
Page 55: Using The Induo
USING THE InDuo MEMORY FUNCTIONS Both the InDuo meter and the InDuo have memory functions. Checking your previous test results Your InDuo meter has a memory that can store the 150 most recent blood glucose and control solution test results, together with the date and time at which they were carried out. - Page 56 USING THE InDuo MEMORY FUNCTIONS (Example) How to recall test results • After 3 seconds, the 30-day average will be replaced by the most recent test result with date and time. • Press Ñ once and the next most recent test result will appear.
- Page 57 Other memory functions of the InDuo meter The InDuo meter can provide valuable information on variations in your blood glucose levels. Average blood glucose test results over 14 days and 30 days • The meter provides 2 averages of your blood glucose tests.
-
Page 58: Checking Your Previous Injection
USING THE InDuo MEMORY FUNCTIONS (Example) Checking your previous injection • Pull out the InDuo insulin doser. • After the display test (see page 80), your previous dose (or priming) and the time passed since delivery can be seen on the insulin doser display. Each segment represents 1 hour. -
Page 59: Viewing Blood Glucose Test Results On A Personal Computer
VIEWING BLOOD GLUCOSE TEST RESULTS ON A PC VIEWING BLOOD GLUCOSE TEST RESULTS ON A PERSONAL COMPUTER You can transfer blood glucose test results to your PC for home viewing. This requires a LifeScan Interface Cable and IN TOUCH ® Diabetes Management Software which is available from LifeScan. - Page 60 IN TOUCH user’s manual. Connect the LifeScan Interface Cable • Connect the LifeScan Interface Cable to a serial port on the back of your computer. • With the InDuo meter turned off, connect the...
- Page 61 IN TOUCH ® Software, which includes the LifeScan Interface Cable, must be purchased separately. To obtain the software and a LifeScan Interface Cable, call InDuo Customer Services at 1-877-520-9056. VIEWING BLOOD GLUCOSE TEST RESULTS ON A PC meter to ®...
-
Page 62: Comparing Induo
COMPARING THE InDuo METER AND LABORATORY RESULTS COMPARING THE InDuo AND LABORATORY RESULTS The InDuo meter blood glucose test results and laboratory results are both expressed in plasma-equivalent units. However, you may notice a normal variation between the results you obtain using your meter and your usual laboratory results. - Page 63 • Never use your InDuo meter with blood that has been collected in a grey-top blood collection tube. • Use fresh capillary blood only. Other reasons for variation Besides the factors listed in the OneTouch ® Ultra test strip package insert there are other reasons for variations: •...
-
Page 64: Caring For Your Induo
CARING FOR YOUR InDuo SYSTEM CARING FOR YOUR InDuo SYSTEM • Your InDuo is a precision instrument. To ensure it works accurately and safely, handle it with care. • Avoid situations where your InDuo component parts can be damaged. • Store InDuo in its carrying case after each use. - Page 65 Power supply The InDuo system is powered by batteries making it portable and self-contained. The InDuo comes with two battery systems already installed. • The meter battery provides you with enough power to perform approximately 1000 blood glucose or control solution tests. When the meter battery expires, it is easily replaced using a 3.0 V (#2032 or equivalent) lithium battery.
- Page 66 CARING FOR YOUR InDuo SYSTEM When to change your InDuo battery Your InDuo meter will alert you when the power is getting low by displaying the following messages. a This message appears when the meter display is turned on and all the other display messages are functional.
- Page 67 How to replace the InDuo • To replace the meter battery, make sure that the InDuo meter is turned off. • Turn your InDuo meter over and locate the battery compartment. • Open the battery door on the back of the meter a. •...
- Page 68 CARING FOR YOUR InDuo SYSTEM (Example) When to replace your InDuo A flashing display indicates that the insulin doser battery power is low. • Be sure to replace your InDuo within 30 days. The battery cannot be changed. Call InDuo Customer Services at 1-877-520-9056 to obtain a new InDuo insulin doser.
-
Page 69: Æ Important Information
æ IMPORTANT INFORMATION • As a precautionary measure, always carry a spare insulin delivery system in case your InDuo doser is lost or damaged. • Always prime your InDuo doser (see page 24) to ensure the insulin flow: • Before each injection. •... - Page 70 IMPORTANT INFORMATION • The InDuo system is tough but could still be damaged. Handle it with care, do not drop it, and avoid knocking it against hard surfaces. If the InDuo system has been dropped or knocked, you must carry out a function check of the insulin doser (see page 50) and a control solution test (see page 14).
- Page 71 • Take the needle off the InDuo insulin doser immediately after each injection. If you do not remove it, temperature changes may cause liquid to leak out of the needle. With an insulin suspension (cloudy insulin), a leak of liquid may change the concentration of the insulin.
-
Page 72: Display Messages And Problem-Solving Guide
DISPLAY MESSAGES AND PROBLEM-SOLVING GUIDE DISPLAY MESSAGES AND PROBLEM-SOLVING GUIDE There are a number of messages and symbols that appear on the insulin doser and meter displays during use of the InDuo system. The following is a summary of all display messages. The meter gives an error message when it detects a problem which could cause an inaccurate result. -
Page 73: The Induo Meter
This message appears immediately after the system check if your meter has not been coded. DISPLAY MESSAGES AND PROBLEM-SOLVING GUIDE ® Ultra test blood glucose meter is Action If segments are missing, call InDuo Customer Services at 1-877-520-9056 for further action. -
Page 74: The Induo Tm Meter
DISPLAY MESSAGES AND PROBLEM-SOLVING GUIDE Meter display What it means This is the code number stored in the InDuo (Example) The system is ready to accept a blood sample. The system is ready to accept a control solution test sample. meter. - Page 75 Meter display What it means Five-second countdown. The meter is calculating the result. At the end of the countdown, the meter will display the test result. A blood glucose test result in mg/dL. (Example) A blood glucose test result in mmol/L.
- Page 76 DISPLAY MESSAGES AND PROBLEM-SOLVING GUIDE Meter display What it means A blood glucose test result with a suggestion to check your ketone levels. (Example) Indicates that you may have a very high blood glucose level, possibly exceeding 600 mg/dL (33.3 mmol/L). Indicates that you may have a very low blood glucose level, possibly lower than 20 mg/dL (1.1 mmol/L).
- Page 77 Meter display What it means A blood glucose test result stored in the memory. (Example) A control solution test result stored in the memory. (Example) There is no test result stored in this place in the InDuo DISPLAY MESSAGES AND PROBLEM-SOLVING GUIDE Action No action required.
- Page 78 DISPLAY MESSAGES AND PROBLEM-SOLVING GUIDE Meter display What it means Average of the last 14 days. (√ means that 64 tests were performed within this period). (Example) Average of the last 30 days. (∑ means that 138 tests were performed during this period). (Example) Error message that indicates that there is a problem with the...
- Page 79 Meter display What it means Error message could be caused by a used or damaged OneTouch there is a problem with the meter. Error message that indicates that the blood sample or control solution was applied before R appeared on the display.
- Page 80 DISPLAY MESSAGES AND PROBLEM-SOLVING GUIDE Meter display What it means Error message that indicates that the InDuo problem with the test. Possible causes are incompletely filled confirmation window or a damaged OneTouch strip. The battery symbol É appears on the display with the unit of measure. It means that the power of the battery is getting low.
- Page 81 Meter display What it means The InDuo that the temperature is below the operating range. You cannot perform a test until the InDuo meter and the OneTouch test strips reach a temperature within the operating range of 43–111ºF (6–44ºC). The InDuo that the temperature is above the operating range.
- Page 82 DISPLAY MESSAGES AND PROBLEM-SOLVING GUIDE Here are the answers to some questions you might ask when using your InDuo meter: What should I do if the InDuo OneTouch ® Ultra test strip has been inserted? Probable reasons Battery exhausted Battery incorrectly installed or absent OneTouch ®...
- Page 83 What should I do if the InDuo test after the OneTouch ® Ultra test strip has been inserted? Probable reasons Insufficient blood sample Defective OneTouch ® Ultra test strip Sample applied after automatic shut-off (2 minutes after last used) Meter malfunction DISPLAY MESSAGES AND PROBLEM-SOLVING GUIDE meter does not start running the blood glucose Action...
-
Page 84: The Induo Tm Insulin Doser
DISPLAY MESSAGES AND PROBLEM-SOLVING GUIDE The InDuo insulin doser As with the meter display, a number of messages and symbols appear on the InDuo insulin doser display during use of the insulin doser. Message What it means The very first time the insulin doser is removed from the meter cap, the display stays blank until the slide is opened. - Page 85 Message What it means The display shows the number of insulin units dialed. The segments turning on two by two tell you how long to leave the needle under the skin during injection. The display shows the number of insulin units delivered. The circle confirms that the delivery has been completed.
- Page 86 DISPLAY MESSAGES AND PROBLEM-SOLVING GUIDE Message What it means The display shows the number of insulin units delivered. The segments indicate the time passed since delivery. 1 segment represents 1 hour. In this example 4 hours have passed since the insulin doser delivered the previous dose.
- Page 87 Here are answers to some questions you might ask about your InDuo insulin doser display: Why has the display turned off? If the display goes off, press the release button, and the push button will jump out. Press the push button completely in, and the display should reappear.
- Page 88 DISPLAY MESSAGES AND PROBLEM-SOLVING GUIDE The needle may be blocked. Change the needle and prime the InDuo insulin doser until insulin appears at the needle tip. Check that the push button is pressed completely in and locked. Open the slide and make sure that PenFill ®...
- Page 89 Why is insulin delivered when the dose selector is turned? You have dialed the maximum dose of 70 units and then continued dialing. If you need to inject a dose of insulin larger than 70 units, you must divide the dose into amounts equal to, or less than, 70 units.
-
Page 90: Specifications
SPECIFICATIONS InDuo Size: 123 mm x 54 mm x 35 mm (4.84 in x 2.13 in x 1.38 in) Weight: 4.40 ounces with battery (125g) Operating ranges: Temperature: 43–104ºF (6–40°C)* Relative humidity: 10–90% Hematocrit: 30–55% InDuo meter Result range: 20-600 mg/dL (1.1–33.3 mmol/L) Calibration: Plasma-equivalent Blood sample:... -
Page 91: Warranty
InDuo doser Cartridge: 3mL PenFill Needle: NovoFine Dose: 1 IU increment, minimum = 1 IU, maximum = 70 IU Memory: 1 (last dose and time since) Power source: Internal non-replaceable lithium battery Battery life: 4 years + 1 year of shelf life WARRANTY The manufacturers warrant that the InDuo workmanship for a period of three years. -
Page 92: Blood Value Targets
BLOOD VALUE TARGETS Times of day Glucose ranges for people without diabetes (mg/dL) Before breakfast 70–105 Before lunch or dinner 70–110 1 hour after meals Less than 160 2 hours after meals Less than 120 Between 2 and 4 am Greater than 70 Source: Krall, L.P., and Beaser, R.S.: Joslin Diabetes Manual, Philadelphia: Lea and Febiger (1989), 138. - Page 96 InDuo™ Customer Services at our toll free number: (English) 1-877-520-9056 (Español) 1-800-381-7226 Distributed by: LifeScan Inc. Milpitas, California 95035, U.S.A. In partnership with Novo Nordisk A/S 2880 Bagsvaerd, Denmark © LifeScan/Novo Nordisk 2001 Revision date: August 2004 AW 06084101C...