Table of Contents
Advertisement
Quick Links
Advertisement
Table of Contents

Related Manuals for NewAir AH-470


Summary of Contents for NewAir AH-470
- Page 1 AH-470 Flat Panel Micathermic Space Heater...
-
Page 2: Table Of Contents
Safety Features ....................... 10 Overheat Protection ..................10 Safety Cut-Out Switch ..................11 Cleaning & Maintenance ..................11 Storage ......................11 Troubleshooting ...................... 12 Limited Manufacturer’s Warranty ................. 14 SPECIFICATIONS AH-470 ODEL 120 Volts OLTAGE 12.5 Amps URRENT 60Hz REQUENCY... -
Page 3: Before First Use
BEFORE FIRST USE Read and follow all the instructions below even if you feel you are familiar with the appliance. Remove the packing and make sure that the appliance is intact. If in doubt do not use the appliance and contact the place of purchase. ... - Page 4 Do not locate in areas of high foot traffic, ensure the power cord and heater are in view to avoid accidents. This appliance heats up when in use. To avoid burns, do not touch the front of the appliance or any of the grilles or vents. Keep away from water: ...
- Page 5 Do not remove the plug from the power socket until the appliance has been switched off. Always hold the plug when removing it from the wall, do not pull the cord. Always unplug the appliance when it is not in use. ...
-
Page 6: Parts List
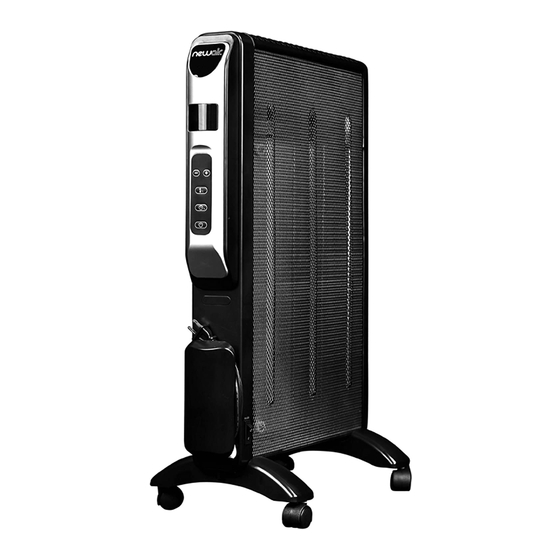
PARTS LIST 1. LOGO Plate 5. Mesh Control 6. Plastic frame 3. Storage location of 7. Feet base 8. Casters plug cord 4. Manual-reset rocker switch... -
Page 7: Assembly Instructions
ASSEMBLY INSTRUCTIONS Position the heater carefully upside down. Place the wheels to the hole, then screw in center round hole of foot base and screw in tightly with a screwdriver. Repeat for other leg Turn the heater the right way up. POSITIONING OF THE HEATER The heater should only be operated at a minimum distance of 1 meter from any wall or other object. -
Page 8: Use & Operation
USE & OPERATION NOTE: When operated for the first time a slight odor may be emitted for a few minutes. This is harmless and occurs with most appliances as slight traces of dust or lubricants may have collected during the manufacturing process. ... -
Page 9: To Set The Thermostat
TO SET THE THERMOSTAT Press the button, then press the + or -buttons to change the target temperature. The thermometer symbol will illuminate, and the digital display will flash, showing the target temperature. After 5 seconds the display will stop flashing and return to displaying the room temperature. -
Page 10: Safety Cut-Out Switch
SAFETY TIP-OVER SWITCH The heater is fitted with a safety tip-over switch to turn the heater off if it is knocked over. If the heater is knocked over and the tip-over switch activates, turn the heater off at the power outlet and take EXTREME care when standing the heater upright as it will still be hot. -
Page 11: Troubleshooting
TROUBLESHOOTING Problem Possible Causes Solution Unit is not Turn the heater off; unplug it heating. Overheat protection has and allow it to cool. Inspect temporarily deactivated and remove any objects on or the heater. adjacent to the heater. Wait 30 minutes before plugging unit back in. - Page 12 Problem Possible Causes Solution The heater It will quickly evaporate and is producing A drop of oil fell on the should not occur again. Ensure a burning heating coil during the room in which heater is smell. manufacturing process. situated is well ventilated. Ensure there are no combustible materials Check for and remove any...
-
Page 13: Limited Manufacturer's Warranty
When making a warranty claim, please have the original bill of purchase with purchase date available. Once confirmed that your appliance is eligible for warranty service, all repairs will be performed by a NewAir™ authorized repair facility. The purchaser will be responsible for any removal or transportation costs. Replacement parts and/or units will be new, re-manufactured or refurbished and is subject to the manufacturer’s discretion.