Table of Contents
Advertisement
68/4CPIG"&KIKVCN"/WNVKOGVGT
YKVJ"2%"+PVGTHCEG
22-812
Auto-Ranging with Manual-Ranging Override —
automatically selects a range when you measure
voltage, current, resistance, capacitance, and
frequency. You can also manually set the range
when measuring values you know are within a
certain range.
Computer Interface with Supplied Software —
you can connect the meter to your computer and
use the supplied software to log and graph
measurements.
Logic Function — you can use the meter to test
HI and LO logic levels.
Multiple Displays — the supplied software
displays the information you see on your meter's
display onto your computer's monitor, updating it
4 times per second.
Automatic Data Logging — the software works
with your meter and computer to select the
correct sampling rate for your application, then
capture and store data. The software logs the
time for each reading, helping you keep track of
each sample. You can also save logged data in
your hard drive for future reference.
If an icon appears at the end of a paragraph, go to the box on that page with the corresponding icon
for pertinent information.
Rý
— Warning
. . . .
#
— Important
#
#
"+/2146#06"
— Caution
OWNER'S MANUAL
Please read before using this equipment.
©
2002 RadioShack Corporation.
RadioShack and RadioShack.com are trademarks used by
RadioShack Corporation.
° ° ° °
±
— Hint
— Note
All Rights Reserved.
Advertisement
Table of Contents

Related Manuals for Radio Shack 22-812


Summary of Contents for Radio Shack 22-812
- Page 1 68/4CPIG"&KIKVCN"/WNVKOGVGT YKVJ"2%"+PVGTHCEG 22-812 Auto-Ranging with Manual-Ranging Override — automatically selects a range when you measure voltage, current, resistance, capacitance, and frequency. You can also manually set the range when measuring values you know are within a certain range. Computer Interface with Supplied Software —...
-
Page 2: Table Of Contents
Your RadioShack 46-Range Digital Multimeter is a "+/2146#06" portable, compact, auto-ranging, digital multimeter. It is ideally suited for field, lab, shop, and home Completely read this manual before you use this applications. The multimeter provides precise meter. measurements and is built to provide the highest possible reliability. - Page 3 apply more than 1000V DC or 750V RMS AC (continued) between the input jacks and ground. Checking Continuity ... 23 • Use extreme caution when working with Checking Diodes ..24 voltages above 100V. Always disconnect Measuring Logic ..25 power from the circuit you are measuring Measuring before you connect test leads to high-voltage...
- Page 4 "2 "/ 2'%+#. #0'. #4-+0)5 "9#40+0) " ý ý For your safety, we have added special markings to (continued) the meter’s panel to remind you of the measurement limitations. • Use extreme care while using the meter to mea- The maximum voltage that this meter can sure current and voltage measure is 1000V DC or 750V AC.
- Page 5 52'%+(+%#6+105 Accuracies at 73.4 ° F (23 ° C) 5 ° , <75% RH ± DC VOLTS (Maximum Measurement: 1000V) 400mV ..........± 0.3% of Reading, ± 4 in Last Digit 4V to 40V ........... ± 0.3% of Reading, ± 3 in Last Digit 400V ..........
- Page 6 AC CURRENT (Average Responds, RMS Calibrated, 10A Maximum, DC Coupled) 400µA ..........± 1.0% of Reading, ± 5 in Last Digit 4mA ........... ± 0.8% of Reading, ± 3 in Last Digit 40mA ..........± 1.0% of Reading, ± 5 in Last Digit 400mA ..........
- Page 7 The accuracy of these modes is determined by the exter- nal device and the accuracy of the DC volt mode. The temperature range of the newer 1mV per degree C probes are generally between –50°C and 1000°C. FREQUENCY Accuracy 400Hz – 4k–40k–400kHz–4MHz: ........
-
Page 8: Specifications
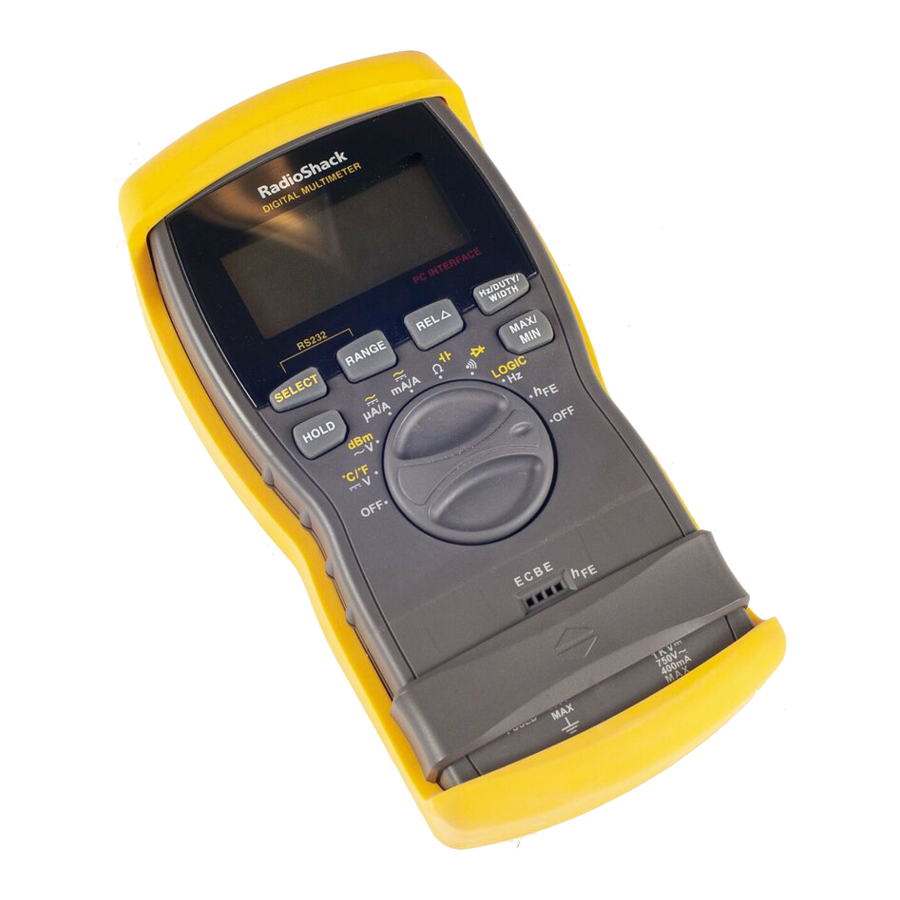
LOGIC MODE Min. High-Level Voltage: ....... 2.0V ± 0.2V Max. Low-Level Voltage: ....... 1.0V ± 0.2V CONTINUITY BEEPER ≤ Continuity (short) ........50 ± 30 Ohms Open ............> 50 ± 30 Ohms Open Circuit ............ < 2.8 Volts Short Circuit Current ......... < 2.0 mA Beeper Volume (at 5cm) ..... - Page 9 #"37+%-".11-"#6";174"/'6'4 • • • • — / mA/A — measures ohms measures and capacitance. current. / µ µ µ µ A/A — „ „ „ „ – – – – — measures checks current. continuity Guard and diodes. WARNING: LOGIC/Hz — THE GUARD measures PROTECTS...
- Page 10 € — lets you RANGE — work with relative selects auto or measurements. manual ranging. Hz/DUTY/WIDTH — measures SELECT — frequency, duty selects options. cycle, and pulse width. HOLD — holds a measurement value. MAX/MIN — lets dBm / ~ V — you store selects AC voltage maximum and...
-
Page 11: Your Meter
24'2#4#6+10 "9#40+0) " ý ý Installing a Battery " "$ 056#..+0) #66'4; • To avoid electrical Your meter requires one 9-volt battery (not shock, disconnect all of supplied) for power. For the best performance and the meter’s test leads longest life, we recommend a RadioShack alkaline from any equipment be- Rý... -
Page 12: Turning The Meter On/Off/Testing The Display
400mA, plug the red test lead’s right-angled e n d . ± + V.mA.Ω Ω Ω Ω i n t o i n s t e a d o f +10A MAX ± ± "016'" " " "5 5+0) 6#0& Connecting the Test Leads The stand on the back of the meter lets you place it... - Page 13 "; "5 '(14' 6#46 "9#40+0) " ý ý Follow these steps to familiarize yourself with the Always turn off power to the meter’s operation before you use it for the first time. Rý circuit you are about to ..measure before you probe the test leads into high- 1.
- Page 14 to display 4001 or more units) or underflow (the meter tries to display 379 or fewer units). 3. To select manual range mode, press disappears. Then repeatedly RANGE AUTO press until the range you want appears. RANGE The decimal point shifts each time you press RANGE 4.
- Page 15 4CPIG &KURNC[ ± ± "016'" " ZZZ$Zýc7 ZZZ$Zýc7 ZZZ$Zýc7 ZZZ$Zýc7 400 mA The display might show a Z$ZZZý7 Z$ZZZý7 Z$ZZZý7 Z$ZZZý7 phantom reading in some ZZ$ZZý7 ZZ$ZZý7 ZZ$ZZý7 ZZ$ZZý7 DC and AC voltage ranges 10 A when the test leads are not Ω...
-
Page 16: Measurement
measures its own internal capacitance, which is ± ± "016'" " normal). If you set the meter in relative mode with the small value as reference, it does not display this Using Relative value when you measure a component. Measurement •... -
Page 17: Making Measurements
To turn the meter back on after it automatically ± ± "016'" " turns off, press any button. The meter automatically "2 ". 5+0) 19'4 sets itself to its power lock To set the meter so it does not turn off mode while you use it to monitor (see “Using automatically, set the function selector to... - Page 18 repeatedly press to read the currently MAX/MIN selected maximum value (if appears) or the currently selected minimum value (if ± ± "016'" " appears). When the meter is set to its 5. To pause monitoring, press HOLD Hold voltage or current function appears.
-
Page 19: Displaying Temperature
& "6 +52.#;+0) '/2'4#674' "9#40+0) " ý ý You can use an optional thermocouple module to Displaying measure temperature with your meter. The Temperature thermocouple module you use must output 1mV per The thermocouple module measured °C or °F. The meter can display has not been evaluated by °... -
Page 20: Measuring Dc/Ac Current
To set manual range control , press RANGE "9#40+0) " ý ý then change the range (if necessary) by Measuring AC Voltage repeatedly pressing RANGE Riding on a DC Source 4. Touch the probes to the circuit you want to test. Bias To avoid injury or damage "#%"8... -
Page 21: Measuring Resistance
2. Press once to set the meter to SELECT "%#76+10" measure AC current ( ∼ ∼ ∼ ∼ appears). Otherwise, repeatedly press to set the meter to Measuring DC/AC SELECT measure DC current ( ∼ ∼ ∼ ∼ disappears). Current (continued) 3. - Page 22 • • • • 2. Rotate the function selector to ± ± "016'" " , or Ω Ω Ω Ω KΩ Ω Ω Ω MΩ Ω Ω Ω 3. If necessary, press until SELECT Measuring Resistance appears to set the meter to measure resistance.
-
Page 23: Measuring Capacitance
"% '#574+0) #2#%+6#0%' "%#76+10" The capacitance measuring circuit in your meter Measuring charges a connected capacitor to a specific voltage Capacitance level, then discharges the capacitor to a lower Do not connect the test leads voltage. The meter measures the amount of time to a source of voltage with . -
Page 24: Checking Diodes
4. Touch the test leads across the circuit you want to measure. appears and the buzzer Shrt sounds if the circuit resistance is less than about 50 ohms (meaning the circuit is continuous or shorted). appears and the Open meter’s buzzer does not sound if the circuit resistance is greater than about 50 ohms (meaning the circuit is not continuous). - Page 25 "& "2 *'%-+0) +1&' 1.#4+6; "%#76+10" Many diodes have a stripe or mark on one side. The marked side of the diode indicates the diode’s Measuring Logic cathode or negative (–) side. The other side is the Do not apply more than 5 VDC between terminals.
- Page 26 Otherwise, to select the duty cycle or pulse width function, repeatedly press Hz/DUTY/ å å å å until appears (to select duty cycle) or WIDTH I I I I until µ µ µ µ appears (to select pulse width) 3. If you are measuring frequency, press RANGE necessary to select manual range then repeatedly press...
- Page 27 "#%"% "( '#574+0) 744'06 4'37'0%; / µ µ µ µ A/A ± ± 1. Rotate the function selector to ý ý ý ý "016'" " 0.4/4mA and 4/10A ranges or for 40/ / mA/A • If the meter is set to 400mA and 4/10A ranges.
- Page 28 75+0)"6*'"/'6'4"9+6*"#" %1/276'4 You can connect your meter to a computer, letting you conveniently monitor and record and log data over a long period of time. You can even use your meter to display oscilloscope information on your computer! For example, you can record changes in temperature in a refrigerator or voltage changes in a circuit over a long period of time.
-
Page 29: Installing The Meter's Software/Hardware
3. After you finish installing the software, restart your computer. 4. Connect one end of the supplied RS-232 cable to the jack on top of the meter, then connect the other end to your computer’s serial port. " "/ " 10(+)74+0) 5+0) '6'4... -
Page 30: Cleaning
%#4'"#0&"/#+06'0#0%' "9#40+0) " ý ý Keep the meter dry; if it gets wet, wipe it dry Cleaning immediately. Use and store the meter only in • Do not let any water drip normal temperature environments. Handle the inside the meter while meter carefully;... - Page 31 plastic holder and insert it into the fuse holder through the loop of the attached ribbon. 6. Replace the back cover and secure it with the screws. 7. Reinstall the battery (see “Installing a Battery” on Page 11), then replace the battery cover and secure it with the screw.
- Page 32 This warranty gives you specific legal rights, and you may also have other rights which vary from state to state. RadioShack Customer Relations, 200 Taylor Street, 6th Floor, Fort Worth, TX 76102 We Service What We Sell 12/99 22-812 AO0069ACA1 RadioShack Corporation 03A02 Fort Worth, Texas 76102 Printed in China...