Table of Contents
Advertisement
www.radioshack.com
SM
OWNER'S MANUAL —
Completely read this manual before using this meter.
–
Bar Graph Display
makes nulls,
peaks, and trends more apparent.
Auto-Ranging with Manual-
Ranging Override
–
the meter
automatically selects a range when
you measure voltage, current, or
resistance. You can also manually
set the range when measuring values
you know are within a certain range.
Function Dial
Latest IC and Display Technology
ensures reliability, accuracy, stability,
and ease of operation.
Data Hold Function
–
The meter
holds the displayed value, so you can
see the reading even after you
disconnect the test leads.
If an icon appears at the end of a paragraph, go to the box on that
page with the corresponding icon for pertinent information.
o
!
— Warning
— Important
©
2002 RadioShack Corporation. All Rights Reserved.
RadioShack and RadioShack.com are trademarks
used by RadioShack Corporation.
29-Range
Auto/Manual
Digital Multimeter
–
!
!
IMPORTANT
Ó
Ô
— Caution
— Note
22-813
Advertisement
Table of Contents

Related Manuals for Radio Shack 22-813


Summary of Contents for Radio Shack 22-813
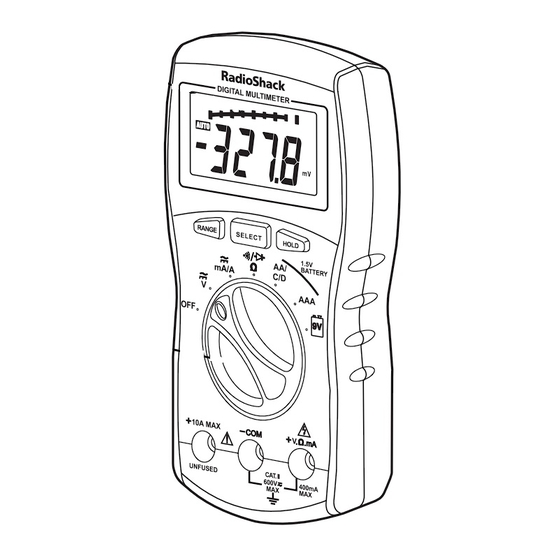
- Page 1 29-Range Auto/Manual www.radioshack.com Digital Multimeter OWNER’S MANUAL — 22-813 Completely read this manual before using this meter. – Bar Graph Display makes nulls, peaks, and trends more apparent. Auto-Ranging with Manual- Ranging Override – the meter automatically selects a range when you measure voltage, current, or resistance.
-
Page 2: Table Of Contents
CONTENTS Thank you for buying a RadioShack 29- Range Auto/Manual Digital Multimeter. Your A Word About Safety ..2 multimeter is a portable, compact auto- Safety Marks ....4 ranging digital multimeter. It is ideally suited Preparation ....5 for field, lab, shop, and home applications. Installing Batteries .. - Page 3 continuity function, resistance WARNING measurement, or any of the battery test or current measurement functions. • USE EXTREME CAUTION IN THE • Always discharge any capacitors of the USE OF THIS circuit under test before you attach test DEVICE, IMPROPER leads.
-
Page 4: Safety Marks
— Diode-Check Function The meter CAUTION safely checks semiconductor junctions for opens, shorts, or normal. • Completely read this manual before using — Battery Test Function Lets you easily the meter. test batteries under load condition. • This meter passes the stringent safety —... -
Page 5: Preparation
PREPARATION WARNING WARNING • To avoid electrical • Although the test NSTALLING ATTERIES shock, disconnect leads are rated for both of the test leads 1000 volts, do not try Your meter requires 3 AAA batteries (not from any equipment to measure any before you install or voltage greater than supplied) for power. -
Page 6: Operation
1. Remove the plastic plugs from both test CAUTION leads. • Be sure to select the 2. Plug the black test lead’s right-angled end correct function into (common) on the front of the meter. –COM before you touch the test leads to the 3a. -
Page 7: Before You Start
EFORE TART WARNING Familiarize yourself with the meter’s Always turn off power to operation before you use it for the first time the circuit you are about by following these steps. to measure before you connect the test leads to 1. - Page 8 Your meter automatically enters the Ô Ô auto range mode when you turn it on. NOTE In the auto range mode, AUTO • Overflow is when the appears and the meter automatically meter tries to display selects the next higher or lower range 4001 or more units.
-
Page 9: Holding A Measurement
Read the range in volts, amps, or ohms CAUTION as indicated by the position of the Ô decimal point. (overflow) appears, the value you are measuring exceeds the Range Display range you set, or you do not have the test leads ddd.d mV 400 mV connected to a... -
Page 10: Automatic Power Off
To cancel hold, press again or set the HOLD function dial to another setting. Hold disappears. UTOMATIC OWER Your meter conserves power by automatically turning off about 30 minutes after the last time you changed the setting (even if you are making measurements), The meter beeps as it turns itself off. -
Page 11: Using The Bar Graph
SING THE RAPH Graph In addition to the numeric display, the meter Ô Ô displays all measurements on a bar graph NOTE which consists of 8 segments at the top of • Each segment of the the display. bar graph represents a unit of Each segment represents a value of 500 measurement used... -
Page 12: Making Measurements
MAKING WARNING MEASUREMENTS • When measuring high voltages, always clamp the meter’s DC/AC EASURING black test lead to ground or neutral OLTAGE first, then the red test lead second. (The hot 1. Set the function dial to wire is usually colored red, black, or 2. - Page 13 Measuring AC Voltage Riding WARNING On a DC Source Bias • To avoid injury or 1. Disconnect power from the circuit you damage to your meter, never try to will test. measure an AC voltage that is riding 2. Set the function dial to .
-
Page 14: Measuring Dc/Ac Current
Three-phase industrial circuits are extremely WARNING powerful. You can be burned severely and even killed if you create an accidental short • This voltage (692.8V AC) exceeds the in these panels. meter’s rating. Therefore, you should Before measuring voltages, put on not connect the meter protective clothing –... -
Page 15: Measuring Resistance
5. To measure current larger than 400 WARNING mA, plug the red test lead into +10 A . Otherwise, plug the red test lead Be sure the circuit under test has all power into . Then connect the red test removed and any lead to the other connection point on associated capacitors... -
Page 16: Checking Continuity
As with the voltage range, use the CAUTION measuring units that appear on the display to determine the current Do not connect the test leads to a source of resistance range. If only appears, the voltage with the function § values of the measurements are in ¹... -
Page 17: Checking Diodes
HECKING IODES CAUTION This procedure lets you check diodes, Do not connect the test transistors, and other semiconductors for leads to a source of opens, shorts, and normal operation. It also voltage with the function § ¹ lets you determine the forward voltage and dial set to / . -
Page 18: Checking Batteries
– the diode’s cathode or negative ( ) side. The other side is the anode or positive (+) side. If a diode is not marked, you can use your meter to check the diode’s polarity. As you follow the steps under “Checking Diodes” on Page 17, connect the black test lead to one side, connect the red test lead to the other side, then measure and note the voltage. - Page 19 2. Connect the black test lead to the Ô Ô – battery’s negative ( ) terminal and the red NOTE test lead to the battery’s positive (+) • When testing 1.5V C, terminal. Then use this table to D, AA and AAA size Ô...
-
Page 20: Care
CARE Keep the meter dry; if it gets wet, wipe it dry immediately. Use and store the meter only in normal temperature environments. Handle the meter carefully; do not drop it. Keep the meter away from dust and dirt, and wipe it with a damp cloth occasionally to keep it looking new. -
Page 21: Specifications
The meter contains a 5 20mm, 500mA, 250V ceramic fuse (Radio Shack Cat. No. WARNING 270-1070). To avoid electric shock, you must disconnect the 1. Set the function dial to and unplug test leads before you the test leads. remove the back cover. - Page 22 DC CURRENT (Maximum Measurement: 10A) – 40mA 400mA ...... ± 1.2% of Reading, ± 4 in Last Digit – 10A ........ ± 1.5% of Reading, ± 4 in Last Digit AC CURRENT (Average responds, RMS calibrated, 10A maximum, DC Coupled) –...
- Page 23 GENERAL Maximum Common Mode Voltage ......600V DC or RMS AC Battery Life (Alkaline) at 1 hour use per day ..About 350 days Sleep Mode timing ...... 30 ± 10 Minutes Range Up Detect Value ......Overflow ( >4000 Counts) Range Down Detect Value ....
- Page 24 This warranty gives you specific legal rights, and you may also have other rights which vary from state to state. RadioShack Customer Relations, 200 Taylor Street, 6th Floor, Fort Worth, TX 76102 12/99 22-813 RadioShack Corporation AO0117AAA1 11A02 Fort Worth, Texas 76102...