
Related Manuals for Kodak EasyShare Z730


Summary of Contents for Kodak EasyShare Z730
- Page 1 Kodak EasyShare Z730 zoom digital camera User’s guide www.kodak.com For interactive tutorials, www.kodak.com/go/howto For help with your camera, www.kodak.com/go/z730support...
- Page 2 Eastman Kodak Company Rochester, New York 14650 © Eastman Kodak Company, 2005 All screen images are simulated. Kodak and EasyShare are trademarks of Eastman Kodak Company. P/N 4J3262...
-
Page 3: Product Features
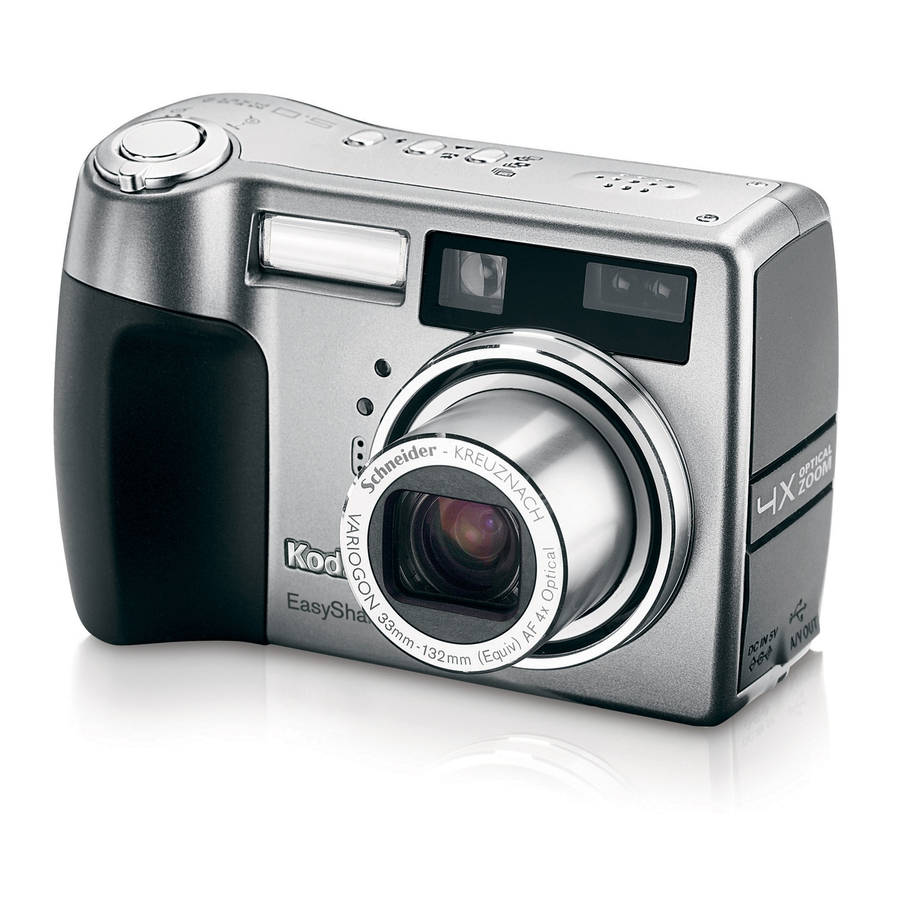
Zoom (Wide angle/Telephoto); Magnify (when Reviewing pictures) Shutter button Flash status button Close-up/Landscape button Exposure Bracketing/Burst button Flash unit Viewfinder www.kodak.com/go/support Speaker USB Port television viewing 10 DC-In (5V) 11 Lens 12 Microphone 13 Light sensor 14 Self Timer/Video light Product features ;... - Page 4 12 Joystick - move OK - press in 13 Mode dial 14 Display/Info button 15 Battery lock 16 MMC/SD card slot 17 Battery compartment 18 Tripod socket 19 Dock connector for EasyShare camera dock series 3 or printer dock series 3 www.kodak.com/go/support...
-
Page 5: Table Of Contents
Using the jog dial to change P, A, S, M, or C mode settings ...14 Using the flash...15 Shooting close-up and landscape pictures...18 Using exposure bracketing ... 19 Using burst ...20 Changing picture-taking settings ... 21 Using setup to customize your camera ...27 Pre-tagging for album names ... 29 www.kodak.com/go/support... - Page 6 When can I tag my pictures and videos? ... 40 Tagging pictures for printing...41 Tagging pictures and videos for emailing ... 42 Tagging pictures as favorites ... 43 6 Transferring and printing pictures ...46 Transferring pictures/videos with the USB cable ... 46 Printing pictures ... 47 www.kodak.com/go/support...
- Page 7 Telephone customer support ... 55 9 Appendix ...56 Camera specifications ... 56 Tips, safety, maintenance ... 59 Important battery information ... 59 Storage capacities ...61 Power-saving features ... 62 Upgrading your software and firmware...62 Warranty... 63 Regulatory compliance ... 65 www.kodak.com/go/support Table of contents...
-
Page 8: Getting Started
The indicator light turns red. When the indicator light turns green, remove the battery and unplug the charger. Charging takes approximately 3 hours. NOTE: You can also charge the battery using an optional Kodak EasyShare printer dock or camera dock. Purchase these and other accessories at a dealer of Kodak products or visit www.kodak.com/go/accessories. -
Page 9: Inserting The Battery
Inserting the battery CAUTION: Use only a Kodak EasyShare rechargeable Li-Ion battery. Battery lock Setting the date and time Setting the date & time, first time The Date and Time have been reset message appears the first time you turn on the camera or if the battery is removed for an extended time. -
Page 10: Turning The Camera On And Off
5 When finished, press the OK button. 6 Press the Menu button to exit the menu. NOTE: Depending on your computer operating system, Kodak EasyShare software may update the camera clock when you connect the camera. See EasyShare software Help for details. -
Page 11: Checking Camera Status In Capture Mode
Landscape/Close-up Date stamp Album name Zoom: digital telephoto wide Aperture Shutter speed www.kodak.com/go/support Then Press the Display/Info button: ■ Once to hide the icons. ■ Again to turn off the camera screen. ■ Again to turn on the camera screen and icons. -
Page 12: Storing Pictures On An Optional Sd Or Mmc Card
We cannot guarantee compatibility with “high-speed” SD cards such as xSD or Ultra-2; these cards are designed primarily for video or audio. Using optional lenses Expand your creativity with a selection of Kodak accessory lenses, offered in wide angle, telephoto, and close-up. See a dealer of Kodak products or www.kodak.com/go/z730accessories. -
Page 13: Taking Pictures And Videos
Display/ Info button NOTE: If you want the camera screen to be off when you turn on the camera, see www.kodak.com/go/support . (See page 10 for other mode descriptions.) 2 Use the camera screen as a viewfinder, or press the Display/Info button to turn off the camera screen and use the viewfinder to frame your subject. - Page 14 NOTE: Framing marks do not appear in Landscape or Video mode. 1 Look through the viewfinder. 2 Using your left thumb, turn the diopter dial until the viewfinder image is sharp. Center focus Center wide focus Center and side focus Left and right focus www.kodak.com/go/support Side focus...
-
Page 15: Taking A Video
After you take a picture or video, the camera screen displays a Quickview for approximately 5 seconds. While the picture or video is displayed, you can: Delete Share www.kodak.com/go/support ■ Review: If you take no action, the picture/video is saved. -
Page 16: Using Optical Zoom
3 Press the Shutter button halfway and hold to set the exposure and focus, then press the rest of the way down to take the picture. (When taking videos, press and release the Shutter button.) www.kodak.com/go/support... -
Page 17: Camera Modes
Using P, A, S, M, and C modes, page 13 P, A, S, M, or C mode settings, page change other settings. Use a tripod for slow shutter speeds. www.kodak.com/go/support Scene modes, page Using the jog dial to change P, A, S, M, or C mode settings, 14.) Press the Menu button to change other settings. -
Page 18: Scene Modes
Using P, A, S, M, and C modes, page 13 Using P, A, S, M, and C modes, page 13 21.) Press the Menu button to change other settings. 14.) Press the 14.) Press the Custom Exposure Mode, page page www.kodak.com/go/support Using Using page 43.) - Page 19 Close-ups of yourself, from 3.9 - 23.7 in. (10-60 cm). Portrait Party People indoors. Children Action pictures of children in bright light. Backlight Subjects in shadow or “backlit” (when light is behind the subject). www.kodak.com/go/support Taking pictures and videos (page...
-
Page 20: Using P, A, S, M, And C Modes
Size, page 22.) Flash compensation Exposure compensation Depth of field Makes both the foreground and the background sharp. Good for landscapes and well-lit conditions. Makes the foreground sharp and the background blurry. Good for portraits and low-light conditions. Picture www.kodak.com/go/support... -
Page 21: Using The Jog Dial To Change P, A, S, M, Or C Mode Settings
(Red settings are out of range and may cause unacceptable image/print quality. Adjust the value higher or lower until it turns yellow.) ■ Press the jog dial to save the setting. www.kodak.com/go/support Taking pictures and videos page 25) to reset P, A, S, M, or C mode to to move the cursor to a setting, such as to change the value of the setting. -
Page 22: Using The Flash
(If the lighting conditions require flash but do not require Red-eye reduction, the flash may fire only once.) NOTE: The flash is not available in all modes. See page 21.) Flash settings in each mode, page www.kodak.com/go/support Flash/Status... -
Page 23: Flash Settings In Each Mode
Landscape Close-up Night Portrait Night Landscape Snow Beach Text Fireworks Flower Manner/Museum www.kodak.com/go/support Default setting Available settings Auto* Auto, Off, Fill Flash, Red-eye Auto Auto, Off, Fill Flash, Red-eye Auto* Auto, Off, Fill Flash, Red-eye Auto Auto, Off, Fill Flash, Red-eye... - Page 24 * When you change to Auto or Red-eye in these modes, it becomes the default until you change it. Default setting Available settings Red-eye* Auto, Off, Fill Flash, Red-eye Red-eye* Auto, Off, Fill Flash, Red-eye Auto* Auto, Off, Fill Flash, Red-eye Fill Fill www.kodak.com/go/support...
-
Page 25: Shooting Close-Up And Landscape Pictures
7) are not available in Landscape. NOTE: Close-up and Landscape are also available as Scene modes (see www.kodak.com/go/support to take pictures of scenes that are very 1 Set the Mode dial to any Capture mode. 2 Press the Close-up/Landscape repeatedly until the status bar. -
Page 26: Using Exposure Bracketing
Determine the best exposure level for your conditions based on your evaluation of 3 pictures. 1 Set the exposure bracketing interval. (See Bracketing Interval, page 2 In any Still mode, press the Exposure Bracketing/ Burst button until www.kodak.com/go/support Exposure 23.) appears in the status area. -
Page 27: Using Burst
2 Press the Shutter button halfway and hold to set the auto-focus and exposure. 3 Press the Shutter button the rest of the way down and hold it to take the pictures. www.kodak.com/go/support And if the exposure bracketing interval is set to the default +/-0.3... -
Page 28: Changing Picture-Taking Settings
Shutter Priority Manual Available only in Custom (C) mode. NOTE: To use the Jog dial, see Off (default) NOTE: To cancel the Self Timer before a picture is taken, press the Menu button, then turn the Self Timer off. page www.kodak.com/go/support... - Page 29 This setting remains until you change it. The setting is displayed on the right side of Liveview if set to Daylight, Tungsten, or Fluorescent. www.kodak.com/go/support Icon Options 5 MP—for printing up to 20 x 30 in. (50 x 75 cm).
- Page 30 (A circle indicates the metering spot.) Ideal when you need an exact exposure of a specific area in the picture. Unavailable in Auto, Scene, or Video modes. www.kodak.com/go/support —evaluates lighting —evaluates the lighting...
- Page 31 This setting remains until you change it. The setting is displayed on the right side of Liveview if set to Single AF or Accessory Lens AF. www.kodak.com/go/support Icon Options Multi-zone (default) give an even picture focus. Ideal for general picture taking.
- Page 32 See Auto (default)—the camera uses the card if one is in the camera. If not, the camera uses internal memory. Internal Memory—the camera always uses internal memory, even if a card is inserted. www.kodak.com/go/support page...
- Page 33 Choose a default video length (useful in self-timer videos). This setting remains until you turn off the camera. Setup Menu Choose additional settings. www.kodak.com/go/support Icon Options On (default)—camera screen is on whenever the camera is on. Off—camera screen is off.
-
Page 34: Using Setup To Customize Your Camera
Pause (default)—when the blue slider on the zoom indicator pauses, the zoom button must be released and reactivated. The slider turns red when the picture may no longer render an acceptable 4 x 6 in. (10 x 15 cm) print. None—no pause. www.kodak.com/go/support... - Page 35 Choose the regional setting that lets you connect the camera to a television or other external device. Orientation Sensor Orient pictures so that they are displayed with the correct side up. www.kodak.com/go/support Taking pictures and videos Icon Options Shutter Only Default...
-
Page 36: Pre-Tagging For Album Names
Choose a date/time option, or turn off the feature. (Default is YYYY/MM/DD.) Choose a language. Memory Card—deletes everything on the card; formats the card. Cancel—exits without making a change. Internal Memory—deletes everything in internal memory including email addresses, album names, and favorites; formats the internal memory. www.kodak.com/go/support... - Page 37 Use Kodak EasyShare software that was included with your camera to create album names on your computer. Then copy up to 32 album names to the camera’s album name list the next time you connect the camera to the computer. See Kodak EasyShare software Help for details.
-
Page 38: Reviewing Pictures And Videos
Reviewing pictures and videos Press the Review button to view and work with your pictures and videos. To save battery power, use the optional Kodak EasyShare camera or printer dock, or Kodak 5-volt AC adapter. (See www.kodak.com/go/z730accessories.) Viewing single pictures and videos 1 Press the Review button. -
Page 39: Viewing Multiple Pictures And Videos
To return to the beginning of the video, move the joystick To replay the video, press the OK button. To go to the previous or next picture or video, move the joystick www.kodak.com/go/support to locate a video. (In Multi-up view, highlight a video, then , then press the OK button. -
Page 40: Deleting Pictures And Videos
To exit Magnify, press the OK button. To exit Review, press the Review button. to locate a picture or video (or highlight one in multiple to highlight an option, then press the OK button: deletes the displayed picture or video. www.kodak.com/go/support... -
Page 41: Changing Optional Review Settings
CAUTION: Formatting internal memory or an SD or MMC card deletes all (including protected) pictures, videos. (Formatting internal memory also deletes email addresses, album names, and favorites. To restore them, see EasyShare software Help.) www.kodak.com/go/support Copy Multi-up (page Setup Menu... -
Page 42: Tagging Pictures/Videos For Albums
Use the Album feature in Review to tag the pictures and videos in your camera with album names. First—on your computer Use Kodak EasyShare software (V 3.0 or higher) to create album names on your computer. Then copy up to 32 album names to the camera’s internal memory. See Kodak EasyShare software Help for details. -
Page 43: Running A Slide Show
Use the Slide Show to display your pictures and videos on the camera screen. To run a slide show on a television or on any external device, see power, use an optional Kodak 5V AC adapter. (Visit www.kodak.com/go/z730accessories.) Starting the slide show 1 Press the Review button, then press the Menu button. -
Page 44: Displaying Pictures And Videos On A Television
The camera’s picture storage location is set to the location from which you are copying. See Image Storage, page to highlight On, then press the OK button. www.kodak.com/go/support to highlight Loop, then press Video Out, page 28). The slide show... -
Page 45: Viewing Picture/Video Information
3 To view information on the next or previous picture or video, move the joystick . Press the Menu button to exit the menu. www.kodak.com/go/support to highlight Copy to highlight an option: copies the current picture or video. -
Page 46: Installing The Software
1 Close all software applications that are open on your computer (including anti-virus software). 2 Place the Kodak EasyShare software CD into the CD-ROM drive. 3 Install the software: if the install window does not appear, choose Run from the Start Windows OS—... -
Page 47: Sharing Pictures And Videos
Any time. (The most recent picture/video taken is then displayed.) ■ Just after you take a picture/video, during Quickview (see ■ After pressing the Review button (see www.kodak.com/go/support Press the Share button to “tag” your pictures and videos. When they are transferred to your computer, you can... -
Page 48: Tagging Pictures For Printing
Printing tagged pictures When you transfer the tagged pictures to your computer, the Kodak EasyShare software print screen opens. For details on printing, click the Help button in the Kodak EasyShare software. For more information on printing from your computer, printer dock, or card, see page NOTE: For the best 4 x 6 in. -
Page 49: Tagging Pictures And Videos For Emailing
Tagging pictures and videos for emailing First—on your computer Use Kodak EasyShare software (V 3.0 or higher) to create an email address book on your computer. Then copy up to 32 email addresses to the camera’s internal memory. See the Kodak EasyShare software Help for details. -
Page 50: Tagging Pictures As Favorites
NOTE: The camera holds a limited number of favorites. Use Camera Favorites in the EasyShare software to customize the size of your camera Favorites section. For more information, click the Help button in the Kodak EasyShare software. to highlight Favorite appears in the status area. -
Page 51: Optional Settings
4 Press the Menu button to exit the menu. Preventing favorites from transferring to the camera 1 Open the Kodak EasyShare software. Click the My Collection tab. 2 Go to the Albums view. 3 Click the Camera Favorites Album for your camera. -
Page 52: Printing And Emailing Favorites
2 Press the Share button. 3 Highlight Print or Email , then press the OK button. NOTE: Favorites that were taken on this camera (not imported from another source) are good for prints up to 4 x 6 in. (10 x 15 cm). www.kodak.com/go/support... -
Page 53: Transferring And Printing Pictures
Transferring pictures/videos with the USB cable NOTE: Visit www.kodak.com/go/howto Also available for transferring You can also use these Kodak products to transfer your pictures and videos: Kodak EasyShare camera dock series 3, Kodak EasyShare printer dock series 3 ■ ■... -
Page 54: Printing Pictures
Connecting the camera to a PictBridge enabled printer 1 Turn off the camera and printer. 2 Optional: If you have a Kodak 5-volt AC adapter (optional accessory), plug it into the camera and into an electrical outlet. IMPORTANT: Do not use the AC adapter included with the Kodak EasyShare camera dock or printer dock to power your camera. -
Page 55: Ordering Prints Online
Print pictures when you insert your card into a printer with an SD/MMC slot. See ■ your printer user’s guide for details. ■ Make prints at an SD/MMC-capable Kodak picture maker. (Contact a location prior to visiting. See www.kodak.com/go/picturemaker.) ■ Take the card to your local photo retailer for professional printing. - Page 56 6000 ■ printer dock 4000 ■ camera dock II ■ LS420, LS443 camera dock Purchase camera docks, printer docks, and other accessories at a dealer of Kodak products or www.kodak.com/go/z730accessories. Docking configuration Not compatible www.kodak.com/go/support Custom dock insert...
-
Page 57: Troubleshooting
Troubleshooting When you have questions about your camera, start here. Additional technical information is available in the ReadMe file located on the Kodak EasyShare software CD. For updates to Troubleshooting information, see www.kodak.com/go/z730support. Camera problems Status Cause ■ The camera does not turn on ■... -
Page 58: Computer/Connectivity Problems
(page Make sure the EasyShare software is installed pictures on a card, then use a card reader to transfer them to the computer. (page 28). (page 15). (page (page 46), delete pictures from (page 46). (page 39). www.kodak.com/go/support (page 25),... -
Page 59: Picture Quality Problems
■ ■ The picture is not clear ■ ■ ■ www.kodak.com/go/support Adjust the camera Video Out setting (NTSC or PAL, Make sure the external device settings are correct (see the device’s user’s guide). Use Fill flash (page 15) or change your position so light is not behind the subject. -
Page 60: Camera Ready Light Status
Change storage location to internal memory to take pictures only. (page 33), switch image storage locations (page 25), or use a different card. (page (page 46), delete pictures from the (page 25), or insert (page 25). Use this card www.kodak.com/go/support... -
Page 61: Getting Help
Other Get support for other cameras, software, accessories, more Get information on Kodak EasyShare printer docks Get information on Kodak inkjet products Optimize your printer for truer, more vibrant colors Register your camera Learn to take better pictures www.kodak.com/go/support... -
Page 62: Telephone Customer Support
91 22 617 5823 Italy 02 696 33452 Japan 03 5540 9002 Korea 00798 631 0024 For the most up-to-date listings, visit: www.kodak.com/US/en/digital/contacts/DAIInternationalContacts.shtml Netherlands 020 346 9372 New Zealand 0800 440 786 Norway 23 16 21 33 Philippines 1 800 1 888 9600... -
Page 63: Appendix
29.5 in. (75 cm)-infinity @ telephoto 3.9 - 23.7 in. (10-60 cm) @ wide macro 9.8 - 33.5 in. (25-85 cm) @ telephoto macro Digital zoom—1-4X with 0.2X step; not supported for movie capture Accessory lens thread—Yes Lens barrier—Built-in www.kodak.com/go/support www.kodak.com/go/z730support... - Page 64 First burst: Maximum 5 pictures @ 2.5 fps. Last burst: Maximum 30 frames @ 2.5 fps (last 5 frames saved). Video capture— Image size: QVGA (320 x 240), VGA (640 x 480) Frame rate: QVGA 20 fps; VGA 12 fps www.kodak.com/go/support...
- Page 65 (The SD logo is a trademark of the SD Card Association.) Quickview—Yes Video output—NTSC or PAL Power—Kodak EasyShare rechargeable Li-Ion battery (KLIC-5000); optional 5V AC adapter; EasyShare printer dock series 3; EasyShare camera dock series 3 Communication with computer—USB 2.0 (PIMA 15740 protocol) via USB cable, EasyShare camera dock or printer dock Languages—English, German, Spanish, French, Italian, Portuguese, Chinese,...
-
Page 66: Tips, Safety, Maintenance
Do not allow chemicals, such as suntan lotion, to contact painted surfaces. ■ Service agreements are available in some countries. Contact a dealer of Kodak products for more information. ■ Please dispose of batteries according to local and national regulations. -
Page 67: Extending Battery Life
Kodak EasyShare camera dock series 3—powers your camera, transfers pictures to your computer, and charges your battery. Kodak EasyShare printer dock series 3—powers your camera, makes 4 x 6 in. (10 x 15 cm) prints, transfers pictures, and charges your battery. -
Page 68: Storage Capacities
32 MB SD/MMC 64 MB SD/MMC 128 MB SD/MMC 256 MB SD/MMC 512 MB SD/MMC Number of pictures 5.0 MP 4.4 MP 4.0 MP Number of pictures 5.0 MP 4.4 MP 4.0 MP www.kodak.com/go/support 3.1 MP 1.8 MP 3.1 MP 1.8 MP... -
Page 69: Power-Saving Features
Turns off. Upgrading your software and firmware Download the latest versions of the software included on the EasyShare software CD and the camera firmware (the software that runs on the camera). See www.kodak.com/go/z730downloads. www.kodak.com/go/support Minutes/seconds of video VGA (640 x 480) 1 min. -
Page 70: Warranty
Limitations Request for Warranty service will not be accepted without proof of date of purchase, such as a copy of the original dated Kodak EasyShare digital camera or accessory sales receipt. (Always keep the original for your records.) This warranty does not apply to the battery(s) used in digital cameras or accessories. -
Page 71: Your Rights
FAILURE TO USE ITEMS SUPPLIED BY KODAK (SUCH AS ADAPTERS AND CABLES), OR CLAIMS MADE AFTER THE DURATION OF THIS WARRANTY. Kodak makes no other express or implied warranty for this product. In the event that the exclusion of any implied warranty is ineffective under the law, the duration of the implied warranty will be one year from the purchase date. -
Page 72: Regulatory Compliance
Regulatory compliance FCC compliance and advisory Kodak EasyShare Z730 zoom digital camera This equipment has been tested and found to comply with the limits for a Class B digital device, pursuant to Part 15 of the FCC Rules. These limits are designed to provide reasonable protection against harmful interference in a residential installation. -
Page 73: Canadian Doc Statement
Install and use the equipment according to the instruction manual. MPEG-4 Use of this product in any manner that complies with the MPEG-4 visual standard is prohibited, except for use by a consumer engaging in personal and non-commercial activities. www.kodak.com/go/support www.kodak.com for recycling program Appendix... - Page 74 Canadian compliance, 66 caring for your camera, 59 charging battery via charger, 1 lights, battery charger, 1 children, 12 clock, setting, 2 close-up, 12 scenes, 18 close-up pictures, 18 color mode, 25 compression, 22 computer connecting camera, 46 transfer to, 46 www.kodak.com/go/support...
- Page 75 18 dock printer, 47 downloading pictures, 46 EasyShare software, 39 emailing pictures, videos, 42 exposure compensation, 13 exposure metering, 23 www.kodak.com/go/support external video device viewing pictures, videos, 37 favorites, 11 removing, 44 settings, 44 tagging, 43 FCC compliance, 65...
- Page 76 61, 62 ISO, 13 jog dial, 14 joystick, ii knob, diopter, 7 Kodak EasyShare software installing, 39 upgrading, 62 Kodak web sites, 54 landscape, 12, 18 language, 29 last burst, 20 lens, i lens, accessory, 5 light ready, ii...
- Page 77 3 switch, ii print warning, 27 printer dock, 47 printing from a card, 48 optimizing printer, 54 www.kodak.com/go/support order online, 48 PictBridge, 47 pictures, 47 tagged pictures, 48 with EasyShare printer dock, 47 program, 10 protecting pictures, videos, 34...
- Page 78 13 shutter, problems, 51 sleep mode, 62 slide show problems, 52 running, 36 snow, 12 software installing, 39 upgrading, 62 sound themes, 28 sound volume, 28 specifications, 56 sport, 11 storage capacity, 61, 62 support online, 54 technical, 55 www.kodak.com/go/support...
- Page 79 50 computer connectivity, 51 picture quality, 52 ready light, 53 turning camera on and off, 3 upgrading software, firmware, 62 URLs, Kodak web sites, 54 USB (universal serial bus) connection location, i transferring pictures, 46 www.kodak.com/go/support VCCI compliance, 66...