Table of Contents
Advertisement
Contents
Important Notices and Warnings ............................................................................. 5
Global Positioning System ..................................................................................................... 5
Precautions ............................................................................................................................ 5
What's in the box .................................................................................................... 6
Getting to Know Your Navig8r GPS .......................................................................... 6
Warning .................................................................................................................. 7
Before Using Your Navig8r GPS Unit ........................................................................ 7
Mounting the GPS Unit in Your Vehicle ................................................................... 8
Connecting the Car Charger ..................................................................................... 8
Navigation
Before Using the Navig8r Please Read the Following ............................................. 11
Key Features ........................................................................................................................ 11
Getting started with your Navig8r GPS System ...................................................... 12
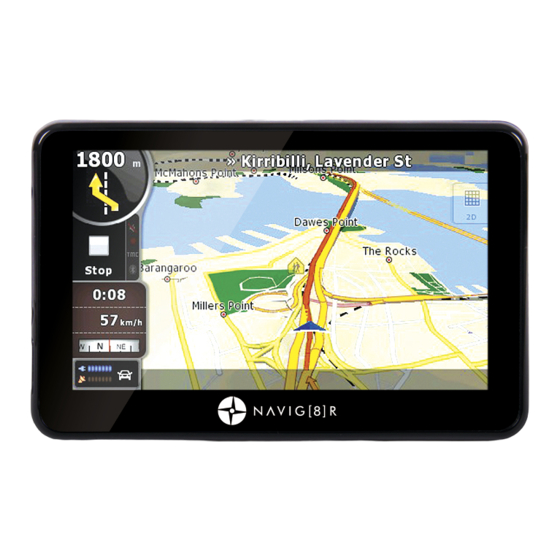
MAIN MAP SCREEN ............................................................................................... 13
Getting to Know the Main Map Screen ............................................................................... 13
1: Next Turn by Name / Turn By Turn Menu ....................................................................... 15
2: Low GPS Satellite Signal Warning Message ..................................................................... 15
3: Quick Options Menu ........................................................................................................ 15
A: Toll Road: ..................................................................................................................... 16
B: Quickest Route:............................................................................................................ 16
C: Shortest Route: ............................................................................................................ 16
E: Detour .......................................................................................................................... 16
F: Route Pause ................................................................................................................. 16
4: GPS Signal Indicator ......................................................................................................... 16
5: Battery Level Indicator .................................................................................................... 18
............................................................................................................................................. 18
7: (& 17) Zoom In and Out of Maps ..................................................................................... 19
8: Speed and Red Light Camera Alert .................................................................................. 19
www.navig8r.com.au
TABLE OF CONTENTS
1
Advertisement
Table of Contents

Related Manuals for Navig8r GPS


Summary of Contents for Navig8r GPS
-
Page 1: Table Of Contents
Getting to Know Your Navig8r GPS ................6 Warning ........................7 Before Using Your Navig8r GPS Unit ................ 7 Mounting the GPS Unit in Your Vehicle ..............8 Connecting the Car Charger ..................8 Navigation Before Using the Navig8r Please Read the Following ..........11 Key Features ........................ - Page 2 Change the trip options....................... 34 A: Quickest Route: ......................34 B: Shortest Route: ......................34 C: Walking mode: ......................34 D: Toll Road: ........................34 E: Camera Alert: ....................... 34 F: SpeedAlert™: ........................ 34 Via (Waypoints) ........................34 www.navig8r.com.au...
- Page 3 ACCESSING THE RECORDED FILES ..................58 Displaying your recorded trip on Google Earth* ............ 59 Updating the Software for the Navig8r ..............62 Adding Your Own Points of Interest (POI) Data to the Navig8r ......63 Hardware Main System Menu ....................65 A: Main Title Bar ........................
- Page 4 System Settings ..................... 69 A: Volume ..........................70 B: Langauge.......................... 70 C: Backlight .......................... 70 D: Battery ..........................71 E: Time & Date ........................71 F: System Information ......................72 Specifications ......................73 Disclaimer ..........................73 Frequently Asked Questions.................. 74 www.navig8r.com.au...
-
Page 5: Important Notices And Warnings
GPS. Precautions For your safety and the safety of other road users, do not operate the controls of this Navig8r while driving. Use care when operating the Navig8r. This product is intended to be used only as an aid to navigate. -
Page 6: What's In The Box
Item Description The Navig8r GPS unit GPS device holder including stylus Bracket/Windscreen Mount Car Charger (12v DC) USB Data Cable 2GB Micro SD card (Pre fitted to GPS) Getting to Know Your Navig8r GPS Item Description Item Description Power Button... -
Page 7: Warning
To turn the GPS off manually or if the device is not to be used for periods longer than two or three days, simply press the power button for 3 seconds and then tap the shut down option or cancel to return to the previous screen. -
Page 8: Mounting The Gps Unit In Your Vehicle
Mounting the GPS Unit in Your Vehicle Fit the windscreen mount to the holder which you have attached to the rear of the GPS unit and test mount the GPS on the windscreen of the car. Choose a position that will not obstruct your vision whilst driving but will also provide the GPS unit the best coverage of the sky through the windscreen. - Page 9 The GPS can now be started by pressing the power button on top of the device for about 3 seconds When starting the GPS in the vehicle it may take a short period of time for the system to acquire a valid GPS signal.
- Page 10 NAVIGATION NAVIGATION www.navig8r.com.au...
-
Page 11: Before Using The Navig8R Please Read The Following
Navig8r is mounted safely and securely. The first time the GPS unit is used, or it has not been used for some time, it may take some several minutes for it to detect the GPS satellites. Restarting the system in the same location should acquire the signals quickly. -
Page 12: Getting Started With Your Navig8R Gps System
Getting started with you Getting started with your Navig8r GPS System Mount and connect the Navig8r as described Navig8r as described in this manual. Press the power button power button on the top of the Navig8r. The Navigation software will run automatically. -
Page 13: Main Map Screen
MAIN MAP SCREEN MAIN MAP SCREEN MAIN MAP SCREEN MAIN MAP SCREEN Getting to Know the Main Map Screen Getting to Know the Main Map Screen www.navig8r.com.au... - Page 14 Displays information on the next turn Turn Menu Tap to display route turn by turn list GPS Signal Warning Message Shown when GPS signal low or not found Quick Route Options Displays the quick route options screen. Amber = signal too low to be accurate...
-
Page 15: 1: Next Turn By Name / Turn By Turn Menu
A low satellite warning message will be displayed when less than 5 satellites are being detected. A low satellite warning message will be displayed when less than 5 satellites are being detected. See Number 4 (GPS Signal Indicator) for more details. See Number 4 (GPS Signal Indicator) for more details. -
Page 16: A: Toll Road
If shown in RED, no Satellites are being detected and the location shown on screen may not be the actual location of the GPS unit not be the actual location of the GPS unit, but the last location for the but the last location for the Navig8r that it detected valid satellite signals. - Page 17 Navig8r is receiving a valid signal from. The number, the greater the accuracy of the Navig8r. Up to 12 satellites can be detected at any one number, the greater the accuracy of the Navig8r. Up to 12 satellites can be detected at any one number, the greater the accuracy of the Navig8r.
-
Page 18: 5: Battery Level Indicator
USB port of the computer or the car adaptor Indicates that the GPS unit is connected to an external power source Indicates that the GPS unit is connected to an external power source... -
Page 19: (& 17) Zoom In And Out Of Maps
Tap either icon to repeat the last spoken instructions by the Navig8r. Distances given in spoken instructions are updated to reflect the current distance from the turn. -
Page 20: 9: Compass
Current Speed Indicator/Speedo/Trip Statistics Button The current speed of the GPS unit is displayed in both cruise and navigation modes on the lower bar. speed of the GPS unit is displayed in both cruise and navigation modes on the lower bar. - Page 21 Average speed of the vehicle while in motion Max Speed Maximum speed attained by vehicle Total Time Total time vehicle has been on trip Driving Time Time that vehicle has been in motion on trip Stopped Time Time that vehicle or GPS unit has been stopped www.navig8r.com.au...
-
Page 22: 13: Current Position Indicator
Estimated Time of Arrival to your destination. destination. The ETA shows distance to destination in The ETA shows distance to destination in Kilometres Kilometres and the estimated time to reach your destination. estimated time to reach your destination. www.navig8r.com.au... -
Page 23: 15: Current Speed Limit/ Over Speed Warning Icon
15: Current Speed Limit/ Over Speed warning Icon Shown on the map in both Cruise and Navigation mode, this icon displays the current speed limit for the road currently being travelled along. Warnings are given if GPS is detected to be travelling over the speed limit. -
Page 24: 18: Scrolling Maps
Tap this icon to enter the Waypoints screen to adjust your trip as required Tap this icon to enter the Waypoints screen to adjust your trip as required. www.navig8r.com.au... -
Page 25: 20: Lane Assist
This feature may not be shown at all intersections and is provided as assistance only. Care should be taken and local road signs must be obeyed especially on roads and intersections that employ a tidal flow system for lane allocation. www.navig8r.com.au... -
Page 26: Main Menu
Points of Interests Change the options and alter the look and feel of the he look and feel of the Navig8r Mute or sound. Record your driving statistics for business or for business or personal use Returns to the map screen. -
Page 27: Driver Profiles
1. Driver Profiles Set the type of driver that is using the Navig8r and use it to record information from Learner drivers Set the type of driver that is using the Navig8r and use it to record information from Learner drivers Set the type of driver that is using the Navig8r and use it to record information from Learner drivers to fully licensed drivers using their vehicle for business purposes. - Page 28 Once a driver has been added, the Navig8r will the Navig8r will record basic information about the driving. The record basic information about the driving.
-
Page 29: The Navigation Menu
Entering your Destination by an Entering your Destination by an Address There are two ways you can enter the destination address in to the Navig8r There are two ways you can enter the destination address in to the Navig8r. Wizard. A three step process where... -
Page 30: Entering Your Destination By The 3 Step Wizard
After the first 3 letters have been After the first 3 letters have been entered, the Navig8r will begin to list the tered, the Navig8r will begin to list the possible options from those letters. possible options from those letters. -
Page 31: Navigation Menu
Trip Options for this particular journey. To start your trip to the set destination with the default options, press the GO! Button. Options are explained on page 28 Via (Waypoints) are explained on page 28 www.navig8r.com.au... -
Page 32: Entering Your Destination Using Quick Step Method
This option will display on the map the destination with whatever information the system has been given. Tap on the “Back” information the system has been given. Tap on the “Back” button to return to the Option button to return to the Option screen. www.navig8r.com.au... - Page 33 Before beginning your trip you are able to change the Trip Options as well as add waypoint to your ng your trip you are able to change the Trip Options as well as add waypoint to your ng your trip you are able to change the Trip Options as well as add waypoint to your journey. www.navig8r.com.au...
-
Page 34: Change The Trip Options
Crow flies”. The route will be shown in a straight line to you destination. This feature is very useful if you are out of the road network or on the water as the Navig8r will always very useful if you are out of the road network or on the water as the Navig8r will always very useful if you are out of the road network or on the water as the Navig8r will always show you the direct route to where you want to go. -
Page 35: Fine Tuning The Destination
One option is to add “Current Location”. This adds the current GPS location to the list. This is useful if you wish to come back the same way or navigate to something that you have seen at a later time. - Page 36 “Confirm” button to start your trip. Remember when placing the marker, it should be as close as possible to a road. If the marker is placed too far away from road, the NAVIG8R will not be able to calculate a valid route to the location.
-
Page 37: Search For Places (Points Of Inerest Or Poi)
Please plan your journey carefully and remember that GPS devices are only meant to be an aid to Please plan your journey carefully and remember that GPS devices are only meant to be an aid to Please plan your journey carefully and remember that GPS devices are only meant to be an aid to navigation around the Australian Road network. -
Page 38: Searching By Nearest
“OK” hightlight it and then press the “OK” button www.navig8r.com.au... -
Page 39: Searching By Name
When you have found the correct Point of Interest that you are looking for, select it and then tap the “OK” button. Tap the “Confirm” button to begin the trip to the location. rm” button to begin the trip to the location. www.navig8r.com.au... -
Page 40: Nearest On Route
Navigation is from current position to next address in the “Delivery Run”. Once that address has been reached the Navig8r will then calculate the route to the next address in the run. ched the Navig8r will then calculate the route to the next address in the run. -
Page 41: Recent Places
A menu with the following options will be shown. The menu items are for an action for the currently menu items are for an action for the currently highlighted address in the Recent Pl highlighted address in the Recent Places list. www.navig8r.com.au... -
Page 42: Favourites
“Start” button. When the destination is shown on the map tap t When the destination is shown on the map tap the “Confirm” button to begin the trip he “Confirm” button to begin the trip www.navig8r.com.au... - Page 43 The “Delete Item” button will remove only the highlighted ad The “Delete Item” button will remove only the highlighted address in the “Recent Places” list. You will be asked to confirm the deletion. “Recent Places” list. You will be asked to confirm the deletion. www.navig8r.com.au...
-
Page 44: Options Menu
Navig8r. Tap the “Option” button in the Main e “Option” button in the Main Menu to enter the options menu. - Page 45 Tap the Back button to return to the previous screen, the map button to return to the Map Screen return to the Map Screen or the More Button to show more look and feel options. or the More Button to show more look and feel options. www.navig8r.com.au...
-
Page 46: Trip Options
Crow flies”. The route will be shown in a straight line to you destination. This feature is very useful if you are out of the roa very useful if you are out of the road network or on the water as the Navig8r will always d network or on the water as the Navig8r will always show you the direct route to where you want to go. -
Page 47: Speedalert™ Settings
OPTIONS MENU SpeedAlert™ Settings The Navig8r is supplied with the SpeedAlert™ feature. This feature displays the Current Speed Limit The Navig8r is supplied with the SpeedAlert™ feature. This feature displays the Current Speed Limit The Navig8r is supplied with the SpeedAlert™ feature. This feature displays the Current Speed Limit for the road that you are traveling on for the road that you are traveling on.*... -
Page 48: Sound
Max Limit may be preset depending on type of driver profile selected. Navig8r recommend Max Limit may be preset depending on type of driver profile selected. Navig8r recommends that this limit be left in place if restrictions are placed on learners or provisional licenses limit be left in place if restrictions are placed on learners or provisional licenses. -
Page 49: Help
This is a useful tool to allow you to get use to the action. This is a useful tool to allow you to get use to the NAVIG8R in Navigation mode. It can also be ion mode. It can also be used to check out settings made in the “Look &... -
Page 50: About
Unique Identifying number of this device. The Software is coded to this number. Software version: denotes the version of the Software version: denotes the version of the Navig8r Navigation Software only. Data Version: Shows the Map Data and release Date : Shows the Map Data and release Date SpeedAlert: shows the SpeedAlert™... -
Page 51: Record
Total Kilometres 1: Location to and from information is 1: Location to and from information is based on GPS location at the start and end of the recorded trip. Suburb the recorded trip. Suburb name may vary slightly from location Common Name. -
Page 52: Free Driving
Tap the Back button to return to the previous screen, the map button to cancel and return to the Tap the Back button to return to the previous screen, the map button to cancel and return to the map screen or the start button to begin recording. map screen or the start button to begin recording. www.navig8r.com.au... -
Page 53: Supervised Driving
PDF document on your PC. Install the Report Generator software supplied on the flash area of the GPS as follows Install the Report Generator software supplied on the flash area of the GPS as follows Install the Report Generator software supplied on the flash area of the GPS as follows. -
Page 54: Installation
Click on Browse to select different program group to install the software. Check the option if you do not wish to have this added to the Start Menu. It is recommended that this be left as default. Click next to continue. www.navig8r.com.au... - Page 55 Click on the back button to go back to make changes or click on the install button to install the software. When the installation is complete click on the finish button to Exit the setup. Uncheck the option if you do not wish the software to launch on Exit. www.navig8r.com.au...
-
Page 56: Generating Reports
REPORT GENERATOR Generating Reports Connect the Navig8r to the PC using the supplied USB cable and ensure that it is turned on. When connected, the Navig8r screen will display a connection icon. From the Start Menu or the desk top shortcut, run the Navig8r Report Generator software Adobe®... - Page 57 Click on the Finish button to exit the software. The Navig8r will be disconnected from the PC if the Eject option is checked. The Navig8r will need to re-connect to be accessed again.
-
Page 58: Accessing The Recorded Files
The backup files are recorded in a folder in the report generated folder Example: C:\Program Files\Navig8r Report Generator\XXXXX\Mobilenavigator\ XXXX represents the last 5 digits of the Navig8r ID number. This is to ensure that data from two different devices can be store separately on the same PC. -
Page 59: Displaying Your Recorded Trip On Google Earth
• Step1. On the top menu bar, select “File” and then “Open” from the drop down menu. • Step 2. Use the pull down list to change the “Files of type” option to show “GPS (*.gpx .loc *mps)” • Step 3. Pull down the “Look in” list to navigate to the folder that contains the files from your GPS. - Page 60 GOOGLE EARTH • Step 5. Select the file you wish to display and click on the “Open” button. • Step 6. Ensure that all options on the GPS Data Import page are selected and then click on the OK button.
- Page 61 Zooming in will release the points recorded by the Navig8r GPS Double click on any point to see the details For further information on importing .gpx or GPS data into Google Earth, please refer to the help section of this program...
-
Page 62: Updating The Software For The Navig8R
UPDATING THE NAVIG8R Updating the Software for the Navig8r From time to time, it may be necessary to update the software for the Navig8r. Please refer to the http://www.Navig8r.com.au website for detailed information and instructions concerning the update options for the Laser Navig8r GPS system. -
Page 63: Adding Your Own Points Of Interest (Poi) Data To The Navig8R
NAVIG8R). Download the POI file that you want on your GPS to a folder on your computer. The POI data may be in 2 parts: the data file and an image file that provides an icon for the POIs. -
Page 64: Hardware
HARDWARE Hardware www.navig8r.com.au... -
Page 65: Main System Menu
Note: Prior to launching any features, please ensure that the card is inserted correctly in the SD card slot on the side of the unit. If the Navig8r has been sitting for a long period without use, please remove the card from the slot and reinsert the card in the slot. Repeat two or three times to ensure that good contact is made. -
Page 66: A: Main Title Bar
If travelling interstate please ensure that the time zone information is set correctly for local time to ensure that Speed Zone information is displayed correctly. Time Displayed in the GPS navigation software is calculated from the satellite time code and the current GPS location and is independent of the system time. -
Page 67: E: E-Book
Return to folder view Current/Total page Load Book Mark Previous Next Exit Tap the screen to display the control buttons. G: Music Play Pause Stop Previous file Next file Random Play Repeat Play Playback time File name Status bar Volume bar www.navig8r.com.au... -
Page 68: H: Video
MAIN SYSTEM MENU H: Video Play Pause Stop Previous file Next file Random Play Repeat Play Tap the screen to toggle control buttons Return folder view Exit and return to Main Menu www.navig8r.com.au... -
Page 69: System Settings
Displays the current battery status Time & Date Sets the Time, Date and Time Zone System Information Resets the device and the GPS antenna and displays device info Note: Some of the settings in this menu can be altered by the navigation Software. www.navig8r.com.au... -
Page 70: A: Volume
Tap the language to be displayed in the main system menu. to return to the previous screen without accepting the changes. C: Backlight to increase the volume or decrease the volume level. to return to the previous screen without accepting the changes. to accept the changes. www.navig8r.com.au... -
Page 71: D: Battery
Time Set the System Time Zone Set your current location time Zone to return to the previous screen without accepting the changes. to accept the changes. System time and Date is updated automatically when the Navig8r gets a valid GPS signal. www.navig8r.com.au... -
Page 72: F: System Information
Displays information about the GPS signal satellite locations and numbers, latitude, longitude, speed and UTC time. Use the Reset button to reset the GPS receiver if Navig8r is not responding or detecting satellites correctly. Reset the Hardware defaults of the Navig8r. This does not change any settings made in Navigation Software. -
Page 73: Specifications
○ GPS Module: High Sensitivity Receiver (NXP GNS7560) ○ Accuracy and velocity < 10 meter, 0.1 m/s ○ Antenna built-in antenna (built-in GPS high sensitivity receiver 42 channel) ○ Firmware upgrade: Micro SDHC card; ○ Operation time (maximum): 2.5 hours (when battery full power) ○... -
Page 74: Frequently Asked Questions
The first GPS satellite was launched in 1978 and the full constellation of 24 satellites was achieved in 1994. A GPS satellite weighs in at about 900 kilograms and lasts about 10 years before it is required to be replaced. - Page 75 Typically a personal GPS unit is accurate to within 15 meters. The GPS system is only as accurate as the mapping software in the unit. If the map data is incorrect the visual representation of you location may not be displayed correctly.
- Page 76 A: The Navigator GPS is detected by computers as Mass Storage devices simular to USB drives. Macs running OSX 10.2 or later should be able to access the GPS and SD Card Slot by connecting with the supplied USB cable without the need for any software or drivers to be installed.
- Page 77 Q: I received my Navig8r as a gift, I need to send it for repairs. What should I do? A: The Laser Navig8r is covered by a 12 month warranty from the date of purchase on the GPS unit only. Accessories are not covered by warranty. Replacement accessories packs are available from where the Navig8r is sold or online at the Navig8r website.
- Page 78 Q: When I drive in a large CBD area, the GPS drops out or has trouble syncing A: CBD areas can have a canyon affect on GPS systems. Not only can tall buildings hide the signal from GPS satellites, it can also reflect the signals of the satellites that can be detected. This makes it hard for the GPS unit to calculate the correct position.