Table of Contents
Advertisement
Table of Contents
IMPORTANT NOTICES AND WARNINGS ................................................................................... 4
This Documentation ........................................................................................................................................ 4
Global Positioning System ............................................................................................................................... 4
Precautions ..................................................................................................................................................... 4
WHAT'S IN THE BOX ....................................................................................................................... 5
1. GETTING TO KNOW YOUR NAVIG8R GPS ........................................................................ 5
1.1 Warning .................................................................................................................................................... 6
1.2 Before Using Your Navig8r GPS Unit .......................................................................................................... 6
1.3 Mounting the GPS Unit in Your Vehicle ..................................................................................................... 7
1.4 Connecting the Car Charger ....................................................................................................................... 7
NAVIGATION ...................................................................................................................................... 8
Before Using the Navig8r Please Read the Following ...................................................................................... 9
Key Features ................................................................................................................................................... 9
2. Getting Started With Your Navig8r GPS System......................................................................................... 10
2.1 Start Up Screen: The Navigation Menu ...................................................................................................... 12
2.2 Buttons and Other Controls on the Screen................................................................................................. 13
2.2.1 Using Keyboards ...................................................................................................................................... 14
2.3 Map Screen ................................................................................................................................................. 15
2.3.1 Navigating On The Map ........................................................................................................................... 15
2.3.2 Status Information and Hidden Controls on the Map. ............................................................................ 18
2.3.3 Variable Data fields. ................................................................................................................................. 19
3 Navigation Menu ........................................................................................................................................ 20
3.1 Setting a Destination .................................................................................................................................. 20
3.1.1 Finding an Address................................................................................................................................... 20
3.1.2 Entering a State ....................................................................................................................................... 21
3.1.3 Entering a Suburb .................................................................................................................................... 21
3.1.4 Entering a Street ...................................................................................................................................... 22
3.1.5 Entering a Street Number ........................................................................................................................ 22
3.1.6 Finalising the Destination ........................................................................................................................ 22
3.1.6.1 Destination Options .............................................................................................................................. 23
3.1.6.2 Further Destination Options ................................................................................................................. 23
3.2 Finding a POI ............................................................................................................................................... 24
3.2 Destination History ..................................................................................................................................... 25
3.2 Find GPS Coordinate ................................................................................................................................... 25
3.3 Find Favourite ............................................................................................................................................. 25
TABLE OF CONTENTS
1
Advertisement
Table of Contents

Related Manuals for Navig8r GPS-C43


Summary of Contents for Navig8r GPS-C43
-
Page 1: Table Of Contents
1.3 Mounting the GPS Unit in Your Vehicle ..................... 7 1.4 Connecting the Car Charger ........................7 NAVIGATION ............................8 Before Using the Navig8r Please Read the Following ..................9 Key Features ..............................9 2. Getting Started With Your Navig8r GPS System..................10 2.1 Start Up Screen: The Navigation Menu ...................... - Page 2 4 Manage Menu ............................... 26 4.1 Manage Menu Explained ..........................26 4.1.1 Manage Menu Controls ........................... 27 4 Route Menu ............................... 28 4.1 Route Menu Explained ..........................28 5 Settings Menu ............................29 5.1 Route Menu Explained ..........................29 6 GLOSSARY ............................ 31 2D/3D GPS reception ............................
- Page 3 8 CHARGING THE NAVIG8R ....................... 41 8 CONNECTING TO A PC ......................41 10 FRESH MAP GUARANTEE ..................... 41 11 TECHNICAL SPECIFICATIONS ..................... 41 Disclaimer: ..............................41 12 FREQUENTLY ASKED QUESTIONS ..................42 13 END USER LICENCE AGREEMENT (EULA) ............... 47 14 COPYRIGHT NOTE........................
-
Page 4: Important Notices And Warnings
GPS. Precautions For your safety and the safety of other road users, do not operate the controls of this Navig8r while driving. Use care when operating the Navig8r. This product is intended to be used only as an aid to navigate. -
Page 5: What's In The Box
The Navig8r GPS unit GPS device holder Bracket/Windscreen Mount Car Charger (12v DC) USB Data Cable User Manual (This Document) 1. Getting To Know Your Navig8r GPS ITEM DESCRIPTION ITEM DESCRIPTION Sleep ON/OFF Button Charge Indicator Light 3.5mm Earphone /Audio Out... -
Page 6: Warning
The protective screen cover may be left on the device but may impede the viewing of the device in normal operation. Connect the Navig8r GPS unit to power source for a period of 24 hours in the first instance to charge and condition the battery. It may take several charge/discharge cycles for the device to reach peak endurance. -
Page 7: Mounting The Gps Unit In Your Vehicle
Loosen the two knobs on the mount to allow movement of the pivot points. The Navig8r should only be fitted on fixed windows. Once the best location has been determined, remove the protective film from the suction cap of the windscreen mount and, on clean glass, fit firmly against the windscreen. -
Page 8: Navigation
NAVIGATION NAVIGATION... -
Page 9: Before Using The Navig8R Please Read The Following
Please read the hardware section to ensure that all accessories can be identified and you can assemble the navig8r GPS. Also please read the section on “Mounting the GPS unit in your vehicle” in the hardware section to ensure that the Navig8r is mounted safely and securely. -
Page 10: Getting Started With Your Navig8R Gps System
GETTING STARTED WITH YOUR NAVIG8R GPS SYSTEM 2. Getting Started With Your Navig8r GPS System Mount and connect the Navig8r as described in this manual. Press the power button on the top of the Navig8r. The Navigation software will run automatically. - Page 11 GETTING STARTED WITH YOUR NAVIG8R GPS SYSTEM Select the type of menu to be displayed. Simple: Shows only the most commonly used menu item. Advanced: Shows all available features. Select one to advance. Navigation Menu (Advanced) Navigation Menu (Simple) Tapping the MAP button in either menu will display the map screen.
-
Page 12: Start Up Screen: The Navigation Menu
GETTING STARTED WITH YOUR NAVIG8R GPS SYSTEM 2.1 Start Up Screen: The Navigation Menu The software starts with its main menu, the Navigation Menu. From here you can reach all parts of the Software Tap to select your destination by entering an address or selecting a place of interest, a location on the map and or select from one of your Favourites. -
Page 13: Buttons And Other Controls On The Screen
GETTING STARTED WITH YOUR NAVIG8R GPS SYSTEM 2.2 Buttons and Other Controls on the Screen When you are using the software, you usually tap buttons on the touch screen. You only need to confirm selections or changes if the application needs to restart, it needs to perform a major reconfiguration, or you are about to lose some of your data or settings. -
Page 14: Using Keyboards
GETTING STARTED WITH YOUR NAVIG8R GPS SYSTEM 2.2.1 Using Keyboards You only need to enter letters or numbers when you cannot avoid it. You can type with your fingertips on the full-screen keyboards and you can switch between various keyboard layouts, for example English, Greek or numerical. -
Page 15: Map Screen
MAP SCREEN 2.3 Map Screen 2.3.1 Navigating On The Map The map shows the current position (the Vehimarker, a blue arrow by default). When there is no position, the Vehimarker is transparent. It shows your last known position. During navigation the route to be taken is marked in orange. - Page 16 MAP SCREEN Symbol Name Action Switches between 2D & 3D Map modes 2D North Up • Map View Modes (cycle) 2D rotated • 3D rotated • Opens the Detour Screen offering 2 ways of modifying the route: Detour List of saved search Criteria •...
- Page 17 MAP SCREEN Symbol Name Action Tap one of the preset buttons to set the zoom level to a fixed predefined value. Zoom preset buttons Smart Zoom is disabled. These buttons are (available in Advance mode available in 2D mode. only) Tap and Hold any of the buttons to set its value to the current zoom level or to reset it to the default value...
-
Page 18: Status Information And Hidden Controls On The Map
MAP SCREEN 2.3.2 Status Information and Hidden Controls on the Map. The following information appears in the rounded field in the top left corner, the Turn preview field. When tapping this area the result will depend on the information currently shown. ICON INFORMATION DETAILS... -
Page 19: Variable Data Fields
MAP SCREEN 2.3.3 Variable Data fields. The following information can be seen in the three data filed shown on the map screen. Tap this area to open the Trip Information screen where you can select which values are shown on the map screen in these three fields. -
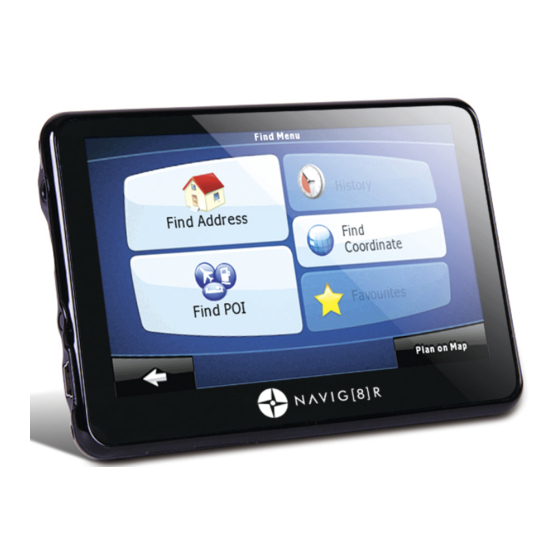
Page 20: Navigation Menu
FIND MENU 3 Navigation Menu From the map screen tap the menu icon to enter the Navigation Menu. Here you can set your destination as well change the way the software looks and behaves. The menu shown to the right is the Advanced menu. -
Page 21: Entering A State
FIND MENU 3.1.2 Entering a State From the Find Address screen tap the second bar to select a state. Tap the or the Change the page to display more and then tap on the desired selection when it is shown. You will be returned to the previous screen when the selection has been made. -
Page 22: Entering A Street
3.1.6 Finalising the Destination With the address entered the screen shown to the right is displayed. Tap the set as Destination button for the Navig8r to begin the route calculation. Or tap the More options Button for other actions. -
Page 23: Destination Options
FIND MENU 3.1.6.1 Destination Options The buttons and their functions on this screen are the following: BUTTON DESCRIPTION Creates a new route with the course as the start point. If an active route already exists, press to add this selection as a via or way point in the active route Marks the map with a pin at the cursor Opens a screen with the name address and co-ordinate information... -
Page 24: Finding A Poi
FIND MENU 3.2 Finding a POI By selecting the Find POI button on the Find menu as shown previously, you can search for a Point Of Interest by several methods. Please see below for more details. BUTTON DESCRIPTION Enter an address, as described previously to search for a POI around. Move the Cursor around the map itself and find a specific point to search for a Point Of Interest around. -
Page 25: Destination History
FIND MENU 3.2 Destination History By selecting the History button on the Find menu as shown previously, you can search previously selected destination. Tap the or the Change the page to display more and then tap on the desired selection when it is shown. You will be returned to the previous screen when the selection has been made. -
Page 26: Manage Menu
Navigation menu you will be presented with the Manage Menu. Form here you are able to Manage the data used and saved by the Navig8r Software Please see below for further details. to return to the previous screen without making a selection or tap the HELP button for detailed information about the Manage Menu. -
Page 27: Manage Menu Controls
MANAGE MENU 4.1.1 Manage Menu Controls In the Manage sub menus the following control buttons are in use. BUTTON DESCRIPTION Delete the selected item. Clear list/lists Move between pages for additional items & Starts recording the tracks while you are driving (also in the Quick Menu) Stops recording Track Logs (also in the Quick Menu) Starts the simulated playback of track logs on the map. -
Page 28: Route Menu
BUTTON DESCRIPTION Opens a useful screen with route data. Browse the driving instructions that the Navig8r presents during navigation. You can exclude manoeuvres or streets to adjust the route to you preference. You can modify the route, remove route points or change their order. -
Page 29: Settings Menu
These settings determine how the routs will be calculated. Control how the Navig8r behaves during Navigation. You can adjust the sounds of the Navig8r Use these settings to adjust the software to your preferred language, unit of measurements, time and date formats as well as different voices guidance profiles. -
Page 30: Button Description
SETTINGS MENU BUTTON DESCRIPTION TMC (Traffic Management Channel) is not available for this model Navig8r. Fine tune device related settings such as Power Management and Screen backlight setting. The About screen simply provides information about Software version and copyright details as well as showing installed map versions Switches Menus or Simple mode. -
Page 31: Glossary
GLOSSARY 6 Glossary 2D/3D GPS reception The GPS receiver uses satellite signals to calculate its (your) position and needs at least four signals to give a three-dimensional position, including elevation. Because the satellites are moving and because objects can block the signals, your GPS device might not receive four signals. If three satellites are available, the receiver can calculate the horizontal GPS position but the accuracy is lower and the GPS device does not give you elevation data: only 2D reception is possible. -
Page 32: North-Up Map Orientation
GLOSSARY North-Up Map Orientation In North-up mode the map is rotated so its top always faces North. This is the orientation for example in Find on Map. See also: Track-up map orientation. Road Safety Camera Special alert points for speed, red light or bus lane cameras. Different data sources are available. You can configure the software to warn you when you approach one of these cameras. -
Page 33: Hardware
HARDWARE Hardware... -
Page 34: Main System Menu
Note: Prior to launching any features that may access the Micro SD card reader, please ensure that the card is inserted correctly in the SD card slot on the side of the unit. If the Navig8r has been sitting for a long period without use, please remove the card from the slot and reinsert the card in the slot. -
Page 35: Gps
Back Button Tap on any page to go back one screen. Time Enters the system time and region settings System Enters the System Information page CO.adjust Tap to recalibrate the Navig8r touch screen Tap to recalibrate the Navig8r touch screen... -
Page 36: Language
MAIN SYSTEM MENU MAIN SYSTEM MENU 7.2.1 Language Use the and the buttons to scroll through the options and then tap the required through the options and then tap the required language. Tap the language to be displayed in the main Tap the language to be displayed in the main system menu. -
Page 37: Sound
MAIN SYSTEM MENU 7.2.4 Sound Use the and the buttons to decrease or increase the volume level for you GPS. Tap the icon to disable or enable Screen tap sounds. Tap the button to return to the previous screen or the button to return to the Main System screen. -
Page 38: Sound
Store Memory Shows size of available memory Open GPS Record: This feature allows for data to be collected direct from the GPS antenna and is reserved for diagnostic and troubleshooting purposes. Data may be requested from this feature by Navig8r Support. -
Page 39: Tools
MAIN SYSTEM MENU MAIN SYSTEM MENU 7.3 Tools 7.3.1 Calculator Use the numeric keypad and function key as Use the numeric keypad and function key as needed. Use the button to clear the whole display or clear the whole display or button to remove the last digit only. -
Page 40: Gps Test
MAIN SYSTEM MENU 7.4 GPS Test The GPS test page shows information about the number of satellites detected and the quality of the signal. Tap the GPS Reset button to reset the GPS antenna if reception difficulties are noticed. Tap the button to return to the previous screen or the button to return to the... -
Page 41: Charging The Navig8R
Care should be taken as deletion of any files on this drive may result in the failure of the navigation software. The Navig8r may use more power than a standard USB port on a PC can provide. It is important that the Navig8r be fully charged prior to any update procedure. -
Page 42: Frequently Asked Questions
FREQUENTLY ASKED QUESTIONS 12 FREQUENTLY ASKED QUESTIONS Q: What is GPS? A: GPS stands for Global Positioning System. Officially named NAVSTAR GPS, It is a satellite-based radio navigation system developed and operated by the U.S. Dept of Defence. GPS is operated and controlled by the Government of the United States of America, who are responsible for the availability and accuracy of the system. - Page 43 Q: Why does my Navig8r receiver show that I am moving when I am standing still? A: Occasionally, GPS satellites may broadcast a signal error called Selective Availability (SA). This can be displayed as up to 4KPH of movement on the GPS receiver.
- Page 44 OSX 10.2 or later should be able to access the GPS and SD Card Slot by connecting with the supplied USB cable without the need for any software or drivers to be installed. Q: My Navig8r is frozen or displays a blue screen, or will not turn on, how do I fix this? A: Contact technical support.
- Page 45 Q: I have finger prints over the screen of my Navig8r, how do I clean it? A: The Navig8r can be cleaned by using a soft damp to dry cloth. Lightly wipe the screen and the case as required. Use another dry soft cloth to make sure that there is no moisture left on the Navig8r.
- Page 46 GPS unit to calculate the correct position. This is more noticeable at slower speeds. Try moving to an area that gives a better view of the sky. For further information about you Navig8r GPS please visit the Navig8r Website at HTTP://WWW.NAVIG8R.COM.AU For navigation software or map related issues please visit HTTP://WWW.NAVIEXTRAS.COM...
-
Page 47: End User Licence Agreement (Eula)
END USER LICENCE AGREEMENT 13 END USER LICENCE AGREEMENT (EULA) 1 The contracting parties 1.1 This Agreement has been entered into by and between Nav N Go Kft. (registered seat: 23 Bérc utca, H-1016 Budapest, Hungary; Company reg.no.: 01-09-891838) as Licensor (hereinafter: Licensor) and You as the User (hereinafter: User;... - Page 48 END USER LICENCE AGREEMENT 5 Rights under copyright 5.1 Unless otherwise provided by law or contractual provisions, the Licensor is the sole and exclusive owner of all material copyrights vested in the Software Product. 5.2 Copyrights extend to the whole Software Product and to its parts separately as well. 5.3 The owner(s) of the copyrights of the Database forming part of the Software Product is (are) the natural person(s) or corporate entity(ies) listed in the Appendix to this Agreement or in the “About”...
- Page 49 END USER LICENCE AGREEMENT 7.1.5 to evade the protection of the Software Product or to modify, circumvent or obviate such protection through technological or by any other means; 7.1.6 to modify, extend, transform the Software Product (in whole or in part), to separate it into parts, combine it with other products, install it in other products, utilise it in other products, not even for the purpose of achieving interoperability with other devices;...
- Page 50 END USER LICENCE AGREEMENT 8.6 By concluding the Agreement, the User shall, in particular, acknowledge the information stated in Section 8 above. 9 Sanctions 9.1 The Licensor hereby informs the User that, if the Licensor finds its rights under the Copyright Act to be breached, the Licensor may 9.1.1 seek judicial recognition of this breach;...
-
Page 51: Copyright Note
COPYRIGHT NOTICE The Licensor or a contractual partner may offer various products and services to the User through www.naviextras.com. The User may only use these services when the User has read and understood the relevant end user licence agreement(s) at www.naviextras.com and the User is obliged to use the services in line with the terms and conditions thereof. -
Page 52: Warranty Against Defects
WARRANTY INFORMATION WARRANTY INFORMATION 15 WARRANTY AGAINST DEFECTS WARRANTY AGAINST DEFECTS Laser Corporation Pty Ltd (“Laser”) warrants your new product to be free from defects in materials Laser Corporation Pty Ltd (“Laser”) warrants your new product to be free from defects in materials Laser Corporation Pty Ltd (“Laser”) warrants your new product to be free from defects in materials and workmanship for 12 months, from the date of purchase, and workmanship for 12 months, from the date of purchase, provided that the product is used in...