Tascam DR-100 Owner's Manual
Portable digital recorder
Hide thumbs
Also See for DR-100:
- Owner's manual (100 pages) ,
- Service manual (43 pages) ,
- Manual to using (2 pages)
Table of Contents
Advertisement
Quick Links
Advertisement
Table of Contents

Related Manuals for Tascam DR-100


Summary of Contents for Tascam DR-100
- Page 1 D01068520A DR-100 Portable Digital Recorder O W N E R ' S M A N U A L...
-
Page 2: Important Safety Precautions
Increase the separation between the equipment and receiver. Declaration of Conformity c) Connect the equipment into an outlet Model Number : DR-100 on a circuit different from that to which the Trade Name : TASCAM receiver is connected. Responsible party : TEAC AMERICA, INC. -
Page 3: Important Safety Instructions
TASCAM DR-100... - Page 4 When installing batteries, pay attention to the Do not disassemble a battery. The acid inside the polarity indications (plus/minus (+/–) orientation), battery could harm skin or clothing. and install them correctly in the battery compart- ment as indicated. Putting them in backward could TASCAM DR-100...
-
Page 5: Table Of Contents
Clear the entire playlist (ALL CLR) ........35 Recording screen ............23 Play files in the playlist (PLAY) .........35 Using menus ..............23 Loop playback (I/O LOOP) ..........36 Basic operation ...............24 Adjusting the playback speed (PB CONTROL) ...36 Adjusting the playback volume ........36 TASCAM DR-100... - Page 6 Setting the type of AA batteries (AA BATTERY) ..45 Menu item list ..............46 List of popup menu items ..........47 11–Messages ............. 48 12–Specifications ............50 Audio input ratings ............50 Audio performance ............50 Accessory (sold separately) ..........50 Requirements for connected computers .....50 Dimensional drawing .............51 TASCAM DR-100...
-
Page 7: 1-Introduction
1–Introduction Thank you very much for purchasing a TASCAM Soft case and windscreen included • DR-100 Portable Digital Recorder. Before using your unit, please read this manual carefully so Included items that you will understand the correct operating procedures and be able to use all the functions This product includes the following items. -
Page 8: Recycling The Lithium Ion Battery
TASCAM is a registered trademark of TEAC • the rightful licensor. Unless you own the Corporation . copyright, or have obtained the appropriate SDHC logo •... -
Page 9: Sd Cards
A list of SD cards that we have confirmed t o w ork w ith t his u nit i s p rovided o n our website (http://www.tascam.com/). Precautions for use SD cards are delicate media. -
Page 10: 2-Quick Start Guide
PS-P520 AC adapter. (See "Using an AC adapter (sold separately)" on page 18 .) Use of a different adapter c ould c ause m alfunction, fi re o r e lectric shock. TASCAM DR-100... -
Page 11: Prepare To Record
Press the ] key to start recording º RECORD from recording standby. 4 Stop recording. Press the ª] key to stop recording. STOP [ For detailed information about recording methods and convenient recording functions, see “6–Recording” on page 25. TASCAM DR-100... -
Page 12: Play And Stop Playback
PLAY/PAUSE [ playback. 3 Adjust the volume with the / control. SP OUTPUT 4 Press the ] key to stop playback. STOP [ ª For detailed information about playback and convenient playback functions, see “7–Playback” on page 33. TASCAM DR-100... -
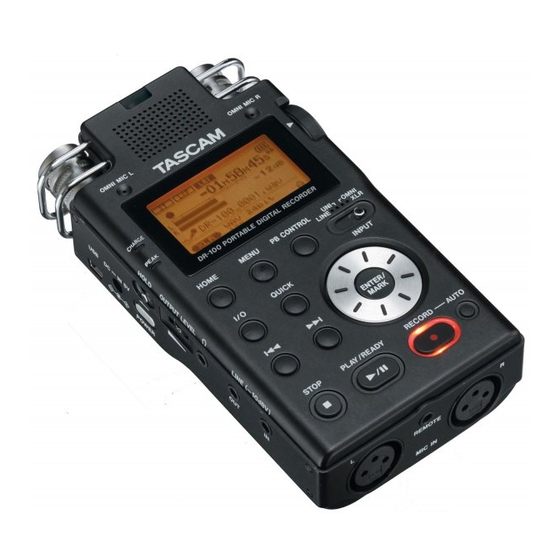
Page 13: 3-Names And Functions Of Parts
Home Screen is open, press this to switch between on setting screens. (See “10–Settings and displaying elapsed and remaining time. (See Information” on page 40.) “Home Screen” on page 22.) Use it also to change the playback position in TASCAM DR-100... -
Page 14: Right Side Panel
(LINE)” on page 26.) Front panel XLR MIC IN connectors Connect external mics (See “Recording with external mics (XLR)” on page 26.) REMOTE connector Connect the included wired remote control. (See “Using the remote control” on page 19.) TASCAM DR-100... -
Page 15: Rear Panel
(See “Using the auto gain control and limiter (LEVEL CTRL)” on page 42.) +48V (phantom power) switch Turn this to provide +48 V of power when a condenser mic is connected. (See “Recording with external mics (XLR)” on page 26.) TASCAM DR-100... -
Page 16: Remote Control (Rc-Dr100)
RECORD [ ] key º Press to start and pause recording. (See “Recording” on page 27.) /¯ Press this key briefly to move to the start of the next file. Press and hold this to search a track forward. TASCAM DR-100... -
Page 17: 4-Preparation For Use
(See “Using an AC adapter (sold separately)” on page 18.) Charging with a computer Connect with a computer using the included USB cable. Charging takes about six hours. (See “8–Connecting with a Computer” on page 37.) TASCAM DR-100... -
Page 18: Using Both Types Of Batteries Together
Follow the disposal instructions written on the • battery or provided by the local government Preparing the remote control when you are done using it. Installing the battery 1 Remove the battery holder. TASCAM DR-100... -
Page 19: Using The Remote Control
When using other devices controlled by infrared rays, use of this remote control might operate Wired use these devices by mistake. Attach the remote control adapter and cable 1 Insert the wireless remote control into the remote control adapter. TASCAM DR-100... -
Page 20: Turning The Power On And Off
NOTE An SD card is already installed when the unit is shipped from the factory. If you want to use this card to record and play tracks, there is no need to reinstall it. TASCAM DR-100... -
Page 21: Card Write Protection
The date and time setting can only be maintained for a few minutes when the unit is not powered by batteries or an AC adapter. When using batteries, we Powered speakers recommend that you replace or recharge them before or audio system they completely lose power. TASCAM DR-100... -
Page 22: 5-Screens And Operation Basics
The total number of files in the playback area and the number of the current file are shown. even when battery power remains. Monitoring output Recorder operation status Headphones Stopped ª Speakers Paused π Playing back Á Fast-forwarding Fast-rewinding Ô TASCAM DR-100... -
Page 23: Recording Screen
MENU The input signal is shown. To return to the Home Screen, press the Elapsed time/remaining time key. HOME (hours: minutes: seconds) Shows the amount of time that can be recorded when in standby. TASCAM DR-100... -
Page 24: Basic Operation
 Use this to move the cursor (the highlighted area) to the left on the screen, and to close folders on screen. Wheel Use this to select items and to change values. TASCAM DR-100... -
Page 25: 6-Recording
a s fi eld r ecording, f or e xample. Point the mics at the sound source and place the unit in a stable location where there is little vibration. If noise is caused by wind, attach the windscreen. TASCAM DR-100... -
Page 26: Recording With External Mics (Xlr)
s etting i s m ade, n ew r ecording fi les a re p laced 1: Ground, 2: Hot, 3: Cold in the folder. (See “Working with folders” on page 38.) TASCAM DR-100... -
Page 27: Adjusting The Input Level
M (mid) PAUSE ( ) key again to restart recording. This ¥/π continues recording in the same file. Use with acoustic guitars and wind instruments, for example L (low) Use with band performances and other loud or close sounds. TASCAM DR-100... -
Page 28: Dividing Files And Creating New Files While Recording
You c an s plit a r ecorded fi le i nto t wo fi les a t a ny position you like. This is convenient for splitting a c ontinuous r ecording i nto m ultiple fi les. TASCAM DR-100... -
Page 29: Automatic Recording (Auto Rec)
Recording starts automatically when the input signal exceeds the value. NOTE Press the STOP ( ) key to stop automatic recording. ª You can also add marks manually. ( See “Adding marks manually to a recording” on page 30.) TASCAM DR-100... -
Page 30: Automatically Pausing Recording (Pause)
6 Press the ) key while holding down º RECORD key to put the unit into recording AUTO NOTE standby. You cannot move to a mark in a different file. Recording starts automatically when the input signal exceeds the value. TASCAM DR-100... -
Page 31: Recording The Moment Before Pushing Record (Pre Rec)
1 Press the key to open the screen. MENU 2 Use the wheel to select , and press the key. ENTER/MARK 3 Set the item to NOTE Set PRE REC to OFF when you set REC DELAY to ON. TASCAM DR-100... -
Page 32: Recording An Overdub
298:08 596:16 64kbps 44.1kHz/48kHz 37:16 72:32 149:04 298:08 96kbps 44.1kHz/48kHz 24:50 49:40 99:20 198:40 128kbps 44.1kHz/48kHz 18:38 37:16 74:32 149:04 192kbps 44.1kHz/48kHz 12:25 24:50 49:40 99:20 256kbps 44.1kHz/48kHz 9:19 18:37 37:16 74:32 320kbps 44.1kHz/48kHz 7:27 14:54 29:48 59:36 TASCAM DR-100... -
Page 33: 7-Playback
Play e very fi le i n t he d esignated a rea o nce 4 Return to the Home Screen and select the file that you want to play. In the case of set the playback area first. (See “Setting the playback area (AREA)” below.) TASCAM DR-100... -
Page 34: Setting The Playback Area (Area)
If you select PLAYLIST, but no files have been Select cancel in the submenu to close it. added to the playlist, a "No PLAYLIST" pop-up appears. You can add files as you like to the playlist. (See “Adding files to the playlist” below.) TASCAM DR-100... -
Page 35: Changing The Playlist Order (Move)
ENTER/MARK key to return to the Home Screen ENTER/MARK 5 Repeat these procedures to delete other files. and start playback. NOTE Files deleted from the playlist are not erased from the unit. TASCAM DR-100... -
Page 36: Loop Playback (I/O Loop)
OUTPUT You can adjust the playback speed by up to -50% or +16% of the original value. When doing so, it is possible to change the pitch with the speed or maintain the original pitch. TASCAM DR-100... -
Page 37: 8-Connecting With A Computer
USB c able, y ou c an t ransfer a udio fi les o n t he S D card in the unit to a computer, as well as transfer 1 Click the "DR-100" drive on the computer screen to show the "MUSIC" and "UTILITY"... -
Page 38: 9-Working With Files And Folders
1 Press the key to open the screen. MENU 2 Use the wheel to select , and press the key. ENTER/MARK 3 Use the wheel to select a folder, and press the key to open a submenu. ENTER/MARK TASCAM DR-100... -
Page 39: Working With Files
1 When the Home Screen is open, press the QUICK key to open a popup menu. 2 Select from the menu, and press the ENTER/ key. MARK 3 Press the key to delete the file, or ENTER/MARK press the ) key to cancel deletion. ª STOP TASCAM DR-100... -
Page 40: 10-Settings And Information
Date o f fi le c reation AUTO OFF: Shows the automatic power OFF setting. SIZE: File size BACKLIGHT: Shows the automatic backlight OFF setting. System Ver.: Shows t he s ystem fi rmware v ersion. TASCAM DR-100... -
Page 41: Battery Information (Battery)
Values: OFF (default), ON Values: OFF (default), 40Hz, 80HZ, 120Hz NOTE NOTE You cannot change this setting during recording or If INPUT is set to LINE, the filter is OFF regardless of record standby. this setting. TASCAM DR-100... -
Page 42: Using The Auto Gain Control And Limiter (Level Ctrl)
: T he d ate i s u sed a s t he fi le n ame, f or example," NOTE The date is determined by the unit’s internal clock setting. (See “Setting the date and time” on page 21.) NOTE If INPUT is set to LINE, the limiter is activated regard- less of this setting. TASCAM DR-100... -
Page 43: Setting The File Name (Word)
1 Press the key to open the screen. MENU 2 Use the wheel to select , and press the ENTER/MARK 3 Use the item to set the time. TASCAM DR-100... -
Page 44: Setting The Brightness Of The Backlight (Dimmer)
2 Use the wheel to select , and press the MENU ENTER/MARK 2 Use the wheel to select , and press the ENTER/MARK 3 Use the item to set the main battery power source. TASCAM DR-100... -
Page 45: Changing Batteries When The Power Is On
CAUTION If the backup battery charge becomes less than a certain level, you can change the MAIN setting. However, the power source does not change while the unit is recording. TASCAM DR-100... -
Page 46: Menu Item List
Set the backlight brightness (OFF, LOW, HIGH Restore the default settings Quick Format the SD card Full Format the SD card Set the main battery ( Li-Ion , AA) Set the AA battery type ( , Ni-MH) ALKALI TASCAM DR-100... -
Page 47: List Of Popup Menu Items
Record an overdub Home Screen (press the QUICK key) Menu Display/Setting Explanation Add a t ag t o t he fi le n ame Delete t he fi le TASCAM DR-100... -
Page 48: 11-Messages
USB and if a new card is inserted in the unit. Always use the DR-100 to conduct FAT formatting of cards to be used with it. Change the card or press the ENTER/MARK key when this message appears to format the card in FAT format. - Page 49 If any of these errors occur, turn the unit power OFF and restart it. If the power cannot be turned OFF, remove the batteries and disconnect the AC adapter (if connected). If the error message continues to appear, please contact a TEAC Repair Center. TASCAM DR-100...
-
Page 50: 12-Specifications
WAV fi les: s ampling f requency 4 4.1/48 k Hz, º Recommended USB host controller: bit length: 16/24-bit Intel chipset º Supported OS: Windows: Windows 2000 Professional SP4 or newer, Windows XP, Windows Vista Macintosh: Mac OS X 10.2 or newer TASCAM DR-100... -
Page 51: Dimensional Drawing
12–Specifications Dimensional drawing TASCAM DR-100... - Page 52 DR-100 Portable Digital Recorder TEAC CORPORATION Phone: +81-42-356-9143 www.tascam.jp 1-47 Ochiai, Tama-shi, Tokyo 206-8530, Japan TEAC AMERICA, INC. Phone: +1-323-726-0303 www.tascam.com 7733 Telegraph Road, Montebello, California 90640 USA TEAC CANADA LTD. Phone: +1905-890-8008 Facsimile: +1905-890-9888 www.tascam.com 5939 Wallace Street, Mississauga, Ontario L4Z 1Z8, Canada TEAC MEXICO, S.A.