Health O Meter 2101KL Operation Manual
Electronic scales wheelchair scale folding wheelchair scale
Hide thumbs
Also See for 2101KL:
- Operation manual (61 pages) ,
- User instructions (23 pages) ,
- Faq (4 pages)
Advertisement
Available languages
Available languages
Advertisement
Chapters

Related Manuals for Health O Meter 2101KL


Summary of Contents for Health O Meter 2101KL
- Page 1 ® PRO PLUS ELECTRONIC SCALES MODELS 2101KL, 2500KL, & 2600KL 2101 HANDRAIL SCALE 2600 2500 WHEELCHAIR SCALE FOLDING WHEELCHAIR SCALE PLEASE REGISTER YOUR PRODUCT FOR WARRANTY AT WWW.HOMSCALES.COM Patent No.D508,655...
-
Page 2: Table Of Contents
TROUBLESHOOTING......................18 CALIBRATION PATH ......................19 EXPLODED VIEW OF DISPLAY MODULE................20 DISPLAY MODULE PARTS LIST..................20 2101KL EXPLODED VIEW …………………………………………………………………… ..21 2101KL PARTS LIST………………………………………………………………………… ..22 2500KL EXPLODED VIEW ……………………………………………………………………….. 23 2500KL PARTS LIST……………………………………………………………………………… . 24 2600KL EXPLODED VIEW …………………………………………………………………… ..25 2600KL PARTS LIST…………………………………………………………………………….. -
Page 3: Caution And Warning
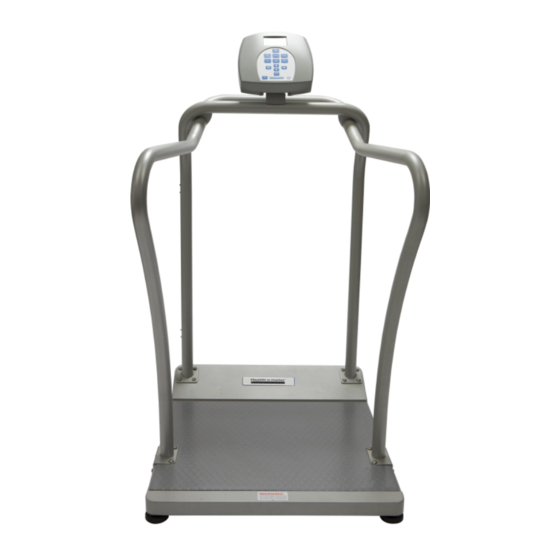
Also included on the platform scales (2101KL, 2500KL & 2600KL) are two wheels for easy mobility. The unit can be operated using its AC adapter or by 6-D cell batteries (not included). -
Page 4: Set Up
Capacity and Resolution 1,000 Lb x 0.2 Lb / ¼ lb / (454 Kg x 0.1 Kg) 2101KL, 2500KL & 2600KL Power Requirements Adaptor model ADPT31*(USA-CSA only) 120 VAC-9VDC 60Hz (NOT INCLUDED) or 6 D cell batteries. Adaptor model ADPT30*(IEC)120-240 VAC-9VDC 50-60Hz (NOT... - Page 5 Press the ON/OFF button to turn the scale on. The display will show “Health o Meter Pro Plus” and then ”000 ”. Place a weight [not to exceed the capacity] on the scale. The display should read “WEIGHING“ until the weight calculation is complete and the weight is displayed.
-
Page 6: Operation Instructions
OPERATION INSTRUCTIONS Make sure there is no object on the weighing platform Press the ON/OFF button to turn the scale on. Health o Meter Pro-Plus Wait until ”000 ” and “ZERO” on the left side of the display appear. Ask the patient to step on the scale. The display should read “WEIGHING“ until the weight of the person is displayed. - Page 7 ITEM DESCRIPTION FUNCTION POWER Turns scale ON and OFF. ZERO Zeros the scale prior to weighing. Holds the value of the weighed object on the display until the HOLD/RELEASE button is pressed again to clear the value. Also used to scroll down in the menu.
- Page 8 NOTE: The default mode of the scale is set so the menu option is locked out. If the menu button is pushed before activating the menu option, “MenuLock” will show on the display. To temporarily reactivate the use of the MENU key, press and hold the MENU key for 5 seconds. During the menu access delay, the menu will display “MenuLock”.
- Page 9 Figure 4. Weight Display Mode Tare Weight Before making changes to this scale setting, please refer to page 6 “Menu” to temporarily activate the Menu key. NOTE: Due to the scale’s sensitivity, we recommend using the REWEIGH function prior to setting the TARE weight, in order to eliminate any operator interference with the item to be tared out.
- Page 10 The number that is to be changed will flash and will move from the left to the right after the appropriate number was entered or by using the key (left) and the key (right). TARE display indicates the weight that has been tared out (Figure 5 shows the display after removal of the tared weight from...
- Page 11 second option stores the value in memory. The maximum capacity of the scale is 270 files of different data. Auto Download Automatic Download is the default option and will transfer the value to the PC as soon as the patient steps off the scale or when the user presses the HOLD/RELEASE button if it was kept in “HOLD”.
- Page 12 Transfer now All the values stored in memory are transferred to the PC and the scale memory is cleared of all values. If the transfer was unsuccessful, the values are kept in memory until successfully transferred or cleared. Clear memory If select YES, then press Enter, All the values stored in memory will be cleared.
- Page 13 The user can set the time elapsed before the scale goes into the sleep mode. The default is 1 minute. 01:00 When the scale goes into sleep mode, STANDBY is displayed on the screen. The maximum setting is 10 minutes Sleep Time. Auto Off Time The user can determine how long the scale will operate before turning off automatically due to inactivity.
- Page 14 The user can set the brightness of the backlight. Display Contrast The user can set the contrast of the LCD. Live Weight By selecting “Yes” the user can set the Live Weight mode to deactivate the motion-sensing mode. In the Live Weight mode the weight displayed will fluctuate with the patient’s movement;...
- Page 15 Set Time & Date The user can set the time and date using the keypad. To set the time move between hours, minutes and seconds using the up and down keys and enter the values on the keypad. If set Display 24 Hours to YES, do not set AM/PM AM/PM) If set Display 24 Hours to NO, then will jump to the AM/PM line press the ENTER...
- Page 16 There are two options display the time: 12 hour (AM/PM) or 24 hour. SYSTEM TEST Before making changes to this scale setting, please refer to page 6 “Menu” to temporarily activate the Menu key. Battery Test The scale will display the estimated amount of battery life remaining until the batteries will have to be replaced.
- Page 17 The scale has a diagnostic routine where it tests the User Interface (UI) hardware functionality (LCD, keypad). In order to do this the user has to press all the keys according to the messages displayed on the screen. If the requested command was not received or wrong button was pressed, the following message will be displayed.
- Page 18 Display Height & ID When the user selects to display the height and ID of the user, it will be displayed at the bottom of the screen. We recommend the use of this function to ensure that the patient’s correct ID and height have been entered.
-
Page 19: Maintenance
This section provides instructions for maintenance, cleaning, troubleshooting and operator ® replaceable parts for Pro Plus Electronic Scales Models 2101KL, 2500KL and 2600KL. Maintenance operations other than those described in this section should be performed by qualified service personnel. MAINTENANCE Before first use and after periods of non-use, check the scale for proper operation and function. -
Page 20: Troubleshooting
TROUBLESHOOTING Refer to the following instructions to check and correct any failure before contacting service personnel. SYMPTOM POSSIBLE CAUSE CORRECTIVE ACTION Scale does not turn on Dead Battery Replace batteries Faulty electrical outlet Use a different outlet Bad power supply Replace adapter Questionable weight or External object interfering... -
Page 21: Calibration Path
Factor OK!(or Factor Fail!) If successful the process will clear the weight. Rebooting… Please wait 9. The scale will reboot after wait for about 1-2 Health o Meter seconds. Pro-Plus 10.Please wait until the scale resumes normal Health o Meter operation. -
Page 22: Exploded View Of Display Module
EXPLODED DIAGRAMS The 2101KL, 2500KL and 2600KL ProPlus® scales all share the same display module. Please refer to page 20 for display module parts for these scales. Exploded diagrams and parts lists are included for the remainder of the scale parts on the pages following the display module parts list. -
Page 23: Kl Exploded View
MODEL 2101KL EXPLODED VIEW OF SCALE... -
Page 24: Kl Parts List
MODEL 2101KL PARTS LIST Key No. Part No. Description Qty. B1109401-0 DISPLAY ASSEMBLY B2033701-0 MAIN BOARD TO JUNCTION BOX CABLE B2266901-0 TILT MECHANISM ASSEMBLY B3822601-0 SMALL REAR COVER B3822901-0 HANDLE B3822101-0 HANDRAIL B3817001-0 ADAPTER HOLDER SHEET METAL SCREW M3.5 HEALTH O METER LABEL... -
Page 25: Kl Exploded View
MODEL 2500KL EXPLODED VIEW OF SCALE... -
Page 26: Kl Parts List
BACK BASE COVER B3823401-0 HANDRAIL PLASTIC TUBE COVER DIA. 38 401307 B3817001-0 ADAPTER HOLDER SHEET METAL SCREW M3.5 HEALTH O METER LABEL SOCKET HEAD CAP SCREW M8 CABLE TIE CV100 RUBBER BUMPER 401308 RIGHT RAMP HINGE 3823601 SPRING LOCK WASHER NC10 PHIL. -
Page 27: Kl Exploded View
MODEL 2600KL EXPLODED VIEW OF SCALE View of Scale in Folded Position... -
Page 28: Kl Parts List
REAR COVER 3822701 B3822601-0 BACK BASE COVER B401305 CABLE CLIP B3822501-0 BASE COVER PLASTIC TUBE COVER DIA. 38 HEALTH O METER LABEL HANDRAIL ADPT31 ADAPTER UNIT 9VDC 120VAC B3817001-0 ADAPTER HOLDER HANDRAIL OPEN RUBBER STOPPER HANDRAIL CLOSED RUBBER STOPPER B2267601-0... -
Page 29: Communication Protocol
PC Communication Protocol This scale uses an escape protocol for communicating with a PC and over the USB and serial port 2 (serial port 1 : connecting to the printer). In an Escape protocol, the escape (<esc> or ASCII 27) is used to indicate that there is a command, and not data, following. - Page 30 Kbytes or Bytes) and send the data. Request Qccc This is a request to receive scale global values such as brightness of LCD, auto hold time, keypad beep volume, etc. (See Table A) (i.e. <ESC>QAHT will return the Auto Hold Time of 10 seconds like this: <ESC>PAHT=10<ESC>E ) Name ESC value with...
- Page 31 Load Cell D Battery E4L(Bat Low, but still usable) or E4U (Bat Low and Unstable) PC Communication (USB) Write to RAM Read from RAM Table B - Components to test The different tables on the scale: There will be two data tables on the scale. The first will store the subject record data (patient-related data that does not change) and the second will store the data recorded during the readings made.
- Page 32 Direction of communication <SCALE> <PC> <ESC>R<ESC>I1234<ESC>W200.19<ESC>H70.5<ESC>B28<ESC>T0.0<ESC>Nm<ESC>R<ESC>I1235<ESC>…<ES C>E Reading (First patient’s data) Patient ID = 1234 Weight = 200.19 (Pounds) Height = 70.5 (inches) TARE = 0.0 (Pounds) BMI = 28 Unit of measure = Constitutional Reading (second patient’s data) If no data is stored on the scale, it will simply send <ESC>R<ESC>E Pin Configuration for ProPlus Cables The pins of the two connectors are connected as follows:...
- Page 33 Printer Parameters Direction of communication <SCALE> <PRINTER> Pinter model: CT-S280 Working voltage: DC8.5V-2.5A This scale is featured with printing function by connecting the printer XXXXX: 1. Connect the printer cable to the PORT 1 of the scale 2. Turn on the printer power 3.
-
Page 34: Warranty
Health o meter ProPlus products are manufactured, designed and owned by Pelstar LLC. Health o meter® is a registered trademark of Sunbeam Products Inc., Boca Raton, FL 33431. ProPlus® is a registered trademark of Pelstar LLC Patent No. D508, 655... - Page 35 ® BALANCES ELECTRONIQUES PRO PLUS MODELES 2101KL, 2500KL, & 2600KL 2101 BALANCE A MAINS COURANTES 2600 2500 alance chaise roulante alance chaise roulante pliable VEUILLEZ ENREGISTRER VOTRE PRODUIT POUR BENEFICIER DE LA GARANTIE, A L’ADRESSE WWW.HOMSCALES.COM Nr de brevet D508,655...
- Page 36 SCHEMA DU BLOC D’AFFICHAGE EN PIECES DETACHEES ......... 47 LISTE DES PIECES DU BLOC D’AFFICHAGE ..............47 2101KL - SCHEMA DE LA BALANCE EN PIECES DETACHEES ........48 2101KL - LISTE DES PIECES....................49 2500KL - SCHEMA DE LA BALANCE EN PIECES DETACHEES ........52 2500KL - LISTE DES PIECES....................
-
Page 37: Precaution Et Prevention
à 180 degrés et permettant de lire le poids de n'importe quel côté de l'appareil. Pour les balances à plateformes (2101KL, 2500KL et 2600KL), deux roues sont incluses pour plus de mobilité. -
Page 38: Installation
Capacité et Résolution 1,000 Lb x 0.2 Lb / ¼ lb / 4 oz (454 Kg x 0.1 Kg) 2101KL, 2500KL & 2600KL Exigences électriques Adaptateur modèle ADPT31* (USA-CSA seulement) 120 VAC-9VDC 60Hz (NON FOURNI) ou 6 piles D. Adaptateur modèle ADPT30*(IEC)120-240 VAC-9VDC 50-60Hz (NON... - Page 39 Assurez-vous qu’il n’y a aucun objet sur la plateforme à peser Appuyez sur la touche de Marche/Arrêt (ON/OFF) pour allumer l'appareil. L'écran affiche le nom « Health o Meter Pro Plus » suivi de la mention « 000 ». Placez un poids [ne dépassant pas la capacité] sur la bascule. L'écran de visualisation affiche la mention «...
-
Page 40: Mode De Fonctionnement
MODE DE FONCTIONNEMENT Assurez-vous qu’il n’y a aucun objet sur la plateforme à peser Appuyez sur l'interrupteur de Marche/ Arrêt (ON/OFF) pour allumer l'appareil. Health o Meter Pro-Plus Attendez que les mentions « 000 » et « ZERO » apparaissent sur le côté... - Page 41 TOUCHE DESCRIPTION FONCTION POWER Allume (ON) et éteint (OFF) l'appareil. ZERO Met la balance à zéro avant la pesée. Maintient l'affichage du poids de l'objet pesé, et ce, jusqu'à la HOLD/RELEASE pression suivante de la touche qui effacera cette valeur de l'écran. Sert aussi à...
- Page 42 REMARQUE : Le mode par défaut de la balance est réglée de manière à ce que le menu des options soit verrouillé. Si le bouton du menu est pressé avant l’activation du menu des options, « MenuLock » s'affiche sur l'écran. Pour réactiver temporairement l’utilisation des touches du MENU, pressez et maintenez le bouton MENU pendant 5 secondes.
- Page 43 Figure 4. Mode d'affichage du poids POIDS DE LA TARE Avant d’effectuer des modifications aux réglages de cette balance, veuillez vous référer au «Menu » de la page 34 afin d’activer temporairement la touche Menu. REMARQUE: Etant donné le degré de sensibilité de la balance, nous recommandons d'utiliser la fonction de repesée (REWEIGH) avant de régler le poids de la TARE, afin d'éliminer toute interférence éventuelle de l'opérateur avec l'objet à...
- Page 44 Une simple pression supplémentaire sur la touche portant la mention TARE effacera la valeur de la tare qui se trouve actuellement en mémoire, la mention TARE disparaîtra de l'écran et la balance reprendra son fonctionnement normal. GESTION DES DONNEES Avant d’effectuer des modifications aux réglages de cette balance, veuillez vous référer au «Menu »...
- Page 45 Le téléchargement automatique est l'option par défaut, il transfère la valeur au PC dès que le patient descend de la balance ou quand l'utilisateur appuie sur la touche HOLD/RELEASE (Maintien/ Libération) si celle-ci était en « position HOLD ». En l'absence de connexion PC, la valeur n'est ni transférée ni stockée et sera perdue après avoir fait descendre le patient de la balance.
- Page 46 Si vous sélectionnez YES (OUI) et vous appuyez sur Entrée, toutes les valeurs enregistrées dans la mémoire seront effacées. Si vous sélectionnez NON, le dernier menu utilisé s’affichera. REGLAGES DE LA BALANCE Avant d’effectuer des modifications aux réglages de cette balance, veuillez vous référer au «Menu »...
- Page 47 réglage maximum est une durée de veille de 10 minutes. Arrêt automatique L'utilisateur peut définir le temps d'attente de la balance avant que celle-ci ne s'éteigne automatiquement suite à son inutilisation prolongée. Le temps réglé par défaut est de 10 minutes.
- Page 48 L'utilisateur peut régler la luminosité du rétroéclairage. Contraste L’utilisateur peut régler le contraste de l’écran LCD. Poids Vif « En appuyant sur Yes » (Oui), l'utilisateur sélectionne le mode Poids Vif et désactive le mode de lecture du poids par sensibilité...
- Page 49 Pour régler l’heure, alternez entre heure, minutes et secondes en utilisant les touches et entrez les valeurs à l’aide du clavier. Si vous réglez "Display 24 Hours" (Affichage 24 heures) sur YES (OUI), ne choisissez pas le réglage AM/PM). Si vous réglez "Display 24 Hours"...
- Page 50 Avant d’effectuer des modifications aux réglages de cette balance, veuillez vous référer au «Menu » de la page 34 afin d’activer temporairement la touche Menu. Test des Piles La balance fait figurer la durée de vie estimée restante avant que les piles actuelles n'aient besoin d'être remplacées. REMARQUE : pour accomplir le test des piles, la balance doit être alimentée seulement par les piles.
- Page 51 Ce message s'affiche si, après 10 secondes, la commande requise n'a pas été transmise. En cas d'apparition du « message UI Error Failure » (Echec d'interface), veuillez consulter un technicien qualifié. REGLAGES UTILISATEUR Avant d’effectuer des modifications aux réglages de cette balance, veuillez vous référer au «Menu »...
- Page 52 Quand l'utilisateur choisit d'afficher la hauteur et le numéro d'identification ID du patient, celui-ci s'affichera au bas de l'écran. Nous recommandons l'application de cette fonction pour vérifier l'exactitude du numéro ID et de la hauteur enregistrés pour le patient. Message guide pour la Hauteur Quand cette option est activée, un message guide demandera à...
-
Page 53: Maintenance
MAINTENANCE GENERALITES Ce chapitre fournit les instructions pour la maintenance, le nettoyage, la localisation des pannes ® et indique les pièces remplaçables par l'opérateur, pour les balances électroniques Pro Plus Toutes opérations de maintenance autres que celles décrites dans ce chapitre doivent être exécutées par un technicien qualifié. -
Page 54: Localisation Des Pannes
LOCALISATION DES PANNES Reportez-vous aux instructions suivantes pour vérifier et rectifier une panne avant de contacter un technicien qualifié. SYMPTOME CAUSE POSSIBLE ACTION CORRECTIVE La balance ne s'allume Les piles sont mortes Remplacez les piles. pas. Prise électrique défectueuse Utilisez une autre prise. Mauvaise alimentation Remplacez l'adaptateur. -
Page 55: Mode De Calibrage
9. Si vous terminez le processus, le poids sera Rebooting…(Réinitialisation) effacé. Please wait (Veuillez patienter) 9. La balance se réinitialisera après environ 1-2 Health o Meter (Compteur santé) secondes. Pro-Plus (Compteur Pro-Plus) 10. 10.Veuillez patienter pendant que la balance Health o Meter (Compteur santé) reprend son opération normale. -
Page 56: Liste Des Pieces Du Bloc D'affichage
SCHEMAS EN PIECES DETACHEES Les balances 2101KL, 2450KL, 2500KL et 2600KL ProPlus® partagent toutes le même module d’affichage. Veuillez vous référer à cette page pour les pièces des blocs d’affichage de ces balances. Des schémas en pièces détachées et les listes des pièces sont inclus pour le reste des pièces des balances, dans les pages faisant suite à... - Page 58 MODELE 2101KL LISTE DES PIECES Key No. Part No. Description Qty. B1109401-0 ENSEMBLE D'AFFICHAGE B2033701-0 CÂBLE TABLEAU DE BORD VERS BOÎTIER DE JONCTION B2266901-0 ENSEMBLE DU MÉCANISME D’INCLINAISON B3822601-0 PETIT CAPOT ARRIÈRE B3822901-0 POIGNÉE B3822101-0 RAMPE B3817001-0 SUPPORT D’ADAPTATEUR M3.5 VIS À FEUILLE DE MÉTAL ÉTIQUETTE HEALTH O METER (COMPTEUR...
-
Page 59: 2500Kl - Schema De La Balance En Pieces Detachees
MODELE 2500KL SCHEMA DE LA BALANCE EN PIECES DETACHEES... - Page 60 RAMPE EMBOUTS PLASTIQUE DE TUBE 38 401307 B3817001-0 SUPPORT D’ADAPTATEUR M3.5 VIS À FEUILLE DE MÉTAL ÉTIQUETTE HEALTH O METER (COMPTEUR SANTÉ) M8 CACHE TÊTE DE VIS COLLIER DE SERRAGE DE CÄBLE CV 100 TAMPON EN CAOUTCHOUC 401308 CHARNIÈRE DE LA RAMPE DROITE 3823601 NC 10 RONDELLE DE BLOCAGE À...
-
Page 61: 2600Kl - Schema De La Balance En Pieces Detachees
MODELE 2600KL SCHEMA DE LA BALANCE EN PIECES DETACHEES... - Page 62 B3822601-0 COUVERCLE DE BASE ARRIÈRE B401305 ATTACHE DE CÄBLE B3822501-0 COUVECLE DE LA BASE EMBOUTS PLASTIQUE DE TUBE 38 ÉTIQUETTE HEALTH O METER (COMPTEUR SANTÉ) RAMPE ADPT31 ADAPTATEUR 9VDC À 120VAC B3817001-0 SUPPORT D’ADAPTATEUR ARRÊT EN CAOUTCHOUC DE LA RAMPE OUVERTE ARRÊT EN CAOUTCHOUC DE LA RAMPE FERMÉE...
- Page 63 Protocole de communication PC Cette balance utilise un protocole de sortie pour communiquer avec un PC et avec un câble USB se connectant à l’imprimante). Dans un protocole Escape (Échap), la touché échap (<esc> ou ASCII 27) est utilisée pour indiquer la présence d’une commande et non des données. Deux scénarios ont été...
- Page 64 Uc(permission d’envoi) ou Ue (erreur, ne pas envoyer). La balance envoie ensuite U127K ou U127B (la longueur des données suivant en Kbytes ou Bytes) et envoie les données. Demande Qccc Ceci est une demande pour recevoir les valeurs globales de la balance, telles que la luminosité...
- Page 65 Tableau A – liste des valeurs globales de la balance et identifiants Nom des composants à tester Code d’erreur identifi cant Cellule de charge A Cellule de charge B cellule de chargeC cellule de charge D Batterie E4L(Bat Low, mais encore utilisable) E4U (Bat Low et Instable) Communication PC(USB) ecrire ram...
- Page 66 Direction of communication <BALANCE> <PC> <ESC>R<ESC>I1234<ESC>W200.19<ESC>H70.5<ESC>B28<ESC>T0.0<ESC>Nm<ESC>R<ESC>I1235<ESC>…<ES C>E Lecture (Données du premier patient) ID Patient = 1234 Poids = 200.19 (livres) Taille = 70.5 (pouces) TARE = 0.0 (livres) BMI = 28 Unitmeasure de mesure = Constitutionnelle Lecture (données du deuxième patient) Si aucune donnée n’est enregistrée, le message envoyé...
- Page 67 Paramètres de l’imprimante Direction of communication <SCALE> <PRINTER> Modèle d’imprimante: CT-S280 Tension de fonctionnement: DC8.5V-2.5A Cette balance vous offre une possibilité d'impression en connectant l'imprimante XXXXX: 1. Connectez le câble de l’imprimante au PORT 1 de la balance 2. Allumez l’imprimante 3.
-
Page 68: Garantie
Les produits Health o meter sont fabriqués, conçus et la propriété de Pelstar LLC. Health o meter® est une marque déposée de Sunbeam Products Inc., Boca Raton, FL 33431 ProPlus® est une marque déposée de of Pelstar LLC Brevet No. D508,655... - Page 69 ® BALANZAS ELECTRÓNICAS PRO PLUS MODELOS 2101KL, 2500KL Y 2600KL KL2101 BALANZA CON PASAMANO KL2600 KL2500 BALANZA PARA SILLA DE RUEDAS BALANZA PARA SILLA DE RUEDAS PLEGABLE REGISTRE SU PRODUCTO PARA OBTENER LA CORRESPONDIENTE GARANTÍA EN WWW.HOMSCALES.COM Patente Nº D508,655...
- Page 70 VISTA DETALLADA DE LA UNIDAD DE DISPLAY .............. 73 LISTA DE PIEZAS DE LA UNIDAD DE DISPLAY..............75 2101KL - VISTA DETALLADA DE LA BALANZA ..............76 2101KL - LISTA DE PIEZAS ....................77 2500KL - VISTA DETALLADA DE LA BALANZA ..............80 2500KL - LISTA DE PIEZAS ....................
-
Page 71: Precaución Y Advertencia
La balanza tiene una barandilla envuelta para comodidad y seguridad del paciente y un eslabón giratorio/cabeza giratoria de 180-grados para leer de cualquier lado de la balanza. Las balanzas provistas de plataformas (2101KL, 2500KL & 2600KL) también incluyen dos ruedas para facilitar su movilidad. -
Page 72: Configuración
Capacidad y Resolución 1,000 Lb x 0.2 Lb / ¼ lb / 4 oz (454 Kg x 0.1 Kg) 2101KL, 2500KL & 2600KL Requerimientos de Adaptador modelo ADPT31*(solo para Estados Unidos y CSA) de 120V CA – 9V CC y 60Hz (NO INCLUIDO) o 6 pilas Energía... - Page 73 Enchufe el adaptador CA de la balanza en la fuente de energía. Asegúrese de que no haya ningún objeto sobre la plataforma de peso. Presione el botón ON/OFF para activar la balanza. El display muestra “Health o Meter Pro Plus” y después ”000 ”.
-
Page 74: Instrucciones De Operación
INSTRUCCIONES DE OPERACIÓN Asegúrese de que no haya ningún objeto sobre la plataforma de peso. Presione el botón ON/OFF para activar la balanza. Health o Meter Pro-Plus Espera hasta que aparezca ”000 ” y “ZERO” en el lado izquierdo del display. - Page 75 ITEM DESCRIPCIÓN FUNCIÓN POWER Conecta (ON) y desconecta (OFF) la balanza. ZERO Cera la balanza antes del pesaje. Mantiene el valor del objeto pesado en el display hasta que HOLD/RELEASE se presione el botón otra vez para limpiar el valor. También usado para moverse hacia abajo en el menú.
- Page 76 COMENTARIO: El modo predeterminado de la balanza se ajusta de manera tal que la opción de menú quede bloqueada. Si se pulsa el botón Menú antes de activar la opción de menú, “Bloqueodemenú” aparecerá en pantalla. Para reactivar temporalmente el uso de la tecla MENÚ, presiónela y manténgala presionada durante 5 segundos.
- Page 77 Figura 4. Modo de Presentación del Peso PESO TARA Antes de efectuar cambios a esta configuración de la balanza, consulte la página 62, "Menú" para activar temporalmente el botón de éste. NOTA: Debido a la sensibilidad de la balanza, recomendamos usar la función REWEIGH antes de establecer el peso TARA, a fin de eliminar cualquier interferencia del operador en el ítem a tener el peso disminuido.
- Page 78 El número que debe ser cambiado parpadeará y pasará de la izquierda a la derecha después que el número apropiado haya sido introducido o usando la tecla (izquierda) y la tecla (derecha). El display TARE indica el peso que ha sido disminuido (La Figura 5 muestra la pantalla luego de...
- Page 79 su PC. La segunda opción almacena el valor en la memoria. La capacidad máxima de la balanza es de 270 archivos con datos distintos. Descarga Automática Descarga Automática es la opción predeterminada y transferirá el valor al PC así que el paciente baje de la balanza o cuando el usuario presiona el botón HOLD/RELEASE si estuviera mantenido en “HOLD”.
- Page 80 Descarga Automática es la opción predeterminada y transferirá el valor al PC así que el paciente baje de la balanza o cuando el usuario presiona el botón HOLD/RELEASE si estuviera mantenido en “HOLD”. Si ningún PC está conectado, el valor no es transferido y no es almacenado y será...
- Page 81 Tiempo Inactivo El usuario puede determinar el tiempo transcurrido antes de la balanza pasar al modo inactivo. El 01:00 valor predeterminado es de 1 minuto. Cuando la balanza pasa al modo inactivo, aparece STANDBY en la pantalla. El ajuste máximo para el temporizador de apagado es de 10 minutos Apagar Automático...
- Page 82 Luz de Fondo del Display El usuario puede establecer el brillo de la luz de fondo. Contraste del Display t El usuario puede ajustar el contraste de la pantalla LCD. Peso Vivo Al seleccionar “Yes” el usuario puede establecer el modo Peso Vivo para desactivar el modo Sensible a Movimientos.
- Page 83 Para ajustar la hora, desplácese por las horas, los minutos y los segundos utilizando las teclas hacia arriba y hacia abajo e ingrese los valores en el teclado. Si Visualización de 24 horas se ajusta a SÍ, no ajuste AM/PM. Si visualización de 24 horas se ajusta a NO, entonces salte a la línea AM/PM y pulse el botón INTRODUCIR una sola vez.
- Page 84 Existen dos opciones de visualización de hora: 12 horas (AM/PM) ó 24 horas. PRUEBA DEL SISTEMA Antes de efectuar cambios a esta configuración de la balanza, consulte la página 62, "Menú" para activar temporalmente el botón de éste. Prueba de la Batería La balanza presentará...
- Page 85 La balanza testará la conexión al PC y exhibirá el mensaje “Connection is OK” o ”NO Connection”. Si aparece “NO Connection”, verifique sus conexiones USB en la balanza y en su PC y haga de nuevo la prueba de la conexión.
- Page 86 Cuando el usuario elige presentar la altura y el ID del paciente, estos serán exhibidos en la parte inferior de la pantalla. Recomendamos usar esta función para asegurarse que el ID y altura correctos fueron introducidos. Solicitación de Altura Cuando esta opción es activada, el usuario es solicitado a introducir la altura del paciente después de cada...
-
Page 87: Mantenimiento
MANTENIMIENTO GENERAL Esta sección provee instrucciones para mantenimiento, limpieza, solución de problemas y piezas reemplazables por el operador para la Balanza Electrónica Pro Plus . Otras operaciones de mantenimiento aparte de las descritas en esta sección deben ser realizadas por el personal de servicio calificado. -
Page 88: Solución De Problemas
SOLUCIÓN DE PROBLEMAS Refiera-se a las siguientes instrucciones para verificar y corregir cualquier falla antes de contactar el personal de senrvicio. SÍNTOMA POSIBLE CAUSA ACCIÓN CORRECTIVA La balanza no se prende Batería terminada Cambie las baterías Toma de corriente Use una toma de defectuosa corriente distinta Mala fuente de energía... -
Page 89: Trayectoria De Calibración
10. Al finalizar el proceso, se borrará el peso. Reiniciando… Espere 9. La balanza se reiniciará después de 1 a 2 Health o Meter segundos aproximadamente. Pro-Plus 10. Espere hasta que la balanza reanude su Health o Meter funcionamiento normal. Quite el peso de la Pro-Plus plataforma. - Page 90 VISTA DETALLADA Las balanzas 2101KL, 2500KL y 2600KL ProPlus® tienen las mismas unidades de display. Consulte esta página para ver las piezas de la unidad de display de estas balanzas. Se incluyen vistas detalladas y listados de piezas para los demás componentes de la balanza en las páginas que siguen al listado de piezas de la unidad de display.
-
Page 91: 2101Kl - Vista Detallada De La Balanza
MODEL0 2101KL VISTA DETALLADA DE LA BALANZA... - Page 92 MODEL 2101KL PARTS LIST Key No. Part No. Description Qty. B1109401-0 PANTALLA B2033701-0 PLACA PRINCIPAL AL CABLE DE LA CAJA DE CONEXIONES B2266901-0 MECANISMO DE INCLINACIÓN B3822601-0 CUBIERTA TRASERA PEQUEÑA B3822901-0 MANIJA B3822101-0 PASAMANOS B3817001-0 SOPORTE DEL ADAPTADOR TORNILLOS DE PLANCHA M3.5 ETIQUETA SANITARIA O DE MEDICIÓN...
-
Page 93: 2500Kl - Vista Detallada De La Balanza
MODEL0 2500KL VISTA DETALLADA DE LA BALANZA... - Page 94 MODELO 2500KL LISTA DE PARTES Key No. Part No. Description Qty. B1109401-0 PANTALLA B2033701-0 PLACA PRINCIPAL AL CABLE DE LA CAJA DE CONEXIONES B2266901-0 MECANISMO DE INCLINACIÓN B3822601-0 CUBIERTA DE LA BASE TRASERA B3823401-0 PASAMANOS TOPE PLÁSTICO DEL TUBO DE 38 DE DIÁMETRO 401307 B3817001-0 SOPORTE DEL ADAPTADOR...
-
Page 95: 2600Kl - Vista Detallada De La Balanza
MODELO 2600KL VISTA DETALLADA DE LA BALANZA Vista de la Balanza en Posición Plegada... - Page 96 MODELO 2600KL LISTA DE PARTES Key No. Part No. Description Qty. B1109401-0 PANTALLA PLACA PRINCIPAL AL CABLE DE LA CAJA DE CONEXIONES MECANISMO DE INCLINACIÓN TORNILLOS DE CABEZA PLANA M4 PHILLIPS CUBIERTA TRASERA 3822701 B3822601-0 CUBIERTA DE LA BASE TRASERA B401305 GANCHO PARA CABLE B3822501-0...
- Page 97 Protocolo de comunicación de PC Esta balanza utiliza un protocolo de escape para comunicarse con un PC a través de los puertos serie 2 y USB(puerto serie 1: conectando a la impresora). En un protocolo de escape, la función de escape (<esc>...
- Page 98 Apagado Cuando se desee saber el estado de carga, esto indicará que la balanza se encuentra apagada (o en modo de carga baja/temporizador de apagado). Si se encuentra en modo de carga baja, la balanza mostrará el carácter L Fecha/Hora Dnnnnnnnnnn Corresponde a la fecha y a la hora (MMDDAAAAhhmmss) Actualización...
- Page 99 Nombre del control Identific Unidad ador Tiempo de espera automático nn (Segundos) Tiempo de apagado automático nn (Minutos) Temporizador de apagado nn (Segundos) Volumen del teclado nn (01..10) Volumen de peso estable nn (01..10) Volumen de la alarma nn (01..10) Visualización de fecha/hora nn (01 ó...
- Page 100 Ejemplo y explicación del protocolo de escape 1. Cuando la balanza mide el peso de un paciente y lo envía a través de la línea de comunicaciones al PC, se verá del siguiente modo: Direction of communication <BALANZA> <PC> <ESC>R<ESC>I1234567890<ESC>W90.98<ESC>H178.7<ESC>T5.7<ESC>B28<ESC>Nm<ESCE Reading (Command) Patient ID = 1234567890 Weight = 90.98...
- Page 101 Direction of communication <BALANZA> <PC> <ESC>R<ESC>I1234<ESC>W200.19<ESC>H70.5<ESC>B28<ESC>T0.0<ESC>Nm<ESC>R<ESC>I1235<ESC>…<ES C>E Lectura (datos del primer paciente) Identificación del paciente = 1234 Peso = 200,19 (Libras) Altura = 70,5 (pulgadas) TARA = 0,0 (Libras) IMC = 28 Unidad de medición = Constitucional Lectura (datos del segundo paciente) Si no se almacenan datos en la balanza, sólo enviará...
- Page 102 Hardware activo Ninguno Parámetros de la impresora Dirección de la comunicación Parámetros < BALANZA > < > Modelo de la impresora: CT-S280 Voltaje de trabajo: CC8.5V-2.5A Esta balanza incluye una función de impresión que se activa al conectar la impresora XXXXX: 1.
-
Page 103: Garantía
0600 www.homscales.com Los productos Health o meter ProPlus son fabricados, proyectados y de propiedad de Pelstar LLC. Health o meter® es una marca registrada de Sunbeam Products Inc., Boca Raton, FL 33431 ProPlus® es una marca registrada de Pelstar LLC...