Table of Contents

Related Manuals for Russell Hobbs RHM2018


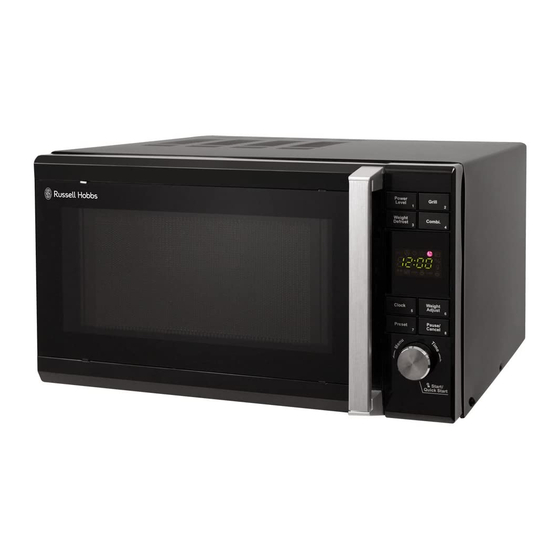
Summary of Contents for Russell Hobbs RHM2018
-
Page 1: Instruction Manual
20 Litre Black Digital Microwave with Grill Instruction Manual Model Number: RHM2018 Please read these instructions carefully and keep them for future reference For Customer Services & Spare Parts please call 0845 209 7461 Opening times: Monday – Friday 8am – 6pm... -
Page 3: Specifications
Specifications • WARNING: if the door or door seals are damaged, the oven must not be operated until it has been repaired by a competent person • WARNING: it is hazardous for anyone other than a qualified engineer to carry out any service or repair operation that involves the removal of a cover which gives protection against exposure to microwave energy;... - Page 4 For Customer Services & Spare Parts please call 0845 209 7461 Opening times: Monday – Friday 8am – 6pm...
- Page 5 For Customer Services & Spare Parts please call 0845 209 7461 Opening times: Monday – Friday 8am – 6pm...
- Page 6 For Customer Services & Spare Parts please call 0845 209 7461 Opening times: Monday – Friday 8am – 6pm...
- Page 7 For Customer Services & Spare Parts please call 0845 209 7461 Opening times: Monday – Friday 8am – 6pm...
- Page 8 Remove the oven and all the material from the carton. Your oven comes with the following accessories: Glass plate - 1 Instruction manual – 1 Turntable ring assembly - 1 Door Safety Lock System Oven Window Turntable Ring Assembly Control Panel Wave Guide Glass Turntable Grill Heater...
-
Page 9: Installation
Glass turntable(6), to be placed on the turntable ring assembly. a. Never place the glass turntable (6) upside down. The turntable should never be restricted in movement. b. Both glass turntable (6) and turntable ring assembly (3) must always be used during cooking. c. - Page 10 Warning : Do not install microwave oven over a range cooktop or other heat-producing appliance. If installed above a heat producing appliance the microwave oven could be damaged and the warranty would be void. Warning : Do not install microwave oven in a cupboard. 1.
- Page 11 Menu action screen Cooking time, power, action indicators, and clock time are displayed. 1. POWER LEVEL Press this button a number of times to set microwave cooking power level. 2. GRILL Press to set grill cooking program. 3. WEIGHT DEFROST Press to defrost food based on the weight entered.
- Page 12 Your microwave Oven is equipped with a clock, you must set the clock when you first install your oven or after a power failure. This is a 24 hour clock. Suppose you want to set the oven clock time to 8:30. In standby mode press once.
- Page 13 Suppose you want to program grill cooking for 12 minutes. In standby mode, press once. GRILL Turn until it displays 12:00. MENU/TIME START/ Press button to start the cooking. QUICK START Note: After total time elapsed, the system will sound beeps every two minutes with END being displayed. Press any button or open the oven door to clear END before starting another cooking function.
- Page 14 22:00 1000 24:15 1100 26:30 1200 28:45 1300 31:00 1400 33:15 1500 35:30 1600 37:45 1700 40:00 1800 42:15 Note: The cooking time for each stage is 1/3 of total cooking time. Note: When the cooking time is halfway through, the oven will stop and produce beep sounds to let you know. You can START/ open the door to turn the food over.
- Page 15 Note: For milk/coffee and potato, parameters on display are not weight but number of servings. For Spaghetti add boiling water before cooking. The result of auto cooking depends on factors such as fluctuation of voltage, the shape and size of food, your personal preference as to the doneness of certain foods and even how well you happen to place food in the oven.
-
Page 16: Normal Condition
cloth. Mild detergent may be used if the oven gets very dirty. Avoid the use of spray and other harsh cleaners as they may stain, streak or dull the door surface. The outside surfaces should be cleaned with a damp cloth. To prevent damage to the operating parts inside the oven, water should not be allowed to seep into the ventilation openings. -
Page 17: Maintenance
for a very short time. It is advised that a glass or microwave safe container of water is always left in the oven to absorb any heat should the oven be turned on accidentally MAINTENANCE Troubleshooting Check for problems by using the chart below. If the microwave oven still does not work properly, contact the nearest authorised service centre. -
Page 18: Bulb Replacement
Q: What is wrong when the oven light will not glow? A: There may be several reasons why the oven light will not glow. The light bulb has burned out or START has not been pressed. Q: Why do eggs sometimes burst? A: The egg yolk may burst because of steam build-up inside the membrane. - Page 19 For Customer Services & Spare Parts please call 0845 209 7461 Opening times: Monday – Friday 8am – 6pm...
- Page 20 For Customer Service and Spare Parts please call 0845 209 7461 Opening times: Monday – Friday 8am until 6pm This symbol is known as the 'Crossed-out wheelie bin Symbol'. W hen this symbol is marked on a product/batteries, it means that the product/batteries should not be disposed of with your general household waste.