Table of Contents
Advertisement
Quick Links
Download this manual
See also:
User Manual
Advertisement
Table of Contents

Related Manuals for Zoom R24


Summary of Contents for Zoom R24
- Page 1 OPERATION MANUAL © ZOOM Corporation Reproduction of this manual, in whole or in part, by any means, is prohibited.
-
Page 2: Usage And Safety Precautions
However, equipment that is very sus- ceptible to interference or that emits powerful electromagnetic always consult with a store that handles ZOOM prod- ucts and use a suitable AC adapter. With any type of electronic device that uses digital control, always pull the body of the adapter itself. -
Page 3: Introduction
Introduction After reading it, please keep the manual along with the warranty in a safe place. Multitrack recorder that can use up to 32 GB Handles a variety of input sources including SDHC cards guitars, microphones and line-level equipment neously, allowing serious live recording. For example, you can record a complete band on individual tracks or a drum kit with multiple microphones. -
Page 4: Table Of Contents
Manual punch-in/punch-out ..30 R24 operation flow ....5 Basic recording guide ... .7 Playback Panel layout and functions . - Page 5 For details about use with a computer, refer to the Audio Interface Manual (PDF) on the CD-ROM included with the unit. Projects Editing a sequence ... . 56 Inserting and deleting beats Project overview .
-
Page 6: R24 Operation Flow
R24 operation flow 24 audio tracks Multitrack recorder Recording preparations Recording Make various settings for the built- in microphones, connected musical Effects instruments and other input sources, signals and tracks. Use the tuner and the metronome to prepare for a new project or a live performance. - Page 7 Use looped material to create performance data for an entire song. Recording a MASTER track Card reader P106 USB memory P107 Send signals between DAW software and audio equipment. P110~ Audio interface manual Operate DAW software with the R24. P110~ Audio interface manual...
-
Page 8: Basic Recording Guide
Basic recording guide Make a quick recording with the R24 Here we explain how to record in stereo with the built-in microphones on the unit's left and right sides and how to record an electric guitar in mono using the high impedance input. - Page 9 Adjust the input sensitivity, STEP 4 STEP 5 Record—Complete—Play monitoring level and output Recording Adjust the input sensitivity (GAIN) Adjust the GAIN of each While pressing press move to the beginning. INPUT so that their PEAK indicators blink occasionally. Adjust the recording level the level meter should not Press and then...
-
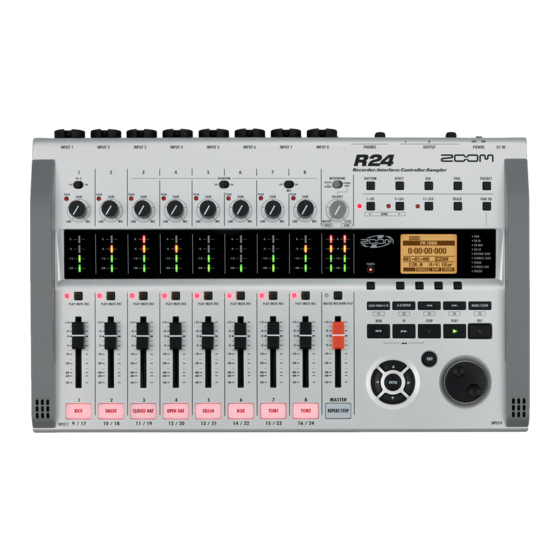
Page 10: Panel Layout And Functions
Panel layout and functions Rear panel Input section Level meters (1/9/17~8/16/24, MASTER) Control section Transport section Display section TEMPO indicator Right side panel TEMPO key Soft keys Bottom panel (not shown) USB HOST port USB DEVICE port... -
Page 11: Rear Panel
Input section PHANTOM METRONOME switch switch switch Hi-Z switch PEAK indicator BALANCE control GAIN Control section PROJECT key EFFECT key TOOL key Status keys USB key (1/9/17~8/16/24, MASTER) Track indicator RHYTHM key Master indicator 1-8Tr key 9-16Tr key TRACK key PAN/EQ key 17-24Tr key Transport section... -
Page 12: Connections
Connections equipment and computers. Outputs Inputs Set the METRONOME switch to output it to only the PHONES jack or also to the INPUT jacks. OUTPUT jacks. Microphones Stereo system, speakers with In order to supply phantom power to a When directly connecting a passive built-in amplifiers, etc. -
Page 13: Sd Card Installation
SD card installation To protect your data, turn the power off before inserting or ejecting a card. NOTE Turn the power OFF beforehand (ordinary use) Turn the POWER OFF and detach the cover of the SD card slot. turn the power OFF. If you do so when the power is ON, recording data might be lost. -
Page 14: Powering The Unit
Powering the unit Using ordinary power (included AC adapter) Using batteries and then plug the included AC battery case cover on the bottom adapter into the back of the unit. of the unit. Install the batteries and close the cover. AC adapter, which is designed for use Battery power Battery indicator on screen... -
Page 15: Turning The Power On & Off
Turning the power on & off/Date & time setting Follow these precautions for starting-up and shutting down the unit. Setting the date and time Turning the power on & off TOOL>SYSTEM>DATE/TIME Press the power, the instruments and the monitoring connected. Select Change menu Turn the power ON to start the unit... -
Page 16: Switch And Key Operation Overview
Switch and key operation overview Please look at the display for icons that show key functions. Transport section Control section Functions only when tracks are Play, create and set rhythm RHYTHM key REC key patterns in recording standby. Starts recording standby Set the insert and send- EFFECT key return effects... -
Page 17: Display Information
Display information The display shows data about projects and other elements, connection and operation status as a recorder or a computer audio-interface, available functions and various menus. Display and indications Icon display and setting keys Insert effect icon P80 Top Screen: Shows the current project Icon display area Project name Hours: minutes: seconds:... -
Page 18: Recording Preparations
Recording preparations R24 recording flow/Creating a new project Create a new project for each song that you make. Create a new project Recording preparations PROJECT>NEW Press Connecting instruments Select Change menu Project and track settings Create a new project Press Select the INPUTS and the recording tracks Confirm the project... -
Page 19: Connecting Instruments
Recording preparations Connecting instruments/Making mono settings Make settings for instruments such as high impedance guitars, line-input synths, the built-in mics and mics that use phantom power as well as for stereo and mono input sources. Connecting passive-type guitars Assign INPUT 1~8 connections to tracks 1~24 Connect the high impedance instrument to INPUT 1, and Connect instruments and mics. -
Page 20: Stereo Settings & Status Keys
Recording preparations Connecting instruments/Stereo settings & status keys To make a stereo recording, set a stereo link for adjacent odd and even-numbered tracks Using the built-in mics Turn the MIC switch ON Signals to INPUTS 7/8 Connecting line input instruments (stereo connection) Use INPUTS 1/2, 3/4, 5/6 and 7/8 as pairs. -
Page 21: Stereo Link
Recording preparations Stereo link Stereo link Status keys and track indicators PAN/EQ>STEREO LINK Press a status key to set the role of a track fader and change the color of the track indi- Press cator light. The track indicator colors show the status as follows. -
Page 22: Setting The Tempo
Recording preparations Setting the tempo Set the tempo for the music. The tempo is saved for each project. Changing the tempo Press beneath Use the dial to change the value. beneath repeatedly. The average pace will be set as the tempo value. -
Page 23: Preparing A Rhythm Track
Recording preparations Preparing a rhythm track Assignment to a track Press Select the track to assign. Select track Select Change menu Press Select to use a rhythm pattern. Change menu HINT Press rhythm pattern. Select the rhythm pattern. Play Select a file or pattern Stop and played back simultaneously, or patterns with... -
Page 24: Track Recording
Track recording Recording the first track After connecting instruments and completing recording preparation, ready the recorder and Adjusting the input level Starting from the Top Screen of a new project Arm the track for recording. Return the counter to the beginning Press 1-2 times until the track light turns red. - Page 25 Recording the first track Playing back the recorded track Press stop (if you have not already). Start recording standby. Press Press Lit red green Start recording. Counter stops Press Lit red Lit green Play the track. Counter starts Press on the track to be played 1-2 times until lit green When green, the track is...
-
Page 26: Changing The Playback Take
Track recording Changing the playback take Press Press beneath Select the track to assign. Select track Select the first track to swap. Select Change menu Press Indicators blink orange on tracks that can be selected. Press the status key to select a track. For an audio file, select Change menu Selectable: blinking orange... - Page 27 NOTE The swap function switches two tracks, including the assigned files, track sequence data and all track parameter information.
-
Page 28: Overdubbing
Overdubbing Recording additional tracks also set recordings to play on different tracks. Playing already recorded tracks Start and stop recording Press 1-2 times until the Press and hold and press indicator lights green for to return to the beginning. all tracks to be played back. - Page 29 Playback all tracks Press 1-2 times until the indicator lights green for all tracks to be played back. Playback-ready when green Press and hold and press to return to the beginning. Press to start playback. Lit green Press to stop playback. Lit green HINT NOTE...
-
Page 30: Re-Recording
Re-recording Automatic punch-in/punch-out recording automatically. Prepare the track that you want to Rehearse punch-in/punch-out Press to start playback. Raise the fader on the track When the punch-in point is passed, the track is you want to re-record automatically muted. Perform (not recording) When the punch-out point is passed, the track is Press 1-2 times automatically unmuted. -
Page 31: Manual Punch-In/Punch-Out
Re-recording Manual punch-in/punch-out You can also punch in and out manually. Press the REC key during playback to start re-recording from that point. Prepare the track that you want to Re-recording: punch-in/punch-out punch-in/punch-out Locate to before the punch in point. Raise the fader on the track you want to re-record Press to start... -
Page 32: Project Playback
Playback Project playback Overview of recording and playback process in a project MASTER 1/9/17 2/10/18 4/12/20 Recording the first track Track 1: mono recording Track 7 & 8: stereo recording New Take New Take New Take New Take New Take New Take New Take New Take... -
Page 33: Repeat Playback Of A Specific Section (A-B Repeat)
Playback Repeat playback of a specific section (A-B repeat) between them. HINT Setting A-B points goes back to point A and continues playback. Locate the beginning continuously. point. back and when stopped. Press Appears on instead. display A-B REPEAT key to cancel it once and then follow the procedures to make new ones. -
Page 34: Using The Counter And Marks To Locate
Using the counter and marks to locate The counter shows the recording or elapsed time in hours: minutes: seconds: milliseconds Locate using the counter Add a mark To prepare, stop the recorder, select the Add a mark using the counter project and start from the Top Screen. - Page 35 Locate to the position of a mark Delete a mark Use keys to move between marks in order Press the forward or backward mark key until you reach the desired mark. Press the forward or backward mark key until you reach the desired mark. Mark icon highlighted Press Project...
-
Page 36: Tools
Tools Tuner Other tuner types Press Press the under Press 1-2 times Select tuner type Record-enabled when red Select Change menu Press Select the note name/ string number and tune Press Press Select note Chromatic tuner name/string number Play the open string of the indicated note and adjust the pitch Tune the instrument... -
Page 37: Metronome
Tools Metronome This metronome, which includes a pre-count function, allows you to change its volume, tone and pattern. You can also output the metronome sound only through the headphones. Menu settings and setting values Press : Set when operative Settings Select ... -
Page 38: 16-Track Synchronized Recording With Two Units
Change menu Change menu Master/Slave Off/Master/Slave HOST DEVICE Connect the two R24 units by USB cable ports that have lit indicators. HINT Command keys that affect both units. REC key FF key PLAY key REW key... - Page 39 NOTE recording of two units is not guaranteed. recording. , operation using or batteries.
-
Page 40: Mixing
Mixing R24 mixing process send amount to send-return effects. NOTE nels of stereo tracks share the same parameter values. HINT Select the send-return What is the track mixer? effect to stereo. Adjust the send-return effect Recorder (recording) Track 1–24 + MASTER... -
Page 41: Eq, Pan And Send Level Track Settings
Mixing HINT Press eter, including pan and the send-return effect Select a track. levels, to process the signals. Change tracks its status key so that its indicator lights orange. Select a menu item and its setting. Change menu NOTE right channels of stereo tracks share the same Change parameter values. -
Page 42: Track Parameters
Mixing Track parameters These parameters can be set for each track Setting range Mono Stereo Master Display Parameter Explanation (default value) tracks tracks track volume balance between the left and right channels. is ON. is set to . -
Page 44: Mix Down/Bounce
Mix down/Bounce Combine multiple tracks into 1–2 tracks Bounce destination track settings Bounce (preparation) PROJECT>REC>BOUNCE TR Select the bounce source tracks (set Start from the Top Screen each track to play back). Press 1–2 times until Press indicator lights green Select Playback-ready when green... - Page 45 Bouncing Adjust the mix balance (audition) Press beneath Press to start playback. appears on the display Adjust the mix balance, including level, volume, pan and EQ settings, for each track. Make sure that Note: Press the soft key again to cancel bounce mode.
-
Page 46: Using A Mastering Effect
Mix down/Bounce Using a mastering effect process the mix down. Insert an insert effect before the MASTER fader Press Selectt and set it to NOTE Change menu MASTER fader in advance, the insert effect cannot also be applied to tracks, either during recording or playback. -
Page 47: Recording To The Master Track
Mix down/Bounce Recording to the master track MASTER track. Signals are sent to the master track after passing through the MASTER fader. Recording to the MASTER track Play the master track Press the MASTER Prepare by adjusting the signal levels. status key 1-2 times until the indicator lights green. -
Page 48: Sampler Functions
Sampler functions Using the sampler to make songs other basic tracks that have high sound quality. These features can be used to make a wide variety of music, from demo songs to produced recordings. Make a loop to provide the basic rhythm After you have determined the structure of the entire song. -
Page 49: Overview Of Sampler Functions
Sampler functions Overview of sampler functions back and played in real time using the pads. The following settings can be made related to A sequence can be input by playing the pads playing the pads. and the time signature can also be changed. assigned to a track. -
Page 50: Assigning Tracks
Sampler functions Assigning tracks NOTE Press , select the project that contains the file. Then, from Select the track to assign. Select track before loading it. project. menu, you can see the files Select create a folder with the same name on the Change menu option from the menu, and... -
Page 51: Loop Settings
Sampler functions Loop settings Make loop settings separately for each track. Turn loops ON and set their starting points and lengths. Setting tracks to loop NOTE Turn loops ON and OFF for each track. lights orange instead of green when enabled for playback. - Page 52 Start playback Stop playback Fast forward Press Rewind Select Change menu When setting the loop starting point and length, you can zoom in on the waveform Press possible. Set the loop starting point. Press beneath to zoom. Starting point Locate...
-
Page 53: Playing The Pads
Sampler functions Playing the pads Press a pad The unit can be set to correct timing errors when playing the pads or inputting sequence data in real time so that Press a pad while holding sounds are aligned with bars and beats. REPEAT/STOP to enable loop playback (if is set to... -
Page 54: Creating A Sequence
Sampler functions Creating a sequence settings to . Combine them to create real-time input or step input. Create a sequence with real-time To delete input, press and hold input beneath . Data that has already been input for a track will be deleted while its pad is being With real-time input, you can create a pressed. - Page 55 Press a pad to input that pad's data at Create a sequence using step that position. input Or, press ENTER to input the data of that A sequence can be created one step at track at that position. a time using step input. Press Select ...
- Page 56 Sampler functions Creating a sequence Deleting data When using step input, you can delete Select data before and after the cursor position Change menu together. Move the cursor to the position of data that you want to delete. Move cursor Press Go back 1 step Go forward 1 step...
-
Page 57: Editing A Sequence
Sampler functions Editing a sequence When creating a sequence by step input, you can insert and delete beats. You can also change the time signature. Select to insert beats or Inserting and deleting beats to delete beats. When using step input for a sequence, Change menu you can insert and delete beats. - Page 58 Sampler functions Editing a sequence NOTE set time signature, the time signature for that part might change depending on the setting. One beat inserted here Setting The time signature does not change. The beats are shifted by the amount inserted or deleted. that contains the last inserted beat will change.
-
Page 59: Changing The Time Signature
Changing the time signature Delete an inserted time signature Move the cursor to the position where you want to delete the time signature can also change the time signature. Start step input. Press Go back 1 step Go forward 1 step Move to the time signature indication area. -
Page 60: Playing Back A Sequence
Sampler functions Playing back a sequence Playback from the sequencer Playback from the Top Screen Press beneath to turn the Press track sequence ON/OFF. Select Change menu Press Press Press Track sequencer ON Press to stop Press to stop Press to fast forward Press to rewind Press and hold... -
Page 61: Changing The Bpm
Sampler functions Changing the BPM standard tempo when changing the tempo of the audio without changing its pitch. NOTE Press time. Select the track where you want to change the setting. is used. Select track Select and change the setting Change menu Change setting... -
Page 62: Changing Tempo Without Changing Pitch
Sampler functions Changing audio tempo without changing pitch Select BPM and the new tempo after Press time-stretching. Change menu To change one track at a time, select a Change track. setting Select track Select and set it to the one most appropriate for the audio file Change menu Select... - Page 63 NOTE operations cannot be undone ( operations overwrite the original audio of each track ( when changing the tempo without changing the pitch of the audio.. value is outside this range, an error message HINT You can listen to a preview of the results of time- stretching for individual tracks.
-
Page 64: Trimming Unnecessary Parts Of Audio Files
Sampler functions Trimming unnecessary parts of audio files Press beneath Press Select Select the track that you want to trim. Move cursor Select track Press Select Change menu NOTE operation cannot be undone ( Press Select Change menu HINT adjusted alternately by using the Press soft keys. -
Page 65: Setting Fade-Ins And Fade-Outs
Sampler functions Setting fade-ins and fade-outs beginnings and ends. You can turn these off, however, for rhythm tracks and other sounds where the attack is important. Press Select the track for which you want to change the fade settings. Select track Select and set it to if you... -
Page 66: Overview Of Rhythm Functions
Rhythm functions Overview of rhythm functions You can also add accents in real-time as you play the pads. The following settings related to playing the The following operations can be conducted on rhythms can be made. rhythm patterns. Moreover, you can create original rhythm pat- input data in real-time or input one note at a time using step input. -
Page 67: Playing Rhythm Patterns
Rhythm functions Playing rhythm patterns Selecting a rhythm pattern Selecting the drum kit Select a rhythm pattern and play it. Select the drum kit sounds. Press beneath Press Select the rhythm pattern. Select pattern Select the drum kit. Press to play Select kit Press to stop Press and hold... -
Page 68: Playing Pad Sounds
Rhythm functions Playing pad sounds You can add accents in real-time as you play the pads below the track faders. Press and hold REPEAT/STOP, Press and press the pad to roll. If you release REPEAT/STOP before the pad, Play the pads that sound continues rolling after the pad is released. -
Page 69: Creating A Rhythm Pattern
Rhythm functions Creating a rhythm pattern You can create your own original rhythm patterns. After preparing, you can create a rhythm pattern using real-time or step input. Set number of bars and time signature. Prepare to create a rhythm pattern Change menu Select an empty rhythm pattern and set the number of bars, time signature and... - Page 70 Rhythm functions Creating a rhythm pattern NOTE Create a rhythm pattern using real-time input accordance with the quantize setting. After preparing, play the pads along force used to play the pads is also recorded as volume changes. rhythm pattern with real-time input. Start input.
-
Page 71: Step Input
Delete a note or change its volume. Create a rhythm pattern using step input Press beneath to delete an input note. After preparing, you can input notes one pattern. Turn to change the volume of the note at that position. Start input. -
Page 72: Copying Rhythm Patterns
Rhythm functions Copying rhythm patterns You can copy a rhythm pattern to create a new one based on it, for example. Select Press Change menu Select the rhythm pattern that you want to copy. Press beneath Press Select pattern Select Change menu Press Select... -
Page 73: Deleting Rhythm Patterns
Rhythm functions Deleting rhythm patterns You can delete rhythm patterns. Press Select the rhythm pattern that you want to delete. Press beneath Select pattern Select Change menu Press Select Move cursor Press... -
Page 74: Changing Rhythm Pattern Names
Rhythm functions Changing rhythm pattern names You can change the names of rhythm patterns. Press Select the rhythm pattern that you want to change the name of. Press beneath Select pattern Select Change menu Press Change the name. Move cursor Change character Delete... -
Page 75: Import Rhythm Patterns
Rhythm functions Import rhythm patterns You can import rhythm patterns from other projects. You can import all the rhythm patterns ( Select Press Change menu Press beneath Press Select the rhythm pattern to import (when set to Select project Select Change menu Press Select the destination rhythm pattern to... -
Page 76: Setting Volume And Stereo Placement
Rhythm functions Setting volume and stereo placement You can change the volume of a rhythm pattern and the stereo placement of the drum kit. Press Select the rhythm pattern that you want to make settings for. Press beneath Select pattern Select a menu item and change the setting. -
Page 77: Assigning Rhythm Patterns To Tracks
Rhythm functions Assigning rhythm patterns to tracks The rhythm pattern displayed on the screen can also be assigned to a track. Press Select the rhythm pattern to assign. Select pattern While pressing beneath press the pad of the track where you want to assign it. -
Page 78: Effects
Effects Effect and patch overview Effect and patch use process Adjust effect send level Adjust effect send level Using effects E dit a patch Select type Adjust parameters You can make fine adjust- m e n t s t o e f f e c t m o d u l e parameters and set levels to... - Page 79 Insert and send-return effects connected internally in the mixer section, can select algorithms and the patches that they be adjusted using mixer send levels (amount contain to suit your purposes and choose where to insert those patches. together. Algorithm Order Display Order Mono...
-
Page 80: Input And Output Of Insert And Send-Return Effects
Effects Input and output of insert and send-return effects at the same time. Insert effects Send-return effect These effects are applied to These effects are internally connected specified channels. in the mixer's send-return bus. CHORUS/DELAY Effect insertion points Inputs Apply effects to selected input signals Recorder REVERB when recording them to tracks. - Page 81 Uses of effects and patches Select effect and patch Patches are selected and adjusted the same way for Effect both insert and send-return effects. Select suitable modules from algorithms, edit patch Press types and parameters, and save them for use later. There are some major differences between mak- Select effect type ing settings for the two types of effects.
-
Page 82: Setting The Insert Effect Position
Effects Setting the insert effect position You can set the insert effect position. This menu item only appears for the insert effect. Select Press Change menu Select effect type Press beneath select an insert effect. Select the input source. Select and set it to Change menu... - Page 83 Setting the insert effect position Inserting the insert effect on 2 mono inputs (Dual Mic algorithm) Inserting the insert effect on a stereo input (Stereo, Mastering algorithms) Inserting the insert effect on 8 inputs (8xComp EQ algorithm)
-
Page 84: Patch Editing
Effects Patch editing (insert and send-return effects) You can create patches that combine effects together, change effect types in patches, or change processing as you like by adjusting effects using their parameters. Edit effect modules Press Select Select effect type Effect module OFF P r e s s E N T E R o r press the... - Page 85 Adjust effect parameters Change the name (insert effect) Select a parameter and set it. Select Select parameter Change menu Change value Press Change the name. Move cursor Change character Press Delete character Insert character NOTE HINT the combination and arrangement of its effect modules.
-
Page 86: Patch Saving
Effects Patch saving (insert and send-return effects) Once you have edited a patch, always save it if you want to keep the changes. You can save a patch at any patch number within the same algorithm. Continued on the next page Press Select Select effect type... -
Page 87: Patch Importing
Effects Patch importing (insert and send-return effects) You can import one or all patches that have been created in another project for use in the current project. Select Import one patch IMPORT>Each Change menu Select Change menu Press Select and set it to Press Change menu Select the project to import from. -
Page 88: Using The Insert Effect Only For Monitoring
Effects Using the insert effect only for monitoring to tracks. Select and set it. Press Change menu Select effect type Press beneath select an insert effect. Change setting Input signals are recorded to tracks after being processed by the insert effect. Select algorithm/patch. -
Page 90: Projects
Projects Project overview & project protection A project stores data and settings necessary for music playback. All elements of a piece of music, including au- Protecting a project dio files, information about track assignments, PROJECT>PROTECT and mixer, effect, metronome and tuner set- tings are stored in a project as one unit. -
Page 91: Creating A New Project
Projects Creating a new project You can also transfer the settings of the previous project to a new project. NOTE Press project in the new one. Select Change menu Settings carried over with Press Select Change menu Press can also be set to a sampling rate that Change the project name as necessary. -
Page 92: Selecting Projects And Files
Projects Selecting projects and files You can select a project to use for recording, playback and editing from the Top Screen. Select a project Select a file PROJECT>SELECT PROJECT>FILE Press Press Select Select Change menu Change menu Press Press Select the project. Select the file. -
Page 93: Project And File Information
Projects Project and file information sizes, recording times and other information. Project information PROJECT>INFO PROJECT>FILE>INFO Follow these procedures after opening the Press project which has the information that you want to see. Select Press Change menu Select Change menu Press Select the file. -
Page 94: Copying Projects And Files
Projects Copying projects and files You can copy a saved project and use it as a new project. Copy a project Copy a file PROJECT>COPY PROJECT>FILE>COPY Follow these procedures after opening the Press project that you want to copy. Press Select Change menu Select... -
Page 95: Changing Project And File Names
Projects Changing project and file names Changing a project name Changing a file name PROJECT>RENAME PROJECT>FILE>RENAME Open the project that you want to change the Press name of and follow these procedures. Press Select Change menu Select Change menu Press Select the file name. -
Page 96: Deleting Projects And Files
Projects Deleting projects and files Delete a project Delete a file PROJECT>DELETE PROJECT>FILE>DELETE Press Press Select Select Change menu Change menu Press Press Select the project to delete. Select the file name. Change file Change project Press Press Select Select Move cursor Change menu Press... -
Page 97: Dividing Files
Projects Dividing files You can use the following keys to listen to a Press file and to set the division point. Select Press to start playback Change menu Press to stop playback Press Press to fast forward Select the file. Press to rewind Press together to return to the Select file... -
Page 98: Sequential Playback Of Projects
Projects Sequential playback of projects The playback order of multiple projects can be registered and managed in playlists. outputting to an external recorder, for example. Playback a playlist Edit a playlist PROJECT>SEQ PLAY>EDIT Select Press Change menu Select Change menu Press Press... - Page 99 Delete a playlist PROJECT>SEQ PLAY>DELETE Select Remove a project from a list Change menu Select a project to remove. Change tracks Press Select Move cursor Press beneath Press Insert a project into a list Select the track number to insert to. NOTE Change tracks track is deleted, the playlist will become empty.
-
Page 100: Recording Settings
Projects Recording settings new ones. This is useful for bands and drums and when you want to record multiple takes. Setting/changing the bit rate Setting/changing recording mode PROJECT>REC>BIT LEN PROJECT>REC>REC MODE Press Press Select Select Change menu Change menu Press Press Select Select... -
Page 101: Adjusting The Display
System Adjusting the display You can adjust the backlight and contrast of the display. Adjusting the contrast TOOL>SYSTEM>LIGHT TOOL>SYSTEM>CONTRAST Press Press Select Select Change menu Change menu Press Press Select Select Change menu Change menu Set the value. Set the value. Change Change value... -
Page 102: Changing The Sd Card While The Power Is On
Load data from the new SD card Press Select Select Change menu Change menu Press Press Select Save R24 data to the new SD card Change menu Select Change menu Press Card replacement possible Press Select and set the project ... -
Page 103: Formatting Sd Cards
SD cards Check SD card remaining capacity TOOL>SD CARD>FORMAT TOOL>SD CARD>REMAIN Press Press Select Select Change menu Change menu Press Press Select Select Change menu Change menu Press Press Select Move cursor Card open space for the current recording format Press NOTE... -
Page 104: Checking The System Version
Press Select Select Change menu Change menu Press Press Select Select Change menu Change menu Press Check the information. Set the battery type. Change type Alkaline Nickel-metal hydride batteries NOTE HINT Check for the latest system software at the ZOOM... -
Page 105: Phantom Power Settings
System Phantom power settings Set the PHANTOM switch to ON to supply phantom power to INPUTS 3~8. Setting phantom power TOOL>SYSTEM>PHANTOM Press Select Change menu Press Select Change menu Press Select and set the value. Change menu Change setting Select and set it to Change menu... -
Page 106: Usb
Connecting with a computer interface for sound input and output and a NOTE sampling rate as set for the project when it was created ( are allowed Alphabet: A-Z, a-z [ ] ^ _ ` { } ~ audio interface, it cannot be used as a recorder at the same time. -
Page 107: Card Reader
Card reader Using the unit as an SD card reader Disconnecting USB>READER Connect the R24 with a computer by Eject the R24 volume icon from your USB (DEVICE port) computer to end the connection. Press Press to disconnect the R24 Select Select YES. -
Page 108: Using Usb Memory To Save And Import Data
Using USB memory to save and import data Select Saving files to USB memory Move cursor USB>STORAGE>FILE SAVE Connect the USB memory to the R24 USB HOST port. Press Press Loading files from USB memory USB>STORAGE>FILE LOAD Select Connect the USB memory to the R24 Change menu USB HOST port. - Page 109 Select the file. Saving projects to USB memory USB>STORAGE>PRJ SAVE Change file Press Press Select Select where to save it . Change menu Change project Press Press Select Change the file name as necessary. Change menu Move cursor Delete character Press...
- Page 110 Loading projects from USB memory Creating an R24 folder on the USB memory USB>STORAGE>PRJ LOAD USB>STORAGE>INIT Connect the USB memory to the R24 Press USB HOST port. Select Change menu Press Select Press Change menu Select Change menu...
-
Page 111: Audio Interface/Control Surface
Hi-Z or phantom power when used as an Connect the R24 to the computer. audio interface. Set and connect the R24 Control surface See “Connecting and setting the R24” on the next page. Make DAW software settings Device settings Control surface settings Install DAW software... - Page 112 Select Change menu Press Select RESET to restore default settings for each item. Connect the USB cable to the R24. necting from a computer, always follow the proper procedures for the computer OS to disconnect USB DEVICE indicator Lit older system, a computer might not recognize it properly.
-
Page 114: Rhythm Pattern List
Rhythm pattern list Beats 08Beat01 08Beat02 08Beat04 08Beat07 08Beat08 08Beat09 08Beat10 08Beat11 08Beat12 Beats... - Page 115 BALD09 BALD10 BOSSA01 BALD11 BOSSA02 BLUS01 440 SAMBA01 Beats BLUS02 441 SAMBA02 POP01 MidE01 POP02 BLUS04 MidE02 POP04 MidE04 POP07 POP08 POP09 POP10 POP11 POP12 RnB01 RnB02 RnB04 RnB07 RnB08 RnB09 RnB10 REGG01 DnB01 REGG02 DnB02 REGG04 DnB04 EMPTY TRIP01 TRIP02 TRIP04 AMB01...
-
Page 116: Effect Types And Parameters 1
Effect types and parameters 1 Effect parameters Insert effects Clean/Crunch, Distortion, Aco/Bass SIM algorithms Type Parameters/Descriptions Sense Attack Tone Level Compressor Threshold Ratio Attack Level Rack Comp Compressor with more detailed adjustments. Threshold Ratio Release Level Limiter Limiter for suppressing signal peaks above a certain level. Parameter descriptions Parameter Setting range... - Page 117 Effect types and parameters 2 Type Parameters/Descriptions Position Sense Resonance Level Auto wah dependent on dynamics of input signal. Depth Rate Level Tremolo Periodically varies the volume level. Position Rate Color Level Phaser Produces a swooshing sound. Position Balance Level Ring Modulator Produces a metallic ringing sound.
- Page 118 Simulation of the Fuzz Face, which has made rock history with its humorous panel design and smashing sound GreatMuff Simulation of the compact Matchless Hotbox pre-amplifier with a built-in tube ZOOM original unadorned clean sound A high gain sound with even more overdrive boost. A high gain sound that emphasizes low and middle frequencies...
- Page 119 Effect types and parameters 4 Type Parameters Depth Rate Tone Chorus Mixes a variable pitch-shifted component with the original sound, resulting in full-bodied resonating tone Depth Rate Tone Ensemble Chorus ensemble features three-dimensional movement Depth Rate Resonance Manual Produces a resonating and strongly undulating sound Shift Tone Balance...
- Page 120 Adjusts effect sound volume level. Type Setting Range Explanation Adjusts sensitivity. Set value as high as possible without causing unnatural decay. ZOOM original noise reduction for reducing noise during playing pauses without affecting the overall tone. Bass algorithm Type Parameters Rack Comp...
- Page 121 Parameter descriptions Parameter Setting range Explanation Gain Tone Adjusts tonal quality of effect. Cabinet Adjusts intensity of speaker cabinet sound. Balance Adjusts mix balance of signal before and after module. Adjusts signal level after passing through module. Level Type Parameters Bass Middle Treble...
- Page 122 Effect types and parameters 7 Type Parameters Type Parameters Chorus Ensemble Pitch Step Exciter Delay Analog Delay Reverse Delay ARRM Pitch Type Parameters DUAL MIC algorithm Type Parameters Threshold Ratio Attack Level Compressor Threshold Ratio Release Level Limiter Attenuates signals that exceed a certain level. Parameter descriptions Parameter Setting range...
- Page 123 Effect types and parameters 8 Type Parameters Compressor Limiter Type Parameters Mic Pre For an explanation of types and parameters, see MIC algorithm. Type Parameters Type Parameters Delay Echo Doubling Type Parameters Stereo algorithm Type Parameters Compressor Limiter Character Color Dist Tone Dry Level...
- Page 124 Effect types and parameters 9 Type Parameters Type Parameters Depth Rate Chorus Mixes a variable pitch-shifted component with the original sound, resulting in full-bodied resonating tone. Depth Rate Resonance Produces a resonating and strongly undulating sound. Rate Color Phaser Produces a swooshing sound. Depth Rate Clip...
- Page 125 Effect types and parameters 10 Parameters marked with Table 1 The note durations for the setting values are shown below. Half note triplet NOTE Table 2 Table 5 Setting Explanation Frequency does not change. Setting Explanation Frequency changes from minimum to maximum original sound along with the controlling waveform.
- Page 126 Effect types and parameters 1 1 Type Parameters Gain Parameter descriptions Parameter Setting range Explanation Gain Adjusts level. Type Parameters Type Parameters Dimension Resonance Type Parameters Send-return effects Type Parameters Depth Rate Pre Delay Chorus Mixes a variable pitch-shifted component with the original sound, resulting in full-bodied resonating tone. Time Rev Send Delay...
-
Page 127: Effect Patch List 1
ZOOM's original hard overdrive sound with extra boost creates a compressed feeling ZOOM original high gain sound great for leads ZOOM original high gain sound with balanced low to high frequencies cuts through mix LEAD ZOOM's classic lead sound with strong mid-boost and long sustain necessary for soloing... - Page 128 Effect patch list 2 Every BG BrianDrv RitchStd Carlos Pete Townshend crunch sound using Hiwatt with clean amp turned all the way up for a powerful tone RR Mtl Stack sound that boldly cuts through the midrange is good for huge guitar solos Monster Weird tone that mixes a heavy sound with a doubling an octave down Empty...
- Page 129 Long DLY InTheBOX This effect seems to put the entire sound into a small box Limiter Limiter effect that is very useful for recording AG MIC Preamp tone that is great for recording acoustic guitar AG Dub 12st Cho Increases the apparent body size of an acoustic guitar AG-Small AG Lead Live AMB...
- Page 130 Effect patch list 4 Stereo algorithm For single-note synthesizer lead Syn-Lead OrganPha OrgaRock EP-Chor Wah for clavinet Concert hall effect for piano Concert Honky-tonk piano simulation PowerBD Conventional flanger for drums LiveDrum Simulates outdoor live doubling Changes a standard kit to an Asian kit BassBost AM Radio AM radio simulation...
- Page 131 1ManBand For self-production Chorus Sequencer StdDrum Standard sounds for recording each drum in a kit Snare drum Hi-hat High tom Mid tom EhcdDrum Punchy compressed drum sound Low tom Overhead mics Small percussion Percus Suitable for recording individual percussion sounds All percussion together CompLtr Female vocals...
- Page 132 Send-return effects REVERB Hall reverb with a hard tonal quality BrgtRoom Hall reverb with a mild tonal quality Simulates the reverberation of a large hall Simulates the reverberation of a small hall Simulates the reverberation of a club TrStudio Simulates the reverberation of a rehearsal studio DarkRoom...
-
Page 133: Error Message List
Error message list EXIT key. When other errors and messages occur, the displayed screen will automatically close in three seconds. Message Meaning Response Messages that indicate something is missing No Card There is no card inserted. Check that the project has not been deleted or moved No Project There is no project. -
Page 134: Specifications
Specifications Section Track count Maximum number of simulta- neous recording tracks Maximum number of simulta- neous playback tracks Recorder Maximum recording time Projects Markers Locator File editing Other functions Number of recording channels Number of playback channels Audio Interface Sampling frequency Faders Level meter display Mixer... -
Page 135: Troubleshooting
Troubleshooting suitable value. Problems during playback No sound, or sound is very weak setting is suitable. system and its volume settings. Problems with effects section are lit green and that their faders are raised. If a track's indicator is not green, press its Insert effect cannot be inserted key repeatedly until it lights green. -
Page 136: Upgrading The Firmware
Copy the firmware upgrade file to the root directory of an SD card. Insert the SD card with the firmware upgrade software file into the R24 (if it is not already in the unit). While pressing and holding turn the POWER switch ON. -
Page 138: Index
Index A-B repeat function ....32 Fade in/out ......64 A point . - Page 139 PDF: Audio Interface Manual on the included CD. Rhythm functions ....65-76 Rhythm patterns Out points ......29 Changing rhythm pattern names .
- Page 140 The recycling of materials will help to conserve natural resources. For more detailed information about recycling of this product, please contact your purchased the product. 4-4-3 Kandasurugadai, Chiyoda-ku, Tokyo 101-0062 Japan Web site: http://www.zoom.co.jp...