Zoom R20 Quicktour
Multi track recorder
Hide thumbs
Also See for R20:
- Operation manual (170 pages) ,
- Firmware update manual (9 pages) ,
- Supplementary manual (6 pages)
Table of Contents
Advertisement
You must read the Usage and Safety Precautions before use.
The Operation Manual can be downloaded from the ZOOM website (www.zoom.jp/docs/r20).
This page has files in PDF and HTML formats.
The PDF file format is suitable for printing on paper and reading on a computer.
The HTML format can be read with web browsers and is designed for reading on smartphones and tablets.
© 2021 ZOOM CORPORATION
Copying or reprinting this manual in part or in whole without permission is prohibited.
You might need this manual in the future. Always keep it in a place where you can access it easily.
The contents of this manual and the specifications of the product could be changed without notice.
Multi Track Recorder
Quick Tour
Advertisement
Table of Contents

Related Manuals for Zoom R20


Summary of Contents for Zoom R20
- Page 1 Quick Tour You must read the Usage and Safety Precautions before use. The Operation Manual can be downloaded from the ZOOM website (www.zoom.jp/docs/r20). This page has files in PDF and HTML formats. The PDF file format is suitable for printing on paper and reading on a computer.
-
Page 2: Inserting Sd Cards
Inserting SD cards Supported recording media SDHC: 4–32 GB SDXC: 64–512 GB Connecting output devices Headphones Powered monitors Turn powered monitors off before connecting them. -
Page 3: Turning The Power On
Turn on the power monitors after starting up the R20. The power will automatically turn off if the R20 is unused for 10 hours. If you want to keep the power on always, turn off the automatic power saving (Auto... -
Page 4: Setting The Date And Time
Setting the date and time Creating projects Templates include preset rhythm loops. Select the desired template. -
Page 5: Home Screen
█ Home Screen Tempo and time Track switching signature button Recording/playback Screen switching bars and beats button Track type buttons Recording/play- back position Track number/type Rhythm track Synth track Rhythm loop included when Scroll the screen to view using a template other tracks and bars... -
Page 6: Connections And Preparation
Recording █ Connections and preparation Connected equipment Connector and setting Guitar/bass with passive INPUT 1 ( pickups (direct connection) Guitar/bass with active pick- INPUT 1 ( ups, synth or other electronic INPUT 2 instrument INPUT 1–4 Dynamic mic INPUT 5–8 ( Condenser mic INPUT 5–8 ( Make sound and adjust so... -
Page 7: Using Effects
█ Using effects Select a track to use an effect on. Add a to select a patch memory. • Tap to return to the previous screen. • Patch memories store the effects used, their order, on/off states and parameter settings. Specific effect settings can be changed. -
Page 8: Playing Recordings
█ Recording Tracks with lit will be recorded. Press when stopped to set the recording/ playback position to the beginning. █ Playing recordings Adjust levels with the MASTER fader and faders for tracks to be played. -
Page 9: Switching Screens
█ Using tracks 9–16 (switching tracks) Select which tracks receive audio from INPUTS 1–8 and can be oper- ated with the physical controls. Tracks 1–8 can be operated. Tracks 9–16 can be operated. █ Switching screens Track view Level meter view This is the normal recording/editing screen. - Page 10 █ Changing track contents Recorded data can be moved between tracks. For example, before recording a guitar or bass directly with INPUT 1 (using Hi-Z), clear track 1 by moving previously recorded data from it to a different track. █ Making individual track settings Double Make settings for each track.
-
Page 11: Editing Projects
Editing projects Waveforms and MIDI notes added to recorded tracks are called “regions”. Regions The R20 has audio, rhythm and synth regions that can be edited to create projects. █ Moving regions Highlight █ Extending regions (looping) Tap once first █... -
Page 12: Mixing Down
█ Adding regions Audio Double Synth Double Rhythm Mixing down Projects can be mixed down to stereo WAV files. Since the project plays back while recording the mixdown, adjusting the faders during play- back will affect the levels. █ Adjusting the mix While listening to playback, adjust the faders to balance the levels as desired. - Page 13 Mute/solo functions Mute tracks. Output sound only from selected tracks. █ Mixing down Switch to level meter view. so that it becomes red. Start playback to begin creating the mixdown file. All fader movements during playback will affect the mixdown file. End mixing down.
-
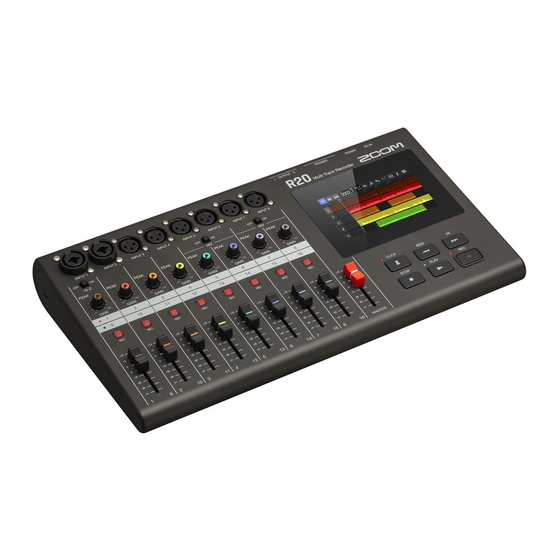
Page 14: Functions Of Parts
Functions of parts ① Input jacks ⑦ PHANTOM switches Use INPUTS 1 and 2 to connect mics, These turn +48V phantom power on/off. Turn these on when, for example, connect- keyboards and guitars. These support XLR and 1/4-inch phone (unbalanced) plugs. ing condenser mics that support phantom Use INPUTS 3–8 to connect mics and power to INPUTS 5–8. -
Page 15: Other Functions
Connect a ZOOM BTA-1 or other dedicated ② DC12V AC adapter connector wireless adapter here. This enables wire- less operation of the R20 from an iOS/ Connect the dedicated AC adapter (ZOOM iPadOS device using a dedicated app. ZAD-1220) here. -
Page 16: Troubleshooting
SD card reader When the R20 is connected to a computer, data on the SD card can be checked and copied. Operation from iOS/ By connecting a BTA-1 or other dedicated wireless adapter to the R20, an iOS/iPadOS iPadOS devices device with a dedicated controller app can be used to operate the R20 wirelessly.