Table of Contents
Advertisement
CD RECEIVER
CD-RECEIVER
RECEPTEUR CD
CD-RECEIVER
KD-S641
FM
LOUD
CD
SEL
SSM
AM
DISP
7
8
9
10
11
12
MO
RPT
RND
MODE
SCM
COMPACT
DIGITAL AUDIO
For installation and connections, refer to the separate manual.
Für den Einbau und die Anschlüsse siehe das eigenständige Handbuch.
Pour l'installation et les raccordements, se référer au manuel séparé.
Bijzonderheden over de installatie en aansluiting van het apparaat vindt u in de
desbetreffende handleiding.
INSTRUCTIONS
BEDIENUNGSANLEITUNG
MANUEL D'INSTRUCTIONS
GEBRUIKSAANWIJZING
GET0119-001A
[E/EX]
Advertisement
Table of Contents

Related Manuals for JVC KD-S641


Summary of Contents for JVC KD-S641
- Page 1 CD RECEIVER CD-RECEIVER RECEPTEUR CD CD-RECEIVER KD-S641 LOUD DISP MODE COMPACT DIGITAL AUDIO For installation and connections, refer to the separate manual. Für den Einbau und die Anschlüsse siehe das eigenständige Handbuch. Pour l’installation et les raccordements, se référer au manuel séparé.
-
Page 2: How To Reset Your Unit
3.CAUTION: Do not open the top cover. There are no user-serviceable parts inside. Leave all servicing to qualified service personnel. 4.CAUTION: This CD player uses invisible laser radiation and is equipped with safety switches to prevent radiation emission when unloading CDs. It is dangerous to defeat the safety switches. -
Page 3: Table Of Contents
Thank you for purchasing a JVC product. Please read all instructions carefully before operation, to ensure your complete understanding and to obtain the best possible performance from the unit. CONTENTS How to reset your unit ... How to use the MODE button ... -
Page 4: Location Of The Buttons
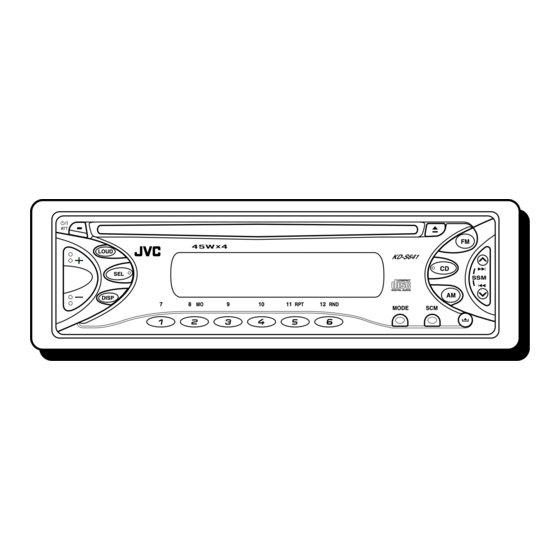
LOCATION OF THE BUTTONS Control panel Display window LOUD DISP (standby/on/attenuator) button 2 LOUD (loudness) button 3 SEL (select) button 4 Display window 5 Loading slot 6 0 (eject) button 7 CD button 8 AM button 9 FM button ¢/4 buttons •... -
Page 5: Basic Operations
LOUD DISP Turning on the power Turn on the power. Note on One-Touch Operation: When you select a source in step 2 below, the power automatically comes on. You do not have to press this button to turn on the power. Select the source. -
Page 6: Setting The Clock
LOUD DISP Setting the clock Press and hold SEL (select) for more than 2 seconds. “CLOCK H,” “CLOCK M,” “SCM LINK,” or “LEVEL” appears on the display. Set the hour. 1 Select “CLOCK H” (hour) if not shown on the display. CLOCK H LEVEL 2 Adjust the hour. -
Page 7: Radio Operations
LOUD DISP Listening to the radio You can use either automatic searching or manual searching to tune in to a particular station. Searching a station automatically: Auto search Select the band (FM1 – 3, AM). Lights up when receiving an FM stereo broadcast Selected band with sufficient signal... -
Page 8: Manual Search
Searching a station manually: Manual search Select the band (FM1 – 3, AM). Note: This receiver has three FM bands (FM1, FM2, FM3). You can use any one of them to listen to an FM broadcast. ¢ or 4 Press and hold until “M”... -
Page 9: Storing Stations In Memory
Storing stations in memory You can use one of the following two methods to store broadcasting stations in memory. • Automatic preset of FM stations: SSM (Strong- station Sequential Memory) • Manual preset of both FM and AM stations FM station automatic preset: SSM You can preset 6 local FM stations in each FM band (FM1, FM2, and FM3). -
Page 10: Tuning In To A Preset Station
Press and hold the number button (in this example, 1) for more than 2 seconds. “P1” flashes for a few seconds. Repeat the above procedure to store other stations into other preset numbers. Notes: • A previously preset station is erased when a new station is stored in the same preset number. -
Page 11: Cd Operations
LOUD DISP Playing a CD Insert a CD into the loading slot. The unit turns on, draws the CD and starts playback automatically. Note on One-Touch Operation: When a CD is already in the loading slot, pressing CD turns on the unit and starts playback automatically. -
Page 12: Locating A Track Or A Particular Portion On A Cd
Locating a track or a particular portion on a CD To fast-forward or reverse the track Press and hold playing a CD, to fast-forward the track. Press and hold 4 playing a CD, to reverse the track. To go to the next tracks or the previous tracks ¢... -
Page 13: Prohibiting Cd Ejection
To play back tracks repeatedly (Repeat Play) You can play back the current track repeatedly. MODE Press MODE to enter the functions mode while playing a Press RPT (repeat), while still in the functions mode, so that the RPT indicator lights up on the display. -
Page 14: Sound Adjustments
SOUND ADJUSTMENTS Adjusting the sound You can adjust the sound characteristics to your preference. Select the item you want to adjust. Each time you press the button, the adjustable items change as follows: (bass) (treble) (volume) Indication To do: Adjust the bass. Adjust the treble. -
Page 15: Using The Sound Control Memory (Scm)
Using the sound control memory (SCM) You can select and store a preset sound adjustment suitable for each playback source (Advanced SCM). Selecting and storing the sound modes Once you select a sound mode, it is stored in memory. It will be recalled every time you select the same source and will be shown on the display. -
Page 16: Storing Your Own Sound Adjustments
Storing your own sound adjustments You can adjust the sound modes (BEAT, SOFT, POP) to your preference and store your own adjustments in memory. • There is a time limit in doing the following procedure. If the setting is canceled before you finish, start from step 1 again. -
Page 17: Other Main Functions
Selecting the level display —LEVEL You can select the level display according to your preference. When shipped from the factory, “VOL 2” is selected. • VOL 1: Shows the volume level indicator. • VOL 2: Alternates “VOL 1” setting and illumination display. -
Page 18: Detaching The Control Panel
Detaching the control panel You can detach the control panel when leaving the car. When detaching or attaching the control panel, be careful not to damage the connectors on the back of the control panel and on the panel holder. Detaching the control panel Before detaching the control panel, be sure to turn off the power. -
Page 19: Troubleshooting
Signals are too weak. The antenna is not connected firmly. CD is inserted upside down. CD-R is not finalized. CD is locked. The CD player may function incorrectly. You are driving on rough roads. CD is scratched. Connections are incorrect. -
Page 20: Maintenance
• After starting the heater in the car. • If it becomes very humid inside the car. Should this occur, the CD player may malfunction. In this case, eject the disc and leave the unit turned on for a few hours until the moisture evaporates. -
Page 21: Specifications
[MW Tuner] Sensitivity: 20 µV Selectivity: 35 dB [LW Tuner] Sensitivity: 50 µV SPECIFICATIONS CD PLAYER SECTION Type: Compact disc player Signal Detection System: Non-contact optical pickup (semiconductor laser) Number of channels: 2 channels (stereo) Frequency Response: 5 Hz to 20 000 Hz... - Page 22 Having TROUBLE with operation? Please reset your unit Refer to page of How to reset your unit Haben Sie PROBLEME mit dem Betrieb? Bitte setzen Sie Ihr Gerät zurück Siehe Seite Zurücksetzen des Geräts Vous avez des PROBLÈMES de fonctionnement? Réinitialisez votre appareil Référez-vous à...
-
Page 23: Installation
Neem bij vragen of voor meer bijzonderheden over inbouwpakketten contact op met uw JVC car audio dealer of een dealer of een bedrijf dat inbouwpakketten levert. (déblocage Voordat u aan de montage van het apparaat... -
Page 24: Electrical Connections
Als het geluid niet verdwijnt, moet u contact opnemen met uw JVC car audio dealer. • Het maximum ingangsvermogen van de speakers moet achterin meer dan 45 W zijn en voorin 45 W, met een impedantie van 4 Ω... - Page 25 ENGLISH DEUTSCH If your car is equipped with the ISO connector Wenn Ihr Auto mit ISO-Steckern ausgestattet ist Si votre voiture est équippée d’un connecteur ISO Indien uw auto is uitgerust met de ISO-connector • Connect the ISO connectors as illustrated. •...
-
Page 26: Problemen Oplossen
Lautsprecherleitungen dieses Geräts unbenutzt lassen. (Die Anschlußklemmen dieser nicht verwendeten Leitungen mit Isolierklebeband umwickeln, siehe Abbidung oben.) Rear speakers Hintere Lautsprecher Enceintes arrière Achterspeakers JVC Amplifier JVC Verstärker INPUT JVC Amplificateur JVC Versterker LINE OUT KD-S641 REAR Signal cord (not supplied with this unit) Einzelleitung (nicht mit diesem Gerät...