
Related Manuals for IOGear GWU735


Summary of Contents for IOGear GWU735
- Page 1 Quick Start Guide Wireless AC1200 Dual-Band USB Adapter GWU735 PART NO. Q1262 www.iogear.com...
- Page 2 Windows are registered trademarks of Microsoft Corporation. All other brand and product names are trademarks or registered trademarks of their respective holders. IOGEAR makes no warranty of any kind with regards to the information presented in this document. All information furnished here is for informational purposes only and is subject to change without notice.
-
Page 3: Table Of Contents
Table of Content Package Contents System Requirements Overview Software Installation – PC Wireless Network Configuration – PC Software Installation – MAC Wireless Network Configuration – MAC FCC Statement CE Statement Limited Warranty CE Statement... -
Page 4: Package Contents
Package Contents 1 x Wireless AC1200 Dual-Band USB Adapter 1 x Quick Start Guide 1 x Driver Installation CD 1 x Warranty Card System Requirements Operating System • Windows Vista , Windows 7, Windows 8, Windows ® ® ® ® •... -
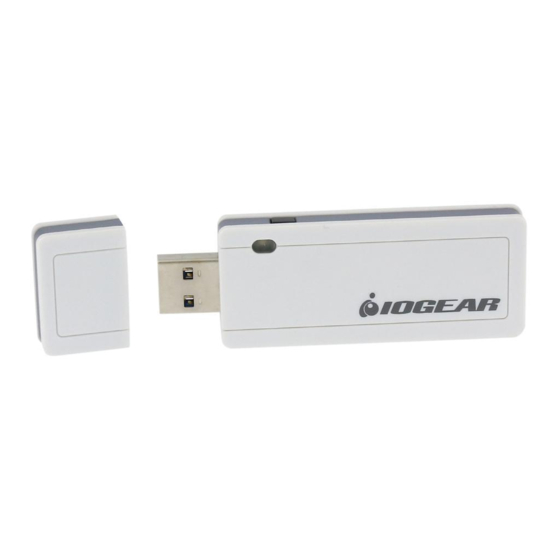
Page 5: Overview
Overview 1. WPS Button 2. LED Status Indicator a. 1 flash/sec. – Wireless LAN Adapter is active b. 3 flashes/sec. – Adapter is connecting to an Access Point c. Off – Wireless LAN adapter is disabled 3. USB Connector 4. Cap... -
Page 6: Software Installation - Pc
Software Installation – PC 1. Insert the driver installation CD into your CD-ROM Drive. Double-click on Setup.exe to start the installation. 2. Wizard is ready to install driver and utility. Click Next to begin installation. 3. Click Finish to restart your computer for the installation to be in effect. -
Page 7: Wireless Network Configuration - Pc
- Client mode utility running, but GWU735 is not plugged into computer. • - Client mode utility running, GWU735 is plugged in and can now scan for an available Access Point (AP). • - Client mode utility running, GWU735 is now connected to your... - Page 8 Connect to a Wireless Network 1. Double-click the wireless utility icon on your desktop to open the IOGEAR USB Wireless LAN Utility. 2. Select the Available Network tab and wait for the utility to search for available wireless networks. The available networks will be listed in the table.
- Page 9 3. Next, the Wireless Network Properties window will appear. Enter the network key, then click OK to continue. 4. Once connected, the utility will display the Signal Strength and Link Quality.
- Page 10 1. Open the Configuration program for your wireless router / Access Point and select the WPS Client set-up option. 2. Next, select the Wi-Fi Protect Setup tab in the IOGEAR USB Wireless LAN Utility, click the Pin Input Config (PIN) button.
- Page 11 2. Click Yes to select a specific AP. 3. Choose the AP to configure, then click Select.
- Page 12 4. Enter the pre-generated PIN code into the Wireless AP WPS client setting. Please refer to your router’s user manual for more instructions on how to add a WPS client. The WPS client screen you see may vary depending on your router. 5.
- Page 13 Option 2: Push Button Configuration (PBC) method: 1. Press and hold the WPS button on the side of the GWU735 adapter for 5 seconds or click Push Button Config (PBC) button under the Wi-Fi Protect Setup tab in the utility.
- Page 14 2. Next, press the physical WPS button on your wireless router / AP or virtual button on the WPS configuration page of the wireless router / AP configuration software. The WPS client screen you see may vary depending on your router. 3.
- Page 15 4. You have now successfully added your computer to your router’s network.
-
Page 16: Software Installation - Mac
Software Installation – MAC Note: Do not connect GWU735 Wireless AC1200 Dual-Band Adapter until prompted. 1. Insert the driver installation CD into your computer’s CD-ROM drive, open the MAC folder, then select the driver folder for your Mac OS system. Double-click Installer.pkg to begin the installation. - Page 17 3. Read the important information and click Continue to proceed. 4. Select your language and click Continue to proceed.
- Page 18 5. Click Agree to continue. 6. Click Install to start the driver and utility installation.
- Page 19 7. When prompted, click Continue Installation to proceed. 8. Once the installation is successful, click Restart to complete the installation process.
-
Page 20: Wireless Network Configuration - Mac
1. After restarting, open the Applications folder on your Mac and the IOGEAR Wireless-AC Network Utility will appear. 2. Insert GWU735 into an available USB port*, then open the IOGEAR Wireless-AC Network Utility in your Applications folder. *Note: For optimal performance, connect to a USB 3.0 port. - Page 21 3. To connect to an available network, click the Available Network tab, select the desired network, and click Connect. 4. Next the Wireless Network Security Properties window will appear. Enter the network key, then click OK to continue.
- Page 22 5. Once successfully connected, the utitlity will display the signal strength of the network.
- Page 23 Point and select the WPS Client Setup. Then select the PIN Configuration option. 2. Next, select the WPS tab in the IOGEAR Wireless-AC Network Utility and enter the pre-generated PIN into the Client PIN field in your router / AP software.
- Page 24 Option 2: Push-Button Configuration (PBC) Method 1. Press and hold the WPS Button on the side of the GWU735 adapter for 5 seconds or you can press the virtual PBC button under the WPS tab of the IOGEAR Wireless-AC Network...
- Page 25 2. Next, press the physical WPS button on your wireless router / AP or the virtual button on the WPS configuration page of the wireless router / AP configuration software. The WPS Client screen you see may vary depending on your wireless router. 3.
- Page 26 4. You have now successfully added your computer to your router’s network.
-
Page 27: Fcc Statement
Federal Communications Commission (FCC) Statement This equipment has been tested and found to comply with the limits for a Class B digital device, pursuant to Part 15 of the FCC Rules. These limits are designed to provide reasonable protection against harmful interference in a residential setting. -
Page 28: Limited Warranty
NEED ASSISTANCE SETTING UP THIS PRODUCT? Make sure you: 1. Visit www.iogear.com for more product information 2. Visit www.iogear.com/support for live help and product support Warranty Information This product carries a 3 Year Limited. For the terms and conditions of this warranty, please go to http://www.iogear.com/support/warranty... - Page 30 GEAR ® © 2014 IO...