Table of Contents
Advertisement
Advertisement
Table of Contents

Related Manuals for Datavideo RMC-190


Summary of Contents for Datavideo RMC-190
-
Page 2: Table Of Contents
Warnings and Precautions ..........2 Warranty ................3 Disposal ................. 3 Product Overview ............4 Features ................4 Functions ................. 4 System Diagram .............. 7 Setting Menu ..............9 Menu operation ............10 Camera Setting ............10 Time Setting .............. 11 Volume Setting ............ -
Page 3: Warnings And Precautions
This product should only be operated from the type of power source indicated on the marking label of the AC adapter. If you are not sure of the type of power available, consult your Datavideo dealer or your local power company. -
Page 4: Warranty
Drives, Hard Drives are only covered for the first 10,000 hours, or 1 year (whichever comes first). Any second year warranty claims must be made to your local Datavideo office or one of its authorized Distributors before the extended warranty expires. -
Page 5: Product Overview
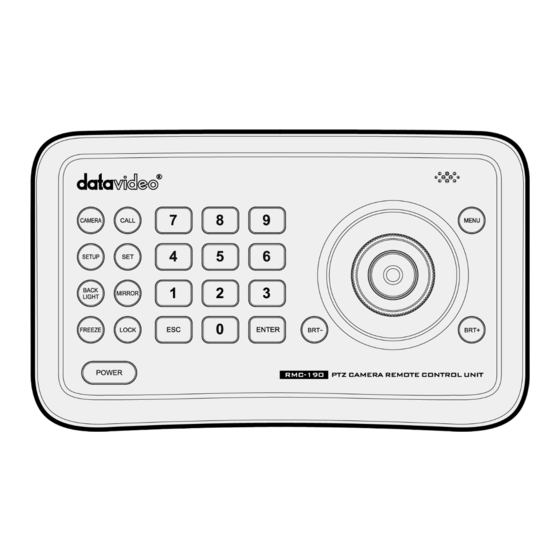
PTZ cameras, video conference cameras, surveillance cameras and etc. The VISCA RS-232/RS-422 communication interface allows high speed, long distance communication. The benefit of RMC-190 is that it is capable of controlling up to 7 cameras connected in a daisy chain fashion. Features •... - Page 6 CALL (Call preset) Input preset number, then press CALL key to call a preset CAMERA (Switch cameras) Input camera number, then press CAMERA key to switch to another camera SET (Set / Clear preset) Input preset number, then press SET key to set or delete a preset (Short press to “set”;...
- Page 7 Down: Move to next option. BRT+ (Increase the brightness) Press BRT+ key to increase the image brightness. Zoom / Focus Switch Key This key is used to switch between zoom and focus function. Operation: Press this key, the crisscross of indicator light near the joystick will go out, twist the joystick to zoom in / out;...
-
Page 8: System Diagram
System Diagram The RMC-190 PTZ Camera Control Unit can also be used in an environment where multiple cameras are required. With RS-232 INPUT/OUTPUT ports, the user is allowed to control up to seven cameras connected in a daisy chain fashion. - Page 9 #2 and #3 are defective or powered off, all camera connections (4/5/6/7) after camera #3 will be cut off from the daisy chain and RMC-190 will not be able to control them even if the cameras are still operable.
-
Page 10: Setting Menu
Setting Menu Press [SETUP] on the remote control to open the setting menu; the bold underlined values in the following table are defaults. Level Level Level Function Descriptions Minor Items Major Items Adjustment Values Set camera ID Camera ID 1~ C ~7 PD = Pelco D/P Protocol Protocol V = SONY VISCA Protocol... -
Page 11: Menu Operation
Calibrate the joystick upward Tilt Up Calibrate the joystick downward Tilt Down Calibrate the joystick with Zoom Tele Zoom Tele Calibrate the joystick with Zoom Wide Zoom Wide Setting menu, no calibration is Free State required. Save the calibration setting Save Cancel the calibration setting Cancel... -
Page 12: Time Setting
range, the system will show “ERROR”. After the setting is entered, press ENT key to confirm 3. After the camera ID is selected, the user will be automatically entered the protocol option; move the joystick up / down the protocol option to select either PD or V and right move the joystick to set the desired protocol 4. -
Page 13: Sleep Setting
e. Sleep Setting This option sets the sleep time of the controller. The screen enters sleep mode after the controller is idle for a pre-determined period. 1. Move the joystick up / down the main menu and select “SLEEP SETTING” by right moving the joystick or pressing ENT to enter “SLEEP SETTING”. -
Page 14: Speed Setting
ENT to confirm. 7. Upon completion of the above calibrations, <SAVE> and <CANCEL> buttons will be displayed. Click on the corresponding button to save or cancel the settings. Move the joystick left/right to choose, and press ENT to confirm. h. Speed Setting This option sets the control speed of joystick. -
Page 15: Specification
Specification Comm. Interface RS-232 / RS422 Protocol VISCA Baud Rate 9600bps / 38400bps Address Joystick 4-axis (Left/Right, Up /Down, Zoom In/Zoom Out, Focus Near / Focus Far) Display OLED Power DC12V Power Consumption <8W Working 0℃~+40℃ Temperature Storage -20℃~+60℃ Temperature Relative Humidity ≤90% (non-condensation) Dimensions... -
Page 16: Service & Support
Service & Support...