Kenwood TK-3130 Instruction Manual
Uhf fm transceiver
Hide thumbs
Also See for TK-3130:
- Instruction manual (48 pages) ,
- Service manual (31 pages) ,
- Brochure (10 pages)

Related Manuals for Kenwood TK-3130


Summary of Contents for Kenwood TK-3130
-
Page 1: Instruction Manual
Instruction Manual PacTronics, Inc. 800-607-2243 www.pactronics.com UHF FM TRANSCEIVER TK-3130 ProTalk © B62-1486-00 (K) 09 08 07 06 05 04 03 02 01 00... - Page 2 HANK We are grateful for your purchase of this KENWOOD product and welcome you to the Business Radio Service (BRS). Your KENWOOD 2-way Business Radio is called a “transceiver”, meaning “transmitter & receiver”. We believe this easy-to-use transceiver will provide you with dependable and reliable communications.
- Page 3 FCC L ICENSE NFORMATION Your KENWOOD radio operates on communications frequencies which are subject to FCC (Federal Communications Commission) Rules & Regulations. FCC Rules require that all operators using Private Land Mobile radio frequencies obtain a radio license before operating their equipment.
- Page 4 • If an abnormal odor or smoke is detected coming from the transceiver, immediately switch OFF the power and remove the batteries from the transceiver. Contact your KENWOOD dealer. Government law prohibits the operation of unlicensed radio transmitters within the territories under government control.
-
Page 5: Table Of Contents
CONTENTS UNPACKING AND CHECKING EQUIPMENT ......1 ............1 UPPLIED CCESSORIES ORIENTATION ................2 ................3 ISPLAY PREPARATION ................ 4 ........ 4 NSTALLING EMOVING THE ATTERY ..........5 NSTALLING EMOVING ATTERIES ..........6 HARGING THE ATTERY ........8 NSTALLING EMOVING THE ...... -
Page 6: Unpacking And Checking Equipment
UNPACKING AND CHECKING EQUIPMENT Carefully unpack the transceiver. We recommend you identify the items listed in the following table before discarding the packing material. If any items are missing or have been damaged during shipment, file a claim with the carrier immediately. -
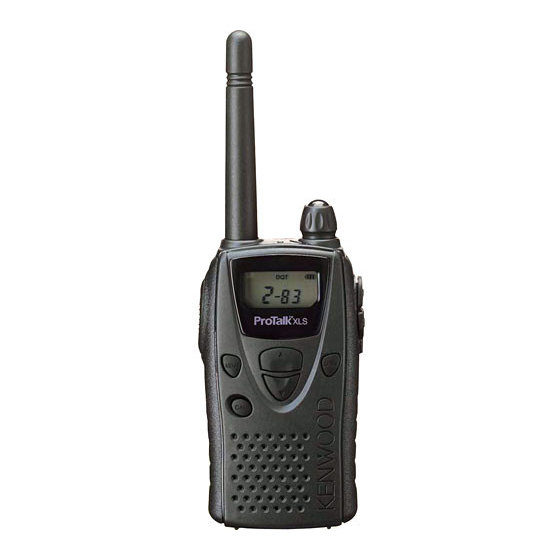
Page 7: Orientation
ORIENTATION Power switch/ Volume control Antenna Turn clockwise to switch MENU key the power ON and counter- Press and hold while clockwise to switch the power switching the power ON OFF. Rotate to adjust the to enter Menu Mode. volume. Press to select settings while in Menu Mode. -
Page 8: Display
ISPLAY... -
Page 9: Preparation
PREPARATION NSTALLING EMOVING THE ATTERY The battery pack is not charged at the factory; charge it before use (pages 6 and 7). Average battery pack life: 10 hours • Average times are calculated using 5% transmit time, 5% receive time, and 90% standby time. Do not short the battery terminals or dispose of the battery by fire. -
Page 10: Installing / Removing Batteries
NSTALLING EMOVING ATTERIES In place of the battery pack, you can use 3 AA batterie. Use high quality alkaline batteries to enjoy longer periods of battery life. 1 Match the four grooves of the battery pack with the corresponding guides on the back of the transceiver. -
Page 11: Charging The Battery Pack
HARGING THE ATTERY Initially charging the battery pack after purchase or extended storage (greater than 2 months) will not bring the battery pack to its normal operating capacity. After repeating the charge/ discharge cycle two or three times, the operating capacity will increase to normal. - Page 12 1 Plug the AC adapter cable into the adapter jack located on the rear of the charger. 2 Plug the AC adapter into an AC outlet. 3 Slide a battery pack using the supplied holder or a transceiver equipped with a battery pack into the battery pack slot.
-
Page 13: Nstalling Emoving The Elt Ook
NSTALLING EMOVING THE If desired, attach the belt hook to the rear of the transceiver using the 2 supplied screws. NSTALLING EMOVING PTIONAL CCESSORIES Note: Always switch OFF the transceiver power when installing or removing the optional accessories. The following accessories can be used with this transceiver: •... -
Page 14: Getting Started
GETTING STARTED q q q q q Switch the Power ON. Switch the transceiver power ON by turning the Power switch/ Volume control clockwise. • A confirmation tone sounds. To switch the transceiver power OFF, turn the Power switch/ Volume control fully counterclockwise, until a click sounds. - Page 15 You can change the frequency of each channel: 1 Turn the transceiver power OFF. 2 Press and hold the MENU key while turning the transceiver ON (for 1 second). 3 Press the key to select the frequency setting menu. • The channel number appears with “F”...
-
Page 16: Quiet Talk/ Digital Quiet Talk
QUIET TALK/ DIGITAL QUIET TALK QT (Quiet Talk) and DQT (Digital Quiet Talk) are functions that reject signals from undesired parties that are using the same channel as you. You will hear audio from the speaker only when you receive a signal that contains a tone or code matching the one set up on the channel you are using. -
Page 17: Scanning The Channels
SCANNING THE CHANNELS You can scan both channels of the transceiver to search for a signal. When the transceiver verifies a signal on a channel, it proceeds to check whether or not its QT/ DQT setting matches that which is set up on your transceiver. If the QT/ DQT matches, the transceiver stops at the channel and opens the squelch so you can listen to the call. -
Page 18: Revert Channel
You can turn the scan function (the ability to perform scan) ON or OFF in Menu Mode: 1 Turn the transceiver power OFF. 2 Press and hold the MENU key while turning the transceiver power ON (for 1 second). 3 Press the key to select “SC”. -
Page 19: Monitoring A Channel
MONITORING A CHANNEL When no signals are present, the squelch on the transceiver automatically mutes the speaker so you will not hear background noise. To manually deactivate the squelch, press and hold the MON key. • When deactivated, the monitor icon appears on the display and the LED lights green. -
Page 20: Voice Activated Control (Vox)
VOICE ACTIVATED CONTROL (VOX) Using the VOX feature, you can operate the transceiver hands-free. In order to use this feature, however, you must use an optional headset; VOX will not function with the built-in mircrophone. For best operation conditions, we recommend you use an optional headset with both an ear piece and a microphone on a boom that rests in front of your mouth. - Page 21 To enjoy the VOX function, take the time to properly adjust the VOX Gain. This level controls the VOX circuit to detect the presence or absence of your voice. 1 Turn the transceiver power OFF. 2 Press and hold the MENU key while turning the transceiver power ON (for 1 second).
- Page 22 While using VOX, you can set the transceiver to detect when the channel is busy. With this function turned on, VOX will not allow you to transmit while the channel is being used. You can transmit only when the channel is free. 1 Turn the transceiver power OFF.
-
Page 23: Voice Scrambler
VOICE SCRAMBLER Whereas the Quiet Talk and Digital Quiet Talk functions give you privacy in so much that you are able to ignore unwanted calls, the voice scrambler gives you complete privacy. When activated, any other party listening on your channel and using the same QT/ DQT settings that you have on your transceiver will be unable to understand your conversation. -
Page 24: Operating Features
OPERATING FEATURES RANSMISSION OWER You can adjust the transmission power on all channels. Selecting low power will allow longer use of the battery pack. Selecting high power will allow you to transmit farther, in case the other party is too far away for low power usage. To change the transmission power: 1 Press the MENU key 3 times. -
Page 25: Display Illumination
ISPLAY LLUMINATION You can set the display illumination to remain off, remain on, or turn on when you press any key other than the PTT switch (auto). When set to auto, the lamp remains on for 5 seconds after pressing a key before turning off again. To turn the display backlight ON: 1 Turn the transceiver power OFF. -
Page 26: Time -Out Timer
IMER The purpose of the Time-out Timer is to prevent any single person from using a channel for an extended period of time. If you continuously transmit for 3 minutes (default value), the transceiver will stop transmitting and a tone will sound. To stop the tone, release the PTT switch. -
Page 27: B Power Saver
ATTERY OWER AVER This transceiver has been designed to give you the most out of your battery power. While using the transceiver, the battery saver will automatically switch ON after 10 seconds have elapsed with no operations or received calls. Operating the transceiver or receiving a call will switch this feature OFF until 10 seconds of non-operation occurs again. -
Page 28: Attery Ndicator
ATTERY NDICATOR When turned ON, the battery indicator on the display lets you know approximately how much battery life is remaining. When turned OFF, the battery indicator will appear and blink only when the battery voltage level is low. When the battery voltage becomes too low while transmitting, the transceiver stops transmitting and a tone sounds until you release the PTT switch. -
Page 29: Call Tones
ONES Call tones are used to alert you as to when a party member is beginning a call. You can set up a call tone to one of 6 types in order to easily identify yourself to your party members. If each party member uses a different call tone, it is easy to know who is making the call. -
Page 30: Call Alert
LERT It is also possible to set up your transceiver so that you are alerted using vibration. When vibration alert is activated, the vibration icon appears on the display. To select your received alert tone method: 1 Turn the transceiver power OFF. 2 Press and hold the MENU key while turning the transceiver power ON (for 1 second). -
Page 31: B C Hannel
HANNEL OCKOUT This function is used in order to prevent transmitting on a channel that somebody else is currently using. When turned ON, a beep sounds when you press the PTT switch while another party is using the channel, and you cannot transmit. 1 Turn the transceiver power OFF. -
Page 32: Notices To The User
NOTICES TO THE USER This device complies with Part 15 of the FCC Rules. Operation is subject to the following two conditions: (1) this device may not cause harmful interference, and (2) this device must accept any interference received, including interference that may cause undesired operation. - Page 33 • When using a headset, ensure that the antenna is at least 2 inches (5 cm) away from your body whenever you are transmitting. • Use only KENWOOD genuine accessories. Unauthorized modifications, or attachments may damage the transceiver and violate FCC rules and regulations.
-
Page 34: Qt Tones/ Dqt Codes
QT TONES/ DQT CODES... -
Page 36: Channel Frequency Chart
CHANNEL FREQUENCY CHART / t i o l l v l i Note: The default channel settings are F2 for channel 1 and F8 for channel 2. -
Page 37: Troubleshooting Guide
TROUBLESHOOTING GUIDE • • e l l . y l t i l • y l t • • s ’ • • l l a ) ’ • o l l e l i l l i...