Creative Sound Blaster Audigy 2 User Manual
Hide thumbs
Also See for Sound Blaster Audigy 2:
- User manual (87 pages) ,
- User manual (30 pages) ,
- User manual (82 pages)
Table of Contents
Advertisement
Advertisement
Table of Contents
Troubleshooting

Related Manuals for Creative Sound Blaster Audigy 2


Summary of Contents for Creative Sound Blaster Audigy 2
-
Page 2: How To Use This Manual
Creative Sound Blaster Audigy 2 Information in this document is subject to change without notice and does not represent a commitment on the part of Creative Technology Ltd. No part of this manual may be reproduced or transmitted in any form or by any means, electronic or mechanical, including photocopying and recording, for any purpose without the written permission of Creative Technology Ltd. - Page 3 Contents...
-
Page 4: Table Of Contents
Step 2: Install the Sound Blaster Audigy 2 card....1-7 Step 3: Install the Joystick/MIDI bracket ......1-8 Step 4: Connect cables to Sound Blaster Audigy 2 card ..1-9 Step 5: Connect to power outlet ........1-10 Connecting Related Peripherals..........1-11 Connecting Speaker Systems ........... - Page 5 Sound Blaster Audigy 2 Getting Started Demo ....3-2 Sound Blaster Audigy 2 Feature Showcase Demo....3-2 SoundFont Showcase ............3-3 Introduction to the Sound Blaster Audigy 2 software suite ..... 3-3 Creative MediaSource Go! ..........3-3 Creative MediaSource Go! Launcher........3-4 Creative MediaSource Player..........
- Page 6 Creative Surround Mixer ..........3-9 Creative Speaker Settings ..........3-9 Creative Speaker Calibrator ..........3-10 Creative MiniDisc Center...........3-10 Creative SoundFont Bank Manager ........3-10 Creative Audio Stream Recorder 2 .........3-11 Creative Wave Studio ..........3-11 Diagnostic and troubleshooting utilities........3-12 Creative Diagnostics ............3-12 Creative Speaker Settings ..........3-12...
- Page 7 Dolby Digital (AC-3) Decoding........A-3 Creative Multi Speaker Surround (CMSS) ....A-3 SB1394/FireWire Compatibility........A-3 Connectivity ................A-4 Sound Blaster Audigy 2 card ..........A-4 Audio Inputs ............A-4 Audio Outputs ............A-4 SB1394/FireWire Interfaces ........A-4 Interfaces ..............A-5 Troubleshooting and FAQs Problems Installing Software ............
- Page 8 Problems with DV driver for Windows 98 SE/2000/Me/XP .... B-13 Problems in Windows XP ............B-14 Problems with Digital Audio Devices .......... B-15...
- Page 9 Introduction...
-
Page 10: High Definition Digital Audio Entertainment
Entertainment This User Manual (on CD) guides you through the installation and usage of Sound Blaster Audigy 2, which consists of the Sound Blaster Audigy 2 card and Joystick/ MIDI bracket*. Featuring 24-bit/192 kHz audio playback, Sound Blaster Audigy 2 delivers high-... -
Page 11: What Is Eax Advanced Hd
This gives Sound Blaster Audigy 2 gamers a better advantage as they are more "attuned" to the game scenario. -
Page 12: Package Contents
128 MB RAM for Windows 2000 SP2 and Windows XP ❑ 600 MB of free hard disk space ❑ Available PCI 2.1 compliant slot for the Sound Blaster Audigy 2 card ❑ Available adjacent slot for the Joystick/MIDI bracket* ❑ Headphones or amplified speakers (available separately) ❑... -
Page 13: Sb1394/Firewire Applications, Games Or Dvd Viewing
Sound Blaster Audigy 2 and demonstrates the card’s capabilities. More Help View the contents of the Sound Blaster Audigy 2 Installation and Applications CD for additional libraries and other software. Visit the www.soundblaster.com site for the latest Sound Blaster news and products. -
Page 14: Document Conventions
Document The following typographical conventions are used throughout this manual: Conventions The notepad icon indicates information that is of particular importance and should be considered before continuing. The alarm clock designates a caution or warning that can help you avoid situations involving risk. The warning sign indicates that failure to adhere to directions may result in bodily harm or life-threatening situations. -
Page 15: Installing Hardware
Installing Hardware This chapter tells you how to install the Sound Blaster Audigy 2 hardware. -
Page 16: What You Need
In addition, you will also need an available PCI slot and another adjacent available slot on your computer. Joystick/MIDI bracket* Sound Blaster Audigy 2 card Digital CD audio cable* Phillips-head screwdriver (not included) *Available on some models of the Sound Blaster Audigy 2 card. -
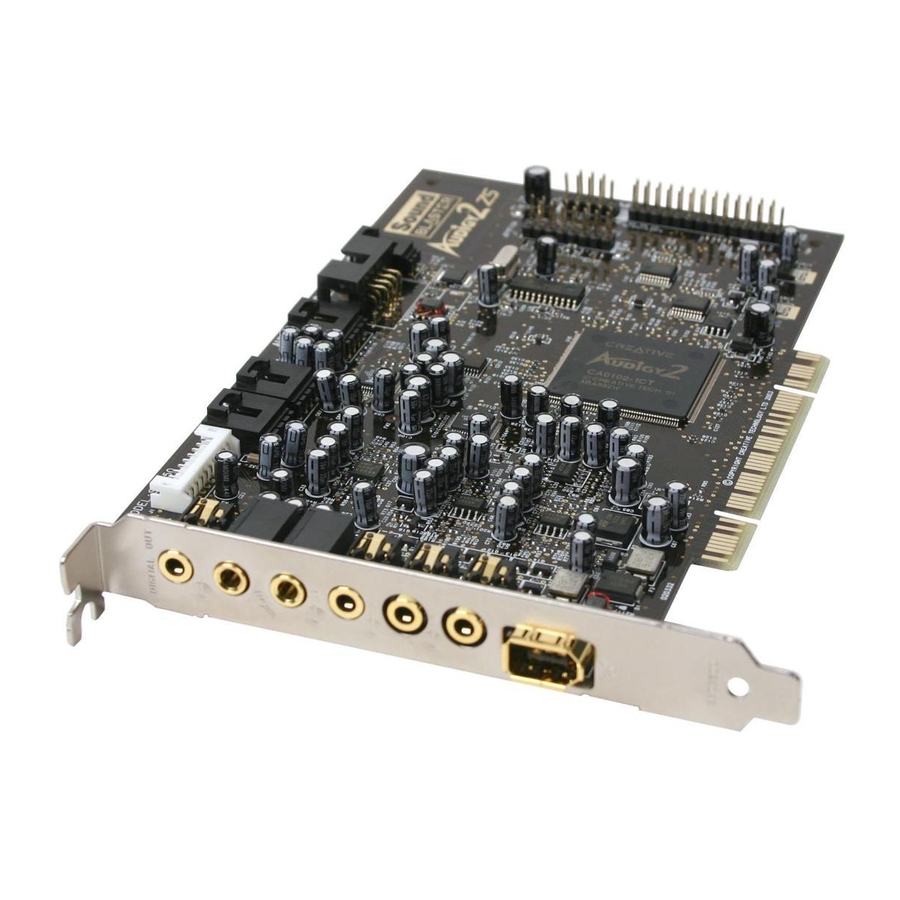
Page 17: Your Sound Blaster Audigy 2 Card
Rear Out and Rear Center Out jacks are used simultaneously for 6.1 channel speaker systems. Click any circled number in the diagram for a description of the item. Figure 1-1: Jacks, connectors and ports on the Sound Blaster Audigy 2 card. Installing Hardware... - Page 18 Table 1: Description of Jacks, Connectors and Ports. Click here or on any Number Description description in the table to return to the main diagram. SB1394/FireWire port (SB1394) Connects to an IEEE 1394 compatible external device (such as a digital video camcorder, digital still camera, printer or scanner). Line Out 3 jack (LIN_OUT3) Connects to Center, Subwoofer and Rear Center Out of powered analog speakers or an external amplifier for audio output.
- Page 19 Connects to the Analog Audio output on a CD-ROM or DVD-ROM *Available with some models drive using a CD audio cable. of the Sound Blaster Audigy 2 card. AUX In connector (AUX_IN) Connects to internal audio sources such as TV Tuner, MPEG, or other similar cards.
-
Page 20: Your Joystick/Midi Bracket
The Joystick/MIDI bracket* is used to attach a joystick or MIDI device: Your Joystick/ MIDI Bracket *Available with some models of the Sound Blaster Audigy 2 card. Joystick/MIDI connector Rear view of Connects to a joystick connector bracket or a MIDI device. Figure 1-2: Connector on the Joystick/MIDI bracket. -
Page 21: Installation Steps
Installation Steps Step 1: Prepare your 1. Turn off your computer and all peripheral devices. 2. Touch a metal plate on your computer to ground yourself and to discharge any computer static electricity, and then unplug the power cord from the wall outlet. 3. -
Page 22: Step 2: Install The Sound Blaster Audigy 2 Card
Step 2: Install the 1. Align the Sound Blaster Audigy 2 card with the PCI slot and press the card gently but firmly into the slot as shown in Figure 1-4. Sound Blaster Audigy 2 card Do not force the audio card into the slot. -
Page 23: Step 3: Install The Joystick/Midi Bracket
Step 3: Install the 1. If you are installing a joystick or MIDI device (optional), secure the Joystick/MIDI bracket* to the slot next to the Sound Blaster Audigy 2 card with the second Joystick/MIDI screw. bracket You may also connect all the... -
Page 24: Step 4: Connect Cables To Sound Blaster Audigy 2 Card
For digital CD audio output: connect the Digital CD audio cable (included with some models) from the Digital Audio connector on your CD-ROM/DVD-ROM drive to the CD_SPDIF connector on the Sound Blaster Audigy 2 card as shown in Figure 1-6. Installing Hardware... -
Page 25: Step 5: Connect To Power Outlet
2. Plug the power cord back into the wall outlet, and turn on the computer. power outlet To connect your Sound Blaster Audigy 2 card to other devices, see “Connecting Related Peripherals” on page 1-11. To install drivers and software, refer to “Installing Drivers and Applications” on page 2-1. -
Page 26: Connecting Related Peripherals
Sound Blaster Audigy 2 will give you endless hours of listening pleasure. Figure 1-7 Connecting shows you how to connect related peripherals to your Sound Blaster Audigy 2 to Related optimize your enjoyment. Peripherals Use the AD_EXT cable with the Audigy 2 Drive ONLY. Do... - Page 27 *Available on some models Number Description of the Sound Blaster Audigy 2 card. Digital Out jack Connects to digital speakers, for example, Creative Inspire Digital Speakers and MiniDisc or DAT via minijack-to-DIN cable. Line in Click here or on any description in the table to Connects to a cassette or CD player, synthesizer, etc.
- Page 28 Table 2: Description of Connectors and Devices. Number Description *Available separately. Analog CD audio cable* (left) and Digital CD audio cable** (right) CD-ROM/DVD-ROM drive **Available on some models of the Sound Blaster Audigy 2 card. Click here or on any description in the table to return to the main diagram.
-
Page 29: Connecting Speaker Systems
If you have a 5.1 channel speaker system, you can upmix your stereo sources (such Connecting as CD Audio, MP3, WMA, MIDI, and Wave) to 6.1 channels by using Creative Multi- Speaker Systems Speaker Surround (CMSS) technology. To upmix, you need to enable the CMSS feature in Creative EAX Console. -
Page 30: Connecting External Consumer Devices
For connection to Center and Subwoofer channels using a 3.5mm (stereo)-to-RCA cable or 3.5 mm (stereo) Audio/Video-to-RCA cable, connect the white RCA jack to the Center input and the red RCA jack to the Subwoofer input. Figure 1-9: Connecting external consumer devices to the Sound Blaster Audigy 2 card. Installing Hardware 1-15... - Page 31 Table 3: Description of Connectors and Consumer Devices. Click here or on any Number Description description in the table to return to the main diagram. Dolby Digital (AC-3) SPDIF In 3.5 mm (mono)-to-RCA cable 3.5 mm (stereo)-to-RCA cable 3.5 mm (stereo) Audio/Video-to-RCA cable Analog Front, Rear and Center/Subwoofer Inputs Digital Out jack Line Out 1(top)
-
Page 32: Positioning Your Speakers
If you are using six speakers, Positioning Your FL: Front-left place them to form a circle speaker Speakers around you (as in Figure 1-10) CS: Center speaker and angled toward you. Make FR: Front-right sure that the computer monitor speaker RR: Rear-right is not blocking the path of your speaker... -
Page 33: Installing Software
Installing Software This chapter tells you how to install the Sound Blaster Audigy 2 software. -
Page 34: Installing Drivers And Applications
2. When prompted for the audio drivers, click the Cancel button. users will be prompted to insert the Windows 98 SE 3. Insert the Sound Blaster Audigy 2 Installation and Applications CD into your CD- installation CD into the CD- ROM drive. -
Page 35: Sound Blaster Audigy 2 Feature Showcase Demo
1. Insert the Sound Blaster Audigy 2 Feature Showcase Demo CD into your CD-ROM Sound Blaster drive. Audigy 2 Feature If the drive supports Windows AutoPlay mode, the CD starts running automatically. If not, you need to enable your CD-ROM drive’s auto-insert Showcase Demo notification feature. -
Page 36: Uninstalling All Audio Drivers And Applications
2. Double-click the Add/Remove Programs icon. 3. Click the Install/Uninstall tab (or Change or Remove Programs button). 4. Select the Sound Blaster Audigy 2 entry, and then click the Add/Remove (or Change/Remove) button. 5. In the InstallShield Wizard dialog box, click the Remove button, and then click the Next button. -
Page 37: Installing/Uninstalling Selected Audio Drivers Or Applications
You may now install existing or updated Sound Blaster Audigy 2 device drivers or applications. For more information, see “Installing Drivers and Applications” on page 2-1. Installing/ The above instructions help you to install or uninstall all device drivers or applications. -
Page 38: Updating Windows 2000 (Service Pack 2)
5. In the InstallShield Wizard dialog box, click the Custom Uninstallation button, and then click the Next button. 6. Click the check box of the application that you want to uninstall to select it. 7. Click the Next button. 8. Restart your computer when prompted. Windows 2000 now provides better support for AC-3 SPDIF output (non-PCM Updating through waveOut) for software DVD viewing. -
Page 39: Using Audigy 2 Software
Using Audigy 2 Software Find out how the software accompanying your audio card can be used to control and customize the card’s features for best performance. -
Page 40: Creative Sound Blaster Audigy 2 Applications
Creative Sound advanced features of your audio card. We recommend that you familiarize yourself Blaster Audigy 2 with their functions in order to make full use of Sound Blaster Audigy 2’s rich features. Applications Demos: Providing an overview of Sound Blaster Audigy 2’s features ❑... -
Page 41: Demos
Note: The Sound Blaster Audigy 2 Feature Showcase Demo can be installed using the Sound Blaster Audigy 2 Feature Showcase Demo CD in your package. This demo will run only if a Sound Blaster Audigy 2 card is installed because the software utilizes the card’s hardware... -
Page 42: Soundfont Showcase
For more information and usage details on SoundFont Showcase, refer to its online Help. This section walks you through the main suite of the Sound Blaster Audigy 2 Introduction to software that enables you to make full use of Sound Blaster Audigy 2’s versatile the Sound and powerful features. -
Page 43: Creative Mediasource Go! Launcher
Unlike other media players, Creative MediaSource MediaSource Player Player is specially designed to access the power of your Sound Blaster Audigy 2 hardware. With it, you can: ❑ play back music and multimedia files: MP3, WAV, WMA, NVF, MLP, VideoCD, etc ❑... -
Page 44: What-You-Hear" Multichannel Recording
❑ use the built-in Creative MediaSource Recorder to record audio (see the section below). Use Creative MediaSource Recorder to record at up to 24-bit/96 kHz from any audio “What-You-Hear” sources processed by the Sound Blaster Audigy 2 card. A multichannel What-You- multichannel recording Hear recording mode lets you capture audio directly from the audio card’s 6.1-... -
Page 45: Transferring Songs
CDs into smaller 4 to 5 MB MP3 files. Creative MediaSource Organizer’s built-in Rip Now module lets you easily extract tracks from audio CDs, then convert them to MP3 and WMA formats at high resolution bit rates of 320 Kbps and 160 Kbps, respectively. -
Page 46: Creative Mediasource Dvd-Audio Player
For more information and usage details on Creative MediaSource Organizer, refer to online Help. Creative Use this application to play back today’s highest quality audio recordings available on DVD-Audio discs. You can enjoy 24-bit/96 kHz multichannel surround sound MediaSource DVD- music, or stereo recordings of up to 24-bit/192 kHz resolution. -
Page 47: Cmss 3D: Simulating Surround Sound
❑ Karaoke Effects let singers add high-quality echo to add richness to their voices. Users can also vary the music’s pitch to suit their vocal range. Creative MultiSpeaker Surround (CMSS) 3D makes ordinary two-channel (Left and CMSS 3D: Simulating Right Stereo) sound seem to surround you, even through only two speakers. For Surround Sound users with 5.1 or 6.1 multichannel speaker systems, CMSS can also simulate... -
Page 48: Time Scaling: Varying The Speed Of Playback
Help. Creative Surround Use Creative Surround Mixer to select the device you wish to listen to or record from. It operates in two possible modes. Click the Basic Mode or Advanced Mode button Mixer to switch between the two modes: In Basic mode, you can: ❑... -
Page 49: Creative Speaker Calibrator
Calibrator Creative MiniDisc Creative MiniDisc Center allows you to play back songs on CDs or supported audio formats, and record them to digital recorders such as Digital Audio Tape machines, Center and also MiniDisc (MD) recorders. -
Page 50: Creative Wave Studio
You can also use ASR2 to listen to selected radio stations live by clicking the blue Play button. For more information and usage details on Creative Audio Stream Recorder 2, refer to its online Help. -
Page 51: Diagnostic And Troubleshooting Utilities
Diagnostic and troubleshooting utilities Creative Diagnostics Use Creative Diagnostics to quickly test your audio card’s Wave, MIDI or CD Audio playback capability, recording function and speaker output. For more information and usage details on Creative Diagnostics, refer to its online Help. -
Page 52: A General Specifications
General Specifications This section displays the specifications of your Sound Blaster Audigy 2 card and Joystick/MIDI bracket. -
Page 53: Features
General Specifications This section displays the specifications of your Sound Blaster Audigy 2 card and Joystick/MIDI bracket*. Features *Available with some models of the Sound Blaster Audigy 2 card. ❑ PCI Specification Version 2.1 compliant PCI Bus Mastering ❑ Bus mastering reduces latency and speeds up system performance ❑... -
Page 54: Professional Digital Audio Processing
❑ 24-bit Digital-to-Analog conversion of digital sources at 96 kHz to analog 6.1 speaker output ❑ 24-bit Digital-to-Analog conversion of stereo digital sources at 192 kHz to stereo output ❑ 16-bit to 24-bit recording sampling rates: 8, 11.025, 16, 22.05, 24, 32, 44.1, 48 and 96 kHz ❑... -
Page 55: Thx Certification
® ❑ Sound Blaster Audigy 2 has received the prestigious THX Multimedia THX Certification Certification award, making it the perfect choice for PC audiophiles seeking the very best music and movie experiences. ❑ Decodes Dolby Digital Surround EX to 6.1 or 5.1 channels or pass-through... -
Page 56: Connectivity
Connectivity Sound Blaster Audigy 2 card ❑ One line-level analog Line input via stereo jack on rear bracket Audio Inputs ❑ One mono Microphone analog input via stereo jack on rear bracket ❑ CD_IN line-level analog input via 4-pin Molex connector on card ❑... -
Page 57: Interfaces
❑ AD_EXT 2 x 20 pin header for connection to Audigy 2 Drive Interfaces ❑ JOYSTICK 2 x 8 pin header* for connection to the Joystick/MIDI connector (optional attachment) General Specifications... -
Page 58: B Troubleshooting And Faqs
Troubleshooting and FAQs This section provides solutions to problems you may encounter during installation or normal use. -
Page 59: Problems Installing Software
Troubleshooting and FAQs This appendix provides solutions to problems you may encounter during installation or normal use. The installation does not start automatically after the Sound Blaster Audigy Problems 2 Installation and Applications CD is inserted. Installing The AutoPlay feature in your Windows system may not be enabled. Software To start the installation program through the My Computer shortcut menu: 1. -
Page 60: Problems With Sound
❑ In the Speaker Selection tab of Creative Speaker Settings, the Headphones option is selected in the Speaker/Headphone Selection box. ❑ In the Basic tab of Creative Surround Mixer, the recording source selected is “What U Hear”. Individual analog recording sources are not displayed in Creative Surround Mixer. - Page 61 Creative Surround Mixer.” on page B-2. To record an individual analog source: ❑ In the Record panel of the Basic tab in Creative Surround Mixer, make sure the recording source selected is Analog Mix (Line/CD/TAD/Aux/PC). ❑ In the Source panel, mute the analog sources that you do not want to record by clicking the Speaker button to change it to a button with a red cross sign on it.
- Page 62 ❑ There is no hardware conflict between the card and a peripheral device. See “Resolving I/O Conflicts” on page B-11. ❑ The Speaker selection in Creative Speaker Settings corresponds to your speaker or headphone configuration. No audio output when playing audio CDs or DOS games that require a CD- ROM.
- Page 63 Windows Volume Control application) is at the opposite end compared to the position to which you have panned the source in the Basic tab of Creative Surround Mixer. For example, the CD Audio balance in Windows Volume Control is on the left but in Creative Surround Mixer you have panned the CD Audio to the right.
-
Page 64: Problems With File Transfers On Some Via Chipset Motherboards
(Take note of the safety precautions on page 1-6.) The VT82C686B chipset has its model number inscribed on the chip. If you have the VT82C686B chipset: ❑ Creative recommends that you first contact your computer vendor or motherboard manufacturer for the latest solution. Figure B-1: Device Manager tab. -
Page 65: Insufficient Soundfont Cache
• obtaining the most current BIOS for your motherboard from the manufacturer’s web site*. *Content in these web sites is controlled by other companies. Creative bears no responsibility for information or downloads obtained from them. This information is provided only as a convenience to you. -
Page 66: Problems With Joystick
2. In the Control Panel window, double-click the System icon. 3. In the System Properties dialog box, click the Device Manager tab. 4. Double-click Sound, Video And Game Controllers, and then select Creative Audigy 2 Gameport (Creative Game Port for Windows 2000). -
Page 67: Problems With Multiple Audio Devices
Operating multiple audio devices in your computer may introduce usability issues. Alternatively, during the installation of your Sound Blaster Audigy 2 card, do the following: ❑ If your computer detects an installed Sound Blaster Live! Series or Sound Blaster PCI512 audio card, a message box recommending that you completely uninstall and remove the older audio device will appear. -
Page 68: Problems With Sound Blaster Live! Series Or Sound Blaster Pci512 Card
2. In the Control Panel window, double-click the System icon. 3. In the System Properties dialog box, click the Device Manager tab. 4. Double-click Sound, Video And Game Controllers, and then select Creative Sound Blaster Live! Series or Creative Sound Blaster PCI512. -
Page 69: Resolving I/O Conflicts
• Clear the check box to disable it. If you have a Disable In This Hardware Profile check box: • Make sure that the check box is selected to disable it. 7. Click OK to restart Windows and for the change to take effect. When the Sound Blaster Live! series is disabled, the entry in Device Manager has a red cross. -
Page 70: Problems With Encore Dvd Player
1. In the Windows system tray, right-click the Disc Detector icon, and then click Properties. 2. On the General tabbed page of the Creative Disc Detector dialog box, make sure that the Enable Disc Detector check box is selected. 3. Click the Players tab. - Page 71 Windows XP. To solve this problem: 1. Turn on your DV camcorder. 2. Insert the Sound Blaster Audigy 2 Installation and Applications CD into your CD- ROM drive. Exit from the welcome screen. 3. Using Windows Explorer, locate the 1394 folder in the CD-ROM, and run the DVConnect 240.exe file.
- Page 72 You may see the message when you install hardware drivers from companies other than Creative. If you do, you may choose to click the Continue Anyway button. Device drivers not signed by Microsoft may be used in Windows XP, and need not impair or destabilize your computer.
- Page 73 The choices available are 48 kHz and 96 kHz. To solve this problem: 1. In Creative MediaSource Go! Launcher, click the Product Settings tab. 2. Double-click the Device Controls icon. 3. Click the Sampling Rate tab.
- Page 74 11.When prompted to restart your computer, click the Yes button. 12.Repeat steps 4-11 if you have other drives, for example, other hard disk drives, CD-ROM, CD-RW, and DVD-ROM drives. In step 4, double-click the respective drive icon. For Windows 2000 and Windows XP: 1.