Table of Contents
Advertisement
Advertisement
Table of Contents

Related Manuals for Salton Elite SECM21


Summary of Contents for Salton Elite SECM21
- Page 1 INSTRUCTIONS AND WARRANTY MODEL NO. SECM21 SALTON ELITE 3 in 1 COFFEE MAKER...
-
Page 2: Important Safeguards
Congratulations on purchasing our Salton Elite coffee maker. Each unit is manufactured to ensure safety and reliability. Before using this coffee maker for the first time, please read the instruction manual carefully and keep it for future reference. IMPORTANT SAFEGUARDS... - Page 3 12. Remove the plug from the socket by gripping the plug. Do not pull on the cord to disconnect the coffee maker from the mains. Always unplug the unit when not in use, before cleaning or when adding or removing parts. 13.
-
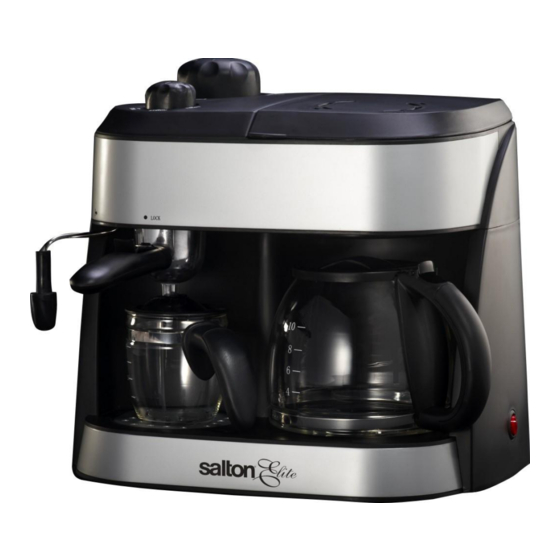
Page 4: Parts Diagram
PARTS DIAGRAM Tank cover(for drip coffee) Tank cover (for espresso coffee) Nylon filter Strength knob Steam knob Funnel Steam pipe Tray cover Nozzle Drip tray Switch Switch (for drip coffee) Keeping warm plate (for espresso coffee) Carafe cover Measuring spoon and tamper Carafe Filter Filter holder... - Page 5 MAKING DRIP COFFEE 1. Open the tank cover (for drip coffee) and pour proper drinking water into the water tank according to the gauge. 2. Place the nylon filter into the funnel; make sure it is assembled correctly. Otherwise the tank cover cannot be closed. 3.
- Page 6 the filter holder in left position, then turn the filter holder counter-clockwise until the handle locates the central position of the unit, make sure that the filter holder is secured firmly. 5. Turn the strength knob to your desired position: “STRONG”, “LIGHT” or “STEAM” functions (see Figure 3), depending on your preference.
-
Page 7: Cleaning And Maintenance
150 grams of milk (whole milk or half whole milk) for each cappuccino to be prepared, place it on the right bottom part of the housing, lift up the cup to ensure the nozzle is immersed in the milk, then turn the steam knob in an anti-clockwise direction slowly when it begins foaming the milk, when the volume of milk frothing is increased to 1.5 times the milk volume, turn off the steam knob to stop making steam. - Page 8 Do not immerse the coffee maker in water or any other liquid, or hold it under a running tap to clean. To remove stubborn spots/marks, wipe the surfaces with a cloth slightly dampened in soapy water or mild non-abrasive cleaner. Rinse and dry a clean, dry, soft cloth.
-
Page 9: Troubleshooting
place the descaler deposit in the water tank at least 15 minutes before brewing the water. 3. Brew the water according to the program of making espresso coffee without coffee powder in the filter. 4. Turn strength knob to “STRONG” or “LIGHT” position, then turn switch on by pressing it to the “I / ON”... - Page 10 The descaler is not a Try using lemon The metal parts in the tank recommended type. It may juice/vinegar. have rust. corrode the metal parts in the tank. Water leaks from the There is too much water in Please clean the drip tray. bottom of the coffee the drip tray.
-
Page 11: Storing The Coffee Maker
STORING THE COFFEE MAKER Unplug the unit from the wall outlet and clean all the parts as instructed above. Ensure that all parts are dry before storing. Store the coffee maker in its box or in a clean, dry place. ... - Page 12 This unit is designed to operate on the stated current only. Connecting to other power sources may damage the coffee maker. Connect a three-pin plug as follows: The wires in this mains lead are coloured in accordance with the following code: Green/Yellow = Earth Blue = Neutral...
- Page 13 PLEASE AFFIX YOUR PROOF OF PURCHASE/RECEIPT HERE IN THE EVENT OF A CLAIM UNDER WARRANTY THIS RECEIPT MUST BE PRODUCED. W A R R A N T Y Tedelex Trading (Pty) Limited (“Tedelex”) warrants to the original purchaser of this product (“the customer”) that this product will be free of defects in quality and workmanship which under normal personal, family or household use and purpose may manifest within a period of 1 (one) year from the date of purchase (“warranty period”).