Table of Contents
Advertisement
Advertisement
Table of Contents

Related Manuals for iOptron SmartStar 8405


Summary of Contents for iOptron SmartStar 8405
- Page 1 ® SmartStar R-80 Telescope Instruction Manual...
-
Page 2: Table Of Contents
4.3. Turn Off the Mount... 13 ® 5. Use SmartStar R-80 ... 14 5.1. Manual Operation of the Telescope... 14 5.2. Slew to an Object ... 14 5.2.1. Planets, Sun, Moon ... 14 5.2.2. Deep Sky Objects... 14 5.2.3. Comets ... 14 5.2.4. - Page 3 Appendix A. Technical Specifications ... 22 Appendix B. GOTONOVA Appendix C. GOTONOVA IOPTRON ONE YEAR LIMITED WARRANTY... 38 NEVER USE A TELESCOPE TO LOOK AT THE SUN! Looking at or near the Sun will cause instant and irreversible damage to your eye.
-
Page 4: Smarstar ® R-80 Overview
The mount is universally compatible with all telescopes using a dove-tail connector plate. With an optional DC adaptor you can plug your telescope mount into your car if you’re camping or at any other remote location. Easy to understand controller... -
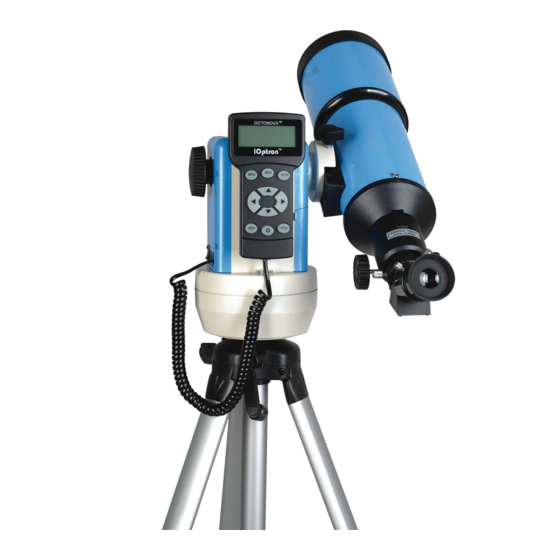
Page 5: Smartstar ® R-80 Assembly Terms
® 1.2. SmartStar R-80 Assembly Terms 1. Telescope 2. Dovetail Lock 3. Hand Controller 4. Altitude Lock 5. Mount (GPS model) 6. Diagonal 7. Eyepiece 8. Height Adjustment Handle 9. Tripod Lock Knob 10. Tripod Leg Lock 11. Tripod 12. Height Extender Lock... -
Page 6: Telescope Assembly
(see arrow in the photo). ** Use only fresh batteries; do not mix fresh and old batteries;insufficient battery power may cause error messages;optional AC Adapter and Car Charger accessories are available at www.ioptron.com... - Page 7 Remove the round dust cover lid from the end of telescope. Use the focus knob to bring objects into focus. You may need to turn the focus knob quite a few turns to focus your telescope for the first time. Always start observing using a lower power eyepiece (such as the K25mm eyepiece) to get a wider field of view.
-
Page 8: Gotonova Tm 8405 Hand Controller
• BACK: Move back to the previous screen, or end/cancel current operation, such as slewing. • ENTER: Confirm an input, go to the next menu, select a choice, slew the telescope to a selected object, or stop/start tracking. • Arrow (▲▼►◄): Press ▲▼ buttons to move... - Page 9 5. A: Altitude of the telescope (zenith is telescope 90º). 6. Z: Azimuth of the telescope (north is 0º, east 90º, south 180º, and west 270º). 7. Local Date and Time: display local time in a format of YY-MM-DD HH:MM:SS.
-
Page 10: Getting Started
South mark faces south. An additional compass is needed. Unlock the altitude lock (#4) and rotate the telescope to point straight up at the Zenith. A torpedo level may help. Make sure the mount is leveled. Then turn the mount power on. - Page 11 Select and slew Land Objects Sync. to Target Set Up Controller Press ENTER. Select “Set Up Time and Site” Set Up Time and Site Set Display Info Set Key Beep Set Azi Work Mode Press ENTER. The Set Local Time screen will show: Set Local Time: 2009-06-01 11:55:09...
-
Page 12: Using Your Telescope
400mm ÷ 25mm = 16X (magnification) 2. Included with this telescope is a 45° Erecting Diagonal Prism. The Erecting Diagonal Prism is used to erect the image you will see. Astronomical telescopes are designed in such a way that the image you UPSIDE REVERSED. -
Page 13: Turn Off The Mount
Park Position. If the mount is not moved, no initial set up is needed when powered on the next time. To do so, press the MENU button, scroll down to “Park Telescope” and press ENTER. Turn the power off. -
Page 14: Use Smartstar ® R-80
Section Assembly), flip the ON/OFF switch on the telescope mount to the ON position. Use ►,◄,▼ or ▲ buttons to point the telescope to desired object. You may need using SPEED key to change the slewing speed. 5.2. Slew to an Object Press MENU button, from the main menu, select “Select and Slew.”... -
Page 15: Watch List Auto
Z 25º58.8’ 09-05-04 15:43:27 Use ◄ ► ▲ and ▼ keys to slew the telescope to the target you want to observe, press ENTER to save the target. Press SPEED button to change the slew speed if needed. Input coordinates (of a land object) Use ▼... -
Page 16: Set Key Beep
5.5.4. Reset All Reset all settings to factory default data. 5.6. Align This function is used for align the telescope. Before star alignment, please make sure the mount is well leveled. In addition to “Solarsys Align,” the system also provides “One Star Align”... -
Page 17: Modify Star Catalog
Select “Two Star Align” in the Align menu. Use ▲ or ▼ button to select a star and press ENTER. The mount will slew to it automatically. Use ◄ ► ▲ or ▼ key to center the object in your eyepiece. Press SPEED button to change the slew speed if needed. -
Page 18: Comets
No. 001 4h38.7m D:19º56.8’ A -31º10.2’ Z303º44.1’ The first line shows the number of the user object and if it is above the horizon. The second line shows the name of the user object, here is “BX”. The third line shows target’s current RA and DEC coordinates. -
Page 19: Asteroids
Watch List Auto. 5.9. Set Telescope Coord. Set the current Altitude and Azimuth of your telescope. 5.10. Park Scope Park your telescope. Return the telescope to its initial position, i.e.,its altitude is 90º0.0’ and azimuth is 180º0.0’. -
Page 20: Maintenance And Servicing
6.2. Storage and Transport When not in use, store the telescope in a cool, dry place. Do not expose the instrument to excessive heat or moisture. It is best to store the telescope in its original box with the altitude lock knob unlocked. -
Page 21: Ioptron Customer Service
9:00 AM to 5:00 PM, Easter Time, Monday through Friday. In the unlikely event that the telescope requires factory servicing or repairs, write or call the iOptron Customer Service Department first, before returning the telescope to the factory, giving... -
Page 22: Appendix A. Technical Specifications
Appendix A. Technical Specifications Mount Body Materials Motor Gear Bearing Speed GOTO System Processor Object in Database GOTO accuracy Tracking Payload Optical Design Clear Aperture Focal Length Focal Ratio Resolution Power Optical Tube Materials Battery Power Requirement Operating Temperature Weight with tripod Weight w/ Tripod, OTA AltAzimuth Mount Die-cast Aluminum... -
Page 23: Appendix B. Gotonova
Appendix B. GOTONOVA MENU Select and Slew Select and Slew Land Objects Land Objects Sync. To Target Sync. To Target Set Up Controller Set Up Controller 8405 HC MENU STRUCTURE Planets, Sun, Moon Planets, Sun, Moon Deep Sky Objects Deep Sky Objects Named Deepsky Object Comets Comets... - Page 24 Add a Watch Object Add a Watch Object Delete One Data Delete One Data Delete One Data Browse the List Browse the List Browse the List Set Telescope Coord Set Telescope Coord Park Telescope Park Telescope Comets Comets Comets Asteroids...
-
Page 25: Appendix C. Gotonova Tm Star List
Appendix C. GOTONOVA Constellation Andromeda Antlia Apus Aquarius Aquila Aries Auriga Boötes Caelum Camelopardalis Cancer Canes Venatici Canis Major Canis Minor Capricornus Carina Cassiopeia Centaurus Cepheus Cetus Chamaeleon Circinus Columba Coma Berenices Corona Australis Corona Borealis Corvus Crater Crux Cygnus Delphinus Dorado Draco... - Page 26 Messier This table is licensed under the GNU Free Documentation License. It uses material from the Wikipedia article List of Messier objects.
- Page 27 GOTONOVA Deep Sky Object List ID No. OBJECT 47 Tucanae Andromeda Galaxy Antennae Arp's Spiral Atom for Peace Galaxy Barnard's Galaxy Baxendell's Nebula Bear Claw Nebula Beehive Cluster Bipolar Nebula Blackeye Galaxy Blinking Planetary Blue Flash Nebula Blue Planetary Blue Snowball Nebula Bode's Nebula Box Nebula Bubble Nebula...
- Page 28 Praesepe Ptolemy's Cluster rho Ophiuchi Nebula Ring Nebula Ringtail Galaxy Rosette Nebula Running Chicken Nebula Saturn Nebula Sculptor Galaxy Group Sculptor Galaxy Seyfert's Sextet Siamese Twins Silver Dollar Small Magellanic Cloud Sombrero Galaxy Southern Integral Sign Southern Pleiades Spindle Galaxy Spindle Star Queen Nebula Stephan's Quintet...
- Page 29 001 Acamar 049 Ascella 002 Achernar 050 Asellus Australis 003 Acrux 051 Asellus Borealis 004 Acubens 052 Aspidiske 005 Adhafera 053 Atik 006 Adhara 054 Atlas 007 Al Na’ir 055 Atria 008 Albali 056 Avoir 009 Alberio 057 Azha 010 Alchibar 058 Baten Kaitos 011 Alcor 059 Beid...
- Page 30 No. Object Const Sep. Magitude 2.3 / 5.1 37734 35.9 4.4 / 8.6 54033 12.8 3.7 / 11 125235 17.5 5.2 / 8.7 104308 5.5 / 7.2 142996 E2489 Aql 5.6 / 8.6 104668 5.8 / 6.5 143898 4.3 / 4.5 146108 12.7 5.3 / 7.3...
- Page 31 No. Object Const Sep. Magitude 73 52 4.2 / 9.4 70467 74 Ups 15.1 4.4 / 10 71173 75 Mu 4.7 / 6.1 89940 76 Psi 4.9 / 7.4 32114 77 17 5.0 / 9.2 68827 78 61 30.3 5.2 / 6.0 70919 79 49 5.7 / 7.8...
- Page 32 No. Object Const Sep. Magitude 149 67 4.0 / 8.6 123013 150 Lam 4.2 / 5.2 121658 151 Xi 4.4 / 9.0 185296 152 36 5.1 / 5.1 185198 153 Tau 5.2 / 5.9 142050 154 Rho 5.3 / 6.0 184382 155 39 10.3...
- Page 33 Name Year 6P d'Arrest 2008 7P Pons-Winnecke 2008 8P Tuttle 2008 9P Tempel 2011 10P Tempel 2010 14P Wolf 2009 15P Finlay 2008 16P Brooks 2008 17P Holmes 2007 19P Borrelly 2008 22P Kopff 2009 24P Schaumasse 2009 29P Schwassmann-Wachmann 2004 30P Reinmuth 2010...
- Page 34 81P Wild 2010 82P Gehrels 2010 85P Boethin 2008 86P Wild 2008 88P Howell 2009 89P Russell 2009 94P Russell 2010 97P Metcalf-Brewington 2011 99P Kowal 2007 100P Hartley 2009 110P Hartley 2008 113P Spitaler 2008 116P Wild 2009 117P Helin-Roman-Alu 2005 118P Shoemaker-Levy 2010...
- Page 35 Name Year Month Ceres 2008 Pallas 2008 Juno 2008 Vesta 2008 Astraea 2008 Hebe 2008 Iris 2008 Flora 2008 Metis 2008 Hygiea 2008 Parthenope 2008 Victoria 2008 Egeria 2008 Irene 2008 Eunomia 2008 Psyche 2008 Thetis 2008 Melpomene 2008 Fortuna 2008 Massalia 2008...
- Page 36 Polyhymnia 2008 Circe 2008 Leukothea 2008 Atalante 2008 Fides 2008 Leda 2008 Laetitia 2008 Harmonia 2008 Daphne 2008 Isis 2008 Ariadne 2008 Nysa 2008 Eugenia 2008 Hestia 2008 Aglaja 2008 Doris 2008 Pales 2008 Virginia 2008 Nemausa 2008 Europa 2008 Kalypso 2008 Alexandra...
- Page 37 GOTONOVA SAO Bright Star List For 8405 GOTONOVA hand controller consists of 5103 SAO bright stars, with there magnitude less than 6. A separate list is provided. (SAO_Bright_Star.pdf)
-
Page 38: Ioptron One Year Limited Warranty
As a condition to the obligation of iOptron to repair or replace such product, the product must be returned to iOptron together with proof-of-purchase satisfactory to iOptron.