
Related Manuals for iOptron #8506


Summary of Contents for iOptron #8506
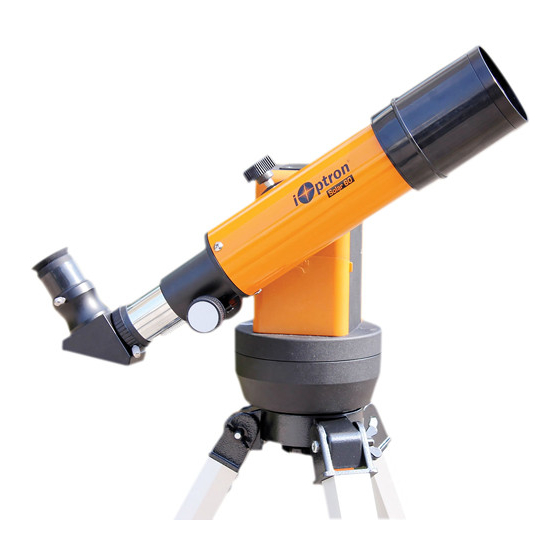
- Page 1 ® SmartStar Solar 60 GOTO Telescope Instruction Manual For Products #8506 & #8507 www.iOptron.com...
-
Page 2: Table Of Contents
Table of Content Table of Content ..........................2 ® 1. SmarStar Solar 60 Overview ....................4 ® 1.1. SmartStar Solar 60 Features ..................4 ® 1.2. SmartStar Solar 60 Assembly Terms................5 2. Telescope Assembly ........................6 ® 3. GoToNova 8405 Hand Controller .................... - Page 3 Check the solar filter before each use for any possible damages, such as cracks and scratches. Never leave a solar scope unattended! Children should always have adult supervision while observing. December 2011 V1.1 iOptron reserves the rights to revise this instruction without notice. Actual color/contents/design may differ from those described in this instruction.
-
Page 4: Smarstar ® Solar 60 Tm Overview
1.1. SmartStar Solar 60 Features New from iOptron -- The Solar 60 computerized telescope system! Now your family or classroom can see sun spots right on a computer screen. The computerized telescope locates and auto-tracks to keep the sun (or moon, planets, and other celestial objects) in view. This is an ideal system to capture video or still photos of the sun spots and their movements. -
Page 5: Smartstar ® Solar 60 Tm Assembly Terms
Electronic eyepiece to bring the video/images to you computer screen With the 1.3 megapixel electronic eyepiece (Model #8506 only), you can experience astro-video and astrophotography for yourself! It allows you to view real-time images from your telescope on a computer screen. It transmits live video images of the Sun, Moon, planets and terrestrial objects through a USB cable to your computer. -
Page 6: Telescope Assembly
(see arrow in the photo). ** Use only fresh batteries; do not mix fresh and old batteries; insufficient battery power may cause error messages; optional AC Adapter and Car Charger accessories are available at www.ioptron.com... - Page 7 Step 4. Attaching telescope Attach telescope to mount using the dovetail lock knob (#2). Dovetail lock (#2) Step 5. Attaching optics Insert 90º diagonal: Remove the round dust cover lid from the drawtube of the telescope. Insert diagonal (#6) into the drawtube. Tighten the thumbscrews to a firm feel only.
-
Page 8: Gotonova 8405 Hand Controller
® 3. GoToNova 8405 Hand Controller ® Figure 1. GoToNova 8405 Hand Controller ® GoToNova 8405 hand controller (HC) is the standard controller for a SmartStar Solar 60 GOTO telescope, as shown in Figure 1. 3.1. Key Description • MENU: Press “MENU” to enter the Main Menu. •... - Page 9 Mount/GPS Status Target Name Declination Right Ascension Azimuth Altitude Slew Speed Local Date and Time Figure 2. 8405 Hand Controller LCD Information Screen 1. Target Name: displays the name of the target that telescope is currently pointed to. • Park Position: A default position when the mount is turned on, i.e., the telescope is pointed to zenith (altitude reading is 90º) and the mount is facing south (azimuth reading is 180º);...
-
Page 10: Getting Started
4. Getting Started 4.1. Getting Familiar with Telescope It is strongly suggested to practice how to use the telescope and mount during the daytime to get familiar with all the functionalities. Since the attached glass solar filter will block more than 99.99% of the light, you will not see anything other than the sun if the filter is not removed. -
Page 11: Moving The Telescope
If you want more magnification, you may order higher power eyepieces. (Note: a 25 mm focal length eyepiece has a lower power than a 10 mm one.) Always starting with the lowest power eyepiece for easy locating the objects. Focusing Telescope on a Land Object: 1. -
Page 12: Explore Goto And Tracking Capability
4.2. Explore GOTO and Tracking Capability ® In order to experience the full GOTO capability of GoToNova technology it is important to set up the mount correctly before observation. 4.2.1. Level the Mount and Set Initial Position Leveling is critical for good GOTO and tracking accuracy Level the mount by observing the bubble (shown) on the base of the mount by adjusting the tripod legs. - Page 13 Press MENU button. From the main menu scroll down and select “Set Up Controller” Select and slew Land Objects Sync. to Target Set Up Controller Press ENTER. Select “Set Up Time and Site” Set Up Time and Site Set Display Info Set Key Beep Set Azi Work Mode Press ENTER.
-
Page 14: Go To The Sun
• New York City is 300 minutes “behind” UT • Los Angeles is 480 minutes “behind” UT • Rome is 60 minutes “ahead” of UT • Beijing is 480 minutes “ahead” of UT • Sydney is 600 minutes “ahead” of UT All time zones in North America are behind UT as shown in the following table (Be sure it shows “behind”... -
Page 15: Go To The Moon And Other Celestial Objects
button to change the adjustment speed during centering. You may do Select and Slew again to double check if the Sun in centered. 4. If the Sun in NOT in the FOV after “Select and Slew”, in most case it shouldn’t it should be too far away either. -
Page 16: Complete Functions Of Gotonova Hand Controller
® 5. Complete Functions of GoToNova Hand Controller 5.1. Slew to an Object Press MENU button, from the main menu, select “Select and Slew.” Select an object you would like to observe and press ENTER key. ® The GoToNova 8405 hand controller has a database consists of over 10,000 objects. Use ► ”... -
Page 17: Enter Position
5.1.7. Enter Position Go to a target by entering its R.A. and DEC numbers. 5.1.8. Watch List A watch list is a list of your favorite celestial objects in the database. It can be selected for slewing. User can add, delete and browse the watch list. (Refer to 5.7. Watch List). 5.1.9. -
Page 18: Sync To Target
Enter Alt. Azi. Alt: 13º 0.0’ Azi: 25º58.8’ Use ► or ◄ button to move the cursor, and ▼ or ▲ button to change the number. Press ENTER to finish land object coordinates setting. Press BACK to back to main menu. 5.3. -
Page 19: Set Key Beep
LCD Back Light 5.4.2. Set Key Beep Turn the key beep on/off. 5.4.3. Set Azi Work Mode This function will set the mount azimuth mode while performing GOTO. There are two modes for selection: AZI +/- 200 degree AZI free running mode The “AZI +/- 200 degree”... -
Page 20: One Star Align
5.5.2. One Star Align From the main menu, select “Align”. Select “One Star Align” and press ENTER. A list of bright align stars that are above the horizon is computed based on your local time and location. These stars are listed alphabetically. Use ▲ or ▼ button to select a star and press ENTER. The mount will slew to it automatically. - Page 21 Add a new object Edit one data Delete one data Delete all Add a new object: Use ▼ or ▲ button to move the cursor to “Add a new object” line, and press ENTER. Enter the name of your object by using ▲ or ▼ key to change the display from 1 to 9, space, - and A to Z, and ◄...
-
Page 22: Comets
Delete one data Use ▼ or ▲ button to move the cursor to “Delete one data” line, and press ENTER. A user object screen will show: No. 001 4h38.7m D:19º56.8’ A -31º10.2’ Z303º44.1’ Use ► or ◄ button to move the cursor, and ▼ or ▲ button to change the number. Press ENTER to delete selected object. -
Page 23: Asteroids
Use ▼ or ▲ button to move the cursor to “Edit one comet” line, and press ENTER. A user object screen will show: No. 01 6P d’Arrest 5h31.2m D:10º20.8’ 31º49.5’ Z253º39.9’ The first line shows the number of this comet and if it is above the horizon. The second line shows the name of the comet, here is “6P d’Arrest”. -
Page 24: Watch List
5.7. Watch List A watch list is a list of your favorite celestial objects in the database. User can add, delete and browse the watch list. All celestial objects, include User Defined object, can be compiled into the list. Up to 20 objects can be added to the watch list. To setup/modify a Watch List, press MENU, use ▲... -
Page 25: Using Electronic Eyepiece To Capture Images
Future Winjoe www.ioptron.com/future.rar. Aim and focus your telescope to an observing target using a regular eyepiece. Always start with a low power eyepiece (the one with a large number, such as a 25mm instead of 4mm.) Remove the eyepiece and insert the iE1300 camera into the telescope focuser. Slowly adjust the focuser knob to bring the image to focus. - Page 26 Double click on “future.rar” to open the compressed file package and double click on “setup.exe” to start install the software Select your language, then click “OK” to confirm 4. Click on Next when an InstallShield Wizard window displayed. 5. Click on “Yes” to accept the License Agreement. 6.
- Page 27 7. Click on "finish" to exit when InstallShield wizard has been completed. Operation of Future WinJoe 1. Connect the iE1300 to the USB port of your computer, 2. Double click on the Future WinJoe icon on desktop “ ”. Or go to start all programs Future WinJoe. A preview window of Future WinJoe will be shown, with a large live image in the middle and captured image thumbnails at the bottom.
- Page 28 3. Click on “ ” to bring up the “Capture Settings” menu to select a camera, if your computer equipped more than one. In this case, select “MDA1300”. You can select where to store the captured videos and images. You may also change other settings in this menu. Click “OK” when done.
- Page 29 5. Click on " " to set the attributes of images shown, such as brightness and contrast. 6. Click on “ ” to capture a still image. 7. Click on the image thumbnails to view the quality of the image. Click on “ ”...
-
Page 30: Maintenance And Servicing
7. Maintenance and Servicing 7.1. Maintenance ® The SmartStar Solar 60 telescope is a precision optical instrument designed to yield a lifetime of rewarding applications. Given the care and respect due any precision instrument, your telescope will rarely require factory servicing or maintenance. Maintenance guidelines include: 1. -
Page 31: Troubleshooting
When transporting the telescope, take care not to bump or drop the instrument; this type of abuse can damage the optics or affect the GOTO tracking accuracy. 7.3. Troubleshooting The following suggestions may be helpful with operation of the Solar 60 telescope. -
Page 32: Ioptron Customer Service
Friday. In the unlikely event that the telescope requires factory servicing or repairs, e-mail or call the iOptron Customer Service Department first, before returning the telescope to the factory, giving full particulars as to the nature of the problem, your purchase information and contact method. -
Page 33: Appendix A. Technical Specifications
Appendix A. Technical Specifications Optical Design Air Spaced Doublet Refractor Optical Tube Materials Aluminum Clear Aperture 60 mm Focal Length 360mm Focal Ratio Resolution Power 1.93 arc sec Limited Magnitude 10.7 Highest Useful Magnification Focuser 1.25” rack-and-pinion Eyepiece adapter 1.25” Optical Eyepiece 25mm (14.4X) Diagonal... -
Page 34: Appendix B. Gotonova 8405 Hc Menu Structure
® Appendix B. GoToNova 8405 HC MENU STRUCTURE MENU Select and Slew Select and Slew Planets, Sun, Moon Planets, Sun, Moon Mercury Venus Mars Jupiter Saturn Uranus Neptune Moon Deep Sky Objects Deep Sky Objects Named Deepsky Object Messier Catalog NGC Catalog Comets Comets... - Page 35 Align Align Align Solarsys Align Solarsys Align Solarsys Align One Star Align One Star Align One Star Align Two Star Align Two Star Align Two Star Align Modify Star Catalog Modify Star Catalog Modify Star Catalog User RA&DEC JD2000 User RA&DEC JD2000 User RA&DEC JD2000 Comets Comets...
-
Page 36: Appendix C. Gotonova Star List
® Appendix C. GoToNova Star List Modern Constellations for 8405 Constellation Abbreviation Constellation Abbreviation Andromeda Lacerta Antlia Apus Leo Minor Aquarius Lepus Aquila Libra Lupus Aries Lynx Auriga Lyra Boötes Mensa Caelum Microscopium Camelopardalis Monoceros Cancer Musca Canes Venatici Norma Canis Major Octans Canis Minor... - Page 37 Messier This table is licensed under the GNU Free Documentation License. It uses material from the Wikipedia article List of Messier objects.
- Page 38 GOTONOVA Deep Sky Object List for 8405 ID No. OBJECT ID No. OBJECT 47 Tucanae Fornax A Andromeda Galaxy gamma Cas Nebula Antennae gamma Cyg Nebula Arp's Spiral Gem Cluster Atom for Peace Galaxy Ghost of Jupiter Barnard's Galaxy Grus Quartet/Galaxy Baxendell's Nebula h Persei/Open cluster Bear Claw Nebula...
- Page 39 Praesepe Sunflower Galaxy Ptolemy's Cluster Swan Nebula rho Ophiuchi Nebula Table of Scorpius Ring Nebula Tank Track Nebula Ringtail Galaxy Tarantula Nebula Rosette Nebula Taurus A Running Chicken Nebula Tempel's Nebula Saturn Nebula The Box Sculptor Galaxy Group The Eyes Sculptor Galaxy The Mice Seyfert's Sextet...
- Page 40 GTONOVA Named Star List for 8405 001 Acamar 049 Ascella 097 Kaus Australis 145 Rassalas 002 Achernar 050 Asellus Australis 098 Kaus Borealis 146 Rasagethi 003 Acrux 051 Asellus Borealis 099 Kaus Media 147 Rasalhague 004 Acubens 052 Aspidiske 100 Keid 148 Rastaba 005 Adhafera 053 Atik...
- Page 41 GOTONOVA Double Star List For 8405 No. Object Const Sep. Magitude Comm. Name No. Object Const Sep. Magitude Comm. Name 2.3 / 5.1 37734 Almaak 37 Iot 4.7/7.0/8.2 12298 35.9 4.4 / 8.6 54033 38 Psi 4.7 / 8.9 11751 12.8 3.7 / 11 125235...
- Page 42 No. Object Const Sep. Magitude Comm. Name No. Object Const Sep. Magitude Comm. Name 73 52 4.2 / 9.4 70467 111 95 5.0 / 5.2 85647 74 Ups 15.1 4.4 / 10 71173 112 Kap 5.0 / 6.2 101951 75 Mu 4.7 / 6.1 89940 113 E2063 Her...
- Page 43 No. Object Const Sep. Magitude Comm. Name No. Object Const Sep. Magitude Comm. Name 149 67 4.0 / 8.6 123013 181 Bet 13.6 2.6 / 4.9 159682 Graffias 150 Lam 4.2 / 5.2 121658 Marfic 182 Sig 2.9 / 8.5 184336 Alniyat 151 Xi...
- Page 44 GTONOVA Comet List for 8405 Name Year Month ω Ω 6P d'Arrest 2008 14.9663 0.612767 1.353724 178.1336 138.9339 19.5151 7P Pons-Winnecke 2008 26.6083 0.634826 1.253104 172.3139 93.4179 22.3096 8P Tuttle 2008 26.8949 0.819561 1.028148 207.5248 270.349 54.9668 9P Tempel 2011 12.2668 0.516901 1.50924...
- Page 45 81P Wild 2010 22.7485 0.537369 1.597838 41.8137 136.0972 3.2375 82P Gehrels 2010 12.4773 0.121921 3.633291 226.3166 239.5183 1.1264 85P Boethin 2008 16.3724 0.775348 1.147441 53.5862 343.4491 4.2172 86P Wild 2008 19.5532 0.366349 2.299076 179.0341 72.5235 15.4397 88P Howell 2009 12.4726 0.561968 1.363503 235.9597...
- Page 46 GTONOVA Asteriod List for 8405 Name Year Month ω Ω Ceres 2008 344.5453 2.766792 0.079475 72.8956 80.4045 10.5857 3.34 0.12 Pallas 2008 327.9744 2.77265 0.230878 310.2565 173.1321 34.8377 4.13 0.11 Juno 2008 256.8166 2.672153 0.255933 247.9335 169.9608 12.968 5.33 0.32 Vesta 2008 144.8639...
- Page 47 Polyhymnia 2008 291.3457 2.864372 0.338273 338.2115 8.5843 1.871 8.55 0.33 Circe 2008 357.3366 2.686037 0.108253 329.9188 184.5186 5.5028 8.51 0.15 Leukothea 2008 210.9581 2.990727 0.227795 213.9588 353.8097 7.9351 0.15 Atalante 2008 198.7502 2.745856 0.303496 47.0352 358.4703 18.4346 8.46 0.15 Fides 2008 190.2175 2.641461...
- Page 48 GoToNova SAO Bright Star List For 8405 ® GoToNova hand controller consists of SAO bright stars with their magnitudes greater than 6. A reference table is available on iOptron’s website.
-
Page 49: Ioptron One Year Limited Warranty
As a condition to the obligation of iOptron to repair or replace such product, the product must be returned to iOptron together with proof-of-purchase satisfactory to iOptron.