
Related Manuals for Chicco 4-in-1 Ride On Car


Summary of Contents for Chicco 4-in-1 Ride On Car
- Page 1 Read all instructions BEFORE assembly and USE of product. KEEP INSTRUCTIONS FOR FUTURE USE. 4-in-1 Ride On Car Owner's Manual IS0062.3ESF ©2011 Artsana USA, INC. 01/12...
- Page 2 DO NOT use this product if any parts YOUR CHILD. NEVER LEAVE CHILD are missing, damaged, or broken. UNATTENDED. Contact Chicco for replacement parts and instructional literature if needed. • Adult assembly required. DO NOT substitute parts. • The un-assembled toy and shipping •...
- Page 3 4 in 1 Modes 4 in 1 Ride on toy – Ages 9 - 36 months. Maximum child’s weight: 44 lbs/20 Kg This product is designed to adjust to your child’s growth: 1. Rocker (9 – 12 months) 2. Push ‘N Go (9 – 18 months) 3.
-
Page 4: Parts List
Parts List A. - Car Body B. - Steering Wheel C. - Backrest/handle for child D. - Seat... - Page 5 Parts List E. - Left and Right Rocking Base F. - Rocking/Footrest Screws G. - Left and Right Armrest H. - Armrest Screws...
- Page 6 Parts List I. - Activity Center J. - Left and Right Footrest K. - Parent Handle L. - Extension Bars...
- Page 7 Ride On Car Assembly 1. Attach Steering Wheel (B) to Car Body (A) as shown. The Steering Wheel can only be attached in one direction. Push down on the center of the Steering Wheel until you hear it click into place. Pull up on the Steering Wheel to make sure it is “CLICK!”...
- Page 8 Ride On Car Assembly 2. Line up the Backrest/handle for Child (C) to the Car Body as shown and push down until you hear it click into place. Pull up on the Backrest to make sure that it is securely attached to the frame.
- Page 9 Ride On Car Assembly 3. With the Seat (D) in a vertical position, attach it to the frame as shown. It will click into place on both sides of the seat to create a hinge, for access to the storage compartment under the Seat.
- Page 10 Ride On Car Assembly 4. Insert Activity Center (I) into the Steering Wheel and press down.
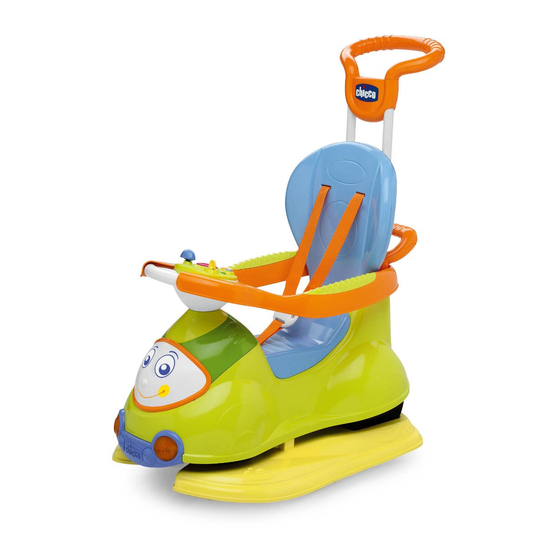
- Page 11 Rocker Mode Assembly 5A. Attach the Right Armrest (G) first, Left Armrest Right Armrest fit the ring into the back of the Backrest and onto the Steering Wheel.
- Page 12 Rocker Mode Assembly 5B. Attach the Left Side Armrest (G), fit the ring on top of the Right Side Armrest ring at the back of the Backrest and onto the Steering Wheel.
- Page 13 Rocker Mode Assembly 5C. Insert the largest Armrest Screw (H) into the back of the Backrest, through the Armrest rings. Use a coin to tighten the screws.
- Page 14 Rocker Mode Assembly 5D. Secure the Left and Right Armrest with a small Armrest Screws (H) under the Steering Wheel as shown. Use a coin to tighten the screws.
- Page 15 Rocker Mode Assembly 6. Attach Left and Right Rocker Base (E) as shown. Secure them with Rocker/Footrest Screws (F) as shown. Use a coin to tighten the screws.
- Page 16 Rocker Mode Assembly 7. Rocker (recommended for 9 to 12 months of age)
- Page 17 Push 'n Go Mode Assembly 8. To create the Push 'n Go Mode: Remove Left and Right Rocking Base and replace them with the Left and Right Footrest (J). Secure the Footrest with the same screws, tighten with a coin.
- Page 18 Push 'n Go Mode Assembly 9A. Insert both Extension Bars (L) into the back of the Backrest as shown. Slide the tab over to open, insert the Extension Bar and push down until it clicks into place. Repeat for the other side.
- Page 19 Push 'n Go Mode Assembly 9B. Attach the Parent Handle (K) to the Extension bars. Line up the bars and push down until they click into place. “CLICK!” “CLICK!”...
- Page 20 Push 'n Go Mode Assembly 9C. Push 'n Go (recommended for 9 to 18 months of age)
- Page 21 Push 'n Walk Mode Assembly Push 'n Walk (recommended for 12 to 18 months of age) 10. Remove the Footrests, Armrests, and the Parent handle. Refer to steps 5, 8 and 9 to remove the components. The car is assembled in the Push 'n Walk Mode.
- Page 22 Sit 'n Ride Mode Assembly Sit 'n Ride (recommended for 18 to 36 months of age) 11. The Car is assembled in Sit 'n Ride Mode.
- Page 23 Fitting and/or Replacing Batteries To replace the batteries: Remove the battery cover with a Phillips head Screwdriver. Install two AA batteries matching the polarity indicated inside battery compartment and re-attach the battery cover. WARNING The Activity Center requires 2 x AA 1.5 Volt alkaline type batteries (not included). •...
-
Page 24: Cleaning And Maintenance
Cleaning and Maintenance CLEANING / MAINTENANCE Clean the toy with a soft cloth, lightly dampened with water if necessary. Do not completely submerge the toy in water. Clean Activity Center with a soft, dry cloth to avoid damaging the electronic circuit. Protect the toy from collisions, heat, dust, sand, humidity and water. - Page 25 For More Information For USA customers : If you have any questions or comments about this product, or are missing any of the parts. Please do not return this product to the store. Contact us in one of the following ways: (877)-424-4226 info.usa@artsana.com www.chiccousa.com...
- Page 26 www.chiccousa.com...