
Related Manuals for Chicco 67648800070 - DJ Baby Walker


Summary of Contents for Chicco 67648800070 - DJ Baby Walker
- Page 1 Lil' Driver/ Lil' Piano Walker Conductor de Lil'/ Piano Lil' Walker Owner's Manual • Manual del propietario ©2011 ARTSANA USA, INC. 11/12 IS0057.5ES...
- Page 2 WARNING For your child’s safety, read these instructions carefully and keep them for future reference. The child may be hurt if you do not follow these instructions. • Before use, check that the product • Keep hot drinks, electrical appliances and all of its components have not and other sources of danger at a safe been damaged during distance, away from the child’s transportation. Check regularly that reach. the product is not broken or • Prevent collisions with glass in doors, damaged. If the product is broken windows and furniture. or damaged, keep out of reach of • This walker frame is intended to be children.
- Page 3 ADVERTENCIA Para seguridad de su niño, lea detenidamente estas instrucciones y guárdelas como referencia futura. El niño podría lastimarse si no observa estas instrucciones. • Antes del uso, verifique que el • Prevenga los choques con el vidrio de producto y todos sus componentes puertas, ventanas y muebles. no han sufrido daños durante el • Este andador debe ser usado por transporte. Verifique periódicamente niños que pueden sentarse sin ayuda, que el producto no esté dañado ni aproximadamente desde los 6 meses roto. Si el producto está roto o viejo. No tiene por objeto ser usado dañado, manténgalo lejos del alcance por niños que pesen más de 26,5 de los niños. libras, o in grado di camminare senza • Solamente un adulto debe armar el assistenza.
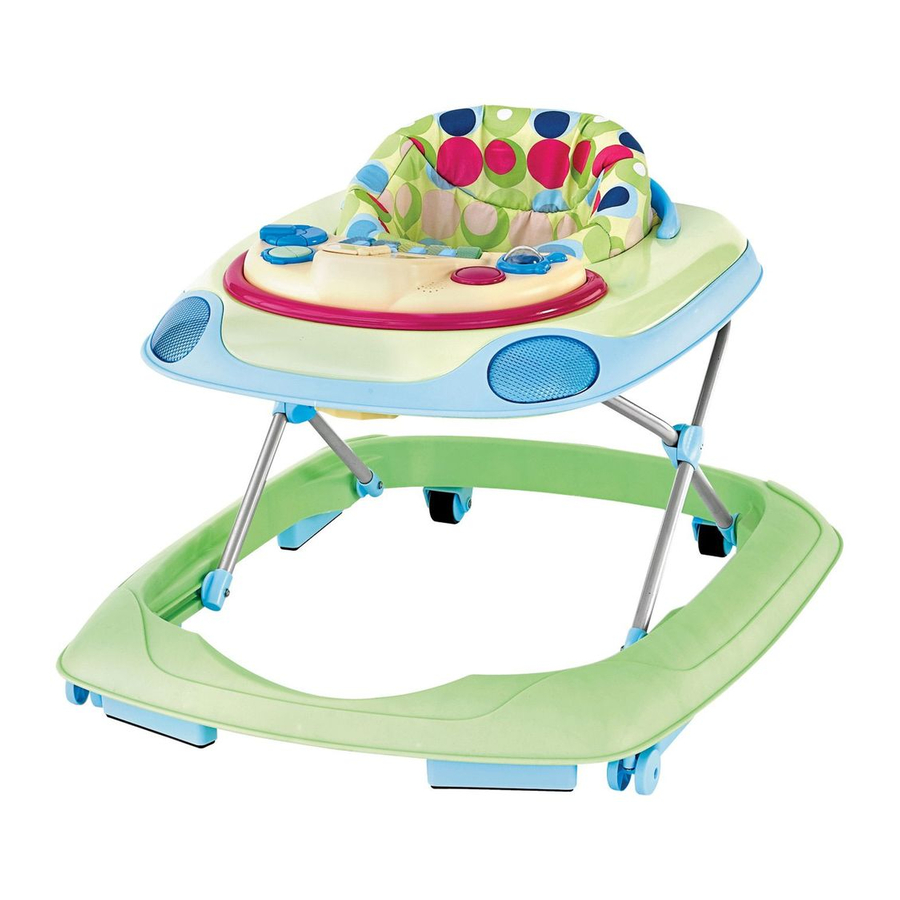
- Page 4 Components Componentes A. - Walker Frame A. - Andador si cualquier B. - Padded Seat B. - Asiento acolchado C. - Rigid Backrest C. - Respaldo rígido D. - Front Swivel Wheels D. - Ruedas giratorias delanteras E. - Rear Fixed Wheels E. - Ruedas fijas traseras...
- Page 5 Components Componentes F. - Brake Pads F. - Almohadillas de freno G. - Large Spoiler G. - Spoiler grande H. - Electronic Play Trays H. - Juguetes electrónico...
- Page 6 How to Assemble Walker Cómo armar el andador 1. Turn the Walker Frame upside down. Insert the Front Swivel Wheels into the socket located at the front corners of the Walker Frame as shown. Ensure that the wheels are firmly pushed all the way into the socket. 1. Dé vuelta el andador. Inserte las ruedas giratorias delanteras en el hueco de las esquinas delanteras del andador como se muestra en la figura. Asegúrese de que las ruedas estén completamente insertas en el hueco.
- Page 7 How to Assemble Walker Cómo armar el andador 2. Insert the Rear Fixed Wheels into the socket located at the rear of the Walker Frame as shown. Ensure that the wheels snap lock clicks into place. The snap lock should be visible through the opening. 2. Inserte las ruedas fijas traseras en el hueco de la parte trasera del andador como se muestra en la figura. Asegúrese de que los cierres a presión de las ruedas se fijen en su lugar al hacer clic. El cierre a presión se debe poder ver a través de la abertura. “CLICK!” “¡CLIC!”...
- Page 8 How to Assemble Walker Cómo armar el andador 3. Insert the Brake Pads into the sockets located around the bottom of the Walker Frame as shown. Ensure that the Brake Pads are firmly pushed all the way into each of the sockets. 3. Inserte las almohadillas de freno en los huecos ubicados alrededor de la base del andador como se muestra en la figura. Asegúrese de que las almohadillas de freno estén completamente insertas en cada uno de los huecos.
- Page 9 How to Assemble Walker Cómo armar el andador 4. To raise the Walker Frame pull, up on the upper tray, while pressing down on the lower “CLICK!” base, until a "click" is heard. This is the first “¡CLIC!” locked seating position. Push down on the Tray before each use to make sure the seat position is locked. 4. Para elevar el andador, tire de la bandeja superior y, simultáneamente, ejerza presión sobre la base inferior hasta que escuche un “clic”. Ésta es la primera posición fija del asiento. Presione la bandeja hacia abajo antes de cada uso para asegurarse de que el asiento esté en una posición fija.
- Page 10 How to Assemble Walker Cómo armar el andador 5. Insert the tabs on the Rigid Backrest into the slots located at the back of the seat “CLICK!” opening. Rotate the Rigid Backrest down “¡CLIC!” and press firmly until it latches in the back. Pull up on the Rigid Backrest to make sure it is properly attached. 5. Inserte las lengüetas del respaldo rígido en las ranuras ubicadas atrás de la abertura del asiento. De vuelta hacia abajo el respaldo rígido y presione firmemente hasta que enganche en la parte trasera. Tire el respaldo rígido hacia arriba para asegurarse de que esté bien colocado.
- Page 11 How to Assemble Walker Cómo armar el andador 6. Insert the plastic rings on the Padded Seat into the slots located on the upper edge of the walker frame. Reach under the upper tray and pull the rings through the slots. Check to make sure that each plastic ring is locked into the position as shown and cannot be pulled back through the slot. 6. Inserte las arandelas plásticas del asiento acolchado en las ranuras que se encuentran en el borde superior del andador. Pase la mano por debajo de la bandeja y tire de las arandelas para que pasen a través de las ranuras. Verifique que cada arandela plástica esté segura en la posición correcta como se muestra en la figura y que no pueda salirse por la ranura.
- Page 12 How to Assemble Walker Cómo armar el andador 7. Insert the tabs on the Large Spoiler into the slots located at the back of the seat opening. Rotate the Large Spoiler down and press firmly until it latches in the back. Pull up on the Large Spoiler to make sure it is properly attached. When the large spoiler has been fitted, it can no longer be removed. Do not try to remove the large spoiler using “CLICK!” screwdrivers or other tools. “¡CLIC!” 7. Inserte las lengüetas del alerón grande en las ranuras ubicadas atrás de la abertura del asiento. De vuelta hacia abajo el alerón grande y presione firmemente hasta que enganche en la parte trasera. Tire el alerón grande hacia arriba para asegurarse de que esté bien colocado. Una vez que se ha instalado el alerón grande, no se puede quitar. No intente quitar el alerón grande usando destornilladores u otras herramientas.
- Page 13 How to Assemble Walker Cómo armar el andador 8. Insert the edge of the Electronic Play Tray into the walker tray opening as shown. Rotate the Electronic Play Tray down until is locks into place and a "click" is heard. Pull up on the Electronic Play Tray to make sure is is properly attached. Note: Batteries are not included. 8. Introduzca el borde de la bandeja electrónica de juego en la abertura para la bandeja del andador como se muestra en la figura. De vuelta hacia abajo la bandeja electrónica de juego hasta que esté bien colocada en su lugar y se escuche un “clic”. Tire la bandeja electrónica de juego hacia arriba para asegurarse de que esté bien colocada. Nota: Las baterías no están incluidas.
-
Page 14: Electronic Play Tray
Using Electronic Play Tray Uso de la bandeja electrónica de juego Note: Electronic toy will differ depending on Nota: Los juguetes electrónicos varían según el specific walker model. modelo del andador específico. 9A. The functions and use of the Electronic 9A. Las funciones y el uso de la bandeja Play Tray 1 are shown below. electrónica de juego 1 se muestran a continuación. ELECTRONIC PLAY TRAY BANDEJA ELECTRÓNICA DE JUEGO A. Activity Selector Switch. A. Interruptor de selección de actividad. B. Power/Volume Switch. B. Interruptor de encendido/volumen. C. Slide to hear music. C. Deslice para escuchar música. D. Insert/push on key to start engine D. Para arrancar el motor, inserte/presione la tecla. E. Press button to hear the horn. E. Presione el botón para escuchar la bocina. F. Turn the steering wheel to rev the engine F. Gire el volante para acelerar el motor. G. Pull/Push to hear funny sounds G. Jale/Empuje para escuchar sonidos divertidos. H. Press left turn signal to hear music. H. Presione la luz direccional izquierda para I. Press right turn signal to hear music. escuchar música. I. Presione la luz direccional derecha para escuchar música. - Page 15 Using Electronic Play Tray Uso de la bandeja electrónica de juego Note: Electronic toy will differ depending on Nota: Los juguetes electrónicos varían según el specific walker model. modelo del andador específico. 9B. The functions and use of the Electronic 9B. Las funciones y el uso de la bandeja Play Tray 2 are shown below. electrónica de juego 2 se muestran a continuación. ELECTRONIC PLAY TRAY BANDEJA ELECTRÓNICA DE JUEGO A. Activity Selector Switch. A. Interruptor de selección de actividad. B. Power/Volume Switch. B. Interruptor de encendido/volumen. C. Spin to hear rattle C. Gire para escuchar el sonajero D. Press button to hear horn sound D. Presione el botón para escuchar la bocina E. Turn page to hear music E. Dé vuelta a la hoja para escuchar música F. Press button to hear funny sounds F. Presione el botón para escuchar sonidos G. Spin to hear funny sounds divertidos H. Push keys to hear music G. Gire para escuchar sonidos divertidos H. Presione las teclas para escuchar música...
- Page 16 Using Electronic Play Tray Uso de la bandeja electrónica de juego 10A. Turn the rear view mirror to set the activity selector switch (A). Slide the power/ volume switch (B) to the low (I) or high (II) volume setting. 10A. Gire el espejo retrovisor para configurar el interruptor de selección de actividad (A). Deslice el interruptor de encendido/volumen (B) hasta la posición volumen bajo (I) o alto (II). 10B. Slide the activity selector switch (A) to select setting. Slide the power switch (B) to turn on the play tray. 10B. Para seleccionar la posición, deslice el interruptor de selección de actividad (A). Para encender la bandeja de juego, deslice el interruptor de encendido (B).
- Page 17 How to Adjust the Walker Cómo ajustar el andador WARNING ADVERTENCIA When opening, closing, or adjusting the Al abrir, cerrar o ajustar el andador, asegúrese walker make sure your child is at a safe de que su hijo se encuentre a una distancia distance. Before placing your child in the segura. Antes de colocar a su hijo en el walker push down on the tray to make andador, presione la bandeja hacia abajo sure that the height adjustment is properly para asegurarse de que la posición regulable latched. de altura esté bien firme. 11. To adjust the height of the seat: Remove your child from the walker. Reach under the front of the walker tray and locate the release latch. Turn the red release latch and push up on the latch to allow the seat height to be raised or lowered. Before placing your child in the walker push down on the tray to make sure that the height adjustment is properly latched. 11. Para ajustar la altura del asiento: Baje a su hijo del andador. Pase la mano por debajo de la bandeja del andador y ubique el pestillo de liberación. Presione el botón rojo y levante el pestillo de liberación azul para aumentar o disminuir la altura del asiento. Antes de colocar a su hijo en el andador, presione la bandeja hacia abajo para asegurarse de que la posición regulable de altura esté bien firme.
- Page 18 How to Adjust the Walker Cómo ajustar el andador 12. How to adjust the Walker: Tray at proper height Tray at proper height La bandeja a la altura correcta Plateau à la bonne hauteur Cómo ajustar el andador: La bandeja a la altura correcta Tray too high Tray too high La bandeja demasiado alta La bandeja demasiado alta Plateau trop haut Tray too low Tray too low La bandeja demasiado baja...
- Page 19 Folding the Walker Cómo plegar el andador ADVERTENCIA WARNING Al abrir, cerrar o ajustar el andador, asegúrese When opening, closing, or adjusting the de que su hijo se encuentre a una distancia walker make sure your child is at a safe segura. distance. 13. To close the walker: Remove your child from the walker. Reach under the front of the walker tray and locate the release latch. Press the red button and pull on the blue release latch (See Step 11) to allow the seat height to be lowered. Lower the seat height until the walker is completely closed. Use caution when lowering the seat; hands can be pinched. 13. Cómo cerrar el andador: Baje a su hijo del andador. Pase la mano por debajo de la bandeja del andador y ubique el pestillo de liberación. Presione el botón rojo y levante el pestillo de liberación azul (Ver el Paso 11) para disminuir la altura del asiento.
- Page 20 Cleaning and Maintenance Limpieza y mantenimiento The cleaning and maintenance of the Walker must only be carried out by an adult. CLEANING The fabric seat can be removed (please refer to the section 6 and reverse the step). Please refer to the care labels for instructions on how to clean the fabric seat. Below are the cleaning symbols and their meanings: Wash by hand in cold water. Do not bleach. Do not tumble dry. Do not iron. Do not dry clean. It is recommended to periodically wipe clean plastic parts with a soft damp cloth. Always dry the metal parts to prevent the formation of rust if the Walker has come into contact with water. Clean the electronic play tray with a soft dry cloth to avoid damaging the electronic circuit. Protect the walker and electronic play tray from heat, dust, sand, and water. Plastic can be cleaned with mild detergent and warm water, no bleach or harsh cleaners/ abrasives.
- Page 21 Cleaning and Maintenance Limpieza y mantenimiento La limpieza y el mantenimiento de la silla de mesa sólo deben ser realizados por un adulto. LIMPIEZA Se puede quitar el asiento de tela (consulte la sección “Cómo quitar el asiento de tela”). Consulte las instrucciones sobre cómo limpiar el asiento de tela en las etiquetas de cuidados. A continuación encontrará los símbolos de limpieza y sus significados: Lavar a mano con agua fría. No utilizar lavandina. No secar a máquina. No planchar. No limpiar en seco. Se recomienda limpie periódicamente las partes plásticas con un paño suave y húmedo. Cuando el andador entre en contacto con el agua, seque siempre las partes de metal para evitar la formación de óxido. Limpie el juguete electrónico con un trapo seco y suave para evitar dañar el circuito electrónico. Proteja al andador y al juguete electrónico del calor, polvo, arena y agua. Se puede limpiar el plástico con detergente suave y agua tibia, sin lavandina ni productos abrasivos o limpiadores fuertes.
-
Page 22: Fitting And/Or Replacing Batteries
Fitting and/or Replacing Batteries Cómo colocar y/o reemplazar las pilas WARNING The Electronic Play Tray requires 2 x “AA” 1.5 Volt alkaline type batteries (not included). • Batteries must only be fitted by an adult. • To fit and/or replace batteries: Loosen the screw on the battery compartment cover with a suitable screwdriver, press the tab and remove the battery compartment cover. Then remove the spent batteries and fit new ones, ensuring that they have been fitted in the correct polarity, as shown inside the battery compartment. Replace the battery cover and tighten the screw. • Always keep batteries and tools out of reach of children. • Always remove spent batteries from the Electronic Play Tray to avoid the danger of possible leakage from the battery. • Always remove the batteries if the Electronic Play Tray will not be used for a long period. • Only use alkaline batteries of the same type or equivalent to the type recommended for the correct function of this product. • Never mix new and old batteries, or different types of batteries. • Do not burn or dispose of spent batteries into the environment. Dispose of spent batteries at an appropriate differentiated collection point. • Do not short-circuit the battery terminals. • Do not attempt to recharge non-rechargeable batteries: they might explode. • The use of rechargeable batteries is not recommended, since they could impair the functionality of the Electronic Play Tray. • If rechargeable batteries are used, take them out of the toy before recharging them. Batteries must always be recharged under adult supervision. - Page 23 Fitting and/or Replacing Batteries Cómo colocar y/o reemplazar las pilas ADVERTENCIA El juguete del andador requiere 2 pilas alcalinas tamaño “AA” de 1,5 voltios (no se incluyen). • Un adulto solamente debe colocar las pilas. • Para colocar y/o cambiar las pilas: Afloje el tornillo en la tapa del compartimiento de las pilas con un destornillador apropiado, oprima la lengüeta y saque la tapa del compartimiento. Luego, saque las pilas gastadas y ponga las nuevas, asegurándose de que han sido colocadas con la polaridad correcta, como se indica en el interior del compartimiento de las pilas. Vuelva a poner la tapa de las pilas y ajuste el tornillo. • Mantenga siempre las pilas y herramientas lejos del alcance de los niños. • Siempre quite las pilas usadas de la bandeja electrónica de juego para evitar un posible escape de la pila. • Saque siempre las pilas del juguete si no lo va a usar durante un largo período. • Use solamente pilas alcalinas del mismo tipo o equivalente al tipo recomendado para la función correcta de este producto. • Nunca mezcla pilas nuevas y viejas o tipos diferentes de pilas. • No queme ni deseche las pilas gastadas al medio ambiente. Deseche las pilas gastadas en un punto de recolección apropiado. • No cause un corto circuito en los terminales de las pilas. • No trate de recargar pilas no recargables: pueden explotar. • No se recomienda el uso de pilas recargables ya que podrían impedir la funcionalidad del juguete. • Si se usan pilas recargables, sáquelas del juguete antes de recargarlas. Se deben recargar las pilas siempre bajo la supervisión de un adulto.
- Page 24 For more Information Para más información If you have any questions or comments about this product, or are missing any of the parts. Please do not return this product to the store. Contact us in one of the following ways: By phone (toll free): (877)-424-4226 By e-mail: info@chiccousa.com By mail: 1826 William Penn Way Lancaster, PA 17601 Si tiene preguntas o sugerencias sobre este producto, o falta alguna de las partes, no devuelva este producto a la tienda. Comuníquese con nosotros por alguno de los siguientes medios: Por teléfono (sin cargo): (877)- 424-4226 Por correo electrónico: info@chiccousa.com Por correo postal: 1826 William Penn Way Lancaster, PA 17601...
- Page 25 FCC Information Información de la FCC Warning: Changes or modifications not expressly approved by the party responsible for compliance could void the user’s authority to operate the equipment. NOTE: This equipment has been tested and found to comply with the limits for a Class B digital device, pursuant to Part 15 of the FCC Rules. These limits are designed to provide reasonable protection against harmful interference in a residential installation. This equipment generates, uses and can radiate radio frequency energy and, if not installed and used in accordance with the instructions, may cause harmful interference to radio communications. However, there is no guarantee that interference will not occur in a particular installation. If this equipment does cause harmful interference to radio or television reception, which can be determined by turning the equipment off and on, the user is encouraged to try to correct the interference by one or more of the following measures: - Reorient or relocate the receiving antenna. - Increase the separation between the equipment and receiver. - Connect the equipment into an outlet on a circuit different from that to which the receiver is connected. - Consult the dealer or experienced radio/TV technician for help. Advertencia: Los cambios o modificaciones no aprobados expresamente por la parte responsable del cumplimiento podrían anular la autoridad del usuario para operar el equipo. NOTA: Este equipo ha sido probado y ha demostrado cumplir con los límites para un dispositivo digital de Clase B, según la Parte 15 de las normas FCC. Estos límites están diseñados para proporcionar una protección razonable contra interferencias en una instalación residencial. Este equipo genera, utiliza y puede irradiar energía de radiofrecuencia y, si no se instala y utiliza de acuerdo con las instrucciones, puede causar interferencias perjudiciales en las comunicaciones por radio. Sin embargo, no hay garantía que la interferencia no ocurrirá en una instalación en particular. Si este equipo causa interferencias perjudiciales en la recepción de televisión, lo cual puede determinarse apagando el equipo y encendiéndolo, se recomienda al usuario que intente corregir la interferencia mediante una o más de las siguientes medidas: - Cambie la orientación o ubicación de la antena receptora. - Aumente la separación entre el equipo y el receptor. - Conectar el equipo a una toma de corriente de un circuito distinto de aquél al que está conectado el receptor. - Consulte al distribuidor oa un técnico experimentado en radio / TV para obtener ayuda.
- Page 26 www.chiccousa.com...