Table of Contents
Advertisement
Quick Links
Advertisement
Table of Contents

Related Manuals for LevelOne WAP-6010


Summary of Contents for LevelOne WAP-6010
- Page 1 WAP-6010 N_Max Wireless Access Point User Manual V1.0...
- Page 2 Notice FCC Warning Changes or modifications to this unit not expressly approved by the party responsible for compliance could void the user authority to operate the equipment. This device complies with Part 15 of the FCC Rules. Operation is subject to the following two conditions:...
- Page 3 Hungary, Latvia, Lithuania, Malta, Slovakia, Poland, Slovenia, Bulgaria, Romania. Preface This guide is for the experienced user who installs and manages the N_Max WAP-6010 product hereafter referred to as the “device”. To use this guide, you should have experience working with the TCP/IP configuration and be familiar with the concepts and terminology of...
-
Page 4: Table Of Contents
TABLE OF CONTENTS CH 1. WAP-6010 INSTALLATION........5 ..............................5 ACKING ......................... 5 ONNECTORS UTTONS AND ..........................6 ARDWARE NSTALLATION CH 2. FIRST TIME CONFIGURATION ........ 7 ........................7 EFORE TART TO ONFIGURE ......................7 NOWING THE ETWORK PPLICATION CH 3. DETAIL CONFIGURATION ........9 .............................. - Page 5 System Log......................49 CHANNEL NUMBER ............49 Specification ......................50...
-
Page 6: Ch 1. Wap-6010 Installation
Ch 1. WAP-6010 Installation Packing List Before starting the installation of the device, please make sure the package contains the following items: ● WAP-6010 AP unit ● Power Adapter ● LAN Cable ● Antenna x 2 ● Quick Installation Guide ●... -
Page 7: Hardware Installation
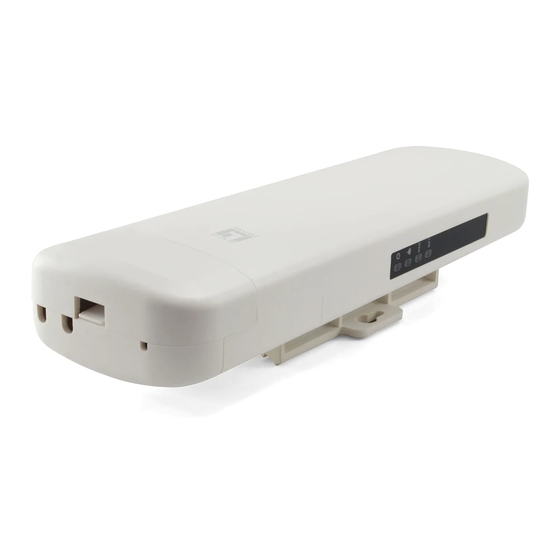
Back Panel From left to right: LAN: You can connect the Ethernet port to PC or the other switch. POWER: Please supply the power in 12V and 1A. Reset Button: Press Reset button to revert it to factory default. Antenna port: There are two antenna ports in the both ends of this side. Connect the antenna into the port. -
Page 8: Ch 2. First Time Configuration
Ch 2. First Time Configuration Before Start to Configure The configuration of this device is through web-browser. To access the configuration interfaces, make sure you are using a computer connected to the same network as the device. The default IP address of the device is 192.168.0.254, and the subnet-mask is 255.255.255.0. - Page 9 1. AP Mode 2. AP Client 3. Bridge Mode 4. WDS Mode 5. Repeater Mode The following table shows the supporting association of wireless radio modes. AP Client- AP Client - Repeater Bridge WLAN mode Mode Infrastructure Ad Hoc Bridge WDS Mode Repeater AP Client-...
-
Page 10: Ch 3. Detail Configuration
This mode adds wireless functionality to your wired network. AP Client Mode: WAP-6010 retrieves the signal from a Wireless AP or Router and shares it to the wired Ethernet ports on a PC or switch. WAP-6010 will not accept wireless clients in this mode. - Page 11 WDS Mode can provide local wireless service to wireless clients. Repeater Mode: WAP-6010 connects wirelessly to a wireless AP or Router and repeats the signal. This allows you to extend the distance of your wireless network. The description below shows the different step for each option.
- Page 12 The next step is to setup the wireless encryption. Choose the Security mode and input the key value. For the example, we choose the WPA2-PSK as the encryption type, AES as the encryption algorithm, leave the Key Renewal Interval as the default 3600 seconds, and enable the WPS function.
- Page 13 AP Client Mode: The Setup Wizard will guide you through the page of “Station Site Survey” and Station page. In this mode, this device turns into a “Station” device which associates to the remote AP and bridges the LAN hosts to it. For setting with Wizard, the first step is to do site survey (Scan) the AP and connect to it, and then setup the encryption in the second page.
- Page 14 In the second page, you are required to select the encryption and input the key to associate the AP. So you must know this information from the AP setting or Wireless ISP. Bridge Mode: The setup Wizard will guide you through the WDS basic setting and the Wireless Encryption.
- Page 15 WDS mode: The wizard will guide you through the Wireless Basic setting and the Wireless Encryption setting. This mode is equal to the Bridge Mode but with AP function additionally. So the bridged network will not only bridge the Ethernet but also the WLAN behind the WDS device.
- Page 16 In the second page, you need to select the encryption type and the key. The encryption type of WDS link and AP must be the same, but the encryption algorithm and key can be different. If use the WEP encryption, it has to set WEP Key between AP and WDS. AP security on WDS mode: You need to set encryption for WAP-PSK or WPA2-PSK.
- Page 17 Repeater Mode: Setup Wizard will guide you through Repeater Site Survey, Repeater Site encryption, Wireless Basic Setting and the Wireless encryption pages. In this mode, this device plays two roles, one is a Client/Station to associate the target AP, and the other is an AP to allow the WLAN client/station to associate into.
- Page 18 In the third page, setup the WLAN of the device for the other clients to connect. In the forth page, setup the encryption/key for the WLAN of this AP.
-
Page 20: Tcp/Ip Settings
TCP/IP Settings Configuring LAN Interface Item Description IP Address This is the IP Address for this device. You can login this IP Address via LAN/WLAN, and you can change it if you want to. Subnet Mask This is the subnet mask for the LAN. The default value is “255.255.255.0”. - Page 21 Secondary DNS This is the second DNS server for the LAN PCs. Server Default Gateway This is the default gateway for the LAN PCs. Lease Time This is the DHCP lease time. When it is short, the IP release/renew of the LAN will be faster but the network congestion will be more.
-
Page 22: Wireless Settings
Wireless Settings Operation Mode This device supports 5 modes of radio. Click the button to select one among the modes. Refer to the explanation for different modes. Notice: Multiple SSID is limited to 2 sets under Repeater Mode. -
Page 23: Basic
Basic Basic Settings Item Description The available options are “11b/g mixed mode”, “11b only”, Network Mode “11g only” and “11b/g/n mixed mode”. We recommend selecting the default value “11b/g/n mixed mode”. Network Name (SSID) The SSID, which is also called ESSID is a unique identifier that wireless networking devices use in order to establish and maintain wireless connectivity. - Page 24 the clients associated to different SSID on the device can see each other. Enable the option to block it. The Default value is “Disable”. BSSID The BSSID is displayed in this field. Frequency (Channel) Click the drop down box to select the radio channel. Select the unused channel to prevent the radio overlapping.
- Page 25 HT Physical Mode—configurable in 11 b/g/n mixed. Item Description Operating Mode Default: Mixed (Mixed, Green Field). Mixed mode: In this mode the device transmits the packets with preamble compatible legacy (802.11g), so they can be decoded by legacy devices. The device receives and decodes both Mixed Mode packets and legacy packets.
- Page 26 below. Reverse Direction Enable this function to provide more robust data packet Grant (RDG) transmission. The “20/40” bandwidth mode uses 5 channels. For Extension Channel example, selecting channel 7 and you can select 3 or 11 for extension channel. Choose the unused channel for the extension channel.
-
Page 27: Advanced
28.9 43.3 57.8 58.5 121.5 72.2 8 (2S) 14.4 28.9 43.3 57.8 86.7 115.6 144.4 Not Supported Not Supported MCS: Modulation Coding Scheme MCS=0~7 (1S, One Tx Stream) MCS=8~15 (2S, Two Tx Stream) MCS 32: BPSK Advanced Advanced Wireless Item Description BG Protection Mode Default: Auto. - Page 28 value from 1 to 255. The AP will check the buffered data according to this value. For example, selecting “1” means to check the buffered data at every beacon. Fragment Threshold The fragmentation threshold determines the size at which packets are fragmented (sent as several pieces instead of as one block).
- Page 29 Wi-Fi Multimedia Item Description WMM Capable Choose “Enable” to enable WMM function. APSD Capable Automatic Power Save Delivery WMM Parameter Click the button to edit the WMM parameter. WMM Configuration Choose to Enable or Disable WMM (WiFi Multimedia) function. This function provides features that improve audio, video and voice applications over the wireless network.
-
Page 30: Security
Protocol (UDP), which are session-based protocols. Multicast is a true broadcast. The multicast source relies on multicast-enabled routers to forward the packets to all client subnets that have clients listening. Security Wireless Security/Encryption Settings Select SSID Item Description SSID choice Choose the ESSID to configure the security setting. - Page 31 Security Mode: Choose one as the wireless authentication among the following types: Open, Shared, WEP Auto, WPA, WPA-PSK, WPA2, WPA2-PSK, WPA/WPA2-PSK, WPA/WPA2, and 802.1X. Encryption Type: Select one for the encryption type. The options vary depending on the Authentication mode. The corresponding options shows below.
- Page 32 WPA2-PSK to encrypt the link without additional RADIUS server. This mode requires only an access point and client station that supports WPA-PSK. For WPA/WPA2, authentication is achieved via WPA RADIUS Server. You need a RADIUS or other authentication server on the network. ...
- Page 33 Hereby, this is the available security setting for each mode. AP Client – AP Client- Repeater Bridge WLAN security Mode Infrastructure Ad Hoc No encryption WEP (open/ Shared/Auto) WPA2 WPA-PSK WPA-NONE WPA2-PSK 802.1X Auto Change Infrastructure when Enable WPS V: Supported. X: Not supported.
-
Page 34: Wps
This function helps to establish the Wi-Fi security. For AP mode, it can be setup one WPS method including PIN (Personal Identification Number) and PBC (Push Button Configuration). To begin the WPS progress, the WLAN security must be setup first. Please setup one among WPAPSK, WPA2PSK, WPA/WPA2PSK and then apply WPS setting. - Page 35 to finish the communication. You can press the PBC button on the WLAN client first and then click the PBC button on this device to establish the encryption. The options and the information fields are showed below. WPS Configuration Item Description WPS Enable/Disable Select to enable this function.
-
Page 36: Station List
Station List In the Station list, the information of associated clients is displayed. -
Page 37: Client Mode
Client Mode Profile In the first page, you can see the profile list to show the information including Profile name, SSID, Channel, Authentication, Encryption and Network Type. Use four buttons to manage the profile list. The “Add” button is to add a new profile. The “Delete” button is to delete the selected profile. - Page 38 Security Policy Item Description Security Mode Please choose the encryption method. The available options are OPEN, SHARED, WPA-Personal and WPA2-Personal. WEP/WPA PSK Item Description WEP Key Length Choose to use 64bit or 128bit length of key. WEP Key Entry Select the key type. The available options are ASCII Text or Method Hexadecimal.
-
Page 39: Link Status
Link Status The status of the radio shows in this field. -
Page 40: Site Survey
Site Survey Site survey page shows information of APs nearby. You may choose one of these APs connecting or adding it to profile. Advance Configuration Item Description Connect button Check the radio button in front of the ESSID and click “Connect”... -
Page 41: Statistics
Statistics The Status page shows the settings and current operation status of the Station. QoS Configuration Item Description Check the box to enable WMM function. It depends on the associated AP, if it supports WMM and you can enable this function on this device. -
Page 42: Wps
The WPS AP lists in the top of the page. The bottom panel shows the status of WPS. Please refer to the section of Access Point mode for the operation. 11n Configuration Item Description Refresh button Click this button to refresh the WPS AP list. Mode This device only supports Enrollee in WLAN client mode. -
Page 43: Management
Management Status System Info Item Description Model It shows the model name of the device. Firmware Version It shows the version of firmware on this device. System Time It indicates the time on this device. If the NTP client is enabled, the time will sync with the NTP server. - Page 44 Bssid It is the current BSSID of the radio. In this device, it is also the MAC Address of the WLAN interface. Associated The number of associated WLAN clients show in this Clients field. Driver Vision This is the driver version. Client Mode Item Description...
-
Page 45: Statistic
Statistic Memory Item Description Memory total This is the total memory size for this device. Memory left The available memory size shows in this field. WAN/LAN The information below shows the transmit status. WAN Rx packets, WAN Rx bytes, WAN Tx packets, WAN Tx bytes, LAN Rx packets, LAN Rx bytes, LAN Tx packets, LAN Tx bytes. -
Page 46: System Management
System Management Administrator Settings Enter the account for login the web interface. Account: enter the name for login. The default name is “admin”. Password: enter the password for login. The default password is “admin”. NTP Settings Current Time: The current time on the device shows in this field. Click “Sync” button to sync the time with NTP server. -
Page 47: Snmp
Reboot System Click the button to reboot the device. SNMP To configure the SNMP settings. You can get some of the system information via setting the SNMP network protocol. This device is compatible with SNMP v1/v2c and provides standard MIB II. Currently only the “public”... -
Page 48: Upgrade Firmware
SNMP Settings Item Description Options: Enable/Disable. Select “Enable” to enable this snmp Enable text function. The details setting shows only when enables this function. Read Community This is password sent with each trap to the SNMP Manager. Write Community Input the password for the write community. This function is still under development. -
Page 49: Save/Reload Settings
Save/Reload Settings In this page, you can export the setting, import the setting or load the factory default. Export Settings: To export the settings, click “Export” button to open or save the configuration. In the pop up window, click “Open” to open the configuration. You can read the configuration in the next page. -
Page 50: System Log
System Log The system log shows in this window. For technical support, you may need to copy and save the log to text file and send it to the technical service. Click “Refresh” button to refresh the page or “Clear” button to clear the log. Channel Number The following table is the available frequencies (in MHz) for the 2.4 GHz radio: Channel No. - Page 51 Specification Frequency Range 2.4~2.4835GHz 802.11b TX power 17dBm ± 1dB@11Mbps 802.11g TX power 14dBm ± 1dB@54Mbps 802.11n TX power 14dBm ± 1dB@150Mbps -89dBm ± 2dB@11Mbps 802.11b RX sensitivity 802.11g RX sensitivity -74dBm ± 2dB@54Mbps 802.11n RX sensitivity -66dBm ± 2dB@150Mbps Data Rate 802.11b: 11, 5.5, 2, 1Mbps 802.11g: 54, 48, 36, 24, 18, 12, 9, 6Mbps...