Table of Contents
Advertisement
Advertisement
Table of Contents

Related Manuals for Sapido GR-1102


Summary of Contents for Sapido GR-1102
- Page 1 User’s Manual V1.0...
-
Page 2: Fcc Statement
IMPORTANT NOTE FCC Radiation Exposure Statement: This equipment complies with FCC radiation exposure limits set forth for an uncontrolled environment. This equipment should be installed and operated with minimum distance20cm between the radiator & your body. http://www.sapido.com.tw User’s Manual V1.0... - Page 3 "Council Directive on the Approximation of the Laws of the Member Sates relating to Electromagnetic Compatibility" (89/336/EEC; 92/31/EEC; 93/68/EEC). The Declaration of Conformity can be found at the Sapido regional website. www.sapidotech.de...
-
Page 4: Copyright Statement
The products, including accessories and software are the property of SAPIDO Technology Inc. It is prohibited to reproduced, transcribed, transmitted and stored without authorization from SAPIDO. SAPIDO may update, revise, and change the contents of this manual without further notice. Users can visit the official website for reference. After reviewing this manual, if you have any problem or suggestion. -
Page 5: Table Of Contents
Application Setup full function table list ............42 4.3.1 Folder Management .................. 43 4.3.2 User Account Management..............44 4.3.3 FTP Server ....................44 4.3.4 Printer Server .................... 45 4.3.5 Webcam Server ..................46 4.3.6 Samba Server .................... 47 AP Mode......................47 http://www.sapido.com.tw User’s Manual V1.0... - Page 6 Dynamic DNS Setting ................84 Wireless Setup ....................86 5.2.1 Wireless Basic Settings................87 5.2.2 Wireless Advanced Settings ..............91 5.2.3 Wireless Security Setup ................93 5.2.4 Wireless Access Control ................96 5.2.5 WDS Settings..................... 97 http://www.sapido.com.tw User’s Manual V1.0...
- Page 7 LAN Interface Setup................152 Wireless Setup ....................154 6.2.1 Wireless Basic Settings................154 6.2.2 Wireless Advanced Settings ..............160 6.2.3 Wireless Security Setup ................. 162 6.2.4 Wireless Access Control ................ 164 6.2.5 WDS Settings................... 165 6.2.6 WPS ......................171 http://www.sapido.com.tw User’s Manual V1.0...
- Page 8 7.3.1.1 How to enter the sharing folder..............228 7.3.2 FTP Server ....................229 7.3.3 Webcam Server ..................231 7.3.4 Printer Server ..................238 System Management ..................245 7.4.1 Change Password ................... 246 7.4.2 Firmware Upgrade................... 246 http://www.sapido.com.tw User’s Manual V1.0...
- Page 9 Printer Server ....................274 9.11 Support ......................275 9.12 Others ....................... 275 9.13 USB Device....................... 275 Chapter 10 Appendix......................276 10.1 Operating Systems ..................276 10.2 Browsers......................276 10.3 SadoGO......................276 10.4 Communications Regulation Information ............. 276 http://www.sapido.com.tw User’s Manual V1.0...
-
Page 10: Chapter 1 Introduction
SAMBA protocol supported, provide a LAN server with file permissions and security control 3.5G and Wireless 11n Combo; Ideal for mobility or backup for fixed lined connection Three mode to be switched; Router, AP and WiFi AP http://www.sapido.com.tw User’s Manual V1.0... -
Page 11: Specifications
Operating Humidity 10% to 85% Non-Condensing Storage Humidity 5% to 90% Non-Condensing Peak Gain of the 2dBi @ 2.45GHz Antenna Dimension 91mm (L) x 80mm (W) x 29mm (H) Application Power Adapt AC 100 V ~ 240 V in http://www.sapido.com.tw User’s Manual V1.0... -
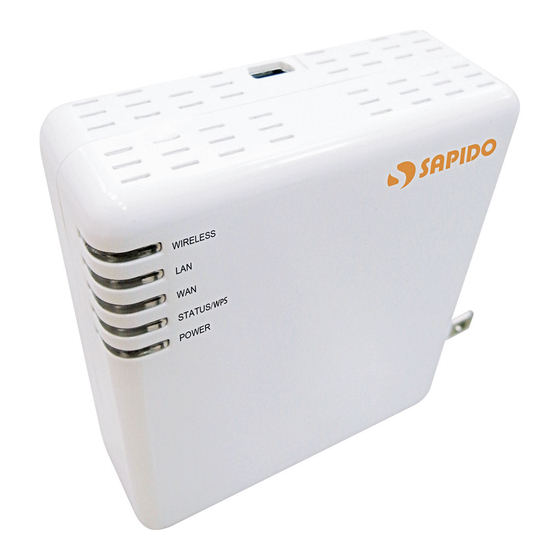
Page 12: Six Views Of Product Appearance
1.3.2 LED Indicator Status Description Status Solid Flashing LED Indicator WIRELESS Operation OK Transmitting Data Ethernet OK Transmitting Data Internet OK Transmitting Data Green: Reset/Firmware updates in STATUS & WPS Operation OK progress Orange: WPS enabled http://www.sapido.com.tw User’s Manual V1.0... -
Page 13: System Requirements
IP is in the automatic IP position or you adjust it manually in order to activate the Internet network from home to Internet. If you don’t know how to enter the settings, please follow the steps as below. Step 1. Go to Start>Settings> Network Connections and then select Local Area Connection. http://www.sapido.com.tw User’s Manual V1.0... - Page 14 Step 2. Click on Properties Step 3. Double click on Internet Protocol (TCP/IP). http://www.sapido.com.tw User’s Manual V1.0...
- Page 15 FTP Server and so on, please skip Obtain an IP address automatically and then select Use the following IP address. And the following default setting of N+ 3.5G Mini Server Router should be noted: IP Address: 192.168.1.10 (as your Print Server for example) http://www.sapido.com.tw User’s Manual V1.0...
-
Page 16: Network Testing
Note: IP address and Default gateway cannot be the same. 1.5.1 Network Testing There are two ways to test your Network whether it can work on Internet or not. They are “Testing with Internet Browser” and “Testing with Dos”. 1.5.2 Testing with Internet Browser http://www.sapido.com.tw User’s Manual V1.0... - Page 17 Input cmd in the blank, and then click OK button. The Command Prompt window appears. Step 3. Input ipconfig in the flashing area then press enter. You will get an IP Address 192.168.1.100, for example, and Default Gateway as 192.168.1.1. http://www.sapido.com.tw User’s Manual V1.0...
- Page 18 Step 4. Ping a legal WAN Address such as 192.168.1.1. If Internet works, it will show Reply from 192.168.1.1: bytes = 32 time = 3ms TTL =64, for example. If it can’t work, it will show Request timed out. http://www.sapido.com.tw User’s Manual V1.0...
-
Page 19: Chapter 2 Hardware Installation
Web Camera Setup, Print Server Setup and Samba Server Setup. 2.1.2 Hardware Connection and Application for AP Mode Under AP Mode, it supports 2 LAN ports as Bridge, and user can connect to N+ 3.5G Mini http://www.sapido.com.tw User’s Manual V1.0... -
Page 20: Hardware Connection And Application For Wi-Fi Ap Mode
LAN. The administrator can set up quickly, including LAN Setup, Wireless Setup, Time Server Setup, Password Setup, USB Disk Management Setup, User Account Management Setup, FTP Server Setup, Web Camera Setup, Printer Server Setup and Samba Setup. http://www.sapido.com.tw User’s Manual V1.0... -
Page 21: Chapter 3 One Button Setup
Please switch to Router mode and plug in power. The default UPnP of N+ 3.5G Mini Server Router is ON. When users connect 3.5G Server Router to their PC, and icon will show up in the right-down corner. http://www.sapido.com.tw User’s Manual V1.0... - Page 22 Step 2. Click the Internet Gateway Device to open the login page. Step 3. Click One Button Setup on the left of the main menu under router mode. http://www.sapido.com.tw User’s Manual V1.0...
- Page 23 Time Zone Select: Select your time zone from the Time Zone drop-down list. Change Password: For changing password, please fill the password information http://www.sapido.com.tw User’s Manual V1.0...
-
Page 24: One Button Setup Configuration For Ap Mode
Finished: Click finished button to complete the setting. One Button Setup configuration for AP Mode Step 1. Please switch to AP mode and plug in power. Step 2. Click the Internet Gateway Device to open the login page. http://www.sapido.com.tw User’s Manual V1.0... - Page 25 Step 3. Click One Button Setup on the left of the main menu under AP mode. http://www.sapido.com.tw User’s Manual V1.0...
-
Page 26: One Button Setup Configuration For Wifi Ap Mode
Finished: Please click finished button to complete the setting. One Button Setup configuration for WiFi AP Mode Step 1. Please switch to WiFi AP mode and plug in power. Step 2. Click the Internet Gateway Device to open the login page. http://www.sapido.com.tw User’s Manual V1.0... - Page 27 Step 3. Click One Button Setup on the left of the main menu under WiFi AP mode. http://www.sapido.com.tw User’s Manual V1.0...
- Page 28 User Account Management: Set up users’ accounts and access control. Finished: Please click finished button to complete the setting. Note: One Button Setup is not completed unless users finish all settings and click Finished button. http://www.sapido.com.tw User’s Manual V1.0...
-
Page 29: Chapter 4 Basic Setup
Notice: If the homepage doesn’t appear, please check if the TCP/IP configuration is obtaining IP address automatically or not. If you don’t know how to do it, please refer to “1.5 Get your IP Automatically & Manually”. Homepage http://www.sapido.com.tw User’s Manual V1.0... - Page 30 Password”. In order to protect your own settings, it’s strongly recommended to change the password before you finish the Router Basic Setup. The default values for User Name and Password are admin (all in lowercase letters). Click Login to enter. http://www.sapido.com.tw User’s Manual V1.0...
-
Page 31: Basic Setup For Router Mode
“Application” two parts. Click Basic, you see 4 major items set in Basic Setup Selection. Please click Next to the next page. 4.2.1 Time Zone Setup Select Enable NTP client update to maintain the system time. http://www.sapido.com.tw User’s Manual V1.0... -
Page 32: Lan Interface Setup
Router supports 3 interfaces and 4 access types to WAN. Select one of the WAN connection modes required by your ISP in the following WAN Setup Configuration page, the WAN setup pages will vary depending on what kind of WAN Type you select. http://www.sapido.com.tw User’s Manual V1.0... - Page 33 USB Dongle and fill in the required information as follows to directly access Internet via connected 3.5G adapter. At this moment, Backup of Connection is not available. When 3.5G signal cannot be reached, the system starts to search downward for 3/2.75/2.5G signals until none existed. http://www.sapido.com.tw User’s Manual V1.0...
- Page 34 4.2.3.2 WAN Interface– Ethernet Port If you are using an Ethernet cable to connect the Internet, please select Ethernet port. http://www.sapido.com.tw User’s Manual V1.0...
- Page 35 Internet via 3.5G adapter. If 3.5G signal is not available, it starts to search downward for 3/2.75/2.5G signals until none existed. The default interval between the two connection detection is 3 minutes. The interval http://www.sapido.com.tw User’s Manual V1.0...
- Page 36 Internet via 3.5G adapter. If 3.5G signal is not available, it starts to search downward for 3/2.75/2.5G signals until none existed. Setting up the interval time to auto detect whether the Internet connection is lost or not. If http://www.sapido.com.tw User’s Manual V1.0...
- Page 37 Apply 3G or 3.5G transmission rate for the backup. In other words, once PPPoE connection is disconnected, the system automatically connects Internet via 3.5G adapter. If 3.5G signal is not available, it starts to search downward for 3/2.75/2.5G signals until none existed. http://www.sapido.com.tw User’s Manual V1.0...
- Page 38 Apply 3G or 3.5G transmission rate for the backup. Once DHCP Client connection is disconnected, the system automatically connects Internet via 3.5G adapter. If 3.5G signal is not available, it starts to search downward for 3/2.75/2.5G signals until none existed. http://www.sapido.com.tw User’s Manual V1.0...
- Page 39 Setting up the interval time to auto detect whether the Internet connection is lost or not. If yes, the system immediately switches to 3.5G Internet connection and will not switch back to the original PPTP connection. Click on Next button to go on next setting page. http://www.sapido.com.tw User’s Manual V1.0...
- Page 40 The security function is provided to prevent the connection requests from unauthorized wireless clients. As the Encryption Type, select WEP or WPA can protect your data from eavesdroppers, if you do not need the encryption, select “None” to skip the following setting. http://www.sapido.com.tw User’s Manual V1.0...
- Page 41 WPA (TKIP) and WPA2 (TKIP): Allow the access from WPA clients simultaneously and the encryption keys are given from PSK respectively. Pre-Shared Key Format: The keys can be entered in ASCII, 8~63 ASCII characters, for example, “0123456789ABCD….” or Hex, 64 bytes hexadecimal http://www.sapido.com.tw User’s Manual V1.0...
-
Page 42: Basic Setup Complete
Application Setup full function table list Click Application Setup, you see 6 major items set in Application Setup Selection: Folder Management Setup, User Account Management Setup, FTP Server Setup, Printer Server Setup, Web Camera Setup and Samba Server Setup. http://www.sapido.com.tw User’s Manual V1.0... -
Page 43: Folder Management
4.3.1.1 Partition / Format SysDisk To partition/format the disk, please select “Yes” and the type. Moreover, if you want to view the data inside the disk, please click Disk Explorer. http://www.sapido.com.tw User’s Manual V1.0... -
Page 44: User Account Management
Personal users can use each individual application such as My Status, My Webcam and Document. This section is to set up the users’ access right. 4.3.3 FTP Server N+ 3.5G Mini Server Router can be the FTP Server providing users to transmit files, also http://www.sapido.com.tw User’s Manual V1.0... -
Page 45: Printer Server
N+ 3.5G Mini Server Router supports USB interface printer. Any users in the same subnet of N+ 3.5G Mini Server Router can print their document via the network printers. If there is no printer connected to this router, this print server function will be automatically disabled. http://www.sapido.com.tw User’s Manual V1.0... -
Page 46: Webcam Server
If you plan to use N+ 3.5G Mini Server Router as a Web Camera site, connect a supported USB Web Camera to the USB port of N+ 3.5G Mini Server Router. Please click on “Next” to next setup. http://www.sapido.com.tw User’s Manual V1.0... -
Page 47: Samba Server
IP address. If not, the N+ 3.5G Mini Server Router will use the default IP or assigned by the user. 4.4.1 Switch to AP Mode Switch to AP mode and plug in power. Note: 1. Before sliding the switch modes, please power-off the router firstly. Moreover, please stay over 5 http://www.sapido.com.tw User’s Manual V1.0... -
Page 48: Basic Setup
“Basic” and “Application” two parts. Click on Next button to go on next setting page. 4.5.1 Time Zone Setup Select Enable NTP client update to maintain the system time. http://www.sapido.com.tw User’s Manual V1.0... -
Page 49: Wireless Setup
The security function is provided to prevent the connection requests from unauthorized wireless clients. As the Encryption Type, select WEP or WPA can protect your data from eavesdroppers, if you do not need the encryption, select “None” to skip the following setting. http://www.sapido.com.tw User’s Manual V1.0... - Page 50 Key Setting: A password is requested here. Note: 128 bits WEP is most secure, but has more encryption/decryption overhead. Note that all wireless devices must support the same WEP encryption bit size and have the same key. http://www.sapido.com.tw User’s Manual V1.0...
-
Page 51: Basic Setup Complete
Pre-Shared Key. After checking each above and choose the suitable item by demand, click Finished to proceed. 4.5.4 Basic Setup Complete The Basic Setup has been completed successfully when you see this screen. http://www.sapido.com.tw User’s Manual V1.0... -
Page 52: Application Setup Full Function Table List
Open the LAN setup page. Assign an IP addresses in the LAN setup page. This IP address should be the same class as the default Gateway. Application Setup full function table list Open the router Home page again. http://www.sapido.com.tw User’s Manual V1.0... - Page 53 Open a Microsoft Internet Explorer, Mozilla Firefox or Apple Safari browser, and enter http://192.168.1.1 (Default Gateway) into browser’s blank. Or through the UPnP Click the Internet Gateway Device to open the login page. http://www.sapido.com.tw User’s Manual V1.0...
-
Page 54: Folder Management
4.6.1.1 Partition / Format SysDisk To partition/format the disk, please select “Yes” and the type. Moreover, if you want to view the data inside the disk, please click Disk Explorer. http://www.sapido.com.tw User’s Manual V1.0... -
Page 55: User Account Management
Document. This section is to set up the users’ access right. 4.6.3 FTP Server N+ 3.5G Mini Server Router can be the FTP Server providing users to transmit files, also for the guest to download the files from assigned website. Moreover, by connecting USB http://www.sapido.com.tw User’s Manual V1.0... -
Page 56: Printer Server
N+ 3.5G Mini Server Router can print their document via the network printers. If there is no printer connected to this router, this print server function will be automatically disabled. Please click on Next button to continue. 4.6.5 Webcam Server http://www.sapido.com.tw User’s Manual V1.0... -
Page 57: Samba Server
USB Web Camera to the USB port of N+ 3.5G Mini Server Router. Please click on “Next” to next setup. 4.6.6 Samba Server N+ 3.5G Mini Server Router supports NetBIOS protocol, providing network neighbors to share file folders or printer. Please click on “Finished” to complete settings. http://www.sapido.com.tw User’s Manual V1.0... -
Page 58: Wifi Ap Mode
Basic Setup Click Step Setup on the left of the main menu. Then you’ll see the full functionality selection screen appears and detailed settings for each item, including “Basic” and “Application” two parts. http://www.sapido.com.tw User’s Manual V1.0... -
Page 59: Time Zone Setup
Click on Next button to go on next setting page. 4.8.1 Time Zone Setup Select Enable NTP client update to maintain the system time. http://www.sapido.com.tw User’s Manual V1.0... -
Page 60: Wireless Site Survey And Security Setup
The security function is provided to prevent the connection requests from unauthorized wireless clients. As the Encryption Type, select WEP or WPA can protect your data from eavesdroppers, if you do not need the encryption, select “None” to skip the following setting. http://www.sapido.com.tw User’s Manual V1.0... - Page 61 Key Setting: A password is requested here. Note: 128 bits WEP is most secure, but has more encryption/decryption overhead. Note that all wireless devices must support the same WEP encryption bit size and have the same key. http://www.sapido.com.tw User’s Manual V1.0...
- Page 62 “0123456789ABCD….” or Hex, 64 bytes hexadecimal digits (0~9, a~f, and A~F). Select the item from drop-down list you wish to use and enter your Pre-Shared Key. After checking each above and choose the suitable item by demand, click Finished to proceed. http://www.sapido.com.tw User’s Manual V1.0...
-
Page 63: Quick Setup Complete
Click Application Setup, you see 6 major items set in Application Setup Selection: Folder Management Setup, User Account Management Setup, FTP Server Setup, Printer Server Setup, Web Camera Setup and Samba Server Setup. Please click Next button after confirmed. http://www.sapido.com.tw User’s Manual V1.0... -
Page 64: Folder Management
To partition/format the disk, please select “Yes” and the type. Moreover, if you Power Plug want to view the data inside the disk, please click Disk Explorer. Notice: You have to click on Unplug button before removing the USB devices from N+ 3.5G Mini Server Router. http://www.sapido.com.tw User’s Manual V1.0... -
Page 65: User Account Management
Moreover, by connecting USB HDD, USB Flash to the router, user can easily set up a FTP Server to share or download files for local or remote users. http://www.sapido.com.tw User’s Manual V1.0... -
Page 66: Printer Server
N+ 3.5G Mini Server Router can print their document via the network printers. If there is no printer connected to this router, this print server function will be automatically disabled. Please click on “Next” to next setup. 4.9.5 Webcam Server http://www.sapido.com.tw User’s Manual V1.0... -
Page 67: Samba Server
USB Web Camera to the USB port of N+ 3.5G Mini Server Router. Please click on “Next” to next setup. 4.9.6 Samba Server N+ 3.5G Mini Server Router supports NetBIOS protocol, providing network neighbors to share file folders or printer. Please click on “Finish” to complete settings. http://www.sapido.com.tw User’s Manual V1.0... -
Page 68: Chapter 5 Advanced Configuration For Router Mode
Select WAN under the IP Config menu. N+ 3.5G Mini Server Router supports 3 interfaces and 4 access types. Follow the instructions below for each to set up accordingly. Choose your WAN Interface and WAN type, and click Next, its associated settings will show up. http://www.sapido.com.tw User’s Manual V1.0... - Page 69 If you are using HSDPA/UMTS (3.5G connection) as the WAN Type, please select 3.5G USB Dongle. At this moment, Backup of Connection is not available. When 3.5G signal cannot be reached, the system starts to search downward for 3/2.75/2.5G signals until none existed. http://www.sapido.com.tw User’s Manual V1.0...
- Page 70 5.1.1.2 WAN Interface– Ethernet Port If you are using an Ethernet cable to connect the Internet, please select Ethernet port. http://www.sapido.com.tw User’s Manual V1.0...
- Page 71 5.1.1.3 WAN Interface– Wireless http://www.sapido.com.tw User’s Manual V1.0...
- Page 72 If you are connecting the internet via wireless, please select Wireless and its associated settings will show up underneath at the same time. You can see a list of available Wireless networks. Select you preferred one to connect and the Encryption type form the drop-down list. http://www.sapido.com.tw User’s Manual V1.0...
- Page 73 If you applied for a Static IP connection type from ISP, please follow the steps to set up your WAN connection. IP Address Input your IP Address supplied by ISP. If you don’t know, please check with your ISP. http://www.sapido.com.tw User’s Manual V1.0...
- Page 74 Select Enable Ping Access on WAN, will make WAN IP address response to any ping request from Internet users. It is a common way for hacker to ping public WAN IP address, to see is there any WAN IP address available. http://www.sapido.com.tw User’s Manual V1.0...
- Page 75 Click on Apply Changes to save the setting data. Or you may click on Reset to clear all the input data. 5.1.1.5 WAN Access Type –DHCP Client If your WAN access type is DHCP Client, please complete the settings as following instructions. http://www.sapido.com.tw User’s Manual V1.0...
- Page 76 Internet users. It is a common way for hacker to ping public WAN IP address, to see is there any WAN IP address available. Enable Web Server Access on WAN This option is to enable Web Server Access function on WAN. http://www.sapido.com.tw User’s Manual V1.0...
- Page 77 Click on Apply Changes to save the setting data. Or you may click on Reset to clear all the input data. 5.1.1.6 WAN Access Type –PPPoE If you applied for a PPPoE connection type from ISP, please follow the steps to set up your WAN connection. http://www.sapido.com.tw User’s Manual V1.0...
- Page 78 3/2.75/2.5G signals until none existed. User needs manual switch through the GUI setting page to recover the original connection. Clone MAC Address Copy the MAC address from the device you had registered to your ISP if your ISP asks http://www.sapido.com.tw User’s Manual V1.0...
- Page 79 This option is to enable Web Server Access function on WAN. 13. Apply Changes & Reset Click on Apply Changes to save the setting data. Or you may click on Reset to clear all the input data. http://www.sapido.com.tw User’s Manual V1.0...
- Page 80 5.1.1.7 WAN Access Type – PPTP If you have applied for a PPTP connection type from ISP, please follow the steps to set up your WAN connection. http://www.sapido.com.tw User’s Manual V1.0...
- Page 81 The default interval between the two connection detection is 3 minutes, and the range is from 1 to 60 minutes. Once Internet connection is disconnected, the system automatically connects Internet via 3.5G adapter. If 3.5G signal is not available, it starts to search http://www.sapido.com.tw User’s Manual V1.0...
- Page 82 This option is to enable Web Server Access function on WAN. 14. Apply Changes & Reset Click on Apply Changes to save the setting data. Or you may click on Reset to clear all the input data. http://www.sapido.com.tw User’s Manual V1.0...
-
Page 83: Lan Interface Setup
Input ISP Default Gateway Address. If you don’t know, please check with your ISP. DHCP Enable or disable DHCP services. The DHCP server will automatically allocate an unused IP address from the IP address pool to the requesting computer if enabled. DHCP Client Range http://www.sapido.com.tw User’s Manual V1.0... -
Page 84: Dynamic Dns Setting
Dynamic DNS allows you to make an assumed name as a DHCP Client address to a static hostname. Please configure the dynamic DNS below. Please select DDNS under the IP Config menu, and follow the instructions below to enter the DDNS setting page to configure the settings you want. http://www.sapido.com.tw User’s Manual V1.0... - Page 85 User name is used as an identity to login Dynamic-DNS service. Password /Key Password is applied to login Dynamic-DNS service. Apply & Cancel Click on Apply button to continue. Click on Cancel button to clear the setting on this page. http://www.sapido.com.tw User’s Manual V1.0...
-
Page 86: Wireless Setup
N+ 3.5G Mini Server Router enables fastest 300 Mbps IEEE802.11g wireless transmissions and keeps compatibility with existing IEEE 802.11n devices. N+ 3.5G Mini Server Router complies with IEEE 802.11b/g standard. Please select Wireless under the main menu. http://www.sapido.com.tw User’s Manual V1.0... -
Page 87: Wireless Basic Settings
5.2.1 Wireless Basic Settings Follow the instructions to configure the Wireless settings. Disable Wireless LAN Interface http://www.sapido.com.tw User’s Manual V1.0... - Page 88 (3.) SSID: please enter the class SSID for this . (4.) Data Rate: please select the data transmission rate. (5.) Access: defined the access type. a. LAN+WAN: the client can access to the Internet and connect to 3.5G server router’s GUI to setup. http://www.sapido.com.tw User’s Manual V1.0...
- Page 89 18M, 24M, 36M, 48M or 54M to be selected from the drop-down list. 11. Associated Clients Check the WiFi ISP connectors and the connecting status. 12. Enable Mac Clone (Single Ethernet Client) Copy the MAC Address for identity of some ISPs. http://www.sapido.com.tw User’s Manual V1.0...
- Page 90 Get back to menu “Network Config” and write down the SSID, channel and security. Step 2. Setting the same SSID, channel and security you got form “Network Config” and Click on Apply Changes to save the setting http://www.sapido.com.tw User’s Manual V1.0...
-
Page 91: Wireless Advanced Settings
15. Apply Changes & Reset Click on “Apply Changes” to save the setting data. Or you may click on “Reset” to clear all the input data. 5.2.2 Wireless Advanced Settings Please follow the instructions to configure the Wireless settings. http://www.sapido.com.tw User’s Manual V1.0... - Page 92 Beacons are packets sent by an access point to synchronize a wireless network. Specify a beacon interval value. The allowed setting range is 20-1024 ms. Preamble Type The preamble (also called “a header”) is a section of data at the head of a packet that http://www.sapido.com.tw User’s Manual V1.0...
-
Page 93: Wireless Security Setup
Click on “Apply Changes” to save the setting data. Or you may click on “Reset” to clear all the input data. 5.2.3 Wireless Security Setup 4 encryption types can be selected here, please follow the instructions below for each. http://www.sapido.com.tw User’s Manual V1.0... - Page 94 (64 or 128 bit) and configure one to four WEP Keys. The “1280bit” method is more secure than the “64-bit”. Use 802.1x Authentication Enable 802.1x Authentication so that a wireless node must be authenticated before it can gain access to other LAN resources. http://www.sapido.com.tw User’s Manual V1.0...
- Page 95 8 to 63 characters. If the coding is in Hex, the key length is 64 characters. Apply Changes & Reset Click on Apply Changes to save the setting data. Or you may click on Reset to clear all http://www.sapido.com.tw User’s Manual V1.0...
-
Page 96: Wireless Access Control
Comment You may input the comments for the set MAC Address. Apply Changes & Reset Click on “Apply Change” to save the setting data. Or you may click on “Reset” to clear all the input data. http://www.sapido.com.tw User’s Manual V1.0... -
Page 97: Wds Settings
APs communicate both with each other and with wireless stations (at the expense of half the throughput). Wireless Connection AP Router AP Router Internet Wired Connection Please follow the instructions to setup WDS connections. http://www.sapido.com.tw User’s Manual V1.0... - Page 98 WDS with N+ 3.5G Mini Server Router. Step 2. Get back to the menu “Wireless Basic Settings” of N+ 3.5G Mini Server Router. Select AP+WDS mode, and then select the Channel Number. Click Apply Changes to save the setting data. http://www.sapido.com.tw User’s Manual V1.0...
- Page 99 User’s Manual V1.0...
- Page 100 Click Apply Changes to save the setting data. Step 4. When the time counts down to 0, you will see the MAC address of the paired device displaying on Current WDS AP List. http://www.sapido.com.tw User’s Manual V1.0...
- Page 101 Doing the same way to setup the MAC address in the paired device. Launch the UT to the menu “WDS settings” of the paired device, and input router’s MAC address. Click Apply Changes to save the setting data. Please input the MAC address. http://www.sapido.com.tw User’s Manual V1.0...
- Page 102 Supports to check out the IP address which is assigned by the paired device. Step 8. You can input http://192.168.6.6 in IE browser to enter the GUI page of the paired device and make sure the connection. http://www.sapido.com.tw User’s Manual V1.0...
-
Page 103: Wps
Please follow instructions below to enable the WPS function. Start PBC: (1.) Press the WPS button from N+ 3.5G Mini Server Router or click Start PBC from menu “Wi-Fi Protected Setup”, and waiting for the WPS wireless card setting. http://www.sapido.com.tw User’s Manual V1.0... - Page 104 (2.) Open the “Wireless Utility” of your wireless card, and click its “PBC” button, to start auto pairing. (3.) While scanning is successful, the information of the wireless card appears in the windows below. http://www.sapido.com.tw User’s Manual V1.0...
- Page 105 Start PIN: (1.) Open the “Wireless Utility” of your wireless card. Follow its PIN instruction to get a new PIN number. Write it down. http://www.sapido.com.tw User’s Manual V1.0...
- Page 106 (2.) Open menu “Wi-Fi Protected Setup” of N+ 3.5G Mini Server Router, input the PIN number from the wireless card then click Start PIN. (3.) Back to “Wireless Utility” and press the “Start PIN” button to complete the auto-paring process. http://www.sapido.com.tw User’s Manual V1.0...
-
Page 107: Nat
IP address to the server. Then, add the IP address and network protocol type, port number, and name of the service in the following list. Based on the list, the gateway will forward service request from outside users to the corresponding local server. http://www.sapido.com.tw User’s Manual V1.0... - Page 108 Current Port Forwarding Table It will display all port forwarding regulation you made. Delete Selected & Delete All Click Delete Selected will delete the selected item. Click Delete All will delete all items in this table. http://www.sapido.com.tw User’s Manual V1.0...
-
Page 109: Visual Dmz
Virtual DMZ allows you to expose one computer to Internet, so that all inbound packets will be redirected to the computer you set. It is useful while you run some applications that use uncertain incoming ports. Please use it carefully. Enable DMZ http://www.sapido.com.tw User’s Manual V1.0... -
Page 110: Firewall
The Firewall function helps to protect your local network against attacks from outside. It also provides a way of restricting users on the local network from accessing the Internet. Additionally, it can filter out specific packets to trigger the router to place an outgoing connection. http://www.sapido.com.tw User’s Manual V1.0... -
Page 111: Port Filtering
Apply Changes & Reset Click on Apply Changes to save the setting data. Or you may click on Reset to clear all the input data. Current Filter Table It will display all ports that are filtering now. http://www.sapido.com.tw User’s Manual V1.0... -
Page 112: Ip Filtering
*All clients inside the local area network can’t open the 80 port through this router. 5.4.2 IP Filtering Use IP Filter to deny LAN IP addresses from accessing the Internet. You can deny specific port numbers or all ports for the specific IP address. http://www.sapido.com.tw User’s Manual V1.0... -
Page 113: Mac Filtering
You can click Reset to cancel. 5.4.3 MAC Filtering Use MAC filters to deny LAN computers by their MAC addresses from accessing the Internet. You can manually add a MAC address that is currently connected to N+ 3.5G Mini Server Router. http://www.sapido.com.tw User’s Manual V1.0... - Page 114 It will display all MAC addresses that are filtering now. Delete Selected & Delete All Click Delete Selected will delete the selected item. Click Delete All will delete all items in this table. Reset You can click Reset to cancel. http://www.sapido.com.tw User’s Manual V1.0...
-
Page 115: Url Filtering
.com. Enter the URL address into this blank to apply filter blocking, example: www.yahoo Apply Changes & Reset Click on Apply Changes to save the setting data. Or you may click on Reset to clear all http://www.sapido.com.tw User’s Manual V1.0... -
Page 116: Server
Samba Server By supporting NetBIOS Protocol, N+ 3.5G Mini Server Router provides LAN users to share files or printer via My Network Places. Click Samba Server to proceed. Enable Samba Server Check to Enable/Disable while connecting. http://www.sapido.com.tw User’s Manual V1.0... - Page 117 Please follow the steps below. Step 1. Go to Start and click My Computer. Step 2. Fill in blank address field with \\192.168.1.1. Step 3. A window pops up asking for user name and password. If log in as an http://www.sapido.com.tw User’s Manual V1.0...
-
Page 118: Ftp Server
FTP Server utility allows both local and remote users to upload or download files, pictures or music files from the same storage device in most easy and timely fashion. It is also cost effective where users do not need to purchase a dedicated http://www.sapido.com.tw User’s Manual V1.0... - Page 119 The default is 300 seconds; the minimum is 60 seconds. Apply & Cancel Click on Apply button to continue. Click on Cancel button to clean the setting on this page. User Account List http://www.sapido.com.tw User’s Manual V1.0...
-
Page 120: Webcam Server
5.5.3.1 Webcam Server Basic Setting Enable Webcam Server Allow using this function by checking on enable. Access from WAN Allow webcam can access from WAN side by checking on enable for this item. Image format http://www.sapido.com.tw User’s Manual V1.0... - Page 121 Click on Apply button to continue. Click on Cancel button to clear the settings on this page. 5.5.3.2 Webcam Server Advanced Setting Click on Record Setting button, and the screen will appear as below. Save image interval: http://www.sapido.com.tw User’s Manual V1.0...
- Page 122 Often marketed as surveillance tools for home or office security; network Webcams are now being employed by early adopters for more personal matters, such as watching kids and monitoring pets. The Webcam can be remotely accessed and controlled via a http://www.sapido.com.tw User’s Manual V1.0...
- Page 123 To monitor the webcam image from outside, you need to know the WAN IP address. Select Network Configuration under Log & Status on main Menu after connected, and you will see the WAN IP Address used to connect to webcam monitor screen. Here uses 192.168.2.51 as an example. http://www.sapido.com.tw User’s Manual V1.0...
- Page 124 After logging in as a user, your will see the personal control panel screen as below, please click on My Webcam. http://www.sapido.com.tw User’s Manual V1.0...
- Page 125 Click on Personal Panel to enter. There will pop-up screen shows the image from web camera as example below. http://www.sapido.com.tw User’s Manual V1.0...
- Page 126 To set up the Webcam Advanced Configuration for each text field, the image from webcam will be recorded into your USB HDD or Remote FTP. Click on Apply Changes after setup finished. http://www.sapido.com.tw User’s Manual V1.0...
- Page 127 Folder Management and click on Disk Explorer to view entire folder inside the disk including webcam record files. After click on Disk Explorer, you will see the folder screen appear including all the folders inside N+ 3.5G Mini Server Router. (Below is the example.) http://www.sapido.com.tw User’s Manual V1.0...
-
Page 128: Printer Server
Printer Server N+ 3.5G Mini Server Router has two USB ports for connecting with printers to be shared on the local area network. Follow the steps to set up your PC to connect to a printer server. http://www.sapido.com.tw User’s Manual V1.0... - Page 129 Besides Printer Server setting is finished, the printer setting on PC also needs to be set. After enabling Printer Server in Quick Setup and Printer Server Configuration, please follow the steps to set the detail LPR settings on your PC. (The example below is for http://www.sapido.com.tw User’s Manual V1.0...
- Page 130 After setting USB printer on N+ 3.5G Mini Server Router setup page, please go to Start > Printers and Faxes to add a printer. Step 2. Click on Add a printer item. Step 3. Click on Next button. http://www.sapido.com.tw User’s Manual V1.0...
- Page 131 Step 4. Select Local printer attached to this computer, and click Next. Step 5. Select Create a new port and choose Standard TCP/IP Port from drop-down list, then click Next. http://www.sapido.com.tw User’s Manual V1.0...
- Page 132 Step 6. Click Next. Step 7. Put in N+ 3.5G Mini Server Router address: 192.168.1.1 and click Next. http://www.sapido.com.tw User’s Manual V1.0...
- Page 133 Select LPR and give it the same Queue Name as USB Printer Name has shown, and mark LPR Byte Counting Enabled. Finally, click on Next button. It has to be the same with the Printer Name as shown in section 3.5.4 Printer Server Configuration. http://www.sapido.com.tw User’s Manual V1.0...
- Page 134 Step 11. Select the Manufacturer and Printers. If your printer is not listed in the table, please insert its driver CD and then click on Have Disk… button for installation. Or click on Next button to finish the setting. http://www.sapido.com.tw User’s Manual V1.0...
-
Page 135: System Management
Step 12. It shows you the printer settings that you have specified, and then click Finish. System Management N+ 3.5G Mini Server Router provides system management including password changing, firmware upgrade, time setting, user’s account setting and other detail settings. Following is detail explanation for each. http://www.sapido.com.tw User’s Manual V1.0... -
Page 136: Change Password
5.6.1 Change Password Users can set or change their password in this section. User Name Enter the User Name. New Password http://www.sapido.com.tw User’s Manual V1.0... -
Page 137: Firmware Upgrade
On the back of this router, there is a reset button. If you can not login the administrator page by forgetting your password; or the router has problem you can’t solve. You can push the reset button for 5 seconds with a stick. The router will reboot and all settings will http://www.sapido.com.tw User’s Manual V1.0... -
Page 138: Profiles Save
To back up the current configuration setting or load the backup data, also you can restore N+ 3.5G Mini Server Router to default setting by this function. Save Settings To File Click on Save button for saving the configuration setting into assigned location. http://www.sapido.com.tw User’s Manual V1.0... - Page 139 A pop window will show up and ask to save config.dat file. please select the location (Figure 2), for example: the desktop (Figure 3). Please select the location, for example: the desktop. http://www.sapido.com.tw User’s Manual V1.0...
- Page 140 Load Settings From File Click on “Browse…” button for searching the saving configuration from hard drive, and then click on Upload button to load all the settings into the router. Select the config.dat file. http://www.sapido.com.tw User’s Manual V1.0...
- Page 141 After you have tried other methods for troubleshooting your network, you may choose to restore N+ 3.5G Mini Server Router to the factory default settings. When you see the screen below, the resetting is completed. Please click OK and return to the main menu. http://www.sapido.com.tw User’s Manual V1.0...
-
Page 142: Time Zone Setting
NTP server is set, you will only need to set the time zone. If you manually set the time, you may also set Daylight Saving dates and the system time will automatically adjust on those dates. http://www.sapido.com.tw User’s Manual V1.0... - Page 143 Or you may click on Refresh to update the system time on the screen. NTP Server Type & Default NTP Server Choose “General Time Server” and select the NTP Server from the drop-down list or choose “Customized Time Server” and enter the server by manual. http://www.sapido.com.tw User’s Manual V1.0...
-
Page 144: Upnp Setting
PCs on the network without having to install drivers, but to configure and use those devices. After enabling UPNP, click My Network Places, and user can open the web GUI by just clicking on the Internet Gateway Device icon. 5.6.6 Language Setting http://www.sapido.com.tw User’s Manual V1.0... - Page 145 Select Language: Select your preferred language from the drop down list, for example, Korea, and then click Apply Changes. Step 2. When you see the screen with message in your selected language, the Language setup is completed. http://www.sapido.com.tw User’s Manual V1.0...
-
Page 146: User Account Management
Personal users can use each individual application such as My Status, My Webcam and Document. This section is to set the user’s right. Also, all the users’ rights will be showed in User Account List and allowed to edit or delete by clicking the linking text. User Name http://www.sapido.com.tw User’s Manual V1.0... -
Page 147: Folder Management
/ partition via clicking the button on this page. Select the USB Disk and click Mount for refreshing all disks before you perform disk partition, and the Unplug button appears afterwards. To partition/format the disk, please select the disk and click on Format button. http://www.sapido.com.tw User’s Manual V1.0... -
Page 148: Log & Status
Note: You have to click on Unplug button before removing the USB device from N+ 3.5G Mini Server Router. Log & Status N+ 3.5G Mini Server Router provides the log list and connection status for user to check. 5.7.1 Network Config http://www.sapido.com.tw User’s Manual V1.0... -
Page 149: Event Log
Network Configuration shows the firmware version and the connection status of LAN, WAN and Wireless. 5.7.2 Event Log N+ 3.5G Mini Server Router provides system logs for review. Enable Log http://www.sapido.com.tw User’s Manual V1.0... - Page 150 Click on Apply Changes to save the setting data. Click on Refresh to renew the system time, or on Clear to clear all the record. After clicking Apply Changes to record the event log, it will be shown as the example below. http://www.sapido.com.tw User’s Manual V1.0...
-
Page 151: Logout
Logout Click Logout on the bottom menu to exit and go back to GUI login home page. http://www.sapido.com.tw User’s Manual V1.0... -
Page 152: Chapter 6 Advance Configuration For Ap Mode
Use this page to set up the local IP address and subnet mask for your router. Please select LAN under the IP Config menu and follow the instructions below to enter the LAN setting page to configure the settings you want. 6.1.2 LAN Interface Setup http://www.sapido.com.tw User’s Manual V1.0... - Page 153 Copy the MAC address from the device you had registered to your ISP if your ISP asks for the specific MAC Address. Apply Changes & Reset Click on Apply Changes to save the setting data. Or you may click on Reset to clear all the input data. http://www.sapido.com.tw User’s Manual V1.0...
-
Page 154: Wireless Setup
Wireless Setup Please select Wireless under the main menu. 6.2.1 Wireless Basic Settings Follow the instructions to configure the Wireless settings. http://www.sapido.com.tw User’s Manual V1.0... - Page 155 Select AP, WDS, or AP+WDS to allow or disallow the wireless operation. Multiple APs Click Multiple APs to set up 4 different SSIDs to deploy a shared WLAN. Users can add or limit the properties for each SSID, increasing the flexibility and efficiency of network. http://www.sapido.com.tw User’s Manual V1.0...
- Page 156 Network Type: : : : Please select “Infrastructure” or “Ad hoc.” The default is “Infrastructure.” The selection is disabled when wireless mode is selected to AP. SSID: : : : Please input your wireless network name. Default is “SAPIDO_Mobile_Hotspot”. http://www.sapido.com.tw User’s Manual V1.0...
- Page 157 How to Enable URM (Universal Repeater Mode) User could enable URM in wireless basic setting page as shown in following figures. Step 3. Get back to menu “Network Config” and write down the SSID, channel and security. http://www.sapido.com.tw User’s Manual V1.0...
- Page 158 Step 4. Setting the same SSID, channel and security you got form “Network Config” and Click on Apply Changes to save the setting http://www.sapido.com.tw User’s Manual V1.0...
- Page 159 Note: The DHCP server should be disabled under menu “LAN Interface Setup” and then the URM could be enabled. Step 5. Check the AP connectors and the Wireless connecting status. 14. SSID of Extended Interface When mode is set to “AP” and Universal Repeater Mode is enabled, user should input http://www.sapido.com.tw User’s Manual V1.0...
-
Page 160: Wireless Advanced Settings
The allowed range is 256-2364, and default length is 2346 bytes. RTS Threshold This value should remain at its default setting of 2347. The range is 0~2347. Should you encounter inconsistent data flow, only minor modifications are recommended. If a http://www.sapido.com.tw User’s Manual V1.0... - Page 161 User can adjust the RF output power to get the best wireless connection. There are 5 power types available: 100%, 70%, 50%, 35%, and 15%. 10. Apply Changes & Reset Click on “Apply Changes” to save the setting data. Or you may click on “Reset” to clear all the input data. http://www.sapido.com.tw User’s Manual V1.0...
-
Page 162: Wireless Security Setup
(64 or 128 bit) and configure one to four WEP Keys. The “1280bit” method is more secure than the “64-bit”. Use 802.1x Authentication Enable 802.1x Authentication so that a wireless node must be authenticated before http://www.sapido.com.tw User’s Manual V1.0... - Page 163 Enterprise (RADIUS): Please input the port, IP address, and password of authentication RADIUS Server. Personal (Pre-Shared Key): Pre-Shared Key type is coding in ASCII, and the length is between 8 to 63 characters. If the coding is in Hex, the key length is 64 characters. http://www.sapido.com.tw User’s Manual V1.0...
-
Page 164: Wireless Access Control
Click on Apply Changes to save the setting data. Or you may click on Reset to clear all the input data. 6.2.4 Wireless Access Control With the MAC address, you may allow or disallow the access to your AP. http://www.sapido.com.tw User’s Manual V1.0... -
Page 165: Wds Settings
WDS APs communicate with each other (without allowing for wireless clients or stations to access them), and/or wireless repeating in which APs communicate both with each other and with wireless stations (at the expense of half the throughput). http://www.sapido.com.tw User’s Manual V1.0... - Page 166 AP Router Internet Wired Connection Please follow the instructions to setup WDS connections. Step 1. Check the MAC address and Channel number of the device you want to setup WDS with N+ 3.5G Mini Server Router. http://www.sapido.com.tw User’s Manual V1.0...
- Page 167 Step 2. Get back to the menu “Wireless Basic Settings” of N+ 3.5G Mini Server Router. Select AP+WDS mode, and then select the Channel Number. Click Apply Changes to save the setting data. http://www.sapido.com.tw User’s Manual V1.0...
- Page 168 Click Apply Changes to save the setting data. Step 4. When the time counts down to 0, you will see the MAC address of the paired device displaying on Current WDS AP List. http://www.sapido.com.tw User’s Manual V1.0...
- Page 169 Doing the same way to setup the MAC address in the paired device. Launch the UT to the menu “WDS settings” of the paired device, and input router’s MAC address. Click Apply Changes to save the setting data. Please input the MAC address. http://www.sapido.com.tw User’s Manual V1.0...
- Page 170 Supports to check out the IP address which is assigned by the paired device. Step 8. You can input http://192.168.6.6 in IE browser to enter the GUI page of the paired device and make sure the connection. http://www.sapido.com.tw User’s Manual V1.0...
-
Page 171: Wps
Please follow instructions below to enable the WPS function. Start PBC: (1.) Press the WPS button from N+ 3.5G Mini Server Router or click Start PBC from menu “Wi-Fi Protected Setup”, and waiting for the WPS wireless card setting. http://www.sapido.com.tw User’s Manual V1.0... - Page 172 (2.) Open the “Wireless Utility” of your wireless card, and click its “PBC” button, to start auto pairing. While scanning is successful, the information of the wireless card appears in the windows below. http://www.sapido.com.tw User’s Manual V1.0...
- Page 173 Start PIN: (1.) Open the “Wireless Utility” of your wireless card. Follow its PIN instruction to get a new PIN number. Write it down. http://www.sapido.com.tw User’s Manual V1.0...
- Page 174 (2.) Open menu “Wi-Fi Protected Setup” of N+ 3.5G Mini Server Router, input the PIN number from the wireless card then click Start PIN. (3.) Back to “Wireless Utility” and press the “Start PIN” button to complete the auto-paring process. http://www.sapido.com.tw User’s Manual V1.0...
-
Page 175: Server
(4.) When you can see the IP information below, the connection is established Server http://www.sapido.com.tw User’s Manual V1.0... -
Page 176: Samba Server
Fill in the name, and the default is “Workgroup”. Server Name Name your server. Server Description Describe your server by demand, and the default is SAPIDO_Mobile_Hotspot. Apply & Cancel Click Apply to save or Cancel to clear settings. http://www.sapido.com.tw User’s Manual V1.0... - Page 177 Go to Start and click My Computer. Step 2. Fill in blank address field with \\192.168.1.254. Step 3. As the window below appears, user has entered file sharing directory, and the folders underneath are all available for sharing locally. http://www.sapido.com.tw User’s Manual V1.0...
-
Page 178: Ftp Server
FTP Server Port Define the FTP command transfer service port. If you want to change this port number, also remember to change the service port setting of your FTP client. The default is 21. Idle Connection Time-Out http://www.sapido.com.tw User’s Manual V1.0... -
Page 179: Webcam Server
6.3.3.1 Webcam Server Basic Setting Enable Webcam Server Allow using this function by checking on enable. Image format The default is 320x240 pixels. http://www.sapido.com.tw User’s Manual V1.0... - Page 180 For saving image, you can set the save interval time, the default value is 5 seconds. Save Location: Set the save location for webcam image, you may save into USB HDD or remote FTP; if select save to remote FTP, please continue follow-up remote FTP setting. Remote FTP URL http://www.sapido.com.tw User’s Manual V1.0...
- Page 181 In addition, record and monitor live actions with USB webcam; then view the image through Internet browsers or 3.5G mobile phones. 01. Web Camera Monitoring via WAN connecting Input IP address 192.168.1.254 into browser blanks. http://www.sapido.com.tw User’s Manual V1.0...
- Page 182 After logging in as a user, your will see the personal control panel screen as below, please click on Webcam. There will pop-up screen shows the image from web camera as example below. http://www.sapido.com.tw User’s Manual V1.0...
- Page 183 Menu and enable this function, click on Record Setting button for further setting. To set up the Webcam Advanced Configuration for each text field, the image from webcam will be recorded into your USB HDD or Remote FTP. Click on Apply Changes after setup finished. http://www.sapido.com.tw User’s Manual V1.0...
- Page 184 Folder Management and click on Disk Explorer to view entire folder inside the disk including webcam record files. After click on Disk Explorer, you will see the folder screen appear including all the folders inside N+ 3.5G Mini Server Router. (Below is the example.) http://www.sapido.com.tw User’s Manual V1.0...
- Page 185 02. Personal Application All the users under administrator’s setting can view entire webcam recording images from Document. Please log in with your own personal account. For viewing your own folder, please click on “Document”. http://www.sapido.com.tw User’s Manual V1.0...
-
Page 186: Printer Server
Printer Server N+ 3.5G Mini Server Router has two USB ports for connecting with printers to be shared on the local area network. Follow the steps to set up your PC to connect to a printer server. http://www.sapido.com.tw User’s Manual V1.0... - Page 187 LPR settings on your PC. (The example below is for Windows XP platform.) Step 1. After setting USB printer on N+ 3.5G Mini Server Router setup page, please go to Start > Printers and Faxes to add a printer. http://www.sapido.com.tw User’s Manual V1.0...
- Page 188 Step 2. Click on Add a printer item. Step 3. Click on Next button. http://www.sapido.com.tw User’s Manual V1.0...
- Page 189 Step 4. Select Local printer attached to this computer, and click Next. Step 5. Select Create a new port and choose Standard TCP/IP Port from drop-down list, then click Next. http://www.sapido.com.tw User’s Manual V1.0...
- Page 190 Step 6. Click Next. Step 7. Put in N+ 3.5G Mini Server Router address: 192.168.1.1 and click Next. http://www.sapido.com.tw User’s Manual V1.0...
- Page 191 Select LPR and give it the same Queue Name as USB Printer Name has shown, and mark LPR Byte Counting Enabled. Finally, click on Next button. It has to be the same with the Printer Name as shown in section 6.3.4 Printer Server Configuration. http://www.sapido.com.tw User’s Manual V1.0...
- Page 192 CD and then click on Have Disk… button for installation. Or click on Next button to finish the setting. You can name your printer, set it as default printer and share your printer as the next screen shown, the Printer Server setting is getting completed. http://www.sapido.com.tw User’s Manual V1.0...
-
Page 193: System Management
Step 12. It shows you the printer settings that you have specified, and then click Finish. System Management N+ 3.5G Mini Server Router provides system management including password changing, firmware upgrade, time setting, user’s account setting and other detail settings. Following is detail explanation for each. http://www.sapido.com.tw User’s Manual V1.0... -
Page 194: Change Password
You can upgrade the firmware of N+ 3.5G Mini Server Router on this page. Make sure the firmware you want to use is on the local hard drive of the computer. Click Firmware Upgrade to proceed. http://www.sapido.com.tw User’s Manual V1.0... - Page 195 5 seconds with a stick. The router will reboot and all settings will be restored to factory default settings. If the problem still exists, you can visit our web site to see if there is any firmware for download to solve the problem. http://www.sapido.com.tw User’s Manual V1.0...
-
Page 196: Profiles Save
Click on Save button for saving the configuration setting into assigned location. A pop window will show up and ask to save config.dat file. please select the location (Figure 2), for example: the desktop (Figure 3). Please select the location, for example: the desktop. http://www.sapido.com.tw User’s Manual V1.0... - Page 197 Load Settings From File Click on “Browse…” button for searching the saving configuration from hard drive, and then click on Upload button to load all the settings into the router. Select the config.dat file. http://www.sapido.com.tw User’s Manual V1.0...
- Page 198 When you see the screen below, the updating is completed. Please click OK to return to the main menu. Reset Setting to Default After you have tried other methods for troubleshooting your network, you may choose to restore N+ 3.5G Mini Server Router to the factory default settings. http://www.sapido.com.tw User’s Manual V1.0...
-
Page 199: Time Zone Setting
NTP server is set, you will only need to set the time zone. If you manually set the time, you may also set Daylight Saving dates and the system time will automatically adjust on those dates. http://www.sapido.com.tw User’s Manual V1.0... -
Page 200: Upnp Setting
UPnP Setting UPnP (Universal Plug and Play) allows users to connect their UPnP-enabled broadband router, printer server and other devices right to the network with zero-configuration, meaning easier setup for installing the device on the network. The http://www.sapido.com.tw User’s Manual V1.0... - Page 201 PCs on the network without having to install drivers, but to configure and use those devices. After enabling UPNP, click My Network Places, and user can open the web GUI by just clicking on the Internet Gateway Device icon. http://www.sapido.com.tw User’s Manual V1.0...
-
Page 202: Language Setting
Step 4. When you see the screen with message in your selected language, the Language setup is completed. Note: In order to prevent the incomplete translation, you can press “CTRL+F5” to force reload of the page. http://www.sapido.com.tw User’s Manual V1.0... -
Page 203: User Account Management
Check to allow set-user monitoring from webcam or using FTP server. Apply & Cancel After finishing the above, click on Apply button to add set-user into the account list or Cancel button to clear the settings on this page. http://www.sapido.com.tw User’s Manual V1.0... -
Page 204: Folder Management
Moreover, if you want to view the data inside the disk, please click on Browse Disk to view all the folders inside the device. Note: You have to click on Unplug button before removing the USB device from N+ 3.5G Mini Server Router. http://www.sapido.com.tw User’s Manual V1.0... -
Page 205: Log & Status
Log & Status N+ 3.5G Mini Server Router provides the log list and connection status for user to check. 6.5.1 Network Config Network Configuration shows the firmware version and the connection status of LAN, WAN and Wireless. http://www.sapido.com.tw User’s Manual V1.0... -
Page 206: Event Log
Click on Apply Changes to save the setting data. Click on Refresh to renew the system time, or on Clear to clear all the record. After clicking Apply Changes to record the event log, it will be shown as the example below. http://www.sapido.com.tw User’s Manual V1.0... -
Page 207: Logout
Logout Click Logout on the bottom menu to exit and go back to GUI login home page. http://www.sapido.com.tw User’s Manual V1.0... -
Page 208: Chapter 7 Advance Configuration For Wifi Ap Mode
Use this page to set up the local IP address and subnet mask for your router. Please select LAN under the IP Config menu and follow the instructions below to enter the LAN setting page to configure the settings you want. 7.1.2 LAN Interface Setup http://www.sapido.com.tw User’s Manual V1.0... - Page 209 MAC address, and expired time. The default range is 192.168.1.100 - 192.168.1.200. 802.1d Spanning Tree IEEE 802.1d Spanning Tree Protocol (STP) is a link layer network protocol that ensures a loop-free topology for any bridged LAN. The main purpose of STP is to ensure that you http://www.sapido.com.tw User’s Manual V1.0...
-
Page 210: Wireless Setup
Click on Apply Changes to save the setting data. Or you may click on Reset to clear all the input data. Wireless Setup Please select Wireless under the main menu. 7.2.1 Wireless Basic Settings Follow the instructions to configure the Wireless settings. http://www.sapido.com.tw User’s Manual V1.0... - Page 211 Select AP, WDS, or AP+WDS to allow or disallow the wireless operation. Multiple APs Click Multiple APs to set up 4 different SSIDs to deploy a shared WLAN. Users can add or limit the properties for each SSID, increasing the flexibility and efficiency of network. http://www.sapido.com.tw User’s Manual V1.0...
- Page 212 AP. SSID: : : : Please input your wireless network name. Default is “SAPIDO_Mobile_Hotspot”. Channel Width Please select “20MHZ” or “40MHZ” channel width to change the transmission channels. http://www.sapido.com.tw User’s Manual V1.0...
- Page 213 How to Enable URM (Universal Repeater Mode) User could enable URM in wireless basic setting page as shown in following figures. Step 1. Get back to menu “Network Config” and write down the SSID, channel and security. http://www.sapido.com.tw User’s Manual V1.0...
- Page 214 Config” and Click on Apply Changes to save the setting Note: The DHCP server should be disabled under menu “LAN Interface Setup” and then the URM could be enabled. Step 3. Check the AP connectors and the Wireless connecting status. http://www.sapido.com.tw User’s Manual V1.0...
-
Page 215: Wireless Advanced Settings
15. Apply Changes & Reset Click on “Apply Changes” to save the setting data. Or you may click on “Reset” to clear all the input data. 7.2.2 Wireless Advanced Settings Please follow the instructions to configure the Wireless settings. http://www.sapido.com.tw User’s Manual V1.0... - Page 216 The preamble (also called “a header”) is a section of data at the head of a packet that contains information that wireless devices need when they send and receive packets. Short preambles improve throughput performance, but some wireless devices require long preambles. Select the suitable preamble as short or long preamble. http://www.sapido.com.tw User’s Manual V1.0...
-
Page 217: Wireless Site Survey
Click on “Apply Changes” to save the setting data. Or you may click on “Reset” to clear all the input data. 7.2.3 Wireless Site Survey This function provides users to search existing wireless APs or wireless base stations http://www.sapido.com.tw User’s Manual V1.0... -
Page 218: Wireless Security Setup
64-bit and 128-bit encryption using the Wired Equivalent Privacy (WEP) algorithm. Select the type of encryption you want to use (64 or 128 bit) and configure one to four WEP Keys. The “1280bit” method is more secure than the “64-bit”. http://www.sapido.com.tw User’s Manual V1.0... - Page 219 The WPA, WPA2 & WPA2 Mixed encrypt each frame transmitted from the radio using the pre-shared key (PSK) which entered from this panel or a key got dynamically through 802.1x. WPA Authentication Mode Enterprise (RADIUS): Please input the port, IP address, and password of authentication RADIUS Server. http://www.sapido.com.tw User’s Manual V1.0...
- Page 220 8 to 63 characters. If the coding is in Hex, the key length is 64 characters. Apply Changes & Reset Click on Apply Changes to save the setting data. Or you may click on Reset to clear all the input data. http://www.sapido.com.tw User’s Manual V1.0...
-
Page 221: Wireless Access Control
Comment You may input the comments for the set MAC Address. Apply Changes & Reset Click on “Apply Change” to save the setting data. Or you may click on “Reset” to clear all the input data. http://www.sapido.com.tw User’s Manual V1.0... -
Page 222: Wps
Please follow instructions below to enable the WPS function. Start PBC: (1.) Press the WPS button from N+ 3.5G Mini Server Router or click Start PBC from menu “Wi-Fi Protected Setup”, and waiting for the WPS wireless card setting. http://www.sapido.com.tw User’s Manual V1.0... - Page 223 (2.) Open the “Wireless Utility” of your wireless card, and click its “PBC” button, to start auto pairing. (3.) While scanning is successful, the information of the wireless card appears in the windows below. http://www.sapido.com.tw User’s Manual V1.0...
- Page 224 Start PIN: (1.) Open the “Wireless Utility” of your wireless card. Follow its PIN instruction to get a new PIN number. Write it down. http://www.sapido.com.tw User’s Manual V1.0...
- Page 225 (2.) Open menu “Wi-Fi Protected Setup” of N+ 3.5G Mini Server Router, input the PIN number from the wireless card then click Start PIN. (3.) Back to “Wireless Utility” and press the “Start PIN” button to complete the auto-paring process. http://www.sapido.com.tw User’s Manual V1.0...
- Page 226 (4.) When you can see the IP information below, the connection is established http://www.sapido.com.tw User’s Manual V1.0...
-
Page 227: Server
Printer Server applications. 7.3.1 Samba Server By supporting NetBIOS Protocol, N+ 3.5G Mini Server Router provides LAN users to share files or printer via My Network Places. Click Samba Server to proceed. Enable Samba Server http://www.sapido.com.tw User’s Manual V1.0... -
Page 228: How To Enter The Sharing Folder
Describe your server by demand, and the default is SAPIDO_Mobile_Hotspot. Apply & Cancel Click Apply to save or Cancel to clear settings. 7.3.1.1 How to enter the sharing folder Please follow the steps below. Step 1. Go to Start and click My Computer. http://www.sapido.com.tw User’s Manual V1.0... -
Page 229: Ftp Server
If a USB printer is connected and enabled, the printer icon shows up. 7.3.2 FTP Server By directly connecting USB storage devices to any USB port, FTP server can be created with simple configuration. FTP Server utility allows both local and remote users to upload http://www.sapido.com.tw User’s Manual V1.0... - Page 230 The default is 300 seconds; the minimum is 60 seconds. Apply & Cancel Click on Apply button to continue. Click on Cancel button to clean the setting on this page. User Account List http://www.sapido.com.tw User’s Manual V1.0...
-
Page 231: Webcam Server
7.3.3.1 Webcam Server Basic Setting Enable Webcam Server Allow using this function by checking on enable. Image format The default is 320x240 pixels. Preview Click on this button, you can preview the image from webcam. http://www.sapido.com.tw User’s Manual V1.0... - Page 232 Set the save location for webcam image, you may save into USB HDD or remote FTP; if select save to remote FTP, please continue follow-up remote FTP setting. Remote FTP URL Input the FTP URL for saving webcam image. Remote FTP port Input the FTP port number under URL to save image. http://www.sapido.com.tw User’s Manual V1.0...
- Page 233 01. Web Camera Monitoring via WAN connecting Input IP address 192.168.1.254 into browser blanks. You will see the personal account login screen appear. Click on Personal Panel to enter, and then input your own user account and password. http://www.sapido.com.tw User’s Manual V1.0...
- Page 234 After logging in as a user, your will see the personal control panel screen as below, please click on Webcam. There will pop-up screen shows the image from web camera as example below. http://www.sapido.com.tw User’s Manual V1.0...
- Page 235 Menu and enable this function, click on Record Setting button for further setting. To set up the Webcam Advanced Configuration for each text field, the image from webcam will be recorded into your USB HDD or Remote FTP. Click on Apply Changes after setup finished. http://www.sapido.com.tw User’s Manual V1.0...
- Page 236 Folder Management and click on Disk Explorer to view entire folder inside the disk including webcam record files. After click on Disk Explorer, you will see the folder screen appear including all the folders inside N+ 3.5G Mini Server Router. (Below is the example.) http://www.sapido.com.tw User’s Manual V1.0...
- Page 237 All the users under administrator’s setting can view entire webcam recording images from Document. Please log in with your own personal account. For viewing your own folder, please click on “ Document”. After click on Document, you will see folder screen appear as the example below. http://www.sapido.com.tw User’s Manual V1.0...
-
Page 238: Printer Server
Printer Server N+ 3.5G Mini Server Router has two USB ports for connecting with printers to be shared on the local area network. Follow the steps to set up your PC to connect to a printer server. http://www.sapido.com.tw User’s Manual V1.0... - Page 239 Windows XP platform.) Step 1. After setting USB printer on N+ 3.5G Mini Server Router setup page, please go to Start > Printers and Faxes to add a printer. Step 2. Click on Add a printer item. http://www.sapido.com.tw User’s Manual V1.0...
- Page 240 Step 3. Click on Next button. Step 4. Select Local printer attached to this computer, and click Next. http://www.sapido.com.tw User’s Manual V1.0...
- Page 241 Step 5. Select Create a new port and choose Standard TCP/IP Port from drop-down list, then click Next. Step 6. Click Next. http://www.sapido.com.tw User’s Manual V1.0...
- Page 242 Step 7. Put in N+ 3.5G Mini Server Router address: 192.168.1.1 and click Next. Step 8. Select Custom and click on Settings… button to set the detail setting. http://www.sapido.com.tw User’s Manual V1.0...
- Page 243 LPR Byte Counting Enabled. Finally, click on Next button. It has to be the same with the Printer Name as shown in section 6.3.4 Printer Server Configuration. Step 10. Click Finish on the next screen after the aforesaid settings, you have to http://www.sapido.com.tw User’s Manual V1.0...
- Page 244 CD and then click on Have Disk… button for installation. Or click on Next button to finish the setting. You can name your printer, set it as default printer and share your printer as the next screen shown, the Printer Server setting is getting completed. http://www.sapido.com.tw User’s Manual V1.0...
-
Page 245: System Management
Step 12. It shows you the printer settings that you have specified, and then click Finish. System Management N+ 3.5G Mini Server Router provides system management including password changing, firmware upgrade, time setting, user’s account setting and other detail settings. Following is detail explanation for each. http://www.sapido.com.tw User’s Manual V1.0... -
Page 246: Change Password
Click Apply to continue or Cancel to clear the settings on this page. 7.4.2 Firmware Upgrade There is certain risk while upgrading firmware. Upgrading firmware is not recommended unless the significant faulty is found. You can upgrade the firmware of N+ 3.5G Mini http://www.sapido.com.tw User’s Manual V1.0... - Page 247 5 seconds with a stick. The router will reboot and all settings will be restored to factory default settings. If the problem still exists, you can visit our web site to see if there is any firmware for download to solve the problem. http://www.sapido.com.tw User’s Manual V1.0...
-
Page 248: Profiles Save
N+ 3.5G Mini Server Router to default setting by this function. Save Settings To File Click on Save button for saving the configuration setting into assigned location. A pop window will show up and ask to save config.dat file. http://www.sapido.com.tw User’s Manual V1.0... - Page 249 Please select the location, for example: the desktop. Load Settings From File Click on “Browse…” button for searching the saving configuration from hard drive, and then click on Upload button to load all the settings into the router. http://www.sapido.com.tw User’s Manual V1.0...
- Page 250 Select the config.dat file. Click Upload to retrieve. http://www.sapido.com.tw User’s Manual V1.0...
- Page 251 After you have tried other methods for troubleshooting your network, you may choose to restore N+ 3.5G Mini Server Router to the factory default settings. When you see the screen below, the resetting is completed. Please click OK and return to the main menu. http://www.sapido.com.tw User’s Manual V1.0...
-
Page 252: Time Zone Setting
Please select the NTP server from the pull-down list, or you can enter the NTP server IP address manually. Apply Changes & Reset & Refresh Please click on Apply Changes to save the setting data. Or you may click on Reset to http://www.sapido.com.tw User’s Manual V1.0... -
Page 253: Upnp Setting
PCs on the network without having to install drivers, but to configure and use those devices. After enabling UPNP, click My Network Places, and user can open the web GUI by just clicking on the Internet Gateway Device icon. http://www.sapido.com.tw User’s Manual V1.0... -
Page 254: Language Setting
Select Language: Select your preferred language from the drop down list, for example, Korea, and then click Apply Changes. Step 2. When you see the screen with message in your selected language, the Language setup is completed. http://www.sapido.com.tw User’s Manual V1.0... -
Page 255: User Account Management
User Account List and allowed to edit or delete by clicking the linking text. User Name Create the user name in this blank. Password Set up the user’s password. Access Right Check to allow set-user monitoring from webcam or using FTP server. http://www.sapido.com.tw User’s Manual V1.0... -
Page 256: Folder Management
Moreover, if you want to view the data inside the disk, please click on Browse Disk to view all the folders inside the device. Note: You have to click on Unplug button before removing the USB device from N+ 3.5G Mini Server Router. http://www.sapido.com.tw User’s Manual V1.0... -
Page 257: Log & Status
Log & Status N+ 3.5G Mini Server Router provides the log list and connection status for user to check. 7.5.1 Network Config Network Configuration shows the firmware version and the connection status of LAN, WAN and Wireless. http://www.sapido.com.tw User’s Manual V1.0... -
Page 258: Event Log
Click on Apply Changes to save the setting data. Click on Refresh to renew the system time, or on Clear to clear all the record. After clicking Apply Changes to record the event log, it will be shown as the example below. http://www.sapido.com.tw User’s Manual V1.0... -
Page 259: Logout
Logout Click Logout on the bottom menu to exit and go back to GUI login home page. http://www.sapido.com.tw User’s Manual V1.0... -
Page 260: Chapter 8 Ddns Service Application
Step 1. First access the Internet and fill http://www.dyndns.com/ into the address field of your web browser, then click Create Account. Step 2. Fill in the form as required, and then click on Create Account button. http://www.sapido.com.tw User’s Manual V1.0... - Page 261 User’s Manual V1.0...
- Page 262 When you got this account created message, close it, and check your mailbox. You would get a mail from DynDNS website. Step 4. Click on the indicated address within your mail to confirm. Step 5. Click on login. Step 6. Click My Services after logging in. http://www.sapido.com.tw User’s Manual V1.0...
- Page 263 Step 7. Click Add New Hostname. Step 8. Put in your favorite hostname and service type, and then click Create Host after finished. http://www.sapido.com.tw User’s Manual V1.0...
- Page 264 Step 9. Your hostname has been created when you see the following page. http://www.sapido.com.tw User’s Manual V1.0...
-
Page 265: Chapter 9 Q & A
Please press the “Reset” button and keep it pressed for over 7 seconds and the light of STATUS will vanish. The LEDs will flash again when reset is successful. Why does N+ 3.5G Mini Server Router shut down unexpectedly? http://www.sapido.com.tw User’s Manual V1.0... -
Page 266: Ip Address
Settings > Network and Dial-up Connections > double click on Internet Protocol(TCP/IP)>select obtain IP address automatically> Click on OK button. Then, open Internet browser for testing. If you still can’t go online, please test something else below. http://www.sapido.com.tw User’s Manual V1.0... - Page 267 2. Select never dial a connection, click on Apply button, and then click on OK button. 3. Click on Tools and then click on Internet Options. 4. Click on Connections and then click on LAN Settings. http://www.sapido.com.tw User’s Manual V1.0...
-
Page 268: N+ 3.5G Mini Server Router Setup
Don’t keep it working. Then, close Internet browser and open it again for going back to the previous page. Why can’t my USB devices and LAN ports work properly after setting the DHCP? A: There are two rules over here. Rule1: After connecting USB devices, please reboot your Router. http://www.sapido.com.tw User’s Manual V1.0... -
Page 269: Wireless Lan
DHCP-client-enabled PC. Wireless LAN Q: Why couldn’t my wireless notebook work on-line after checking? A: Generally, Wireless networks can sometimes be very complicated to set up, particularly if you're dealing with encryption and products from different vendors. http://www.sapido.com.tw User’s Manual V1.0... - Page 270 Q: My PC can’t locate the Wireless Access Point. A: Check the following: Your PC is set to Infrastructure Mode. (Access Points are always in http://www.sapido.com.tw User’s Manual V1.0...
- Page 271 Use the Special Application feature to allow the use of Internet applications which do not function correctly. If this does solve the problem, you can use the DMZ function. This should work with almost every application, but: http://www.sapido.com.tw User’s Manual V1.0...
-
Page 272: Samba Server
A: First, you should check if you have connected assigned storage device properly. Then enable Samba Server afterwards, so that it can be accessed. USB FTP Server Q: How does N+ 3.5G Mini Server Router assign numbers for the Hard Disk? http://www.sapido.com.tw User’s Manual V1.0... -
Page 273: Webcam Server
Login button. Step3. Click on Web Camera Server under Server directory of the Main Menu. Step4. Then, select Enable to turn on Webcam Access from WAN. Q: Why is that the image from Webcam is so vague? http://www.sapido.com.tw User’s Manual V1.0... -
Page 274: 9.10 Printer Server
A: Your printer’s driver is lost or incompatible with your router. Please set up the printer’s driver again. If you don’t have the appropriate driver or want to get a compatible one, please contact with your printer supplier. http://www.sapido.com.tw User’s Manual V1.0... -
Page 275: 9.11 Support
In this situation, we suggest to disable DHCP server in router and configure your PC manually. 9.13 USB Device Q: How many USB devices can be connected to the Product? A: N+ 3.5G Mini Server Router supports maximum of 2 USB ports. http://www.sapido.com.tw User’s Manual V1.0... -
Page 276: Chapter 10 Appendix
Safari ver. 3.04 and the following related versions. 10.3 SadoGO Microsoft:Windows 2000, XP, Vista and the following related versions. 10.4 Communications Regulation Information Should any consumers need to learn more information, services and supports, please contact the supplier of your product directly. http://www.sapido.com.tw User’s Manual V1.0...