Table of Contents
Advertisement
Advertisement
Table of Contents

Related Manuals for Keurig B100


Summary of Contents for Keurig B100
- Page 1 USE & CARE GUIDE B100 SINGLE-CUP BREWING SYSTEM B R E W I N G E X C E L L E N C E O N E C U P A T A T I M E ® Part # 71-000039-003...
-
Page 2: Limited One Year Warranty
WARRANTY Limited One Year Warranty Keurig warrants that your Keurig B100 Brewer will be free of defects in materials or workmanship under normal home use for one year from the date of purchase. Keurig will, at its option, repair or replace the Brewer without charge upon its receipt of proof of the date of purchase. -
Page 3: Table Of Contents
........Features of the B100 Brewer . -
Page 4: Safe Operation & Use Important Safeguards
SECTION 1 SAFE OPERATION & USE Important Safeguards When using electrical appliances, basic safety precautions should always be followed, including the following: 1. Read all Instructions. 2. Do not touch hot surfaces. 3. To protect against fire, electric shock and injury to persons do not immerse cord, plugs, or the appliance in water or other liquid. -
Page 5: Set-Up & Operation Helpful Hints
1. Keep your Keurig Brewer turned “ON” all the time. For a fresh cup of coffee or tea anytime you want, we suggest you keep your Keurig Brewer turned “ON” all the time. The Brewer draws minimal power (approximately the equivalent of a 60 Watt light bulb). -
Page 6: Unpacking
It should contain the following: Parts Checklist: 1. K-Cup Holder Assembly (preassembled) 1 K-Cup Holder 1 Funnel 2. Keurig B100 Brewer 3. Drip Tray Assembly consisting of 1 Drip Tray 1 Drip Tray Plate 1 Cleaning Tool (under Drip Tray) 1. -
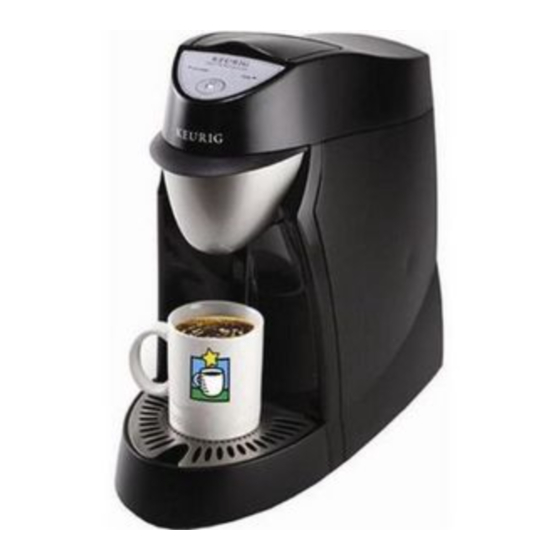
Page 7: Features Of The B100 Brewer
Features of the B100 Brewer Water Fill Area & Lid “Brew” Button “Not Ready” Green Light “Ready” Light Drain Cap (in rear) Brew Drawer On/Off Switch (in rear) Cleaning Tool (under Drip Tray) Drip Tray Plate Water Fill Indicator Drip Tray... -
Page 8: Assembly
Assembly 1. Drip Tray Assembly Drip Tray Plate a. Ensure that Drip Tray Plate rests on Drip Tray. b. Place Drip Tray Assembly at the front base of the Brewer. Drip Tray K-Cup Holder Assembly 2. K-Cup Holder Assembly a. Open the Brew Drawer. b. - Page 9 2. Fill with Water Water Fill Lid Vent Port a. Lift the Water Fill Lid and hold it open. Water Fill Area b. Fill the Brewer with up to 80 oz of water Red “Not Ready” Light on the initial fill (regular re-fill quantity is 64 oz) by pouring water into the Green “Ready”...
-
Page 10: Controls & Indicators Brewer Control Panel
SECTION 3 CONTROLS & INDICATORS Brewer Control Panel Controls operation and indicates the brewing system status. Green “Not Ready” Light “Ready” Light “Brew” Button Control Panel Indicators Display Meaning Red “Not Ready” Solid Not Ready - needs water or is heating water. -
Page 11: Water Level Indicator
Water Level Indicator Indicates the amount of water and water system status. Water Level Indicator Water Level Indicators Display Meaning Water Fill Indicator Solid Blue Has sufficient water. Flashing Blue Needs water. Flashing Yellow De-scale Brewer (See instructions on page 10). If you have de-scaled the Brewer and the light is still flashing yellow, the Brewer may need service –... -
Page 12: Care & Maintenance Cleaning Exterior Parts
SECTION 4 CARE & MAINTENANCE Cleaning Exterior Parts Regular cleaning of the Brewer’s external components is recommended. a. Housing: the Housing and other exterior components may be cleaned with a soapy, damp non-abrasive cloth. b. Drip Tray & Drip Tray Plate: the Drip Tray can accumulate up to 16 oz of overflow. The Drip Tray and Drip Tray Plate should be periodically inspected and rinsed clean. -
Page 13: Draining & Storing Your Keurig Brewer
Draining & Storing Your Keurig Brewer You can drain the water from your Keurig Brewer if you are going to move it, store it or not use it for more than a week. To drain your Keurig Brewer, please follow these instructions: a. - Page 14 a. PREPARE Step 1: Make sure you have at least 64 oz. of undiluted white vinegar on hand. You will also need an empty sink and a ceramic mug (do not use a paper cup). Step 2: Turn power “OFF”, remove Charcoal Filter (if any) and drain the Brewer as instructed in the Care &...
-
Page 15: Eliminating Potential Plastic Odor
Eliminating Potential Plastic Odor Like many new products, you may notice a slight plastic or metallic odor. If this persists, we recommend this cleaning procedure to eliminate any odor. a. PREPARE Step 1: Turn power “OFF”, unplug and drain the Brewer as instructed in the Care and Maintenance section on page 10 of this guide. -
Page 16: Troubleshooting
SECTION 5 TROUBLESHOOTING SITUATION SOLUTION Brewer Does Not Have Power Check to be sure it is plugged in securely. Plug into a different outlet. Reset circuit breaker if necessary. Brewing a Partial Cup Ensure Exit Needle is not clogged. (Less than 6 oz.) Clean K-Cup Holder Assembly if necessary and rinse under faucet (See page 9). - Page 17 TO CONTACT CUSTOMER SERVICE: www.keurig.com 1-866-901-BREW (2739) Made in USA Keurig, Keurig-Brewed, Brewing Excellence One Cup at a Time, and K-Cup are registered trademarks of Keurig, Inc. ©2003 Keurig, Inc. All rights reserved. Covered by U.S. Patents 5,325,765; 5,840,189; 6,079,315;...