Table of Contents
Advertisement
Quick Links
Advertisement
Table of Contents

Related Manuals for Sirius Satellite Radio Sportster


Summary of Contents for Sirius Satellite Radio Sportster
- Page 1 Satellite Radio Plug & Play Installation & User Guide...
- Page 3 Congratulations on the Purchase of your new SIRIUS Sportster 3 Plug-n-Play Radio Your new SIRIUS Sportster™ 3 Plug-n-Play Radio lets you enjoy SIRIUS ® Satellite Radio’s digital entertainment anywhere you’ve installed the SUPH1 SIRIUS Universal Plug and Play Home Kit, SUPV1 SIRIUS Universal Plug and Play Vehicle Kit, or the SUBX1 SIRIUS Plug and Play Universal Boombox (each sold separately).
-
Page 4: Table Of Contents
ConTRolS SIRIUS Sportster Reference Guide ......40 Remote Control Reference Guide ......42 Vehicle Dock Reference Guide . - Page 5 Memory (MEMO) and Song Seek (S-Seek) Functions ....53 Game Alert ........60 menU oPTIonS Sirius ID .
-
Page 6: Warning And Safety Information
Warning and Safety Information FCC Information This device complies with part 15 of the FCC Rules. Operation is subject to the following two conditions: This device may not cause harmful interference, and This device must accept any interference received, including interference that may cause undesired operation. -
Page 7: Canadian Compliance
General Precautions liquid Crystal Precautions If the LCD screen on the SIRIUS Sportster is damaged, do not to touch the liquid crystal fluid. If any of the following situations happen, take the action indicated: If the liquid crystal fluid comes in contact with your skin, wipe the skin area with a cloth and then wash the skin thoroughly with soap and running water. -
Page 8: Warnings
• To avoid short circuits, do not open the unit, and never put or leave any metallic objects (coins, tools, etc.) inside the unit. • If the unit emits smoke or unusual odors, turn the power off immediately, and disconnect the unit from any power source. - Page 9 Cleaning and maintenance If the radio or accessories become dirty, turn the power off and wipe it clean with a soft cloth. Do not use hard cloths, strong cleaning fluids, paint thinner, alcohol, or other volatile solvents to clean. These may cause damage to the radio. Cigarette lighter adapter The SUPV1 vehicle dock cannot be powered directly from a vehicle’s 12 VDC power system.
-
Page 10: Copyrights & Trademarks
Portions of the software on this radio are licensed under the eCos License. Distribution of eCos requires that the eCos source code be made available to Sirius Satellite Radio custom- ers. The eCos License and eCos source code are available to the public at http://www.sirius. -
Page 11: Package Contents
Package Contents The following items are included with your purchase of the SIRIUS Sportster 3 radio: Sportster 3 Radio Sportster 3 Radio Remote Remote Control Control Vehicle dock Vehicle dock Package Contents... - Page 12 Suction Cup mount Suction Cup mount Vent mount & Vent mount & Cigarette lighter Cigarette lighter extended Vent hooks extended Vent hooks adapter adapter antenna antenna mounting Screws mounting Screws alcohol Swab alcohol Swab magnetic antenna magnetic antenna Cover/Tail Cover/Tail Package Contents...
- Page 13 Unpack your SIRIUS Sportster 3 radio carefully and make sure that everything shown is pres- ent. If anything is missing or damaged, or if your SIRIUS Sportster radio fails to operate, notify your dealer immediately. It is recommended that you retain the original carton and packing materials in case you need to ship your radio in the future.
-
Page 14: Installation
Installation SIRIUS suggests professional installation of this product in your vehicle. Professional instal- lation provides an experienced technician to install this product in your vehicle, advice for se- lecting a suitable mounting location, installation of the antenna, and routing all the necessary wires and cables. - Page 15 figure 1 figure 1 Depending upon the mounting location you select in your vehicle, the mount should be at- tached to the vehicle dock and installed as described in the following sections. Installation...
- Page 16 Suction Cup mount method (a) The suction cup mount may be attached to any smooth surface. Before attaching the suction cup mount to your windshield, you should check your state and local laws for regulations regarding mounting this device on your windshield. To mount the vehicle dock using the suction cup mount, assemble the mount as follows: Attach the vehicle dock to the suction cup mount using the provided screws.
- Page 17 Be sure the cam lever is up (as shown in Figure 3) and position the suction cup mount on the windshield or other location you which have chosen. Press the cam lever all the way down towards the base of the mount until it locks to adhere the suction cup. (To unlock the suction cup, lift the lever up.) figure 3 figure 3...
- Page 18 Vent mount method (b) To mount the vehicle dock using the vent mount method, install the vent mount as follows: If the vent louvers in your vehicle are recessed, you may need to use the longer vent hooks with the vent mount. Refer to Figure 4 and install the longer vent hooks into the vent mount.
- Page 19 Refer to Figure 6 and attach the vent mount to a heating/air conditioning vent in your vehicle. Position the two tension springs a against a vent louver B. Then push the vent mount into the vent, far enough so that the hooks C drop down and hook the rear of the vent louver (Figure 7).
-
Page 20: Installing The Antenna
The angle of the vehicle dock may be changed by changing the position of foot D on the vent mount (Figure 6) to a different adjustment hole. (Figure 8) ADJUSTMENT HOLES figure 8 figure 8 Installing the Antenna The optimum mounting location for the magnetic antenna is on the roof of the vehicle, with a minimum unobstructed area of 12 inches by 12 inches, and exactly 6½... - Page 21 figure 9 figure 9 Sedan/Coupe. Mount the antenna along the rear center-line of the vehicle roof, located at the rear of the roof near the rear window. Pickup Truck. Mount the antenna along the rear center-line of the cab roof, located at the rear of the roof near the rear window.
- Page 22 Connect the rubber antenna cable cover/tail to the antenna cable, making sure that the strain- relief on the antenna sits into the rubber antenna cable cover/tail groove. (Figure 10) Route the antenna cable through the wire channel in the rubber antenna cable cover/tail. Do not remove the protective strips yet.
-
Page 23: Connecting The Cigarette Lighter Adapter
ber antenna cable cover/tail for another 30 seconds. (Figure 12) At room temperature (68 degrees), maximum adhesion usually occurs within 72 hours. During this period, avoid car washes and other contact with the antenna and rubber antenna cable cover/tail. Connect the antenna cable to the anT connection at the rear of the vehicle dock. (Refer to Figure 3 on page 44 for the location of this connector.) Connecting the Cigarette Lighter Adapter Connect the provided cigarette lighter adapter to the DC5V connection at the rear of the... - Page 24 90. 1 figure 13 figure 13 Included with your SIRIUS radio is an FM Extender Antenna to maximize the audio quality of your SIRIUS radio when using a wireless audio connection. Should the wireless audio qual- ity without the FM Extender Antenna be not acceptable, you can try using the FM Extender Antenna (or opt for a direct connection).
- Page 25 If you’re not sure which FM channels are not broadcasting in your home or travel cities, you can also go to http://www.sirius.com/fmchannel and search for a suggested FM channel based on your zip code. Wireless audio Connection Using the fm extender antenna The purpose of the FM Extender Antenna is to maximize the audio quality of your SIRIUS radio when using the FM transmitter in your SIRIUS radio to transmit the audio to your vehicle’s FM radio.
- Page 26 The FM antennas found in vehicles are of four distinct types: Aerial Type Fender Mounted FM • Antenna: A fixed or retractable aerial antenna located on the front or rear fender of the vehicle. • Aerial Type Roof Mounted FM An- tenna: A fixed aerial antenna mounted on the roof (often at the front or rear of the roof, just above the window glass).
- Page 27 on Glass Type FM Antenna: Wires on • the window glass of the vehicle, usually near the top of the window. It may be located on the windshield glass, the rear window glass, or a rear side window in some SUV and mini-van type vehicles (and other vehicles).
- Page 28 The FM Extender Antenna should be placed inside the vehicle, as close as possible to the vehicle’s FM antenna. A test mounting should be done first using the included suction cup mounts to test the installation. Once an acceptable location has been found, you will remove the suction cups and permanently adhere the FM Extender Antenna using the adhesive mounts.
- Page 29 Alternate mounting location on adjacent A-Pillar figure 15 figure 15 figure 16 figure 16 Installation...
- Page 30 b Installation Instructions for Vehicles with aerial Type Roof mounted fm antenna For vehicles where the FM radio antenna is located on the front or rear of the roof of the vehicle, the FM Extender Antenna should be mounted horizontally on the front or rear glass below the FM antenna, or installed into the headliner of the vehicle under the FM antenna.
- Page 31 Installation Instructions for Vehicles with on glass Type fm antenna For vehicles where the FM radio antenna is located on the window glass, the FM Extender Antenna can be mounted horizontally on the glass, directly over the FM radio antenna, or installed into the headliner of the vehicle directly above the FM antenna.
- Page 32 figure 19 figure 19 Installation...
- Page 33 d Installation Instructions for Vehicles with Shark fin Type fm antenna For vehicles where the FM radio antenna is located on the rear of the roof of the ve- hicle, the FM Extender Antenna should be mounted horizontally on the glass below the FM antenna, or installed into the headliner of the vehicle under the FM antenna.
- Page 34 Plug the FM Extender Antenna into the FM OUT connector of the vehicle dock. (Figure 21) From FM Extender Cable FM OUT figure 21 figure 21 Tune your vehicle’s FM radio and your SIRIUS radio to the same FM channel (Figure 22): a.
- Page 35 note: The FM transmitter in your SIRIUS radio is automatically set to FM channel 88.1. This may not be the best channel in your area. Tip: If you regularly travel between cities with different active FM channels, you may need to find channels that are not broadcasting in each city. Several SIRIUS radio models can store multiple FM transmit channels, so you can easily switch to the best FM channel for each city.
-
Page 36: Direct Connections
DireCt ConneCtions Direct connection provides better audio performance than a wireless connection and removes the possibility of interference from local FM broadcasters. direct Wired audio Connection If your vehicle radio offers an “AUX IN” or “LINE IN” connection, it is the best audio connec- tion available. - Page 37 Cassette adapter If your vehicle radio has a cassette player: Purchase a Cassette Adapter at your local electronics retailer. Connect the adapter between the “AUDIO OUT” or “LINE OUT” on your SIRIUS radio and the vehicle radio’s cassette slot. (Figure 26) TRANSMITTER figure 26 figure 26...
- Page 38 SIRIUS fm direct adapter If your vehicle radio does not have an “AUX IN” or “LINE IN” jack, the SIRIUS FM Direct Adapter provides a wired connection between your SIRIUS radio and your vehicle radio, elimi- nating the outside static and interference you sometimes experience when using a wireless FM connection.
-
Page 39: Subscribing To The Sirius Service
Before you can listen to the SIRIUS service, you need to subscribe to the SIRIUS Satellite Radio service. To subscribe, do the following: Be sure that the SIRIUS Sportster is correctly installed, is in the vehicle or home dock, and that the antenna is oriented to receive the SIRIUS signal. -
Page 40: Controls
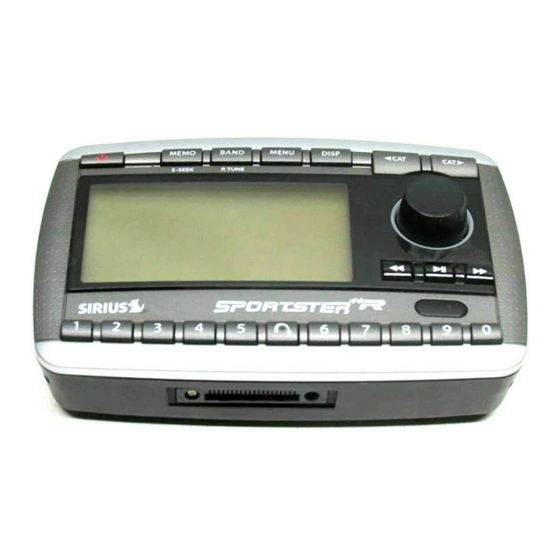
Controls SIRIUS Sportster Reference Guide Figure 1 and the section following identify and describe the buttons and controls of the SIRIUS Sportster. 5 6 7 figure 1 figure 1 Category Buttons: Navigates through the category list screens which displays the SIRIUS channel categories. - Page 41 Pressing and holding the MENU button accesses the FM Transmitter setup menu to change the frequency of the FM transmitter. Power Button: Turns the radio On and Off. Rotary Knob & Select Button: Navigates through display screens and makes selections of items highlighted on the display screen.
-
Page 42: Remote Control Reference Guide
Remote Control Reference Guide Figure 2 and the section following identify the buttons of the remote control. figure 2 figure 2 Power Button: Turns the radio On and Off. Channel Buttons: Navigates through channels and display screens. FM Frequency Button: Accesses the FM Transmitter menu to change the frequency of the FM transmitter. - Page 43 Pressing and holding the MENU button accesses the FM Transmitter setup menu to change the frequency of the FM transmitter. BAND Button: Pressing and releasing this button switches between the preset banks A, B, and C, which hold 10 presets each for a total of 30. Pressing and holding this button enables the Preset Tune Mode, which allows for viewing and browsing of stored presets.
-
Page 44: Vehicle Dock Reference Guide
Vehicle Dock Reference Guide Figure 3 and the section following identify and describe the controls and connectors of the vehicle dock. figure 3 figure 3 Lock Switch: Locks and unlocks the SIRIUS radio in the vehicle dock. Mounting Holes: Mounting holes for attaching the suction cup mount or the vent mount. FM OUT Connector: FM output for use with the optional FM Direct Adapter. -
Page 45: Operation
Operation Display Screen Information The display screen of the SIRIUS Sportster provides information about the operation of the radio, such as the currently tuned channel, song or show being played, artist name, time and other information. This screen is referred to as the Default display screen in this manual. -
Page 46: Navigating Menus And Lists
Navigating Menus and Lists The menu and list structures in the SIRIUS Sportster are navigated by turning the Rotary Knob to scroll through a menu or list to highlight your choice, and then pressing the Rotary Knob to select the choice. When using the remote control, menus and lists are navigated by pressing the Channel buttons, and then pressing the Select button to select the choice. -
Page 47: Search Modes (Category, Channel, Artist, Song Title)
Search Modes (Category, Channel, Artist, Song Title) The SIRIUS Sportster radio has four ways to search for and select music: by category, by channel, by artist, and by song title. Each search method is discussed in the sections which follow. - Page 48 Pressing the DISP button while in the channel list mode will change between channel name, artist name, and song title. (Figure 4) You can use this feature to search for a specific artist, song, or show that may be playing at the time. Turn the Rotary Knob to locate the channel you want.
-
Page 49: Direct Tuning
Direct Tuning Channels can be directly accessed by pressing and releasing the Rotary Knob and then using the 0–9 keys to enter the desired channel number. (Figure 5) Once the desired number has been entered, the channel will change and the display will revert to the default screen for the selected channel. -
Page 50: Jump Button
Jump Button The SIRIUS Sportster radio features a special button called Jump . This button can be pro- grammed to jump to a channel which is accessed frequently and temporarily such as traffic, weather, news, or sports. -
Page 51: Channel Presets (P.tune Mode)
Pressing the Jump button while the radio is searching will cancel the search. Pressing the Jump button after the radio has tuned to your traffic report will return to the channel to which you had been listening immediately prior to pressing the Jump button. - Page 52 Preset Tune list mode While in the preset tune mode, you can view your list of presets showing channel name, artist name, or song title, just like in the channel list mode: Press and hold the BAND button to enter the preset tune mode (P.TUNE). Press the DISP button for two seconds which will bring up the preset tune mode dis- playing up to 6 preset channel names.
-
Page 53: Memory (Memo) And Song Seek (S-Seek) Functions
Memory (MEMO) and Song Seek (S-Seek) Functions This feature allows you to capture and store information about the programming (artist, song, sports team, or traffic city) on the currently tuned channel, up to a total of 30 items. The radio then continuously searches all the SIRIUS channels and alerts you when a match to a saved program is being played. - Page 54 figure 10 figure 10 Turn the Rotary Knob to highlight Store Artist or Store Song (when available) and press the Rotary Knob to save the current selection to memory. If both the artist and song are available to save, you will be prompted again to save which- ever one you haven’t yet saved, song title or artist name.
- Page 55 If either of the teams is not available to save, that team will be displayed as unavailable. (Figure 13) figure 13 figure 13 Turn the Rotary Knob to highlight the desired sports team (when available) and press the Rotary Knob to save the current selection to memory. The next screen will ask which kind of alert you wish to have.
- Page 56 figure 15 figure 15 The radio will then revert to the last active display mode. If the new alert was successfully stored in memory, an Artist/Song/Game Stored pop-up screen followed by an X Used/Y Empty screen will be displayed for one and two seconds respectively.
- Page 57 A Replace–Cancel screen will then be displayed which will allow you to choose whether to re- place an existing alert stored in memory, or to cancel storing the alert to memory. (Figure 18) figure 18 figure 18 Turn the Rotary Knob to select whether to replace an existing alert or cancel saving the alert to memory.
- Page 58 Use the Rotary Knob to scroll through the listings. This function allows you to review previously stored program information. The information will be displayed as sports league or college/team name or artist name/song title. (Figure 20) figure 20 figure 20 deleting a Song Title Stored in memory To delete a song title stored in memory: Press and release the Rotary Knob while in S-Seek mode.
- Page 59 Song (S-Seek) alert When S-Seek alerts are enabled, whenever the SIRIUS Sportster radio is turned on, it auto- matically searches the channels to determine if a match exists with the program information stored in radio’s memory.
-
Page 60: Game Alert
Game Alert The SIRIUS Sportster radio can automatically identify when your favorite team is playing. When a game is found, Game Alert is displayed and the My Game Zone screen is displayed listing the sports games which are currently being played. (Figure 25) Use the Rotary Knob to select and tune to the desired game. -
Page 61: Menu Options
Menu Options Menu options allows you to set and/or change the various features and settings of the SIRIUS Sportster. To enter the menu options, press and release the MENU button. The Menu Options screen will be displayed. (Figure 1) figure 1... -
Page 62: Fm Transmitter
This menu option displays your 12 digit SIRIUS ID (SID) number. (Figure 2) The SID is unique to each SIRIUS Sportster radio, and is required to activate your service. It is recommended that you write this number in the space provided near the end of this user guide. No adjust- ments are allowed in this mode. -
Page 63: Game Alert
Game Alert Game Alert allows you to store your favorite sports teams in memory. The SIRIUS Sportster radio will constantly scan the channels and will sound an alert when a sports team you stored in memory is playing a game, or when there is a score update for a team, depending upon which option you have chosen for the sports team. - Page 64 figure 4 figure 4 Select the league team name or college team name you wish to add. (Figure 5) figure 5 figure 5 Note that for college teams, you will receive an alert for all teams playing for that col- lege.
-
Page 65: Settings
Settings The Settings menu allows you access the Jump Settings, Display Options, Memory Options, Audio Level, Confirmation Tone, and Parental Control menu options, which are described in the sections following. Jump settings You can access the Jump Settings menu by pressing and holding the Jump button for two seconds or by pressing the MENU button to enter Menu Options, selecting Settings, and then selecting Jump Settings. -
Page 66: Display Options
figure 8 figure 8 Note: If the channel list has not yet been downloaded from the SIRIUS data stream, an Updat- ing City List notification screen will be displayed. Wait 10 minutes and then try selecting a city again. Setting the Jump button to a Channel To set the jump button to any channel other than a traffic channel: Select the JumpSet menu option. -
Page 67: Confirm Tone
To exit Display Options, press the MENU button. Confirm tone The SIRIUS Sportster radio can sound an audio tone alert when the radio powers On and Off, as well as when an S-Seek Alert is activated. The default setting is On. To change the tone options: Select the Confirm Tone menu option. -
Page 68: Audio Level
The audio output level of the SIRIUS Sportster radio can be adjusted to fine tune the audio level for best performance. This is important when using either the optional Home Docking Station or the optional Mobile Docking Station. The audio level setting affects both the line output and FM transmitter output audio levels. -
Page 69: Parental Control
Control The SIRIUS Sportster radio has the ability to lock a channel (or channels) you do not want others to access without your permission. Like the Skip channel feature, the locked channel will not appear when browsing channels with the Rotary Knob. In addition, when the anyone tries to access the locked channel using the Direct Tuning function, an Enter Code screen will be displayed and the channel cannot be accessed until the correct code is entered. - Page 70 Changing the lock/Unlock Code The first time the Lock/Unlock menu is accessed, you must enter the default lock code. The default lock code is 0000. This code can be kept or changed. To change the lock code: Select the Lock Options menu option. Select the Edit Code menu option.
-
Page 71: Time-Based Features
Time-Based Features The Time-Based Features menu allows you access the Clock, Alarm, Program Alert, Auto Shutdown, and Sleep Mode menu options, which are described in the sections following. CloCk The Clock menu option allows you to setup the clock shown on the Default display screen, based on the format desired and the time zone in which you reside. -
Page 72: Program Alert
Alarm Time: This menu option allows you to set the alarm time. Use the Category buttons and the Rotary Knob to select the time when you want the radio to power on. (De- fault time is 12:00 PM). When the desired time is displayed, press the Rotary Knob. program alert The Program Alert menu option allows you to program the radio to switch to a selected channel at a specific time. -
Page 73: Signal Indicator
sleep moDe The Sleep Mode menu option allows you to program the radio to shutdown after a selected period of time. When the Sleep Mode menu option is selected, the following menu options are displayed: 15 Minutes 30 Minutes 45 Minutes 60 Minutes Select the desired sleep time, or select Off to cancel a previously selected sleep time. -
Page 74: Factory Default
14 figure 14 Factory Default The Factory Default option will restore all original factory settings in your SIRIUS Sportster radio. Note that factory default will not reset the lock code if you have changed it from the default lock code. - Page 75 If Yes is chosen, the radio reverts to the original factory settings for the following param- eters: • All presets revert to empty • Reset to Normal Tuning Mode • Reset to default screen (with 2-line PDT display) • Reset previous power state setting to: Off •...
-
Page 76: Troubleshooting
The FM frequency contains static. clarity Locate a quiet FM frequency on your vehicle radio and set the FM transmitter frequency of the SIRIUS Sportster to match. If using the AUX audio connector, check the cable connections. No sound The audio cables are not connected, or the FM radio is set to the wrong frequency. -
Page 77: Optional Accessories
SIRIUS radio to your car audio system. The SUPV1 SIRIUS Universal Plug and Play Vehicle Kit will work with the Sportster 3 and most new SIRIUS plug and play radios. - Page 78 SIRIUS fm direct adapter The FM Direct Adapter accessory redirects your vehicle’s FM antenna signal when listening to your SIRIUS radio using your vehicle’s AM/FM radio. When the SIRIUS radio is powered on the FM Direct Adapter automatically redirects the vehicle’s FM antenna signal away from the vehicle’s AM/FM radio, reducing any interference which might be present from FM radio sta- tion broadcasts.
-
Page 79: Specifications
Specifications Audio Output ..........1V (Peak-to-Peak) Total Harmonic Distortion (THD) . -
Page 80: Warranty
Warranty 12 month Warranty SIRIUS Satellite Radio Inc. (the “Company”) warrants to the original retail purchaser of this product that should this product or any part thereof, under normal use and conditions, be proven defective in material or workmanship within 12 months from the date of original purchase, such defect(s) will be repaired or replaced with new or reconditioned product (at the Company’s option) without charge for... -
Page 81: Sirius Id
SIRIUS ID Write down the SIRIUS ID (SID) of your SIRIUS Sportster in the space provided below. SID: _______________________________________ SIRIUS ID... - Page 83 SIRIUS Customer Service: 1-888-539-7474 customercare@sirius-radio.com SIRIUS Satellite Radio Inc. 1221 Avenue of the Americas New York, NY 10020 1-888-539-7474 http://www.sirius.com...
- Page 84 SIRIUS Satellite Radio Inc. 1221 Avenue of the Americas New York, NY 10020 (800) 869-5590 http://sirius.com SIRIUS Sportster SP3-TK1 with SUPV1 (011907a)