
Related Manuals for Sirius Satellite Radio SIRIUS Sportster SP-R1


Summary of Contents for Sirius Satellite Radio SIRIUS Sportster SP-R1
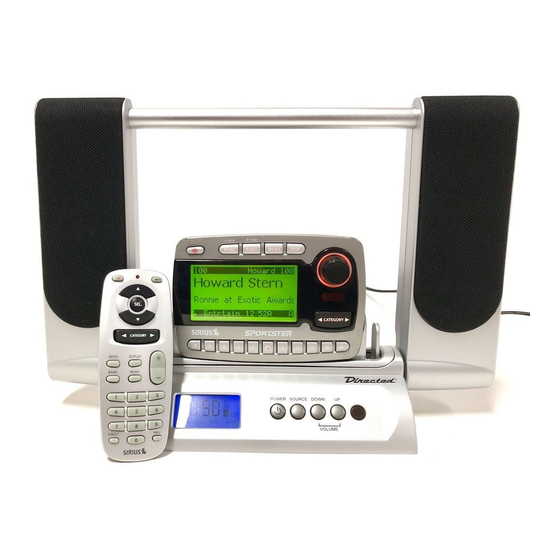
- Page 1 SP-R1 Satellite Radio Receiver User Guide...
-
Page 2: Table Of Contents
CONGRATULATIONS! Your new Sirius Sportster™ SP-R1 portable Plug-n-Play Receiver kit lets you enjoy SIRIUS® Satellite Radio’s digital entertainment anywhere you’ve installed the SP-H1 Home Docking Station, SP-C1 Mobile Docking Station or the SP-B1 Portable Boombox (each sold separately). Use this manual to familiarize yourself with all of Sirius Sportster’s features and capabilities. -
Page 3: Box Contents
Take the following precautions to prevent traffic accidents and avoid personal injury: • Installation must be performed according to this user guide. Sirius Satellite Radio is not responsible for issues arising from installations not performed according to the procedures in this manual. - Page 4 Warning Take the following precautions to prevent fire and avoid personal injury: • To avoid short circuits, never put or leave any metallic objects (coins, tools, etc.) inside the unit. • If the unit emits smoke or unusual odors, turn the power off immediately and consult your Sirius Sportster retailer.
- Page 5 Note This equipment has been tested and found to comply with Part 15 of the FCC Rules. These rules are designed to provide reasonable protection against harmful interference. This equipment may cause harmful interference to radio communications if it is not installed and used in accordance with these instructions.
-
Page 6: Receiver Controls And Features
Receiver Controls and Features 1. POWER Button : Turns Receiver On and Off. 2. Rotary Knob & Select Button: Navigates through display screens and makes selections of items highlighted on the display. Rotating clockwise (CW) increases or moves up in the menus. -
Page 7: Remote Control
Remote Control 1. POWER Button 2. Channel Buttons: Navigate through channels and display screens. 3. Category Buttons: Navigate through categories and display screens. 4. Mute Button: Mutes audio. 5. DIRECT Button: Accesses channels directly by number. 6. SELECT (SEL) Button: Selects items highlighted on the display; hold- down to jump to the previously-received Channel. -
Page 8: Activating Your Sirius Subscription
Activating your SIRIUS Subscription Before you can listen to the Receiver, you must subscribe to SIRIUS Satellite Radio’s service. 1. Make sure that the Sirius Sportster Receiver is properly connected and that its antenna is oriented to receive the SIRIUS satellite signal (see Docking Station Installation and/or Boombox User Manuals for details). -
Page 9: Basic Operation
Basic Operation After you have successfully activated your SIRIUS subscription, the Normal Operation (Default ) screen will appear (Below): Use the Rotary Knob to select channels. • The selected channel will automatically start playing. The name and artist of the currently playing song will scroll across the display. -
Page 10: Search Modes (Category, Channel, Artist, Song)
Search Modes (Category, Channel, Artist, Song Title) The Sirius Sportster Receiver has four ways to search for and select music: by category, by channel, by artist, and by song title. Searching Categories If you want to listen to a different entertainment category, push the CATEGORY buttons to activate the Category Select screen (top right): 1. -
Page 11: Direct Tuning
3. Press and release the Rotary Knob to select the channel. To exit this mode without changing to a new channel, press and hold the DISP button for 1 second. Press and Hold the DISP button to enter the Channel List Mode Press DISP again to show the Artist Name... -
Page 12: Setting Channel Presets
Setting Channel Presets You can store up to 30 of your favorite channels as presets, for quick access. Presets are stored in 3 banks, A, B & C, each containing 10 channel presets. 1. Press the BAND button to activate the preset bank you want. -
Page 13: Searching For A Channel Preset (P.tune Mode)
• If your Jump Setting is set to traffic, pressing the Jump button will immediately begin searching for your desired city’s traffic report. The band indicator on the display will change to the Jump icon to indicate a Jump search is active. Once your local traffic is found, the Receiver will automatically tune to that channel. -
Page 14: Preset Tune List Mode
Default Display P.TUNE Display To exit Preset Tune Mode and return to Channel Tuning Mode, press and hold the BAND button. Preset Tune List Mode In Preset Tuning Mode you can view your list of presets showing Channel Name, Artist Name, or Song Title just like in the Channel List Mode: 1. -
Page 15: Memory (Memo) And Songseek (S-Seek) Functions15
P.TUNE Channel Name List Display P.TUNE Artist Name List Display P.TUNE Song Title List Display Sportster SP-R1 User Guide Memory (MEMO) and Song Seek (S-Seek) Functions: This feature allows the user to capture and store information about the programming (Artist/Song, sports team or traffic city) on the currently tuned channel, up to a total of 20 listings. - Page 16 If the current tuned channel is a play-by-play sports broadcast, pressing the MEMO button will allow you to select one of the teams playing to be stored in memory. In the future, as long as your receiver is turned on, you will be alerted when your team is playing in a game being broadcast.
- Page 17 Viewing Program Information stored in Memory 1. Press and hold the MEMO button for 3 seconds to enter S-Seek Mode. The program information stored in memory will be displayed one-at-a-time in page format. 2. Use the Rotary Knob to scroll through the 20-page listing.
- Page 18 Activating the Song (S-Seek) Alert 1. Press and hold the MEMO button for 3 seconds to enter the S-Seek Mode. 2. Press and Release the Rotary Knob. A pop-up screen displaying two selectable options - “Delete” and “S-Seek” will appear (below left). 3.
-
Page 19: Game Alert
Game Alert The Sirius Sportster Receiver can automatically identify when your favorite team is playing. When a game is found, the Game Alert screen is displayed, followed by tuning information for that game. Use the Rotary Knob to select and tune to the desired channel. -
Page 20: Sirius Id
Sirius ID Displays your 12 digit Sirius ID (SID) number. The SID is unique to every Sirius Sportster Receiver and is required to activate your service. It is recommended that you write this number in the space provided on the last page of this user guide. No adjustments are allowed in this mode. -
Page 21: Jump Settings
Jump Settings You can access the Jump Settings menu by pressing and holding the Jump button for 2 seconds or by pressing Menu to enter the Menu Options list and selecting Jump Settings using the Rotary Knob. There are two options available for Jump button settings –... -
Page 22: Display Settings
1. JumpSet Select JumpSet if you would like to use the Jump button for any channel other than a traffic channel. a. Use the Rotary Knob to highlight the “JumpSet” option. Press the Rotary Knob to select. b. After pressing Menu to exit to the Default Screen, the Jump button can be programmed by tuning to your desired channel and pressing &... -
Page 23: Confirm Tone Options
c. Color Option: You can set the color for the LCD backlight and keypad LEDs. Use the Rotary Knob to select which color you would like to adjust and then select from the two options. To exit the Display settings, simply push the MENU button. -
Page 24: Channel Add Or Skip
Channel Add or Skip The Sirius Sportster Receiver will allow you to skip selected channels when changing channels via the Rotary Knob. At any time you may select to add or skip specific channels. While in the “Menu Options” List mode, follow the steps below to Add or Skip a channel 1. -
Page 25: Audio Level
Changing the Lock/Unlock Code The first time the Lock/Unlock function is accessed, the user must enter the default lock code. The default lock code is “0000”. This code can be maintained or changed. To change the default lock code, perform the following procedure while in the “Menu Options”... -
Page 26: Antenna Aiming
Antenna Aiming When using the optional Home Docking Station or the Boombox indoors, it is important to locate the antenna in an acceptable location (See the individual installation guides for more information). 1. Use the Rotary Knob to highlight “Antenna Aiming”. -
Page 27: Time-Based Features
Time-Based Features This Menu Option allows for adjustments of the following items: Clock Auto Shutdown Alarm Clock Sleep Mode Program Alert To change the Time-Based Features, use the following procedure while in the “Menu Options” List mode: 1. Use the Rotary Knob to highlight the “Time- Based Features”. - Page 28 • Set Alarm: Use the Rotary Knob to select “Set Alarm” From the Alarm Clock Menu. Select either “Alarm Off” (Default) or “Alarm On” from the Menu and press the Rotary Knob to set. • Alarm Time: Use the Rotary Knob to select “Alarm Time”...
-
Page 29: Factory Default
to enter the menu. Once in the Auto Shutdown Menu, use the Rotary knob to select either “Enable” or “Disable” the feature. • Cancel Auto Shutdown: If you want to temporarily deactivate the Auto Shutdown feature once the beep tone sounds, press the Rotary Knob. - Page 30 If “Yes” is chosen, the unit reverts to the original factory settings for the following parameters: • All Presets revert to empty • Auto Dimming On • Display Contrast to 50% • Display Mode to Auto • FM Modulator to On •...
-
Page 31: Troubleshooting
Troubleshooting PROBABLE CAUSE FAULT Blown Fuse, power cable not properly Receiver does not turn on connected Satellite antenna not connected “ANTENNA NOT DETECTED” Antenna or cable is faulty message FM modulator frequency contains static Audio static or loss of clarity Vehicle antenna not connected to radio No signal on receiver Check for obstacles over or around... -
Page 32: Specifications
Specifications Audio Output ... 2.2V (Peak-to-Peak) Total Harmonic Distortion (THD) ... <0.3% Signal-to-noise (S/N) ... Greater than 75dB Fuse Requirement ... 3A Slow Blow Power Supply ... 10-16V, Negative Ground, DC Receiver Dimensions ... 110mm(W) x 70mm(H) x 28mm(D) ... (4-3/8” W x 2-3/4” H x 1-1/8” D) Receiver Weight ... - Page 33 Sportster SP-R1 User Guide...
-
Page 34: Optional Accessories
Optional Accessories for your Sirius Sportster Receiver Add one or all of these accessories to maximize your Sirius experience. SP-B1 Portable Boombox The SP-B1 is a portable docking station and audio system for the Sirius Sportster Receiver. With the built-in amplifier and speakers, the SP- B1 delivers rich, powerful sound indoors or outdoors. - Page 35 SP-C1 Mobile Docking Station The SP-C1 is a compact docking cradle that positions the receiver for easy wiring, viewing and operation. Designed for quick and easy self- installation, it includes all necessary cabling to connect to your car audio system. Includes the Following: •...
-
Page 36: Warranty
12 MONTH LIMITED WARRANTY Sirius Satellite Radio Inc. (the “Company”) warrants to the original retail purchaser of this product that should this product or any part thereof, under normal use and conditions, be proven defective in material or workmanship within 12 months from the date of original purchase, such defect(s) will be repaired or replaced with new or reconditioned product (at the Company’s option) without charge for parts and repair labor. - Page 37 IMPORTANT INFORMATION SIRIUS ID (SID): __ __ __ __ __ __ __ __ __ __ __ __ PSN:__ __ __ __ __ __ __ __ __ __ __ __ __ __ __ __ Customer Service: 1-800-869-5187 Sportster SP-R1 User Guide...
- Page 38 Sirius Satellite Radio Inc. 1221 Avenue of the Americas New York, NY 10020 (800) 869-5590 sirius.com © 2004 Sirius Satellite Radio Inc. SP-R1-OM (Rev. 1, June 2004)