Table of Contents
Advertisement
Quick Links
INSTALLER / CONSUMER
SAFETY INFORMATION
Please read this manual before
installing and using appliance.
WARNING: If the information in this
manual is not followed exactly, a
fire or explosion may result causing
property damage, personal injury or
loss of life.
—Do not store or use gasoline or
other flammable vapors and
liquids in the vicinity of this or
any other appliance.
—WHAT TO DO IF YOU SMELL GAS
• Do not try to light any
appliance.
• Do not touch any electrical
switch; do not use any phone
in your building.
• Immediately call your gas
suppler from a neighbor's
phone. Follow the gas
suppler's instructions.
• If you cannot reach your gas
supplier, call the fire
department.
Installation and service must be
performed by a qualified installer,
service agency or the gas supplier.
This is an unvented gas-fired heater.
It uses air (Oxygen) from the room
in which it is installed. Provisions for
adequate combustion and
ventilation air must be provided.
Refer to Page 7.
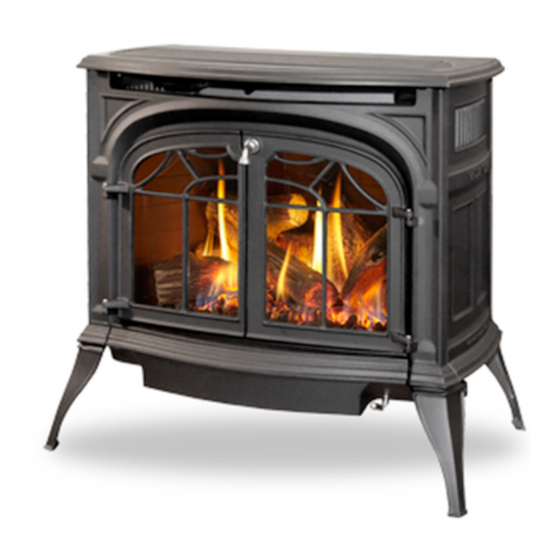
Radiance
Vent Free Gas Heater
Model RUVSOD: 3237 thru 3244,
3357, 3358, 3370 thru 3379
Homeowner's Installation
and Operating Manual
4555
Radiance
UVSOD
cover
7/24/01 djt
INSTALLER: Leave this manual with the appliance.
CONSUMER: Retain this manual for future reference.
20004555 2/09 Rev. 19
Advertisement
Table of Contents

Related Manuals for Vermont Castings RUVSOD 3237


Summary of Contents for Vermont Castings RUVSOD 3237
- Page 1 Vent Free Gas Heater loss of life. Model RUVSOD: 3237 thru 3244, —Do not store or use gasoline or other flammable vapors and 3357, 3358, 3370 thru 3379 liquids in the vicinity of this or any other appliance.
-
Page 2: Table Of Contents
Table Of Contents PLEASE READ THE INSTALLATION & OPERATING INSTRUCTIONS BEFORE USING APPLIANCE. Thank you and congratulations on your purchase of a Vermont Castings stove. IMPORTANT: Read all instructions and warnings carefully before starting installation. Failure to follow these instructions may result in a possible fire hazard and will void the warranty. -
Page 3: Installation And Operating Instructions
Radiance Vent-Free Gas Heater Installation & Operating Instructions In order to ensure safe and effective installation, this unit CARBON MONOxIDE POISONING must be installed only by a qualified agency, individual, firm, MAY LEAD TO DEATH! corporation or company that is experienced in the instal- Carbon Monoxide Poisoning: Early signs of carbon lation, repair and servicing of this type of appliance and is monoxide poisoning resemble the flu, with headaches,... -
Page 4: Stove Dimensions
Radiance Vent-Free Gas Heater Radiance Vent Free Gas Heater Dimensions 29 " (756mm) R A D I A N C E 28 " (717mm) 6 " Supply Inlet (165mm) 11" (279mm) 31" (787mm) 18 " (465mm) Drawing Not to Scale 4555 Fig. -
Page 5: Clearance Requirements
Radiance Vent-Free Gas Heater Clearance Requirements Minimum Clearances to Combustible Materials Maintain clearance, (empty space), between combus- tible materials and the heater as specified below. Wall ST694 ST101 Mantel Mantel from A: To Side Wall / Trim*......4” (102 mm) Ref. -
Page 6: Gas Specifications
Radiance Vent-Free Gas Heater High Elevations Gas Specifications Input ratings are shown in BTU per hour and are Max. Min. certified without deration from elevations up to Input Input Shutter 4,500 feet (1,370m) above sea level. Model Fuel Control BTU/h BTU/h Setting Nuisance outages may occur at altitudes above... -
Page 7: Vent Free Features
Radiance Vent-Free Gas Heater Vent Free Features 1) Unusually Tight Construction 2) Confined Space The Radiance RUVSOD, Model Nos. 3357, 3358, 3) Unconfined Space 3370 thru 3379, is an unvented gas heating appliance First, determine which classification defines the intend- tested and listed to the ANSI standard Z21.11.2-2000. - Page 8 Radiance Vent-Free Gas Heater 2. Divide the volume of space by 50 cubic feet. The re- Each of the two grilles must provide an opening of at least 50 square inches, with all opening dimensions sult is the maximum Btu/hr that the space can support. being at least 3”.
-
Page 9: Assembly Procedures
Radiance Vent-Free Gas Heater Assembly Procedures Read these instructions thoroughly before starting Remove the Front, Screen and Logs the assembly. Follow procedures in the order given. Inspect the stove for damage before starting the Remove the Front panel, the Screen panel, the Log Set assembly. -
Page 10: Assemble Legs
Radiance Vent-Free Gas Heater 6. Remove pallet and allow stove to gently rest on all Assemble the Legs four legs. 1. Slide stove to the rear of the pallet just far enough to 7. Adjust leg levelers to compensate for irregularities in access rear leg holes. - Page 11 Radiance Vent-Free Gas Heater 4. Attach the fan assembly to the fan bracket provided 6. Position the fan assembly so the ducts slide be- in the log box. Use #10 sheet metal screws provided tween the inner and outer shroud. The inner shroud with fan kit.
-
Page 12: Install On/Off Switch
Radiance Vent-Free Gas Heater • Thread the retaining nut onto the shaft of the Install ON/OFF Switch rheostat, tightening with a wrench. Do not over- tighten. The switch assembly parts are found in the parts bag. • 1. Attach switch assembly to left rear side of stove Attach the control knob to the rheostat shaft. -
Page 13: Glass & Catalyst Installation
Radiance Vent-Free Gas Heater 4. Replace burner. Slide the burner in at an angle with On/Off Switch Wiring left side lower than the right side. Slide the left side onto the injectors, making sure the burner leg remains at a 90°... -
Page 14: Connect The Gas Supply Line
Radiance Vent-Free Gas Heater 8. Install glass frame assembly by resting the bot- CAUTION tom edge of the frame on support brackets below the front opening of the firebox. Swing the top edge of the This appliance should only be connected assembly toward the firebox, and center it. -
Page 15: Complete The Installation
Radiance Vent-Free Gas Heater Complete the Installation Right Log Right Rear Log 1. Replace the screen frame by sliding the hooks over Left Rear Log the top front edge of the firebox and resting the bot- tom on the support brackets. If the catalyst has been installed, place the glass front on the stove by resting the bottom edge of the frame on support brackets below the front opening of the firebox. -
Page 16: Operation
Radiance Vent-Free Gas Heater Operation The Radiance is shipped with the operable door front plate. The stove may be operated with the doors either open or closed. To open the front doors, insert the handle provided into the door latch stub and turn it to the right and up. -
Page 17: Lighting Instructions
Radiance Vent-Free Gas Heater Lighting and Operating Instructions FOR YOUR SAFETY READ BEFORE LIGHTING WARNING: If you do not follow these instructions exactly, a fire or explosion may result causing property damage, personal injury or loss of life. A. This heater has a pilot which must be lit manu- •... -
Page 18: Troubleshooting
Radiance Vent-Free Gas Heater Troubleshooting Follow these procedures in the order presented. W A R N I N G TURN OFF HEATER AND ALLOW TO COOL COMPLETELY BEFORE SERVICING. CONDITION POSSIBLE CAUSE SOLUTION 1. Inspect and re-connect, replace No spark at pilot when Ignitor is 1. - Page 19 Radiance Vent-Free Gas Heater Troubleshooting cont’d. SOLUTION CONDITION POSSIBLE CAUSE Pilot lights but flame goes out 1. Control Knob not fully depressed 1. Depress Control Knob fully and when Control Knob is released. or held in long enough. hold in for a full 30 seconds. 2.
-
Page 20: Maintenance
Radiance Vent-Free Gas Heater Maintenance The following procedures will help ensure that your heater continues to perform safely and efficiently. Screen Hooks Firebox Cleaning and Inspection Cleanliness is critical to correct operation of the Glass Latch heater. The log set, burner, valve controls and air circulation areas must all be kept free of dust and unobstructed by debris. -
Page 21: Catalytic Combustor
Radiance Vent-Free Gas Heater Catalytic Combustor The combustor should be cleaned annually to ensure optimal performance. Follow the procedure below. Remove the Combustor Module 1. Be sure the heater is COLD. 2. Remove the front plate, top grille and screen. (Fig. 36) 3. -
Page 22: Replacement Parts
MHSC reserves the right to make changes in design, materials, specifications, prices and discontinue colors and products at any time, without notice. Radiance Vent Free Gas Heater (RUVSOD) Models: 3237 thru 3244, 3357, 3358, 3370 thru 3379 4555 RUVSOD Ref. - Page 23 Radiance Vent-Free Gas Heater Radiance Vent Free Gas Heater (RUVSOD) Models: 3237 thru 3244, 3357, 3358, 3370 thru 3379 (continued) Ref. Description RUVSOD Handle Package, Ceramic w/Screw 0004345 Damper Steel Handle/Screw 30002720 10a. Valve NG Honeywell - VS84212003 10000235 10b.
-
Page 24: Optional Accessories
Radiance Vent-Free Gas Heater Optional Accessories Fan Kits Screen Kit FK26 Fan An optional screen, R40SK, is avaialble for use with the operable doors to allow the doors to be left in the open The FK26 fan helps distribute heated air from within position. -
Page 25: Warranty
Radiance Vent-Free Gas Heater 20004555... - Page 26 Radiance Vent-Free Gas Heater 20004555...
- Page 27 LIMITED LIFETIME WARRANTY Radiance Vent-Free Gas Heater PRODUCT COVERED BY THIS WARRANTY All Vermont Castings gas stoves, gas inserts, and gas fireplaces, and all Majestic brand gas fireplaces equipped with an Insta-Flame Ceramic Burner, or standard steel tube burner. BASIC WARRANTY warranty is covered for six months or the remainder of the original warranty, whichever is longest.
- Page 28 MHSC 149 Cleveland Drive • Paris, Kentucky 40361 www.mhsc.com...