Table of Contents
Advertisement
HP E8491A IEEE 1394 PC Link to VXI Configuration and User's Guide
Safety Symbols ............................................................................................................. 6
WARNINGS ................................................................................................................. 6
Declaration of Conformity............................................................................................ 7
Reader Comment Sheet ................................................................................................ 9
Introduction .................................................................................................................. 11
Using the IEEE 1394 Serial Bus in VXI Systems ...................................................... 11
Component Overview ......................................................................................... 11
The HP E8491A PC Link to VXI Interconnect ............................................ 11
The Adaptec® AHA-8940 1394-to-PCI Host Adapter ................................ 11
The HP I_O Libraries ................................................................................... 11
Using this Manual .............................................................................................. 11
Chapter 2: Interface Installation and Configuration ..................................... 11
Chapter 3: VXI Programming Using the IEEE 1394 Serial Bus .................. 12
Chapter 4: IEEE 1394 Fundamentals and Interface Overview ..................... 12
Appendix A: Specifications .......................................................................... 12
Additional Information ........................................................................................ 12
Chapter 2
Interface Installation and Configuration ................................................................... 13
Using this Chapter ...................................................................................................... 13
Step 1: Installing the IEEE 1394Host Adapter .................................................... 13
Where to go Next .......................................................................................... 17
Step 2: Installing the HP E8491A Interconnect .................................................. 17
Alternate Configurations .............................................................................. 19
Where to go Next .......................................................................................... 20
Step 3: Installing VXI Instruments ...................................................................... 20
Installing C-size Instruments ........................................................................ 20
Installing A- and B-size Instruments ............................................................ 22
Step 4: Installing the HP I_O Libraries ............................................................... 24
Configuring the HP E8491A Interconnect ................................................... 25
Editing the HP E8491A Configuration ......................................................... 27
Editing the HP E8491A Configuration on Windows 95 Platforms .............. 28
Step 5: Installing the HP VXIplug&play Instrument Drivers ............................. 28
Step 6. Verifying the Installation ........................................................................ 29
Using Instrument Soft Front Panels .............................................................. 29
Viewing the Resource Manager Output ....................................................... 30
Running the Resource Manager .......................................................................... 33
Contents
Edition 1
Contents
1
Advertisement
Table of Contents

Related Manuals for HP AHA-8940


Summary of Contents for HP AHA-8940
-
Page 1: Table Of Contents
HP E8491A IEEE 1394 PC Link to VXI Configuration and User’s Guide Safety Symbols ... 6 WARNINGS ... 6 Declaration of Conformity... 7 Reader Comment Sheet ... 9 Chapter 1 Introduction ... 11 Using the IEEE 1394 Serial Bus in VXI Systems ... 11 Component Overview ... - Page 2 VXI Data Transfers ... 60 The Adaptec® AHA-8940 Host Adapter and Interface Cable ... 61 The HP E8491A PC to VXI Interconnect ... 62 Using the HP E8491A with the HP E1406 Command Module ... 64 The HP I_O Libraries ... 64 Appendix A Specifications ...
- Page 3 Appendix B Editing the HP E8491A Resource Manager Configuration ... 69 Introduction... 69 Configuration File Overview ... 69 The names.cf Configuration File ... 72 The oride.cf Configuration File ... 72 The vmedev.cf Configuration File ... 72 The cmdrsrvt.cf Configuration File ... 72 The dynamic.cf Configuration File ...
- Page 4 Contents...
-
Page 5: Edition 1
3. HP does not warrant that the operation of HP products will be interrupted or error free. If HP is unable, within a reasonable time, to repair or replace any product to a condition as warranted, customer will be entitled to a refund of the purchase price upon prompt return of the product. -
Page 6: Safety Symbols
All Editions and Updates of this manual and their creation date are listed below. The first Edition of the manual is Edition 1. The Edition number increments by 1 whenever the manual is revised. Updates, which are issued between Editions, contain replacement pages to correct or add additional information to the current Edition of the manual. -
Page 7: Declaration Of Conformity
Supplementary Information: The product herewith complies with the requirements of the Low Voltage Directive 73/23/EEC and the EMC Directive 89/336/EEC (inclusive 93/68/EEC) and carries the "CE" mark accordingly. Tested in a typical configuration in an HP C-Size VXI mainframe. June, 1998 European contact: Your local Hewlett-Packard Sales and Service Office or Hewlett-Packard GmbH, Depart- ment HQ-TRE, Herrenberger Straße 130, D-71034 Böblingen, Germany (FAX +49-7031-14-3143) - Page 8 Notes:...
-
Page 9: Reader Comment Sheet
HP E8491A IEEE 1394 PC Link to VXI Configuration and User’s Guide You can help us improve our manuals by sharing your comments and suggestions. In appreciation of your time, we will enter you in a quarterly drawing for a Hewlett-Packard Palmtop Personal Computer (U.S. government employees are not eligible for the drawing). -
Page 11: Chapter 1 Introduction
The bus links the PC backplane to the VXI mainframe backplane. This manual describes the implementation, configuration, and use of this interface. Implementation of the IEEE 1394 serial bus as an I/O interface for HP VXI systems is provided through three components: •... -
Page 12: Chapter 3: Vxi Programming Using The Ieee 1394 Serial Bus
HP VISA and HP SICL manuals for detailed information. Also, included with the HP I_O Libraries is the utility ‘I_O Config’. This utility is used to configure the HP E8491A and has a help file associated with Chapter 1... -
Page 13: Interface Installation And Configuration
Step 3: Installing VXI Instruments ....• Step 4: Installing the HP I_O Libraries....•... - Page 14 14 Interface Installation and Configuration Internal IEEE 1394 connector ® AHA-8940 1394-to-PCI Host Adapter. Turn off and disconnect the power to your computer and to any peripheral devices before installing the host adapter. A. Remove the computer chassis cover to expose the expansion slots and external access covers.
- Page 15 Figure 2-2. Locating a PCI bus Expansion Slot. Note Figure 2-3. Removing the PC Expansion Slot Cover. Chapter 2 shared slot Many computer PCI systems have one pair of ISA and PCI slots close to each other. This saves space and allows you to install either an ISA card or a PCI card in the slot pair.
- Page 16 16 Interface Installation and Configuration D. Align the bus contacts on the bottom of the host adapter with the PCI bus slot. Carefully, but firmly, press the adapter into the slot. host adapter Figure 2-4. Installing the Host Adapter. E. Secure the host adapter bracket to the computer chassis with the screw from the expansion slot cover removed in step C.
-
Page 17: Where To Go Next
There are no configuration switches on the E8491A. The device’s logical address is 0 and it provides the system’s resource manager functionality via software that is part of the HP I_O Libraries. Its VXI servant area is 255, therefore; it is the interface to all VXI devices with logical addresses between 1 and 255. - Page 18 18 Interface Installation and Configuration Refer to “Alternate Configurations” for information on using the E8491A with the HP E1406 Command Module and using it in VXI-MXI systems. A. If turned on, turn off the VXI mainframe and disconnect all power sources that may be applied to any instruments.
-
Page 19: Alternate Configurations
Refer to Chapter 4: IEEE 1394 Fundamentals and Interface Overview for information on the topology and terms associated with the IEEE 1394 bus. Certain applications may include the HP E1406A Command Module as an HP-IB interface to selected instruments. In this configuration, the E8491A must be the resource manager since its logical address is always 0. -
Page 20: Where To Go Next
If you are installing the IEEE 1394 interface and your VXI system for the first time, continue with “Step 3: Installing VXI Instruments.” If your VXI instruments are already installed, proceed to “Step 4: Installing the HP I_O Libraries.” Generally, any VXI instrument can be installed in any slot other than slot 0. - Page 21 retaining screws extraction levers slide the module into the mainframe until it plugs into the backplane connectors Caution Chapter 2 seat the module by pushing in the extraction levers Figure 2-8. Installing C-size Instruments. To prevent damage to the VXI instruments, install the instruments when the mainframe is turned off.
-
Page 22: Installing A- And B-Size Instruments
A- and B-size instruments can also be installed in the mainframe. These instruments are installed using a module carrier: • HP E1403C A/B-size Module Carrier extends the P1 connector on the VXIbus backplane and mounts the (A/B-size) modules flush with C-size modules. This carrier is recommended for Hewlett-Packard B-size, slave-only devices which have the P1 connector. - Page 23 Figure 2-9. Installing A- and B-size VXI Instruments. Chapter 2 Interface Installation and Configuration...
-
Page 24: Step 4: Installing The Hp I_O Libraries
C. Continue through the installation process as directed by the installer. Be sure to indicate that you want HP I_O Libraries support for the E8491A interface installed by clicking on the box next to “Install HP E8491 VXI Components.”... -
Page 25: Configuring The Hp E8491A Interconnect
E8491A interconnect if you have not already done so. Turn on the VXI mainframe. B. From the HP I_O Libraries program group created when the libraries were installed, click on ‘I_O Config’ (Figure 2-10). Figure 2-10. The HP I_O Libraries Program Group. - Page 26 Figure 2-11. The HP I_O Libraries I_O Config Utility. The HP E8491A uses the SICL interface name ‘vxi’ and the VISA interface name ‘VXI’ (Figure 2-12). The VISA interface number is assigned by ‘I_O Config’ and is unique to each E8491A. The interface...
-
Page 27: Editing The Hp E8491A Configuration
D. Click on OK to close the utility and complete the configuration. Editing the HP E8491A When it is necessary to edit your configuration, click ‘I_O Config’ in the HP I_O Libraries program group (Figure 2-10). To edit the HP E8491A, Configuration click (highlight) the configured interface (vxi VXI0) in the utility (Figure 2-11). -
Page 28: Editing The Hp E8491A Configuration On Windows 95 Platforms
28 Interface Installation and Configuration After installing the HP I_O Libraries and configuring the HP E8491A on the Windows 95 platform, an hp icon is placed in the bottom right corner of your PC monitor (Figure 2-13). Figure 2-13. Editing Your Configuration on Windows 95 Platforms. -
Page 29: Step 6. Verifying The Installation
Figure 2-14. Selecting a VXIplug&play Soft Front Panel. Chapter 2 If you are updating an existing VXI system to use the HP E8491A and IEEE 1394 serial bus, we highly recommend that you obtain the latest version of the HP VXIplug&play drivers. Information on the latest drivers available can be found on the World Wide Web at http://www.hp.com/go/inst_drivers . -
Page 30: Viewing The Resource Manager Output
Correct interface name and logical address shown. Figure 2-15. Soft Front Panel Indicating PC - Mainframe Communication. Viewing the Resource Manager Output 30 Interface Installation and Configuration Another way to determine if your system is properly configured is to view the output of the resource manager. - Page 31 Select Enable Advanced to activate the Advanced Settings controls. Click Resource Manager to bring up the window below. Figure 2-16. Viewing the Resource Manager Output using ‘I_O Config’. Chapter 2 Click RM Output to view the resource manager output. Figure 2-17 is a partial listing of a typical resource manager output. Interface Installation and Configuration...
- Page 32 Figure 2-17. Typical Resource Manager Output. 32 Interface Installation and Configuration Chapter 2...
-
Page 33: Running The Resource Manager
Running the Resource Manager Chapter 2 When the VXI mainframe is turned on and the E8491A interface has been configured using ‘I_O Config’, the SICL iproc utility is started. This enables the resource manager to run when: • mainframe power is cycled •... - Page 34 Services. Figure 2-18. Starting, Stopping, and Verifying iproc. 34 Interface Installation and Configuration 1. Click Start, select Set- tings, and click Control Panel. 3. Select HP E8491 Resource and either Start, Stop, or Close after verify- ing. Manager Chapter 2...
-
Page 35: Vxi Programming Using The Ieee 1394 Serial Bus
Optimizing Programs ......• HP E8491A Triggering ......•... -
Page 36: Optimizing Programs
The HP E8491A IEEE 1394 interconnect uses the interface name VXI (or vxi). The interface number is assigned using the ‘I_O Config’ utility (Chapter 2). In the examples above, the logical address of the HP E1563 digitizer is 24 and INSTR indicates a VISA instrument control resource. -
Page 37: Block Transfers Using Hp Vxiplug&Play Drivers
ViChar err_message[256]; dataPtr = rdgs;// set pointer to rdgs array Chapter 3 The following extended SICL function is unique to the HP E8491A and is used for block transfers over the bus: iblockmovex Additionally, the extended SICL functions shown below must be used when... - Page 38 // open a VXIplug&play device session and reset the digitizer errStatus = hpe1563_init(E1563,0,1,&vi); if( VI_SUCCESS > errStatus) hpe1563_error_message( vi, errStatus, err_message); printf("Unable to open %s\n", E1563); printf("hpe1563_init() returned error message %s\n", err_message); return; // enable digitizer error detection hpe1563_errorQueryDetect(vi, 1); // set a 5s timeout period to allow functions to complete errStatus = hpe1563_timeOut(vi, 5000);...
- Page 39 1. The maximum block transfer size allowed by the HP E1563A hpe1563_fetchAll_Q function is 2,000 bytes. 2. This manual is included on the HP I_O Libraries CD. By viewing the manual from the CD, you can cut and paste this program into your development environment.
-
Page 40: Block Transfers Using Hp Visa
Block Transfers using HP VISA // 1563visa.CPP - This program configures the HP E1563A digitizer using its // VXIplug&play driver and then transfers a block of 60,000 readings from // the digitizer’s FIFO memory to the computer using the VISA viMoveIn32 // function. - Page 41 (i=0; i<10; i+=2) printf("%lf\n\n",dataPtr[i]*range/32768); // reset digitizer following the transfer errStatus = hpe1563_reset(vi); // close the device session hpe1563_close(vi);// HP VXIplug&play session //************************************************************ // error checking routine void check (ViSession vi, ViStatus errStatus) ViInt32 inst_err; ViChar err_message[256];...
- Page 42 HP VXIplug&play driver function calls and by HP VISA function (i.e viMoveIn32) calls. 2. This manual is included on the HP I_O Libraries CD. By viewing the manual from the CD, you can cut and paste this program into your development environment.
-
Page 43: Hp E8491A Triggering
Output trigger level is +5V (low (HP E8491A faceplate) true - default) and can be pulled to +30V. * The E8491A Trig In and Trig Out ports are configured using the HP I_O Libraries ‘I_O Config’ utility. Using Triggers Chapter 3 The HP E8491A is capable of asserting, receiving, and routing trigger signals along the VXI (mainframe) backplane trigger lines. -
Page 44: Configuring The E8491A Trig In And Trig Out Ports
I_TRIG_EXT0 (specifies faceplate ‘Trig Out’ and ‘Trig In’ ports) Configuration of the E8491A external ‘Trig In’ and ‘Trig Out’ ports is done through the HP I_O Libraries’ ‘I_O Config’ utility. This portion of the utility is shown in the following figure. -
Page 45: Triggering Example
Triggering Example // TRIGSICL.CPP - This program demonstrates how trigger signals are // generated and routed using the HP E8491A. The program uses SICL functions // to generate and route a trigger signal from the face plate ‘Trig Out’ // port to VXI backplane trigger line TTLTRG4. The signal triggers the // E1412 multimeter which then takes a burst of 10 readings. - Page 46 ‘Trig Out’ port which is connected by a jumper wire to the ‘Trig In’ port. 4. This manual is included on the HP I_O Libraries CD. By viewing the manual from the CD, you can cut and paste this program into your development environment.
-
Page 47: Trigger Pull Up
Trigger Pull Up Output trigger state LH = normally low, high true Output trigger state HL = normally high, low true (default) Figure 3-2. Using a Pull Up on the HP E8491A ‘Trig Out’ Port. Using HP E8491A Shared Memory... - Page 48 Another way to view the output is using the SICL ivxisc utility contained in the <drive:>\siclnt\bin or sicl95\bin directory. This utility is an executable that is used with the SICL logical unit number (see “Editing the HP E8491A Configuration” in Chapter 2) to return the configuration output of the resource manager.
-
Page 49: Example Programs
Chapter 3 The following examples show an application using the E8491A’s shared memory. In the program, 8,000 readings are taken with the HP E1410 multimeter. Because the E1410 has only enough memory to store 4,096 readings internally, all 8,000 readings are stored in shared memory and then transferred to the PC. -
Page 50: Storing Readings In Shared Memory - Hp Visa Example
// SHAR_VISA.CPP - This program demonstrates how to access the // HP E8491A’s shared memory. The program stores readings taken // by the HP E1410 multimeter in HP E8491A shared memory, and then // transfers those readings from shared memory to the computer. - Page 51 // set up byte swap function for readings transferred from // E8491A shared memory to the PC #define SWAP_FLOAT64(rdgs) { unsigned char src[8]; *((double *)src) = *((double *)rdgs); ((unsigned char *) (rdgs))[0] = ((unsigned char*) (src))[7]; \ ((unsigned char *) (rdgs))[1] = ((unsigned char*) (src))[6]; \ ((unsigned char *) (rdgs))[2] = ((unsigned char*) (src))[5];...
- Page 52 // set 8000 readings errStatus = hpe1410_sampCoun(vi, 8000); check(vi, errStatus); // store the readings in HP E8491A shared memory // specify the E8491A shared memory base address errStatus = hpe1410_memVmeAddr(vi, start_addr); check(vi, errStatus); // specify the amount of memory required // (8000 readings * 8 bytes/reading) errStatus = hpe1410_memVmeSize(vi, 64000);...
- Page 53 Error : %ld, %s\n", inst_err, err_message); else // get driver error message hpe1410_error_message(vi, errStatus, err_message); // display the error printf("HP E1410 Driver Error : %ld, %s\n", errStatus, err_message); hpe1410_reset(vi);// reset the multimeter hpe1410_close(vi);// close the multimeter handle exit(1); return;...
-
Page 54: Storing Readings In Shared Memory - Sicl Example
Depending on the storage formats of your particular instruments, swapping may not be necessary. 2. This manual is included on the HP I_O Libraries CD. By viewing the manual from the CD, you can cut and paste this program into your development environment. - Page 55 // set a 10 us aperture time iprintf(e1410, "VOLT:APER 10.0e-6\n"); // set 8000 readings iprintf(e1410, "SAMP:COUN 8000\n"); // store the readings in HP E8491A shared memory // specify the E8491A shared memory base address iprintf(e1410, "MEM:VME:ADDR %d\n", start_addr); // specify the amount of memory required // (8000 readings * 8 bytes/reading) iprintf(e1410, "MEM:VME:SIZE 64000\n");...
- Page 56 Depending on the storage formats of your particular instruments, swapping may not be necessary. 2. This manual is included on the HP I_O Libraries CD. By viewing the manual from the CD, you can cut and paste this program into your development environment.
-
Page 57: Ieee 1394 Fundamentals And Interface Overview
• The HP I_O Libraries ......Optimizing the IEEE 1394 bus must include an understanding of the topology and terms associated with its use. -
Page 58: Features Of The Ieee 1394 Bus
VXI mainframe 3. Child A node (HP E8491A) is a child if it is farther from the root than an adjacent node. In Figure 1, VXI mainframe 3 is a child node because it is farther from the root than VXI mainframe 1. -
Page 59: Optimizing The Configuration
Optimizing the Configuration IEEE 1394 Data Transfer Protocol VXI mainframe 2 data packet F I n-1 arbitration rest gap Figure 4-2. IEEE 1394 Data Transfer Protocol. 1. Isochronous data transfers broadcast variable amounts of data at regular intervals with no acknowledgement. Isochronous and Asynchronous data transfers can occur on the same bus. -
Page 60: Asynchronous Data Transfers
2. A fairness interval consists of one or more subactions in which data packets are transferred over the bus. A fairness interval is as follows: 1. The interval begins when devices (HP E8491A’s) arbitrate for control of the bus. 2. When a device is granted control, it transfers its data packet and is then disabled from arbitrating until the next fairness interval. -
Page 61: The Adaptec Aha-8940 Host Adapter And Interface Cable
400 MBits/second. The adapter has one internal and two external 1394 ports. Each AHA-8940 represents one bus segment capable of supporting up to 63 nodes. If required, the AHA-8940 can supply 12V at up to 1.5A for IEEE 1394 devices that require power.The layout of the adapter is shown below. -
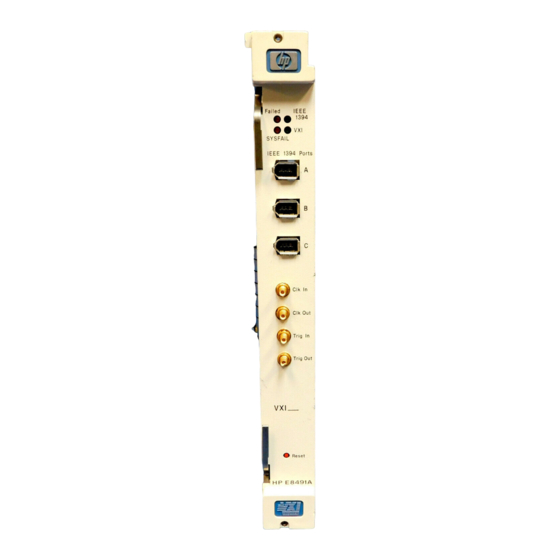
Page 62: The Hp E8491A Pc To Vxi Interconnect
HP E1406A Command Module - a VXI resource manager/slot 0 device common in many GPIB-based systems. A VXI mainframe with the HP E8491A in slot 0 can also be powered on/off at any time without affecting other mainframes in the system. - Page 63 Configuration Label Used to identify the interconnect address in multi-frame VXI systems. Figure 4-5. The HP E8491A IEEE 1394 to VXI Interconnect. Chapter 4 IEEE 1394 Ports Three ports allow tree topologies which minimize the number of hops.
-
Page 64: Using The Hp E8491A With The Hp E1406 Command Module
Using the HP E8491A Though not a common configuration, the HP E1406 command module can be used in the same mainframe as the HP E8491 to provide HP-IB access to with the HP E1406 instruments. In this configuration, however, the E8491A must be the Command Module mainframe’s resource manager. -
Page 65: Appendix A Specifications
16-bit: 1.76 MBytes/s to PC * 200 MHz Pentium PC 32 bit: 1.0 MByte/s to PC 400 MHz Adaptec Host Languages C/C++, Visual Basic, HP VEE, LabView VXI Device Type Data transfer bus Slot 0 functionality Resource Manager Functionality MXIbus Resource Manager... -
Page 66: Clk 10
CLK 10 External Trigger Input External Trigger Output 66 Specifications Clk In Input Frequency Stability Duty Cycle Clk Out Output Frequency Stability Duty Cycle Connector Levels TTL, CMOS, ECL, 0 to +33V Programmable Threshold Range Programmable Threshold Accuracy Threshold Sensitivity (hysteresis) Input Load Maximum Rate... -
Page 67: Trigger Delays
Trigger Delays Cooling Power Supply Loading Appendix A Maximum delay from TTLTRG to ECLTRG Maximum delay from ECLTRG to TTLTRG Maximum delay from Trig In port to ECLTRG or TTLTRG Maximum delay from TTLTRG or ECLTRG to Trig Out port Watts / slot P mm H Air flow liters / s... - Page 68 68 Specifications Appendix A...
-
Page 69: Editing The Hp E8491A Resource Manager Configuration
Configuration files (.cf extension) are placed in the <drive:>\siclnt\defaults or \sicl95\defaults directory when the HP I_O Libraries are installed. Except where noted, the following files can be edited from the HP I_O Libraries’ ‘I_O Config’ utility (Figure B-1) as shown on the following pages. When editing a file, note the following: 1. - Page 70 Edit. This brings up the window (partial view) in Figure B-2. Figure B-1. Editing Configuration Files from the ‘I_O Config’ Utility. 70 Editing the HP E8491A Resource Manager Configuration configured 1. From the I_O Libraries program group, click I_O Config.
- Page 71 3. Check Enable Advanced and then click Resource Manager... 4. Select the portion of the configuration to edit and then click Edit. Figure B-2. Editing Configuration Files from the ‘I_O Config’ Utility (cont’d). Appendix B Editing the HP E8491A Resource Manager Configuration...
-
Page 72: The Names.cf Configuration File
Configuration File The dynamic.cf Configuration File 72 Editing the HP E8491A Resource Manager Configuration The names.cf file is a database that contains a list of symbolic names to assign VXI devices that have been configured. The ivxirm utility reads the model id number from the VXI device and the ivxisc utility uses that information and this file to print out the VXI device symbolic name. -
Page 73: The Irq.cf Configuration File
Within the <drive:>\siclnt\bin or \sicl95\bin directory are utility functions that view the resource manager output (ivxisc) and which clear the HP E8491A interface (iclear) and run the resource manager (if the iproc utility is running). The ivxisc function is used to view the resource manager output. ivxisc is executed from the Windows command (DOS) prompt (..\siclnt\bin or... - Page 74 <logical unit> is the value from the ‘Logical Unit’ window in the HP I_O Libraries ‘I_O Config’ utility. An example of the output produced by ivxisc is shown in Figures B-3 and B-4. Figure B-3. Output of ivxisc. 74 Editing the HP E8491A Resource Manager Configuration...
-
Page 75: Using Iclear
Figure B-4. Output of ivxisc (cont’d). Using iclear The iclear function is used to clear the interface (HP E8491A) or individual message-based instruments in the VXI mainframe. iclear is executed from the DOS command prompt (..\siclnt\bin or \sicl95\bin directory) as: iclear <SICL interface name, [logical address]>... - Page 76 76 Editing the HP E8491A Resource Manager Configuration Appendix B...
-
Page 77: Index
E8491A interconnect configuring the Trig In and Trig Out ports connecting the HP E8491A to the host adapter cooling data transfer protocol asynchronous transfers fair arbitration data transfers over VXI dynamic.cf HP E8491A IEEE 1394 PC Link to VXI Configuration and User’s Guide... - Page 78 HP VISA locating using SICL shared memory examples SICL programs porting for use with the E8491A soft front panels for installation verification...
- Page 79 HP E8491A shared memory using instrument soft front panels using the HP E8491A with the HP E1406 Command Module utility functions iclear ivxisc verifying the installation viewing the resource manager output vmedev.cf...
- Page 80 80 Index...
Need help?
Do you have a question about the AHA-8940 and is the answer not in the manual?
Questions and answers