Table of Contents
Advertisement
Quick Links
Advertisement
Table of Contents

Related Manuals for Cannon DIGI-TROLL 10


Summary of Contents for Cannon DIGI-TROLL 10
- Page 1 DIGI-TROLL 10 DIGI-TROLL 10 TS Owner’s Manual...
-
Page 2: Table Of Contents
TABLE OF CONTENTS Introduction ..................................3 Warranty / Service Information ...........................4 Product Overview.................................5 Installation ..................................6 Mounting .................................6 Boom and Ball Hook ...............................8 Boom End Assembly.............................10 Spool Cover Removal ............................11 Rod Holders ................................12 Cable Termination..............................13 Line Release…………………………………………………………………………………………………………………13 Intellitroll Antenna ..............................14 Power Loss Crank Handle ............................15 Wiring Your Downrigger ............................16 Installing Transducer.............................18 Getting Started ................................19... -
Page 3: Introduction
This manual covers installation and the functions of both the Digi-Troll 10 and Digi-Troll 10 TS. The Tour- nament Series version of the Digi-Troll is fitted with a cast stainless steel reel, brushed finish stainless steel boom, and a white frame. -
Page 4: Warranty / Service Information
Johnson Outdoors Marine Electronics, Inc. will, at its After the applicable warranty period, or, if one of the above exclu- sions applies, Cannon products will be repaired for a charge of parts option, either repair or replace same without charge (but no cash plus labor. -
Page 5: Product Overview
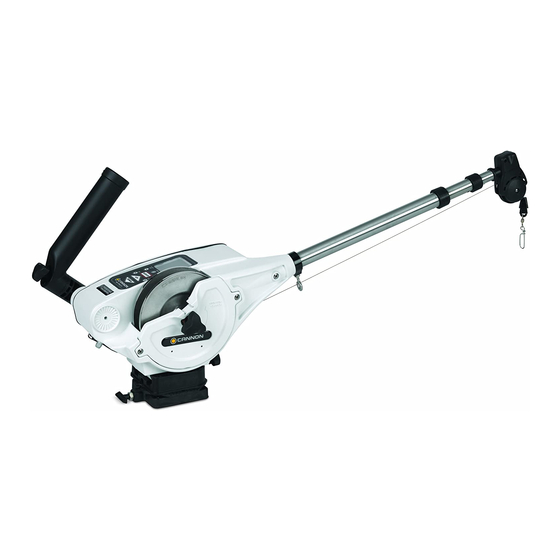
Digi-Troll 10 TS Parts Description 1. Reel This is used to spool the cable, available in lengths ranging from 150 to 400 feet. -
Page 6: Installation
Due to the great variety of boats available, Locations mounting your downrigger can be a difficult decision. Cannon has a complete line of mounting and fishing accessories to aid in your fishing experience. Before making any permanent changes to your boat consider what accessories might be used in your application. - Page 7 Decks thinner than 1/4" The Low-Profile Swivel Base mounting follows the same Use a Cannon deck plate (PN 2200693) to prevent procedure as for the deck plate except that four 1/4"-20 deflection and add stability to decks thinner than 1/4".
-
Page 8: Boom And Ball Hook
INSTALLING THE BOOM AND BALL HOOK 1) Remove the ball hook collar, ball hook, and 1/4-20 nut from the included hardware bag assembly. 2) Thread the nut onto the ball hook, then thread the ball hook into the ball hook collar. Do not tighten yet (Figure 1). - Page 9 6) Insert the 1/4-20 nylon locknut into the hex pocket on the nose of the frame (motor side of frame). (Figure 5) 7) Insert 1/4-20 x 2” bolt into reel side of frame nose. With a Phillips head screw driver, thread bolt into nylon locknut from step 6.
-
Page 10: Boom End Assembly
BOOM END PULLEY Telescopic Boom 1) Remove boom end assembly from hardware bag. 2) Remove #8 self tapping screw from hardware bag. 3) Insert boom end post into end of the small tube of the telescopic boom assembly. (Figure 9) 4) Align hole in boom post with hole in small end tube. -
Page 11: Spool Cover Removal
REMOVABLE SPOOL COVER Your new downrigger comes with a removable spool cover. By removing this cover, you are able to gain easy access to your spooled cable and easy spool removal. This feature allows you to easily access tangled line, get it repaired and get you back into ac- tion quickly. -
Page 12: Rod Holders
REPLACING THE CLUTCH PAD To replace the clutch pad, follow the steps for removing the spool. Once the spool is removed, you have access to the clutch pad. (Figure 16) Simply pull it off the shaft and replace. Reassemble the spool and cover in the reverse order. -
Page 13: Cable Termination
ATTACHING THE LINE RELEASE (UNI-RELEASE) The Cannon Uni-Release attaches directly to the downrigger weight. Attach fishing line to the clip at the end of the release, and then click through a series of increasing tension settings. -
Page 14: Intellitroll Antenna
USING YOUR DIGI-TROLL WITH THE INTELLITROL ACCESSORY Both the Digi-Troll 5 and Digi-Troll 10 are compatible with the IntelliTroll accessory. The Digi-Troll 5 receives the IntelliTroll data and sends it to your Humminbird fishfinder (using the Cannonlink accessory). You can also use the Intellitroll monitor and antenna cable as- sembly to display sensor information. -
Page 15: Power Loss Crank Handle
Your Digi-Troll is now Intellitroll compatible. Once you attach your Intellitroll to the cable per the instructions included, your Digi-Troll 10 will display the data on it’s screen. The Digi-Troll 5 will pass this data on to the Cannonlink for display on your Humminbird fish finder. -
Page 16: Wiring Your Downrigger
It should be 0.6-0.8VDC (fixed PIC) or it should match your Digi-Troll setting if properly wired. • The use of Cannon vinyl coated lead weights is recommended. • Use the trolling weight insulators supplied with your downrigger. This insulates your weight from the positive charge on the cable. - Page 17 FUSE / BREAKER SPECIFICATIONS: An over-current protection device (circuit breaker or fuse) must be used with this downrigger. Coast Guard require- ments dictate that each ungrounded current-carrying conductor must be protected by a manually reset, trip-free circuit breaker or fuse. The following breaker size is a recommended guideline: 1 downrigger—30A @ 12 vdc 2 downriggers—60A @ 12 vdc...
-
Page 18: Installing Transducer
Digi-Troll Transducer By purchasing the optional Digi-Troll transducer accessory (1491072), the Digi-Troll 10 is able to display water depth and independently bottom track. Installing the Optional Transducer Proper transducer installation is critical to the performance of your Digi-Troll’s depth tracking features. For best re- sults, follow all mounting instructions carefully. -
Page 19: Getting Started
Connector removal or cable splicing voids the product warranty. Once the transducer is mounted and connected to your Digi-Troll 10, the display will show the bottom depth un- der SONAR DEPTH on the display. CIRCUIT BREAKER... -
Page 20: Display
(Note: A negative depth indicates distance above the water surface). During programming of special features, the display is used to indicate various settings. Digi-troll 10 Keypad The Digi-troll 10's key pad has eight keys located below the display. Power The ON/OFF key functions: 1) Turn the Digi-troll ON - Simply press and release. - Page 21 Programming the Digi-troll 10 The Digi-troll 10 contains up to eight menus that enable you to program and customize its operation. Any changes made using the menu system are automatically saved in permanent memory when the downrigger is turned off.
-
Page 22: Bottom Track
In the bottom track mode, the Digi-troll 10 maintains the weight at a fixed distance above the bottom. In order to avoid continuous weight adjustments due to minor changes in bottom depth and boat motion caused by wave ac- tion, you have the ability to adjust the responsiveness of the weight. -
Page 23: Cycle
Cycling Menu From the depth screen, press the MENU key once (or once from the Bottom Track screen if the transducer is con- nected) to enter this menu. The first screen allows you to adjust the pause time of the weight between cycling movements. -
Page 24: Up And Down
Up Speed Menu This menu lets you adjust the speed of the weight in the UP direction from 1 to 5 (1 slowest, 5 fastest) at all times except during the AUTO UP operation. AUTO UP is always at speed 5. Press the MENU key three times from the depth screen or once from the cycle menu. -
Page 25: Units
Press the Menu six times from the depth screen or once from the Line On Reel Screen Un/Coated Menu This menu lets you switch between Cannon coated and uncoated cable. This setting is important as well in deter- mining accurate line out. -
Page 26: Preset Programmable Depths
Using Programmable Depths The Digi-troll 10 allows you to program and store up to five depths for quick movement of the weight without having to manually hold the DOWN key until the desired depth is reached. When in the (default) depth screen, simply press the Select key until the required depth memory is displayed. -
Page 27: Networking
The Digi-Troll series is compatible with the Cannon Intellitroll Speed and Temp sensor. The Intellitroll sensor gives the user the speed, temperature, and depth at the weight. With the Digi-Troll 10, this information is displayed on the built in LCD display. The Digi-Troll 10 will automatically recognize the Intellitroll when the Intellitroll is powered... -
Page 28: Fishing Theory
Because of the composite fast or as slowly as you wish. Turning the knob counter- construction of the frame, Cannon downriggers are insu- clockwise (away from the boom) stops the weight. This lated from your boat's hull charge. -
Page 29: Positive Ion Control Theory
How the Positive Ion Control System Works Maintaining Your Downrigger The PIC system uses an internal circuit that passes Periodically, lightly grease the thrust bearing and the voltage through the drive train of the Digi-Troll to the bearing race found behind the clutch knob. Replace the shaft. -
Page 30: Blowback Calculations
Current drag, water salinity and the use of non-Cannon products will affect your actual trolling depth. As an example, the first chart shows that if you are trolling at 4 MPH with an 8 pound weight and you have 100 FT. -
Page 31: Trolling Tips
Ten Good Trolling Tips that fish occupy certain areas for certain reasons 1) Test your lures over the boat side before sending (sources of food, protective cover, preferred tempera- them down and back. Do this to make sure the lure wig- tures, etc.). -
Page 32: Troubleshooting
Troubleshooting PROBLEM: PROBLEM: Bottom-Following option does not work. In the UP or AUTO-UP mode the downrigger stops periodically but the display stays on or the circuit SOLUTION: • breaker trips repeatedly. Check cable connections with transducer or SOLUTION: with Cannonlink. •... - Page 33 THIS PAGE INTENTIONALLY LEFT BLANK www.cannondownriggers.com...
-
Page 34: Parts Lists
www.cannondownriggers.com... - Page 35 www.cannondownriggers.com...
- Page 36 www.cannondownriggers.com...
- Page 37 www.cannondownriggers.com...
-
Page 38: Wiring Diagram
www.cannondownriggers.com... - Page 39 NOTES: __________________________________________ __________________________________________ __________________________________________ __________________________________________ __________________________________________ __________________________________________ __________________________________________ __________________________________________ __________________________________________ __________________________________________ __________________________________________ __________________________________________ __________________________________________ __________________________________________ __________________________________________ __________________________________________ __________________________________________ __________________________________________ __________________________________________ __________________________________________ __________________________________________ __________________________________________ __________________________________________ __________________________________________ __________________________________________ __________________________________________ www.cannondownriggers.com...
-
Page 40: Weee Compliance
For more information about where you should dispose of your waste equipment for recycling and recovery and/or your European Union member state requirements, please contact your dealer or distributor from which your product was purchased. To download product manuals or purchase Cannon products from an authorized dealer, please visit our web page at www.cannondownriggers.com Cannon Johnson Outdoors Marine Electronics, LLC.