Table of Contents
Advertisement
Advertisement
Table of Contents

Related Manuals for Star Trac 3900


Summary of Contents for Star Trac 3900
- Page 1 TREADMILL MANUAL PIN: 620-1092 Revision: A Date: Sept. 97...
- Page 3 6 call International Product Support in USA (I) 714-669- 166D. Copyright 1997, Star Trac by Unisen, Inc. All rights reserved, including those to reproduce this book or parts thereof in any form without first obtaining written permission from Unisen, Inc.
-
Page 5: Table Of Contents
TABLE OF CONTENTS Chapter ,: !iat'ety Instructions .••••••••••..•••••• Chapter Parts List Assembly and Setup Chapter Operating Instructions ••..••.•••••••••••• Display Control Panel Features Hints and Tips for Getting Started Simple Operation Chapter Training Int'onnation ••••••••.•.•.•..•..•• The Importance of Cardio Exercise Getting Started and Sticking With It Breathing and Stretching Chapter Daily Maintenance... - Page 6 This page intentionally left blank.
- Page 7 INTRonUCT/ON Welcome to the world of TRAC. In your hands is the owner's manual that will acquaint you with your §TAR TRAC assembly, operation and maintenance so that you may begin reaching your fitness goals. We highly recommend that you read this owner's manual prior to setting up and using your tread- mill.
- Page 8 This page intentionally left blank.
- Page 9 These safety notes are directed to you as the owner of the MILL. Please train all your members and fitness staff to follow these safety instructions. DDNDT Do encourage your members to discuss their Do not let unsupervised children operate your health program or fitness regimen with a health treadmill.
- Page 10 Call your Do keep the treadmill air openings free of lint, dealer, or Star Trac at (800) 503-1221. hair, etc. Do unplug your treadmill before doing any maintenance or cleaning.
- Page 11 TRAC TREADNlILL • Dutch • French • German • Italian • Portuguese • Spanish • Swedish...
- Page 12 TRAC TR39aa HARDLOOPBAND Dit produkt is voor gebruik op een circuit met een nominale waarde van 120 volt en is in de fabriek uitgerust met een speciaal elektrisch snoer en stekker om verbinding met een passend elektrisch circuit toe te staan. Zorg ervoor dat dit produkt verbonden is met een stopcontact dat dezelfde configuratie heeft als de stekker.
-
Page 13: Chapter 3: Operating Instructions
Gebruik dit produkt aileen voor het gevallen ofbeschadigd is. Neem contact op met uw doeleinde waarvoor het bestemd is. STAR TRAC geautoriseerde detailhandelaar of de Verricht regelmatig preventief onder-... - Page 14 vous que votr personnel et vos adherents les suivent toujours. Encouragez vos adherents parler de leur Ne laissez pas d' enfants non-accompagnes sur programme d' entrainement un medecin ou un Ie tapis. Dne surveillance tres stricte est entraineur, en particulier s'ils n'ont pas eu neecessaire si des personnes invalides ou d' activite sportive pendant plusieurs annees, handicapees utilisent Ie tapis.
- Page 15 D'UTILISATION AVANT D'UTILISER CE TAPIS ROULANT ATTENTION: DEBRANCHEZ A LA SOURCE AVANT D'EFFCIUER UN ENTRETIEN DU UNE REPARATION ATTENTION: NE PAS GLISSER LAS MAINS OU LES PIAOS SOUS LE TAPIS ROULANT EN ACTION COURANT ALTERNATIF OUVRE FERME TRAC 3900 TREADMILL Owner'§ Manual...
- Page 16 STAR TRAC 3900 LAUFBAND SICHERHEITSVORSCHRIFTEN WARNUNG Dieses Produkt ist fiir den Gebrauch an einer passenden Netzsteckdose mit 220 Volt Spannung bestimmt und werkseitig mit einer dafiir vorgesehenen Netzleitung und einem Netzstecker ausgeriistet. Stellen Sie sicher, daB das Gerat nur an einem AnschluB mit gleicher Bauart wie der Stecker angeschlossen wird. VER- WENDEN SIE KEINEN ADAPTER FOR DEN BETRIEB DES TR.
- Page 17 SICHERHEITSVORSCHRIFTEN Diese Sicherheitshinweise sind an Sie, den Besitzer des Laufbandes STAR TRAC TR 3900 gerichtet. Bitte weisen Sie Ihre Mitglieder und Ihre FitneB-Mitarbeiter an, sich an die folgenden Sicherheitsvorschriften zu halten. LESEN SIE ALLE ANWEISUNGEN VOR DER BENUTZUNG DES LAUFBANDES.
- Page 18 TREADMILL STAR TRAC ISTRUZIONI DI SICUREZZA ATTENZIONE Questo prodotto da usare su un circuito elettrico con una tensione nominale di 220 volt ed fornito dalla fabbrica con un cavo elettrico e spina specifici per permettere i[ collegamento ad un circuito elettrico appropriato.
- Page 19 ISTRUZIONI DI SICUREZZA TREADMILL STAR TRAC 3!lOO Queste indicazioni sono inditizzate ai proprietari del Chiedete a tutti i membti della vostra palestra e al vostro staff di seguite queste istruzioni di sicurezza. LEGGETE TUITE LE ISTRUZIONI PRIMA DI USARE IL TREADMILL.
- Page 20 TRAC ESTEIRA STAR ADVERTENCIA Este produto deve ser usado em urn circuito com tensao nominal de 220 volts. Ele foi fabricado com urn cabo de alimema<;ao e plugue especificos para permitir a sua conexao com urn circuito eletrico apropriado. Certifique-se de que produto esteja conectado a uma tomada com as mesmas configura<;6es do plugue.
- Page 21 ESTElRA STAR TRAC Estas observac;oes de seguranc;a destinam-se 3900.Treine todos os membros e funcionarios que utilizarao equipamento para que sigam estas LElA TODAS AS lNSTRU<;OES ANTES DE USAR SUA ESTElRA ADVERTENCIA: para reduzir os riscos de choque eletrico, SEMPRE desconecte a esteira...
- Page 22 TAPIZ RODANTE STAR TRAC3900 INSTRUCCIONES SEGURIDAD ADVERTENCIA Este ptoducro esta preparado para utilizarse en un circuito de 220 voltios y se suministra equipado de fabrica con un cable y un enchufe electricos especfficos para permitir su conexion a un circuito electrico apropiado. Asegurese de que el producto se conecte a una toma de corriente con la misma configuracion que el enchufe.
- Page 23 INSTRUCCIONES DE SEGURIDAD TAPIZ RODANTE Estas notas sobre seguridad van dirigidas a Yd. como propietario del STAR TRAC Haga que todos los usuarios y preparadores ffsicos cumplan estas instruc- 3!lDD. ciones de seguridad. LEA TODAS LAS INSTRUCCIONES ANTES DE UTILIZAR SU TAPIZ RODANTE.
- Page 24 STAR TRAC SIKKERHEDSINSTRUKTIONER ADVARSEL Dette produkt er beregnet til brug i forbindelse med et el-net med nomine! effekt pa 220 volt. Det leveres med s<erlig ledning og stik fra fabrikken, som kun passer til den korrekte type e!-net. Sj2lrg for, at produktet er sat til en stikkomakt, som har samme konfiguration som stikket.
- Page 25 Kontakt den autoriserede STAR Foretag forebyggende vedligeholdelse TRAC, forhandler eller servieeafdelingen hos 1 71 46691660 med regelmressige mellemrum. STAR TRAC Ring pa + eller du Hold ledningen fri af varmeanlreg. fat i os pa vores web-site: http://www.star- Vent till¢bebandet standser, f¢r du trae.eom for ¢jeblikkeligt eftersyn eller reparation.
- Page 26 POWER CORD REPLACEMENT INSTRUCTIONS I. TURN THE POWER OFF AND UNPLUG THE TREADMILL. 2. USING APHJLL1PS SCREW DRIVER, REMOVE THE ON THE CENTER FRONT OF THE MOTOR SHROUD, SEPARATE THE VELCRO BY PULLING AWAY ON THE SIDES OF THE SHROUD THEN SLIDE THE SHROUD UP THE FRONT RA1L TO ACCESS THE POWER CORD CONNECTION. 3 REMOVE THE GROUND SCREW AND DISCONNECT GROUND WIRE.
-
Page 27: Parts List
CHAPTER This chapter details how to assemble and set up your Please begin by verifying that the following parts were included in your shipment: Description Qty. Frame Assembly Motor Shroud Front Handrail with Display Control Panel Attached Side Handrails Bolt, Hex Head, 5/16-18 UNC 6"... -
Page 28: Assembly And Setup
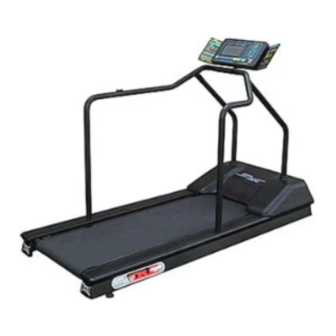
To assemble your just follow these steps. Note: Don't finally tighten the bolts and screws until all the parts are fitted together. Remove all the packaging LEFT SIDE HANDRAIL material so that the treadmill is sitting, ready for assembly, on the shipping crate platform. - Page 29 Lift the shroud and secure it to the display control panel support tube, placing the bungee cord around the tube and hooking it under the rim ofthe shroud as shown. The bungee cord should lift and hold the shroud halfway up the front handrail legs. Lift the front handrail and shroud, and lower the front handrail legs over the elevation screws that stick up from the...
- Page 30 CABLE HANDRAIL INSERT RUBBER GASKET BOLT Locate the side handrails. Remove and place aside the four screws (two per side) that are on the stub sticking out of the upper end of the side handrails. Slide the side handrails stub into the front handrail, replace the four screws (two per side), and tighten loosely.
- Page 31 You have now completed the assembly ofyour .. _ - - - - LOCK NUTS - - - - - - - t.. TRAC 3900 TREADMILL. (LEVELING THE TREADMILL) ADJUSTABLE, REAR LEVELING FEET CALIBRATE: While depressing "DISPLAY SCROLL", turn the Power...
- Page 32 SMALL DISPLAY WINDOW LARGE DISPLAY WINDOW SPEED KEYS INCLlNE KEYS START KEY DISPLAY SCROLL KEY INFO DISPLAY KEYS INFO DISPLAY KEYS...
-
Page 33: Display Control Panel Features
OPERATING IN!iTRUCT/ON!i Operating the.!iTAR TRAC 3900 TREADMILL is very easy. Simply step onto the running belt, press (. and begin walking or running naturally. Learning the features and incorporating the .!iTAR TRAC 3900 TREADMILL into your members' fitness programs is just as easy. In this chapter, you will learn the display function and how to get the most out of every .!iTAR TRAC 3900 TREADMILL workout. - Page 34 Show information on your workout. The informa- Display Windows (large and small): tion consists of: Upon activating this key, the display windows will show the TIME Display Key: elapsed time of your workout thus far. Upon activating this key, the display windows will show DISTANCE Display Key: the total number of miles you have walked or ran thus far.
-
Page 35: Hints And Tips For Getting Started
The following hints and tips will assist in training your users to maximize the fitness benefits of your • Walk or run at a rate that feels comfortable and most natural, yet is sufficiently vigorous to get a good cardio workout. •... -
Page 36: Chapter 4: Training Int'onnation
TRAINING INFORMATION To assist you in your training program, this chapter provides you hints of how to stay motivated, climb up the conditioning ladder, and use training logs to chart your progress. THE IMPORTANCE OF CARDIa EXERCI§E "Regular physical activity is essential to the performance, safety, and health issues faced by every American. -
Page 37: Getting Started And Sticking With It
(Source: Walter M. Borts, M.D., author of We Live Too Short and Die Too Young). For fitness newcomers or veterans, your §TAR TRAC 3900 TREADMILL gives you the full control of your workouts. Follow these suggestions to get on the road to fitness. -
Page 38: Breathing And Stretching
Whether you're on a Star Trac treadmill or not, running is tough on your knees, legs, and feet. Don't try to do too much too soon. Beginners need patience. Be sure to check with your physician before you start any rigorous exercise program. -
Page 39: Chapter 5: Prellentille Maintenance
Severe breakdown may result. Therefore, consistently follow the maintenance schedule below. Also, report unusual symptoms, such as error readings and blown circuit breakers, to Star Trac's Service Hotline at (800) 503-1221. -
Page 40: Twice-Weekly Maintenance
TWICE-WEEKLY MAINTENANCE • Raise the motor shroud and vacuum around the motor and its ventilation holes. Avoid bumping or damaging parts normally covered by the shroud. MONTHLY MAINTENANCE • Wipe the elevation screw with a dry cloth and coat them with silicon lubricant. inAdjustments-Thumping •... - Page 41 If the deck shows underlying fibers, flip it (or replace it if it has been already flipped). Obtain instructions for replacing the belt and flipping or replacing the deck from Star Trac's Service Hotline at (800) 503-1221. Grinding: Tum the treadmill off.
-
Page 42: Maintenance Led
MAINTENANCE The §TAR TRAC 3900 TREADMILL is designed with a MAINTENANCE LED that indicates when it is time to rewax the belt and deck per the following RE-WAXING procedure. TREADMILL RUI\lI\lII\lIi BELT/DECK RE-WAXlI\lIi PROCEDURE: TOOLS & MATERIALS 1 Bag Wax Powder, & Teaspoon 1 Clean Towel, &... -
Page 43: Calibration Procedure
5. Repeat steps 2 through 4, on the right side ofthe belt/deck. 6. WALK: Start the treadmill at 1 mph and walk on all sections of the belt and deck for 1 minute to ensure the wax has been evenly distributed and worked-in properly. 7. - Page 44 This page intentionally left blank.
- Page 45 This page intentionally left blank.
- Page 46 This page intentionally left blank.