
Related Manuals for Omron HEM-650


Summary of Contents for Omron HEM-650
- Page 1 HEM-650_E_SP_q6.qxp 6/25/07 7:19 PM Page 1 Instruction Manual Wrist Blood Pressure Monitor with Advanced Positioning Sensor (APS ® HEM-650 Model...
-
Page 2: Table Of Contents
HEM-650_E_SP_q6.qxp 6/25/07 7:19 PM Page 2 TABLE OF CONTENTS Before Using the Monitor Introduction ..........3 Safety Information . -
Page 3: Introduction
The HEM-650 comes with the following components: • Main Unit • 2 “AAA” Batteries • Storage Case • Warranty Card • Instruction Manual printed in English and Spanish The Omron HEM-650 Wrist Blood Pressure Monitor is intended for home use. SAVE THESE INSTRUCTIONS... -
Page 4: Safety Information
HEM-650_E_SP_q6.qxp 6/25/07 7:19 PM Page 4 SAFETY INFORMATION To assure the correct use of the product basic safety measures should always be followed including the warnings and cautions listed in this instruction manual. SAFETY SYMBOLS USED IN THIS INSTRUCTION MANUAL Indicates a potentially hazardous situation which, if not avoided, could result in death or WARNING... -
Page 5: Care And Maintenance
Do not submerge the device or any of the components in water. Store the device and the components in a clean, safe location. Changes or modification not approved by Omron Healthcare will void the user warranty. Do not disassemble or attempt to repair the unit or... -
Page 6: Before Taking A Measurement
HEM-650_E_SP_q6.qxp 6/25/07 7:19 PM Page 6 BEFORE TAKING A MEASUREMENT To ensure a reliable reading follow these recommendations: 1. Avoid eating, drinking alcohol, smoking, exercising and bathing for at least 30 minutes before taking measurement. Rest for at least 15 minutes before taking a measurement. -
Page 7: Operating Instructions
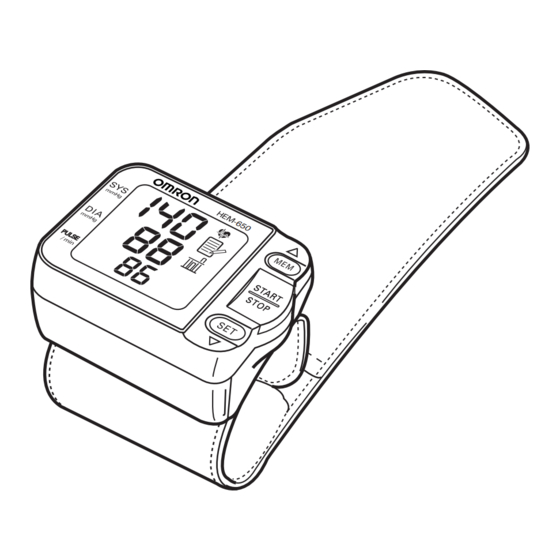
HEM-650_E_SP_q6.qxp 6/25/07 7:19 PM Page 7 Operating Instructions KNOW YOUR UNIT Main Unit: Wrist Cuff Display MEM (Memory) Button START/STOP Button SET Button Battery Compartment Fabric Fastener (hook) Inner Surface of Wrist Cuff Fabric Fastener (loop) - Page 8 ADVANCED POSITIONING SENSOR (APS ® ) ENSURES A RELIABLE MEASUREMENT Correct cuff positioning is critical when monitoring blood pressure. The Omron Wrist Blood Pressure Monitor with APS ® has a unique positioning sensor that confirms the cuff is level with the user’s heart. This helps ensure that each reading...
-
Page 9: Unit Display
HEM-650_E_SP_q6.qxp 6/25/07 7:19 PM Page 9 UNIT DISPLAY Heartbeat Symbol Systolic Blood Pressure Memory Value Symbol Diastolic Blood Pressure Average Value Symbol Low Battery Indicator Irregular Heartbeat Cuff Deflation Symbol Symbol Right Wrist Measurement Symbol Date/Time Display Position Sensor Alarm Symbol Pulse Display... -
Page 10: Display Symbols
HEM-650_E_SP_q6.qxp 6/25/07 7:19 PM Page 10 DISPLAY SYMBOLS IRREGULAR HEARTBEAT SYMBOL ( When the monitor detects an irregular rhythm two or more times during the measurement, the Irregular Heartbeat Symbol ( ) will appear on the display with the measurement values. Normal Heartbeat Normal Heartbeat An irregular heartbeat rhythm is defined as a... - Page 11 Self-diagnosis and treatment using measured results may be dangerous. Follow the instructions of your physician or licensed healthcare provider. Omron Healthcare recommends you contact your physician if the HEARTBEAT SYMBOL ( ) appears on the display with your measurement values. Follow the directions of your doctor.
-
Page 12: Heartbeat Symbol
HEM-650_E_SP_q6.qxp 6/25/07 7:19 PM Page 12 DISPLAY SYMBOLS HEARTBEAT SYMBOL ( TAKING A MEASUREMENT The Heartbeat Symbol ( ) flashes on the display during the measurement. The Heartbeat Symbol ( ) flashes at every heartbeat. When the measurement is complete, the Heartbeat Symbol ( flashes on the display with your blood pressure and pulse rate if the reading is above 135 for the Systolic Blood Pressure value and/or 85 for the Diastolic Blood Pressure value. -
Page 13: Battery Installation
HEM-650_E_SP_q6.qxp 6/25/07 7:19 PM Page 13 BATTERY INSTALLATION 1. Press both sides of the battery cover and lift the cover off in the direction of the arrow. 2. Install 2 “AAA” Alkaline Batteries so the + (positive) and - (negative) polarities match the polarities of the battery compartment as indicated. - Page 14 HEM-650_E_SP_q6.qxp 6/25/07 7:19 PM Page 14 BATTERY INSTALLATION BATTERY REPLACEMENT Low Battery Indicator When the Low Battery Indicator appears on the display screen turn the monitor off and remove all the batteries. Replace with two new batteries at the same time. WARNING If battery fluid should get in your eyes, immediately rinse with plenty of clean water.
-
Page 15: Setting The Advanced Positioning Sensor
HEM-650_E_SP_q6.qxp 6/25/07 7:19 PM Page 15 SETTING THE ADVANCED POSITIONING SENSOR The Advanced Positioning Sensor (APS ) will assure you the unit is in the ® correct position level with the user’s heart before the monitor starts to take the measurement. When the APS is set to ON, the Heartbeat Symbol ( flashes once your wrist is in the correct position. -
Page 16: Setting The Position Sensor Alarm
HEM-650_E_SP_q6.qxp 6/25/07 7:19 PM Page 16 SETTING THE POSITION SENSOR ALARM The Position Sensor Alarm emits sound to help you place your wrist in the correct position. The Position Sensor Alarm can be set to ON or OFF when the APS is set to ON. The Position Sensor Alarm is set to ON1 at the time of purchase. -
Page 17: Setting The Measurement Wrist
HEM-650_E_SP_q6.qxp 6/25/07 7:19 PM Page 17 SETTING THE MEASUREMENT WRIST The monitor is designed to take measurements on the left wrist or the right wrist. The monitor is set to OFF to take measurements on the left wrist at the time of purchase. 1. -
Page 18: Setting The Date And Time
HEM-650_E_SP_q6.qxp 6/25/07 7:19 PM Page 18 SETTING THE DATE AND TIME Set the monitor to the current date and time before taking a measurement for the first time. If the date and time are not set correctly, the measurement values stored in the memory will have the wrong date and time. - Page 19 HEM-650_E_SP_q6.qxp 6/25/07 7:19 PM Page 19 SETTING THE DATE AND TIME Press the SET button to confirm the setting. The month flashes on the display. 3. SETTING THE MONTH Press the MEM button to advance by increments of one month. Press the SET button to confirm the setting.
- Page 20 HEM-650_E_SP_q6.qxp 6/25/07 7:19 PM Page 20 SETTING THE DATE AND TIME 6. SETTING THE MINUTE Press the MEM button to advance by increments of one minute. Press the SET button to confirm the setting. The APS setting screen is displayed. Press the START/STOP button to turn the monitor off.
-
Page 21: Applying The Wrist Cuff
HEM-650_E_SP_q6.qxp 6/25/07 7:19 PM Page 21 APPLYING THE WRIST CUFF The monitor is designed to take measurements on the left wrist or the right wrist. The monitor is set to take measurements on the left wrist at the time of purchase. To change the setting, refer to “Setting the Measurement Wrist”. - Page 22 HEM-650_E_SP_q6.qxp 6/25/07 7:19 PM Page 22 APPLYING THE WRIST CUFF APPLYING THE WRIST CUFF ON THE LEFT WRIST 1. Roll up sleeve. Make sure your sleeve is not rolled up too tight on your arm. This may constrict the flow of blood in your arm. 2.
- Page 23 HEM-650_E_SP_q6.qxp 6/25/07 7:19 PM Page 23 APPLYING THE WRIST CUFF NOTES: • If the cuff is not securely fastened, the wrist cuff may become loose during measurement and the measurement may not be possible. • Users with a wrist circumference of less than 5 3/4 inches may feel the wrist cuff move if the cloth fastener is not wrapped snugly.
-
Page 24: Taking A Measurement
HEM-650_E_SP_q6.qxp 6/25/07 7:19 PM Page 24 TAKING A MEASUREMENT CAUTION Operate the device only as intended. Do not use the device for any other purpose. CAUTION Do not use a cellular phone near the device. It may result in an operational failure. - Page 25 HEM-650_E_SP_q6.qxp 6/25/07 7:19 PM Page 25 TAKING A MEASUREMENT Hold your wrist in this position. Do not move until the measurement is complete. NOTE: To stop the inflation or measurement, press the START/STOP button. The monitor will stop inflating, start deflating and will turn off.
-
Page 26: Taking A Measurement On The Right Wrist
HEM-650_E_SP_q6.qxp 6/25/07 7:19 PM Page 26 TAKING A MEASUREMENT 3. When the measurement finishes, the deflation symbol ( ) flashes and the wrist cuff deflates. Your blood pressure and pulse rate are displayed. Alternating Display NOTE: The time and date of the measurement are displayed alternately. The Heartbeat Symbol ( ) flashes on the display with your blood pressure and pulse rate if the reading is above 135 for the Systolic Blood... -
Page 27: Using The Memory Function
HEM-650_E_SP_q6.qxp 6/25/07 7:19 PM Page 27 USING THE MEMORY FUNCTION The monitor automatically stores up to 90 sets of measurement values with date and time in the memory. When 90 sets of measurement values are stored, the oldest record is deleted to save the most recent values. AVERAGING FUNCTION The monitor calculates the average reading based on the three most recent sets of measurement values taken within 10 minutes of the most recent... -
Page 28: To Display The Measurement Values
HEM-650_E_SP_q6.qxp 6/25/07 7:19 PM Page 28 USING THE MEMORY FUNCTION TO DISPLAY THE MEASUREMENT VALUES 1. Press the MEM button to display the average reading based on the three most recent sets of measurement values taken within 10 minutes of the most recent reading. The Average Value Symbol ( ) appears on the display when the average reading is shown. -
Page 29: To Delete All Values Stored In The Memory
HEM-650_E_SP_q6.qxp 7/5/07 7:12 PM Page 29 USING THE MEMORY FUNCTION TO DELETE ALL VALUES STORED IN THE MEMORY You cannot partially delete records stored in the memory. All records will be deleted. 1. While holding down the MEM button, press and hold the START/STOP button for more than 2 seconds. -
Page 30: Care And Maintenance
Use only Omron authorized parts and accessories. Parts and accessories not approved for use with the device may damage the unit. CAUTION Changes or modification not approved by Omron Healthcare will void the user warranty. Do not disassemble or attempt to repair the unit or components. -
Page 31: Error Indicators And Troubleshooting Tips
HEM-650_E_SP_q6.qxp 6/25/07 7:19 PM Page 31 ERROR INDICATORS AND TROUBLESHOOTING TIPS ERROR INDICATORS SYMBOLS CAUSE CORRECTION Turn the unit off. Refer to “Taking a Measurement”. Wait 2-3 minutes. Movement during measurement. Take another measurement and do not move until the measurement results display. -
Page 32: Troubleshooting
HEM-650_E_SP_q6.qxp 6/25/07 7:19 PM Page 32 ERROR INDICATORS AND TROUBLESHOOTING TIPS SYMBOLS CAUSE CORRECTION Repair service required. Cuff over-inflated. Refer to “Warranty”. After several seconds Repair service required. Abnormal unit function. Refer to “Warranty”. Only E and numerals are displayed. TROUBLESHOOTING TIPS PROBLEMS CAUSE... -
Page 33: Fcc Statement
HEM-650_E_SP_q6.qxp 6/25/07 7:19 PM Page 33 FCC STATEMENT NOTE: POTENTIAL FOR RADIO/TELEVISION INTERFERENCE (for U.S.A. only) This product has been tested and found to comply with the limits for a Class B digital device, pursuant to part 15 of the FCC rules. These limits are designed to provide reasonable protection against harmful interference in a residential installation. -
Page 34: Warranty
OMRON SHALL NOT BE LIABLE FOR LOSS OF USE OR ANY OTHER INCIDENTAL, CONSEQUENTIAL OR INDIRECT COSTS, EXPENSES OR DAMAGES. Some states do not allow the exclusion or limitation of incidental or consequential damages, so the above exclusions may not apply to you. -
Page 35: Specifications
HEM-650_E_SP_q6.qxp 6/25/07 7:19 PM Page 35 SPECIFICATIONS Model: HEM-650 Display: Digital Display Measurement Range: Pressure: 0 to 299 mmHg, Pulse: 40-180/min. Accuracy/Calibration: Pressure: ±3mmHg or 2% of reading Pulse: ±5% of reading Inflation: Automatic by electric pump Deflation: Automatic rapid deflation pressure... - Page 36 HEM-650_E_SP_q6.qxp 6/25/07 7:19 PM Page 36 Manufactured by OMRON HEALTHCARE Made in China Distributed by: OMRON HEALTHCARE, INC. 1200 Lakeside Drive Bannockburn, Illinois 60015 www.omronhealthcare.com Copyright © 2007 Omron Healthcare, Inc.
- Page 37 HEM-650_E_SP_q6.qxp 6/25/07 7:19 PM Page 37 Manual de instrucciones Monitor de presión arterial de muñeca con sensor de posicionamiento avanzado (APS ® HEM-650 Modelo...
- Page 38 HEM-650_E_SP_q6.qxp 6/25/07 7:19 PM Page E2 ÍNDICE Antes de usar el monitor Introducción ..........E3 Información de seguridad .
- Page 39 • 2 pilas tamaño “AAA” • Estuche • Tarjeta de garantía • Manual de instrucciones impreso en inglés y español El monitor de presión arterial de muñeca HEM-650 de Omron está diseñado para uso en el hogar. GUARDE ESTAS INSTRUCCIONES...
-
Page 40: Información De Seguridad
HEM-650_E_SP_q6.qxp 6/25/07 7:19 PM Page E4 INFORMACIÓN DE SEGURIDAD Para garantizar el uso correcto del producto, siempre se deben aplicar las medidas de seguridad básicas, incluyendo las advertencias y precauciones que se describen en este manual de instrucciones. SÍMBOLOS DE SEGURIDAD UTILIZADOS EN ESTE MANUAL DE INSTRUCCIONES Indica una situación potencialmente peligrosa que, si no se evita, puede provocar la muerte o... -
Page 41: Cuidado Y Mantenimiento
No use teléfonos celulares cerca del dispositivo. Puede provocar fallas de funcionamiento. Use sólo las piezas y accesorios autorizados por Omron. Las piezas y accesorios que no hayan sido aprobados para usar con el dispositivo pueden dañar la unidad. -
Page 42: Antes De Tomar Una Medición
HEM-650_E_SP_q6.qxp 6/25/07 7:19 PM Page E6 ANTES DE TOMAR UNA MEDICIÓN A fin de garantizar una lectura confiable, siga estas recomendaciones: 1. Evite comer, tomar bebidas alcohólicas, fumar, hacer ejercicio y bañarse durante al menos 30 minutos antes de tomar una medición. Descanse durante al menos 15 minutos antes de tomar una medición. -
Page 43: Instrucciones De Funcionamiento
HEM-650_E_SP_q6.qxp 6/25/07 7:19 PM Page E7 Instrucciones de funcionamiento CONOZCA LA UNIDAD Unidad principal: Banda para la muñeca Pantalla Botón MEM (Memoria) Botón START/STOP (Inicio/Detener) Botón SET (Configuración) Compartimiento de las pilas Cierre de tela (gancho) Superficie interna de banda de muñeca Cierre de tela (presilla) - Page 44 UNA MEDICIÓN CONFIABLE El posicionamiento correcto de la banda es crítico al momento de controlar la presión arterial. El monitor de presión arterial para la muñeca de Omron con APS ® posee un sensor de posicionamiento único que permite confirmar que la banda de la muñeca esté...
-
Page 45: Pantalla De La Unidad
HEM-650_E_SP_q6.qxp 6/25/07 7:19 PM Page E9 PANTALLA DE LA UNIDAD Símbolo de latidos de corazón Presión arterial sistólica Símbolo de valor de memoria Presión arterial diastólica Símbolo de valor promedio Indicador de batería baja Símbolo de latido Símbolo de desinflado de banda irregular Símbolo de medición de... -
Page 46: Símbolos De La Pantalla
HEM-650_E_SP_q6.qxp 6/25/07 7:19 PM Page E10 SÍMBOLOS DE LA PANTALLA SÍMBOLO DE LATIDO IRREGULAR ( Cuando el monitor detecta un ritmo irregular dos o más veces durante la medición, aparecerá en la pantalla el símbolo de latido irregular ( ) con los valores de medición. - Page 47 Si el SÍMBOLO DE LATIDO ( ) aparece en la pantalla junto con los valores de medición, Omron Healthcare recomienda que consulte a su médico. Siga las instrucciones del médico. Declaración científica de la Asociación Estadounidense del Corazón de 2004...
-
Page 48: Símbolo De Latido ( )
HEM-650_E_SP_q6.qxp 6/25/07 7:19 PM Page E12 SÍMBOLOS DE LA PANTALLA SÍMBOLO DE LATIDO ( CÓMO TOMAR UNA MEDICIÓN El símbolo de latido ( ) parpadea en la pantalla durante la medición. El símbolo de latido del corazón ( ) parpadea con cada latido del corazón. -
Page 49: Colocación De Las Pilas
HEM-650_E_SP_q6.qxp 6/25/07 7:19 PM Page E13 COLOCACIÓN DE LAS PILAS 1. Presione ambos lados de la tapa del compartimiento para pilas y retírela en el sentido que muestra la flecha. 2. Coloque 2 pilas alcalinas “AAA” de modo que las polaridades + (positiva) y - (negativa) concuerden con las polaridades que se indican en el compartimiento de las pilas. - Page 50 HEM-650_E_SP_q6.qxp 6/25/07 7:19 PM Page E14 COLOCACIÓN DE LAS PILAS CAMBIO DE LAS PILAS Indicador de batería baja Cuando el indicador de batería baja aparezca en la pantalla, apague el monitor y retire todas las pilas. Cámbielas simultáneamente por dos pilas nuevas.
-
Page 51: Configuración Del Sensor De Posicionamiento Avanzado
HEM-650_E_SP_q6.qxp 6/25/07 7:19 PM Page E15 CONFIGURACIÓN DEL SENSOR DE POSICIONAMIENTO AVANZADO El sensor de posicionamiento avanzado (APS ® ) le asegura que la unidad se encuentra en la posición correcta respecto del nivel del corazón del usuario antes de comenzar a tomar la medición. Cuando el sensor de posicionamiento avanzado está... -
Page 52: Configuración De La Alarma Del Sensor De Posicionamiento
HEM-650_E_SP_q6.qxp 6/25/07 7:19 PM Page E16 CONFIGURACIÓN DE LA ALARMA DEL SENSOR DE POSICIONAMIENTO La alarma del sensor de posicionamiento emite un sonido para ayudarle a colocar correctamente la muñeca. La alarma del sensor de posicionamiento puede configurarse en ON (Encendido) u OFF (Apagado) cuando el sensor está... -
Page 53: Configuración Del Medidor De Muñeca
HEM-650_E_SP_q6.qxp 6/25/07 7:19 PM Page E17 CONFIGURACIÓN DEL MEDIDOR DE MUÑECA El monitor ha sido diseñado para tomar mediciones tanto en la muñeca izquierda como en la muñeca derecha. El monitor está configurado en OFF (Apagado) para tomar mediciones en la muñeca izquierda al momento de la compra. -
Page 54: Configuración De La Fecha Y Hora
HEM-650_E_SP_q6.qxp 6/25/07 7:19 PM Page E18 CONFIGURACIÓN DE LA FECHA Y HORA Configure el monitor con la fecha y hora actuales antes de tomar una medición por primera vez. Si no se configuran la fecha y hora correctamente, los valores de las mediciones almacenadas en la memoria indicarán una fecha y hora incorrectas. - Page 55 HEM-650_E_SP_q6.qxp 6/25/07 7:19 PM Page E19 CONFIGURACIÓN DE LA FECHA Y HORA Presione el botón SET (Configuración) para confirmar la configuración. El mes parpadeará en la pantalla. 3. CONFIGURACIÓN DEL MES Presione el botón MEM (Memoria) para avanzar con incrementos de un mes. Presione el botón SET (Configuración) para confirmar la configuración.
- Page 56 HEM-650_E_SP_q6.qxp 6/25/07 7:19 PM Page E20 CONFIGURACIÓN DE LA FECHA Y HORA 6. CONFIGURACIÓN DE LOS MINUTOS Presione el botón MEM (Memoria) para avanzar con incrementos de un minuto. Presione el botón SET (Configuración) para confirmar la configuración. Se muestra la pantalla de reconfiguración del sensor.
-
Page 57: Colocación De La Banda Para La Muñeca
HEM-650_E_SP_q6.qxp 6/25/07 7:19 PM Page E21 COLOCACIÓN DE LA BANDA PARA LA MUÑECA El monitor ha sido diseñado para tomar mediciones tanto en la muñeca izquierda como en la muñeca derecha. El monitor está configurado para tomar mediciones en la muñeca izquierda al momento de la compra. Para cambiar la configuración, consulte la “Configuración del medidor de muñeca”. - Page 58 HEM-650_E_SP_q6.qxp 6/25/07 7:19 PM Page E22 COLOCACIÓN DE LA BANDA PARA LA MUÑECA COLOCACIÓN DE LA BANDA PARA LA MUÑECA EN LA MUÑECA IZQUIERDA 1. Súbase la manga. Asegúrese de que la manga no esté muy ajustada al brazo. Esto puede reducir el flujo de sangre en el brazo.
- Page 59 HEM-650_E_SP_q6.qxp 6/25/07 7:19 PM Page E23 COLOCACIÓN DE LA BANDA PARA LA MUÑECA NOTAS: • Si la banda no está ajustada correctamente, se puede aflojar durante el proceso y no se podrá realizar la medición. • Los usuarios que tengan una circunferencia de muñeca de menos de 5 3/4 pulgadas pueden sentir que la banda se mueve si el seguro de la tela no está...
-
Page 60: Cómo Tomar Una Medición
HEM-650_E_SP_q6.qxp 6/25/07 7:19 PM Page E24 CÓMO TOMAR UNA MEDICIÓN PRECAUCIÓN Sólo opere el dispositivo para el fin para el que está diseñado. No use el dispositivo para ningún otro fin. PRECAUCIÓN No use teléfonos celulares cerca del dispositivo. Puede provocar fallas de funcionamiento. - Page 61 HEM-650_E_SP_q6.qxp 6/25/07 7:19 PM Page E25 CÓMO TOMAR UNA MEDICIÓN Mantenga la muñeca en esta posición. Permanezca quieto hasta que se complete la medición. NOTA: Para detener el inflado o la medición, presione el botón START/STOP (Inicio/Detener). El monitor dejará de inflarse, comenzará...
-
Page 62: Cómo Tomar Una Medición En La Muñeca Derecha
HEM-650_E_SP_q6.qxp 6/25/07 7:19 PM Page E26 CÓMO TOMAR UNA MEDICIÓN 3. Cuando finaliza la medición, el símbolo de desinflado ( ) parpadea y la banda de la muñeca se desinfla. Aparecen la presión arterial y el pulso. Cambio de visualizaciones NOTA: La hora y fecha de la medición se visualizan en forma alternada. -
Page 63: Uso De La Función Memoria
HEM-650_E_SP_q6.qxp 6/25/07 7:19 PM Page E27 USO DE LA FUNCIÓN MEMORIA El monitor almacena automáticamente hasta 90 conjuntos de valores de medición con fecha y hora en la memoria. Una vez almacenados 90 conjuntos de valores de medición en la memoria, el registro más antiguo se borrará... -
Page 64: Para Mostrar Los Valores De Medición
HEM-650_E_SP_q6.qxp 6/25/07 7:19 PM Page E28 USO DE LA FUNCIÓN MEMORIA PARA MOSTRAR LOS VALORES DE MEDICIÓN 1. Presione el botón MEM (Memoria) para mostrar la lectura promedio basada en los valores de los tres conjuntos de mediciones más recientes tomados dentro del período de 10 minutos de la lectura más reciente. -
Page 65: Para Borrar Todos Los Valores Almacenados En La Memoria
HEM-650_E_SP_q6.qxp 7/5/07 7:14 PM Page E29 USO DE LA FUNCIÓN MEMORIA PARA BORRAR TODOS LOS VALORES ALMACENADOS EN LA MEMORIA No puede borrar parcialmente los registros almacenados en la memoria. Se borrarán todos los registros. 1. Mientras mantiene presionado el botón MEM (Memoria), presione y mantenga presionado el botón START/STOP (Inicio/Detener) por más de 2 segundos. -
Page 66: Cuidado Y Mantenimiento
Cambie siempre todas las pilas por pilas nuevas al mismo tiempo. PRECAUCIÓN Use sólo las piezas y los accesorios autorizados por Omron. Las piezas y accesorios que no hayan sido aprobados para utilizar con el dispositivo pueden dañar la unidad. -
Page 67: Indicadores De Error Y Resolución De Problemas
HEM-650_E_SP_q6.qxp 6/25/07 7:19 PM Page E31 INDICADORES DE ERROR Y RESOLUCIÓN DE PROBLEMAS INDICADORES DE ERROR SÍMBOLOS CAUSA CORRECCIÓN Apague la unidad. Consulte “Cómo tomar una medición”. Movimiento durante la Espere 2 ó 3 minutos. medición. Tome otra medición y no se mueva hasta que aparezca el resultado de la medición. - Page 68 HEM-650_E_SP_q6.qxp 6/25/07 7:19 PM Page E32 INDICADORES DE ERROR Y RESOLUCIÓN DE PROBLEMAS SÍMBOLOS CAUSA CORRECCIÓN Necesita servicio de La banda reparación. está demasiado inflada. Consultar “Garantía”. Luego de varios segundos Necesita servicio de Funcionamiento reparación. anormal de la unidad. Sólo aparecen letras E y Consultar “Garantía”.
-
Page 69: Declaración De La Fcc
HEM-650_E_SP_q6.qxp 6/25/07 7:19 PM Page E33 DECLARACIÓN DE LA FCC NOTA: POTENCIAL DE INTERFERENCIA DE RADIO/TELEVISIÓN (para EE.UU. solamente) Este producto ha sido probado y cumple con los límites de un dispositivo digital de Clase B, de acuerdo con la sección 15 de las normas de la FCC. Estos límites fueron diseñados para proporcionar una protección razonable contra interferencias perjudiciales cuando se utilice el equipo en una instalación residencial. -
Page 70: Garantía
único recurso conforme a las garantías anteriormente mencionadas. Para obtener servicio de garantía, contáctese con Omron Healthcare que le proporcionará la dirección del lugar donde se efectúan las reparaciones. Puede obtener instrucciones de envío e información sobre reparaciones llamando al 1-800-634-4350 o visitando nuestro sitio Web en www.omronhealthcare.com. - Page 71 HEM-650_E_SP_q6.qxp 6/25/07 7:19 PM Page E35 ESPECIFICACIONES Modelo: HEM-650 Pantalla: Pantalla digital Rango de medición: Presión: 0 a 299 mmHg, Pulso: 40-180/min. Precisión/Calibración: Presión: ±3mmHg o 2% de lectura Pulso: ±5% de lectura Inflado: Automático por bomba eléctrica Desinflado: Presión automática de desinflado rápido Liberación rápida...
- Page 72 HEM-650_E_SP_q6.qxp 6/25/07 7:19 PM Page E36 Fabricado por OMRON HEALTHCARE Hecho en China Distribuido por: OMRON HEALTHCARE, INC. 1200 Lakeside Drive Bannockburn, Illinois 60015 www.omronhealthcare.com Copyright © 2007 Omron Healthcare, Inc. 1664377-1A...