Datavideo DAC-100 Installation Manual
Digital video converter
Hide thumbs
Also See for DAC-100:
- Getting started (13 pages) ,
- Supplementary manual (13 pages) ,
- Getting started (15 pages)
Advertisement
Advertisement
Table of Contents

Related Manuals for Datavideo DAC-100


Summary of Contents for Datavideo DAC-100
- Page 1 Digital Video Converter Installation Guide http://www.datavideo-tek.com...
- Page 2 GETTING STARTED DAC-100 What’s in the Box? DAC-100 AC ADAPTER S-VIDEO CABLE (REQUIRES RED & WHITE RCA AUDIO CABLE) RCA VIDEO & AUDIO CABLE FIREWIRE 6 PIN MALE TO 6 PIN MALE) INSTALLATION GUIDE MANUAL REGISTRATION CARD SUPPORT INFO AC ADAPTER...
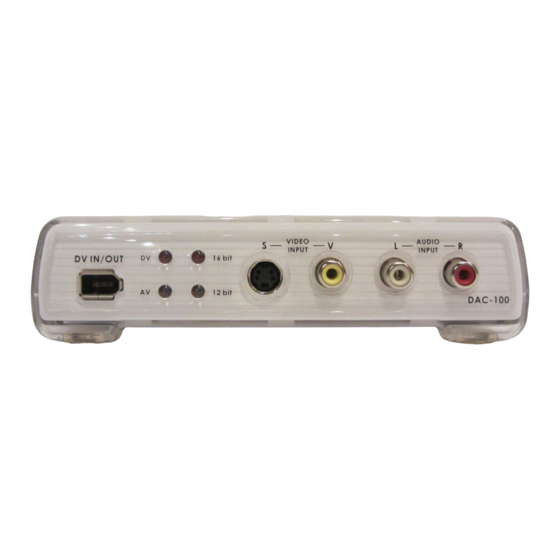
- Page 3 MEET THE DAC-100 INPUT SIDE Input Selector Audio Bit Rate Selector FireWire Input/Output Source Indicator Right Audio Input S-Video Left Audio Input Audio Input Bit Rate Indicator Composite Video Input OUTPUT SIDE Right Audio Output Left Audio Output Composite Video Output...
- Page 4 4. Start the Editing Software. (Not Supplied) 5. Press the DAC-100’s Source Button to switch it to “AV” and the A Encode Button to “16 bit”. 6. Go to the “Capture or Import” mode on the Editing software to begin capturing video to a PC or a MAC...
- Page 5 CAPTURING 1. Connect the S-Video cable and RCA audio cables from the VCR’s Line output to the input on the DAC-100. 2. Connect the FireWire cable to the DAC-100, connect the opposite end to the PC or Mac’s FireWire Port.
- Page 6 1. Connect the RCA Video/audio cables from the VCR’s Line input to the output on the DAC-100. 2. Connect the FireWire cable to the DAC-100, connect the opposite end to the PC or Mac’s FireWire Port. 3. Power on the DAC-100 and the VCR.
- Page 7 EXPORTING TO 1. Connect the S-Video and RCA audio cables from the VCR’s Line input to the output on the DAC-100. 2. Connect the FireWire cable to the DAC-100, connect the opposite end to the PC or Mac’s FireWire Port.
-
Page 8: Important Notice
The Important Notice of Safety Instruction and Radio & TV Interference Read all of these instructions and save them for later reference. Follow all warnings and instructions marked on the products. Unplug this product from the wall outlet before cleaning. Do not use liquid or aerosol cleaners. - Page 9 10. Never push objects of any kind into this product through cabinet slots as they may touch dangerous voltage points or short out parts that could result in a risk of fire or electric shock. Never spill liquid of any kind on the product.
-
Page 10: Service And Support
It is our goal to make your products ownership a satisfying experience. Our supporting staff is available to assist you in setting up and operating your system. Please refer to our web site www.datavideo-tek.com for answers to common questions, support requests or contact your local office below. -
Page 11: Radio & Television Interference
RADIO & TELEVISION INTERFERENCE UNITED STATES. The equipment described in this guide generates and uses radio frequency energy. If it is not installed and used in accordance with the instructions in this guide, it may cause interference with radio and television reception. This equipment has been tested and found to comply with the limits for a Class B digital device, pursuant to Part 15 of the FCC Rules. -
Page 12: Declaration Of Conformity
Use of unshielded interface cables may result in interference to radio and TV reception, and may void the user’s right to operate this equipment. Declaration of Conformity Model Number: DAC-100 Trade Name: Datavideo Responsible: Datavideo Corporation (USA) Address: 12300-U East Washington Blvd., Whittier,... -
Page 13: Table Of Contents
Radio & Television Interference-------------- 4 Introduction ------------------------------------ 7 Front Panel Control ---------------------------- 8 Rear Panel Control ---------------------------- 9 Important Notice for editing systems ------- 10 Configuring a DAC-100 with Avid DV Xpress 3.5 on Windows XP---------- 14 Specifications ---------------------------------- 18... -
Page 14: Introduction
The DAC-100 is a simple, competent solution for encoding video and audio back and forth between analog tape and DV in both the Mac and PC platforms. Using the DAC-100 to convert analog to DV let’s you maintain the quality of your analog tape without generation loss. Key Features... -
Page 15: Front Panel Control
FRONT PANEL CONTROL Description: 6-Pin FireWire interface for DV In/Out Video source indicators for DV or AV input LED indicators for Audio encoder 12-Bit or 16-Bit S-Video (Y/C) input connector. Composite Video input RCA connector Stereo Audio input RCA connectors Push button to select 12-Bit or 16-Bit Audio encoding Push button to select video input source DV or AV Note: Please wait 5 seconds for the LED ready status to come on after... -
Page 16: Rear Panel Control
2. Composite Video output RCA connector 3. S-Video (Y/C) output connector 4. Mode DIP switch (Reboot the DAC-100 if you change a DIP Switch) S1. PAL or NTSC (PAL-ON, NTSC-OFF) S2. 7.5 IRE / 0 IRE (0 IRE-ON, 7.5 IRE-OFF) Please note: 0 IRE is most often used in Japan. -
Page 17: Important Notice For Editing Systems
IMPORTANT NOTICE FOR PC/MAC EDITING SYSTEMS 1.Please shut down all resident programs in your PC for better editing performance. Such as the Anti-Virus program, screen saver, system power management software… etc. 2.Enable the Disk DMA function in windows to improve system HDD access performance To install a proper HDD DMA or Bus Master driver will improve your PC system’s overall performance. - Page 18 S1. On windows desktop, click on “My computer” and check the “properties” S2. Click on “Device manager” Click on Device Manager...
- Page 19 S3. Click on ”Disk drives” and Select “Generic IDE Disk” and then click on “Properties” ” Click on “Properties S4. Select “Setting” and enable “DMA” and click on “OK”. Enable “DMA”...
- Page 20 3.To work with MAC Final cut pro (Recommended): 1). Select "Preferences" from Final Cut Pro menu 2). Select "General" page. 3). Uncheck "Abort capture on dropped frame" 4). Uncheck "Abort capture on time code break" for Final cut pro 5). Click OK button 4.
-
Page 21: Configuring A Dac-100 With
Please follow the steps below to configure your DAC-100 for use with Xpress DV 3.5. Setup Procedure: Step 1. Connect your DAC-100 to your computer via FireWire. (IEEE/1394 cable) Step 2. Turn on your DAC-100 converter. - Page 22 Note: The DAC-100 uses the same deck configuration setting as the DAC-2...
- Page 23 Using the Record Tool with the DAC-100 in Xpress DV 3.0...
-
Page 25: Specifications
Data Transfer Rate 25Mbps, PAL 4:2:0 / NTSC 4:1:1 GENERAL Power (Included) DC 5V / 6.0W AC Adapter Caution: DAC-100 requires DC 5 Volt +/- 4%, Use only Datavideo approved Power Adaptor. Ambient Temperature 32° - 131°F (0° - 55°C)