Table of Contents
Advertisement
Quick Links
Advertisement
Table of Contents

Related Manuals for Datavideo DAC-45


Summary of Contents for Datavideo DAC-45
- Page 1 4K UP/DOWN/CROSS CONVERTER DAC-45 Instruction Manual...
-
Page 2: Table Of Contents
SERVICE AND SUPPORT ................... 23 Disclaimer of Product & Services The information offered in this instruction manual is intended as a guide only. At all times, Datavideo Technologies will try to give correct, complete and suitable information. However, Datavideo Technologies cannot exclude that some information in this manual, from time to time, may not be correct or may be incomplete. -
Page 3: Fcc Compliance Statement
AC adapter. If you are not sure of the type of power available, consult your Datavideo dealer or your local power company. Do not allow anything to rest on the power cord. Do not locate this unit where the power cord will be walked on, rolled over, or otherwise stressed. -
Page 4: Warranty
• The product warranty period beings on the purchase date. If the purchase date is unknown, the product warranty period begins on the thirtieth day after shipment from a Datavideo office. • Damage caused by accident, misuse, unauthorized repairs, sand, grit or water is not covered under warranty. -
Page 5: Chapter 1 Product Overview
Chapter 1 Product Overview Datavideo DAC-45 4K up / down / cross converter is designed to convert video signals from VGA, HDMI, SDI with Audio input to 4K HDMI or 3G-SDI output. It allows instant and automatic switch between 4K, HD and SD video formats when the video input changes. -
Page 6: Chapter 2 Connections And Controls
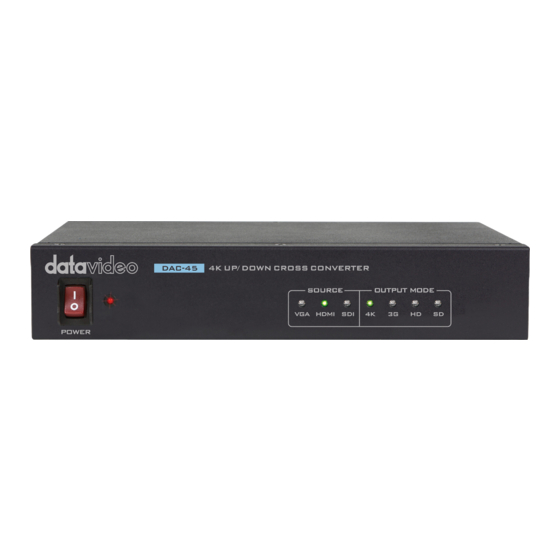
Chapter 2 Connections and Controls Front Panel Power Switch Turns ON/OFF the device Source LED Indicators Only one input can be enabled at a time. For details on how to select the source, see the DIP Switch descriptions in the Rear Panel section. -
Page 7: Rear Panel
10 before connecting the SDI source device to this port. REF IN (Genlock) The DAC-45 can be synchronized with the connected input device. REF IN will accept Tri-level and Black Burst sync. Set DIP SW 3 to 1 to enable the Genlock feature. To disable this port, simply set DIP SW 3 to 0. - Page 8 Please note the low nibble determines the resolution and frame rate of the output depending on the setting of the 4K bit. Firmware Upgrade USB firmware upgrade port Connects the DAC-45 device to the PC for firmware upgrade. See the Firmware Update section for details. DC IN DC In Socket Connects the supplied 12V PSU to this socket.
-
Page 9: Chapter 3 Dac Center
Chapter 3 DAC Center DAC-45 Center Utility is a Graphical User Interface that allows the user to obtain the device information and perform various video and audio settings. To use the utility, the user should first copy the DAC-45 Center.exe utility software from the installation CD to the computer running Windows. -
Page 10: Video
Video Video tab Click the to enter the video setup page. Video Setting button to enter the video configuration On the video setup page, click the page. - Page 11 Set the Input Source, HDMI Output Color and Output Format. Input Source • HDMI • • HDMI Output Color • YUV422 • YUV444 • RGB444 Output Format • 720x480 59.94i • 720x576 50.00i 3840x2160 60.00p • 3840x2160 59.94p • 3840x2160 50.00p •...
- Page 12 1920x1080 50.00p • • 1920x1080 30.00p 1920x1080 29.97p • 1920x1080 25.00p • 1920x1080 24.00p • 1920x1080 23.98p • • 1920x1080 60.00i • 1920x1080 59.94i • 1920x1080 50.00i • 1280x720 60.00p 1280x720 59.94p • • 1280x720 50.00p Click Apply after all settings are configured. Note: When Control Mode displays USB, it indicates that the device is accessible by the PC.
-
Page 13: Audio
• Disable Aspect Ratio • Keep Aspect Ratio Full Screen (16:9) • Dot By Dot • • 14:9 • UnderScan • Pan Scan 16:9 • Enable 3G Level-B Enable • • Disable Click Apply after all settings are configured. Audio Click the Audio tab to set audio parameters. - Page 14 Set the Audio Mute, Audio Source and Audio Level. Audio Mute • • Audio Source • Default • HDMI • L/R Audio • Audio Level • SMPTE(USA) EBU(Europe) • Note: Audio Level allows the user to select EBU or SMPTE standards. Click Apply after setting the Audio Mute, Audio Source and Audio Level.
-
Page 15: Proc Amp
Proc Amp Proc AMP tab Click the to adjust the picture settings. Set the Brightness, Contrast, Hue, and Saturation levels on the Proc Amp setup page. -
Page 16: Setting
Setting Setting tab. To restore the factory default settings, click the Click the Factory Default button to reset the DAC-45 to factory defaults. - Page 17 In addition, the user can also set OSD Hide Mode and No Signal Mode. Details of these two modes are described in the table below. OSD Hide Mode When enabled, source information and output resolution will not be displayed on the screen upon resolution change. No Signal Mode This sets how the screen looks like when there is no signal.
-
Page 18: Firmware Update
Disconnected and the connect button is greyed out. 5. Switch on the DAC-45 power and the connect button will now be enabled. Click the connect button and the Utility will show Connected. 6. Click the Open File button and select the new firmware file. -
Page 19: Frequently-Asked Questions
Frequently-Asked Questions This section describes problems that you may encounter while using DAC-45. If you have any questions, please refer to related sections and follow all suggested solutions. If problem still exists, please contact your distributor or the service center. -
Page 20: Dimensions
Dimensions All measurements in millimeters (mm) -
Page 21: Specifications
Specifications Interfaces VGA x 1 , HDMI x 1 , HD/SD-SDI x 1 Inputs RCA x 2 (Unbalanced Audio L/R), Reference Input x 1 Outputs SDI x 1, HDMI x 1 Power LED x 1 Indicator Source LED x 3 (VGA, HDMI, SDI) Output Format LED x 3 (4K, 3G, HD, SD) F/W Updates and Mini USB x 1... - Page 22 HDMI (YUV) 3840x2160p60/59.94/50 3840x2160p30/29.97/25/24/23.98 1080p60/59.94/50, 1080p30/29.97/25/24/23.98 1080i60/59.94/50, 720p60/59.94/50 480p, 576p, 480i, 576i SDI: YUV422 Video Process HDMI: YUV422/YUV444/RGB444/YUV420(4K only) Input Unbalanced Audio L/R : stereo audio SDI embedded audio : up to 8ch, 48KHz, PCM audio HDMI embedded audio : up to 8ch, 44.1/48/96KHz, PCM audio Supported Audio Format Output...
-
Page 23: Service And Support
Service & Support It is our goal to make owning and using Datavideo products a satisfying experience. Our support staff is available to assist you to set up and operate your system. Contact your local office for specific support requests. Plus, DATAVIDEO WORLDWIDE OFFICES please visit www.datavideo.com to access our FAQ section.