Table of Contents
Advertisement
Advertisement
Table of Contents

Related Manuals for Central Pneumatic 67450


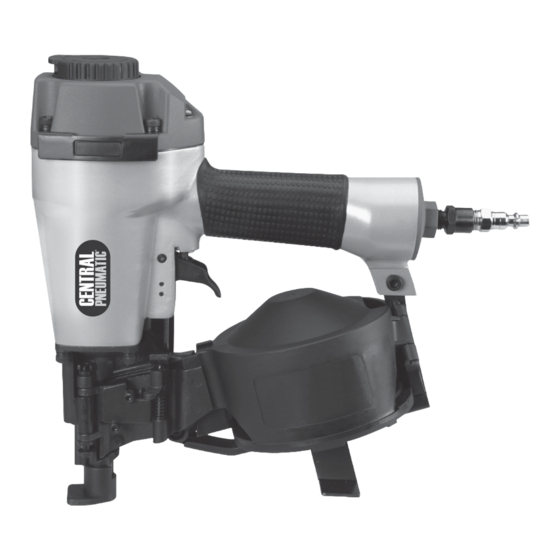
Summary of Contents for Central Pneumatic 67450
-
Page 2: Table Of Contents
Read the manual before set-up and/or use. WARNING marking concerning Risk of Hearing Loss. Wear hearing protection. WARNING marking concerning Risk of Respiratory Injury. Wear NIOSH-approved dust mask/respirator. WARNING marking concerning Risk of Explosion. Table A: Symbol Definitions Property or statement Item 67450... -
Page 3: Work Area
A dust mask, non-skid safety shoes and a hard hat must be used for the applicable conditions. Wear heavy-duty work gloves during use. Item 67450 For technical questions, please call 1-800-444-3353. c. Keep bystanders, children, and visitors away while operating the tool. Distractions are able to result in the loss of control of the tool. -
Page 4: Tool Use And Care
Use only the lubricants supplied with the tool or specified by the manufacturer. b. Never use oxygen, carbon dioxide, combustible gases or any bottled gas as an air source for the tool. Such gases are capable of explosion and serious injury to persons. Item 67450... - Page 5 Fasteners may bend sideways during firing, causing them to exit the workpiece at an unexpected point, causing personal injury. Item 67450 For technical questions, please call 1-800-444-3353. 18. Transport tool safely. Always disconnect air supply when moving the tool. Carry the tool by the handle and avoid contact with the trigger.
- Page 6 If abnormal vibration occurs, stop immediately. 3. Use appropriate safety equipment, such as, but not limited to: fall arrest systems, safety net systems, roof jacks, and guard rails with toeboards. 4. Follow OSHA requirements for working on roofs. Item 67450...
-
Page 7: Safety
Safety Nosepiece Safety Nosepiece - Also called the workpiece contact, the Safety Nosepiece helps prevent the tool from firing unless it is pressed against an object. Item 67450 For technical questions, please call 1-800-444-3353. 120 PSI 1/4″ -18 NPT 2 CFM @ 90 PSI... - Page 8 Figure C: Installing Trigger 5. Insert Pin, and place Rubber Ring over end of Pin. Trigger Figure D: Inserting Pin 6. Check Trigger for proper operation and test safety operation according to the instructions that follow. Trigger Spring Lever Rubber Ring Item 67450...
-
Page 9: Air Supply
3. The air hose must be long enough to reach the work area with enough extra length to allow free movement while working. Item 67450 For technical questions, please call 1-800-444-3353. 4. Release the tool’s trigger and empty its magazine. - Page 10 Page 10 For technical questions, please call 1-800-444-3353. Item 67450...
- Page 11 Item 67450 For technical questions, please call 1-800-444-3353. Page 11...
-
Page 12: Setup
With the Trigger held, carefully lift the tool and press it against the workpiece again. The tool must not cycle (fire). If it fails to perform in the manner explained in bold, have it repaired by a qualified service technician. Item 67450... - Page 13 The tool must not cycle (fire). If it cycles (fires), stop immediately and have it repaired by a qualified service technician. Item 67450 For technical questions, please call 1-800-444-3353. 6. Hold the tool away, or off of the workpiece. The Safety Nosepiece should return to its original position.
-
Page 14: Loading The Tool
If it does not engage, the nail head is not in the slot in the upper portion of the Feed Hook (50) and nail shank is not in the feeder. Canister Cover (89) Nails Adjuster Plate (86) Item 67450... - Page 15 4. To fire, place the nose of the Nailer on the workpiece and push down until it stops. Pull the Trigger to fire a nail. Item 67450 For technical questions, please call 1-800-444-3353. 5. If the tool requires more force to accomplish...
-
Page 16: Maintenance
3. If the jam cannot be cleared using the method above, have the tool serviced by a qualified technician. Note: Keep tool free of tar and debris to limit jamming. Item 67450... -
Page 17: Troubleshooting
3. Damaged valve or housing. 4. Dirty, worn or damaged valve. Follow all safety precautions whenever diagnosing or servicing the tool. Disconnect air supply before service. Item 67450 For technical questions, please call 1-800-444-3353. Likely Solutions 1. Adjust depth setting, if available. -
Page 18: Parts List And Diagram
Stopper Taper Spring Block Plate Spring Washer Screw Washer Connecting Plate Support Bracket Screw Screw Nail Canister Adjuster Bushing Adjuster Stem Adjuster Plate Spring Pin Adjuster Nut Canister Cover Soft Grip Sleeve O-Ring 48.5x2.5 End Cap Air Inlet Item 67450... - Page 19 Note: If product has no serial number, record month and year of purchase instead. Note: Some parts are listed and shown for illustration purposes only, and are not available individually as replacement parts. Item 67450 For technical questions, please call 1-800-444-3353. Page 19...
-
Page 20: Warranty
Limited 90 Day Warranty Harbor Freight Tools Co. makes every effort to assure that its products meet high quality and durability standards, and warrants to the original purchaser that this product is free from defects in materials and workmanship for the period of 90 days from the date of purchase.